Transcription
Microsoft OfficeWord 2016 for WindowsIntroduction to WordUniversity Information Technology ServicesLearning Technologies, Training & Audiovisual Outreach
Copyright 2016 KSU Division of University Information Technology ServicesThis document may be downloaded, printed, or copied for educational use without further permission of theUniversity Information Technology Services Division (UITS), provided the content is not modified and thisstatement is not removed. Any use not stated above requires the written consent of the UITS Division. Thedistribution of a copy of this document via the Internet or other electronic medium without the writtenpermission of the KSU - UITS Division is expressly prohibited.Published by Kennesaw State University – UITS 2016The publisher makes no warranties as to the accuracy of the material contained in this document andtherefore is not responsible for any damages or liabilities incurred from UITS use.Microsoft product screenshot(s) reprinted with permission from Microsoft Corporation.Microsoft, Microsoft Office, and Microsoft Word are trademarks of the Microsoft Corporation.
University Information Technology ServicesMicrosoft Office: Word 2016 for WindowsIntroduction to WordTable of ContentsIntroduction . 5Learning Objectives. 5The Word 2016 Interface . 6The Backstage View . 6The Ribbon . 7Customizing the Ribbon . 7The Quick Access Toolbar . 9Tell Me . 10Search for Features . 10Get Help with Word . 11Smart Lookup . 12The Mini Toolbar . 13Disable the Mini Toolbar . 13The Status Bar . 13Customize the Status Bar . 14Creating a New Document . 14Setting up Your Document . 15Setting Margins . 16Setting the Default Font . 16Setting Default Paragraph Alignment . 18Adding Styles . 19Add a Style to Your Document . 19Adding Themes . 20Editing a Document. 21Entering Text . 21Formatting Text. 21
Character Formatting . 21Paragraph Formatting . 21Enabling the Ruler . 22Setting Tab Stops . 22Adding a Leader to Tab Stops . 23Selecting Different Tab Stops. 24Headers and Footers . 24Editing Headers & Footers . 25Removing Headers & Footers . 25Adding Page Numbers to Your Document . 26Cut, Copy, and Paste Text . 26Cutting and Pasting Text . 26Copying and Pasting Text . 27Navigating the Document . 27Using Find. 28Using Go To . 28Navigation Pane . 29Proofing and AutoCorrect Options . 30AutoCorrect Options . 30Spelling & Grammar Check . 31Thesaurus . 32Saving a Document . 33Compatibility Mode . 35Printing a Document . 36Additional Help . 37
IntroductionThis booklet is the companion document to the Intro to Word 2016 workshop. It includes an introduction tothe interface, and covers the various aspects of creating, formatting, editing, saving, and printing a document.Learning ObjectivesAfter completing the instructions in this booklet, you will be able to: Identify the components of the Word 2016 interface. Use the Tell Me feature to enter words and phrases related to what you want to do next to quicklyaccess features or actions. Create a new document. Set document margins. Set paragraph alignment, indentation, and spacing. Set tabs. Add headers and footers to a document. Apply a theme to a document. Format text. Check the document for spelling and grammar.Revised 6/28/2016Page 5 of 37
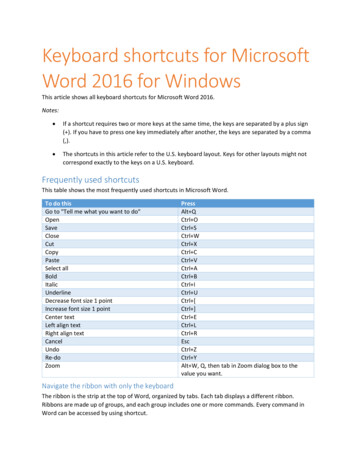
The Word 2016 InterfaceThe Word 2016 interface is very similar to the Word 2013 interface, with a few minor changes. Thefollowing describes the Word 2016 interface.The Backstage ViewWhen first opening the program, the user will be presented with options to open recent documents,start a new blank document, or select from a number of templates. The following explains how toenter the Backstage View after creating your document:1. Click the File tab.Figure 1 - File Tab (Backstage View)2. From the Backstage View, you can perform the following actions:a. Back - Takes you back to edit your document (See Figure 2).b. Info - Obtain information about your documents (See Figure 2).c. New - Create a new document from a blank or pre-formatted template (See Figure 2).d. Open - Open a document (See Figure 2).e. Save - Save the document to keep your edits (See Figure 2).f. Save As - Resave a saved document as a different filename or file type (See Figure 2).g. Print - Print documents and see a preview of your document (See Figure 2).h. Close - Close the document (See Figure 2).Figure 2 - Backstage ViewPage 6 of 37
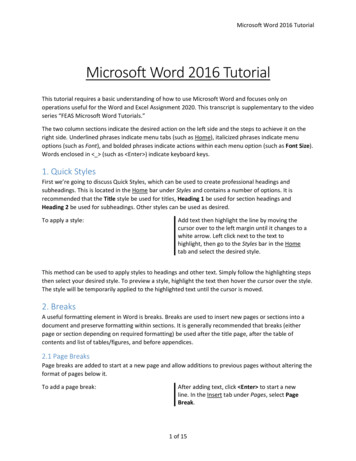
The RibbonThe Ribbon is a panel that contains functional groupings of buttons and drop-down lists organized bytabs. Each product in the Office Suite has a set of tabs that pertain to the functionality of thatapplication. Each tab is further divided into groups such as the Font and Paragraph.Figure 3 - The RibbonAt the bottom right-hand corner of some groups, there is a diagonal arrow called a Dialog BoxLauncher (See Figure 4). Clicking this button opens a dialog box for that group containing furtheroption selections for the group.Figure 4 - Dialog Box LauncherContextual tabs will appear depending on what you are working on. For example, if you’ve insertedpictures, the tab appears whenever a picture is selected.Figure 5 - Contextual TabCustomizing the RibbonYou can hide/unhide tabs that you do not use, or create your own tab of favorite tools. The followingexplains how to customize the Ribbon to build your own tabs and groups.1. Click the File tab.Figure 6 - File Tab (Backstage View)2. In the Backstage View, click Options.Page 7 of 37
3. In the Word Options dialog box, click Customize Ribbon (See Figure 7).4. Click the New Tab button (See Figure 7).5. A New Tab has been added in the list of Main Tabs. Under New Tab, you will see New Group isalready selected for you (See Figure 7).6. From the column on the left, select a command from the list under Choose commands from toadd to the New Group (See Figure 7).7. Click the Add button (See Figure 7).Figure 7 - Creating a New Tab8. The command will be added to your New Group tab.9. To rename the tab or group, right-click on the New Tab or New Group (See Figure 8).10. Click Rename (See Figure 8).11. To hide a tab, remove the check-mark next to the name of the tab (See Figure 8).Figure 8 - Rename New Tab or New GroupPage 8 of 37
The Quick Access ToolbarThe Quick Access Toolbar is located in the upper-left part of the main Word window, above the File andHome tabs. It provides easy access to commands that you may use often and be customized to yourpreferences. The following explains how to customize the Quick Access Toolbar:1. Click the drop-down arrow in the Quick Access Toolbar (See Figure 9).2. In the Customize Quick Access Toolbar drop-down menu, click the command(s) you wish to addor remove from your Quick Access Toolbar (See Figure 9).3. Click More Commands (See Figure 9).Figure 9 - Customize Quick Access Toolbar4. In the Customize Quick Access Toolbar window, from the column on the left, select a commandfrom the list under Choose commands from to add to your Quick Access Toolbar (See Figure 10).5. Click the Add button (See Figure 10).6. Click the Ok button (See Figure 10).Figure 10 - Adding Command
The Word 2016 interface is very similar to the Word 2013 interface, with a few minor changes. The following describes the Word 2016 interface. The Backstage View When first opening the program, the user will be presented with options to open recent documents, start a new blank document, or select from a number of templates. The following explains how to enter the Backstage View after creating .File Size: 2MBPage Count: 37