Transcription
Installation Instructionsfor Wasco E-Class SkylightsEFEFHREVEVMINSTALLATION VIDEOwww.wascoskylights.com
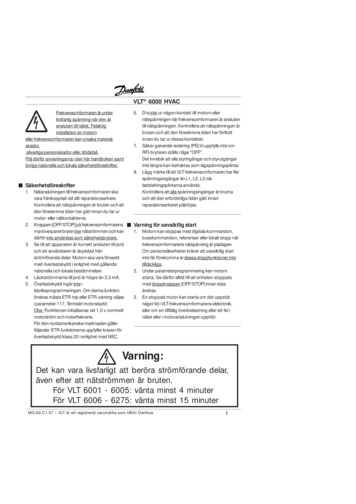
Installation Instructions for Wasco E-Class SkylightSIDE14"22"30"38"46"STEP 1Snap the aluminum brackets (provided) in the groove founddirectly underneath the Ultraseal Flashing, spacing approximately6" from corners (4" on 14" side) and in the middle of the sidewhen 3 are used. Screw to deck with screws provided.IMPORTANT Use brackets and screws provided to attachto roof. DO NOT use any mastic or cements. DO NOT apply sticky side of ANY self-adheredmembrane to flexible flange. Apply sticky sideto roof deck only. Keep nails no closer than 2-1/2" fromskylight frameLIFT FLANGEANCHOR BRACKET ANDINSERTION POINTSTEP 2At the bottom: Place flange over shingles and nail the outer edgeof the flexible Ultraseal Flashing down to the roof deck withroofing nails spaced about 6" apart. Then apply one nail to eachtop corner to hold unit in place. Ultraseal Flashing is self-sealingaround nail penetrations.You may wish to place shingles across the bottom edge of theflashing if you prefer that appearance.IMPORTANTThe Ultraseal Flashing MUST be OVER the bottom row ofshingles at this point in order for water to drain correctly ontothe shingles below.BOTTOMOPTIONAL COSMETICSHINGLENAIL BOTTOM EDGE6" APARTSTEP 3At the sides: Place shingles over flat ribbed portion of flexibleflange, then trim shingles as needed, and tuck UNDER L-Gasketand nail.IMPORTANTTo properly secure shingles, nails may penetrate the Ultrasealflashing only in the area shown. Ultraseal Flashing is self-sealingaround nail penetrations.SIDETOP SHINGLE COVERSNAIL HEAD AS STANDARDSHINGLE APPPLICATION3017501BRACKETSPER SIDE22233
Installation Instructions for Wasco E-Class Skylight3017501STEP 4At the top: Place shingles OVER the flexible flange and the L-gasketas follows: First, nail an inverted shingle(s) across the width of theskylight (similar to use of starter shingle at roof edges). An invertedshingle would have bottom edge of shingle facing up the slope.STEP 5TOPKEEP BACK 3/4" – 1"Next, continue the shingles up from the sides of the skylight, and placethe next top course of shingles over the first applied inverted shingle.IMPORTANTBe sure that the shingles at the top (both the inverted and normal)are OVER the L-Gasket and approximately 3/4"–1" away from theframe. Ultraseal Flashing is self-sealing around nail penetrations.FIRST SHINGLEINVERTEDCUT SHINGLE HERENOTCHPLACE OVERL-GASKETSTEP 6If necessary, notch shingle as shown. This notch will facilitate thetransition from the side of the skylight where the shingles go underthe L-Gasket, to the top where they go over it.STEP 71"Continue shingling to complete installation.1/4"NOTCHPLACE UNDERL-GASKETSTEP 8 (Vent Unit Only)Attach the operator to the well framing with the two wood screwsprovided in the hardware kit.Please visit our web site www.wascoskylights.com for: Installation video Light shaft suggestions and instructions Wood shakes instructions Instructions for installing side-by-side units Metal roof instructionsCustomer service can be reached at 800-388-0293.Wasco Products, Inc.85 Spencer Drive, Unit AWells, ME ights.com
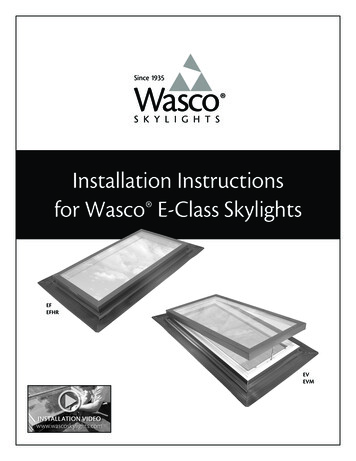
Installation Instructions for Wasco E-Class Skylight3017501TOPKEEP BACK3/4" – 1"FELT PAPERROOF DECKWASCO ULTRASEAL FLASHINGFIRST SHINGLE INVERTED“L" SHAPED GASKETANCHOR BRACKETVERTICAL CROSS-SECTIONPRIMARY WATER DIVERTER CHANNELHEADER(S)ROUGH OPENINGCOSMETIC SHINGLE (OPTIONAL)NAIL BOTTOM EDGE 6" APARTNOTE: NAIL SHINGLES TO ROOF DECK NOCLOSER THAN 4" FROM SKYLIGHT FRAMEBOTTOMSHINGLEHORIZONTAL CROSS-SECTIONTO PROPERLY SECURE SHINGLES,NAILS MAY PENETRATE THEULTRASEAL FLASHING ONLY INTHE AREA SHOWN.TOP SHINGLE COVERS NAIL HEAD ASSTANDARD SHINGLE APPPLICATIONFELT PAPERTOP SHINGLE COVERS NAIL HEAD ASSTANDARD SHINGLE APPPLICATIONWASCO ULTRASEAL FLASHING“L" SHAPED GASKETANCHOR BRACKETPRIMARY WATER DIVERTER CHANNELROUGHOPENINGVENT UNIT SASH REMOVAL1. OPEN UNIT ANDREMOVE GRENADE PIN3. EXTRUDED WATERGARDHINGE WILL DISCONNECT2. ROTATE SASHUP PAST 45 INSTALLATION IS REVERSE OF REMOVAL
Installation Instructions for GENRA-1 Model GSCurb-Mount SkylightsMinimum Roof Pitch of 3” in 12”. Not for vertical applications.2093700DD RSSAFETY CONSIDERATIONSWhile Wasco Skylights are designed to support the weight of snow, ice and the force of normal winds,they are not designed to withstand the weight of people. If human safety becomes considerations, skylights should be protected by railings, grids or screens.READ THE INSTRUCTIONS. Proper installation is the key to a trouble-free skylight.Skylights must be installed with a roofing cement or Wasco Superseal installation kit.Use a high-quality, trowel consistency roof mastic. Do not use silicones or urethanesealants. Wasco Superseal may be purchased as a substitute for mastic. Every installationis unique and Wasco cannot control the conditions and the quality of the work that isdone. Wasco assumes no responsibility for improper installation or noncompliance withall applicable building codes.GSSECTION 1 – CURB CONSTRUCTION DETAILSGSVDo not exceed max.curb dimensions.IMPORTANT NOTE: 1-1/2” – wide curb material and a standard rough opening will yield the above curb dimension.To use a wider curb, reduce the size of the rough openingaccordingly.Build curb from 2x4, 2x6, etc.Nail to roof deck.Cut rough openingthrough roof deck.Frame under opening to matchinside of skylight curb. Use doublerafters and headers if necessary.Shingle up to low side ofcurb.
Installation Instructions for GENRA-1 Model GSCurb-Mount Skylights2093700SECTION 2 – FLASHING CONSTRUCTION DETAILSHEAD AND SILL DETAILIMPORTANT NOTES1. Head flange width should be increasedto 12 or more for roof pitches less than 5in 122. O.C. – Outside dimension of curb width3. C.H. – Curb height4. Dimensions are in inches5. All bends are 90 Weld, braze or solderfor a water-tight joint.(2)(1)FLASHING MATERIALSTHICKNESSCOPPER16 OZALUMINUM0.040”STAINLESS STEEL26 GAGALVANIZED STEEL24 GA(3)Weld, braze or solderfor a water-tight joint.SIDE FLASHING DETAILO.C. 1677Bend up (1)1Cut in 16 (12) NoteCut in 11Bend down1O.C.8C.H. 116 (20) Note(2) (3)8Bend up – piece 2Bend down – piece 3C.H. 18C.H. 112Bend
Installation Instructions for GENRA-1 ModelGS Curb-Mount Skylights2093700SECTION 3 – FLASHING THE WOOD CURBInstall head flashing. Trim corners and bend over wood curb.Bend over curbwhen installed.Frame out the skylight well andcover with sheetrock, etc.Step flash slides. Align flashingwith bottom edge of shingleabove it.One side piece installed with each course ofshingles and nailed to curb. Quantity varieswith shingle exposure and length of unit.Install sill piece over shinglesat bottom. Trim corners andbend over wooden curb.
Installation Instructions for GENRA-1 Model GSCurb-Mount SkylightsSECTION 4 – INSTALLING THE UNITPlace unit on curb and attach withscrews or nails using pre-drilled mounting holes.Apply a bead of sealantaround the top of the curb.CROSS-SECTIONSCREW OR NAILTO CURBFLASHINGSEALANTBe sure to allow for screenremoval on vent units.2093700
Installation Instructions for Model GSHRCurb-Mount Skylights2093701Minimum Roof Pitch of 3” in 12”. Not for vertical applications.GSHRSAFETY CONSIDERATIONSWhile Wasco Skylights are designed to support the weight of snow, ice and the force of normal winds,they are not designed to withstand the weight of people. If human safety becomes considerations,skylights should be protected by railings, grids or screens.READ THE INSTRUCTIONS. Proper installation is the key to a trouble-free skylight.Skylights must be installed with a roofing cement or Wasco Superseal installation kit. Usea high-quality, trowel consistency roof mastic. Do not use silicones or urethane sealants.Wasco Superseal may be purchased as a substitute for mastic. Every installation is uniqueand Wasco cannot control the conditions and the quality of the work that is done.Wasco assumes no responsibility for improper installation or noncompliance with allapplicable building codes.GSHR Unit carries Miami-DadeNOA #04-078.03 (ExpiresOctober 20, 2015) andcomplies with Florida BuildingCode including the HighVelocity Hurricane Zone.SECTION 1CURB CONSTRUCTION DETAILSUNIT OF DIMENSION (WIDTH OR LENGTH)MAXIMUM OUTISDE CURB T NOTE: 1-1/2” – wide curb material and a standard rough opening will yield the above curb dimension. To usea wider curb, reduce the size of the rough opening accordingly.Do not exceed max.curb dimensions.Build curb from 2x6 minimumSouthern Yellow Pine forminimum clearance of4” from lower edge skylightcurb frame to roof surface.Cut rough openingthrough roof deck.Frame under opening to match insideof skylight curb. Use double rafters andheaders if necessary.Shingle up to low side of curb.
Installation Instructions for Model GSHRCurb-Mount Skylights2093701SECTION 2 – FLASHING CONSTRUCTION DETAILSHEAD AND SILL DETAILIMPORTANT NOTES1. Head flange width should be increased to12 or more for roof pitches less than 5 in 122. O.C. – Outside dimension of curb width3. C.H. – Curb height4. Dimensions are in inches5. All bends are 90 Weld, braze or solder fora water-tight joint.(2)(1)FLASHING MATERIALSTHICKNESSCOPPER16 OZALUMINUM0.040”STAINLESS STEEL26 GAGALVANIZED STEEL24 GA(3)Weld, braze or solder fora water-tight joint.SIDE FLASHING DETAILO.C. 1677Bend up (1)1Cut in 16 (12) NoteCut in 11Bend down1O.C.8C.H. 116 (20) Note(2) (3)8Bend up – piece 2Bend down – piece 3C.H. 18C.H. 112Bend
Installation Instructions for Model GSHRCurb-Mount Skylights2093701SECTION 3 – FLASHING THE WOOD CURBInstall head flashing. Trim cornersand bend over wood curb.Bend over curb when installed.Step flash slides. Align flashing withbottom edge of shingle above it.One side piece installed with each course ofshingles and nailed to curb. Quantity varieswith shingle exposure and length of unit.Install sill piece over shingles atbottom. Trim corners and bendover wooden curb.
Installation Instructions for Model GSHRCurb-Mount SkylightsSECTION 4 – INSTALLING THE UNITPlace unit on curb and attach with 8d stainlesssteel nails in pre-drilled holes.Apply a bead of sealant aroundthe top of the curb.CROSS-SECTION8d STAINLESS STEEL NAILS INPRE-DRILLED HOLES WITHMINIMUM 1-1/2” ENGAGEMENTSEALANT(Dow Corning 795or equivalent).MINIMUM 4” ABOVEROOF SURFACEFLASHING5/8”Frame out the skylight well andcover with sheetrock, etc.2093701
Installation Instructions for Model GSHR Curb-Mount Skylights GSHR Minimum Roof Pitch of 3" in 12". Not for vertical applications. READ THE INSTRUCTIONS. Proper installation is the key to a trouble-free skylight. Skylights must be installed with a roofing cement or Wasco Superseal installation kit. Use a high-quality, trowel consistency .