Transcription
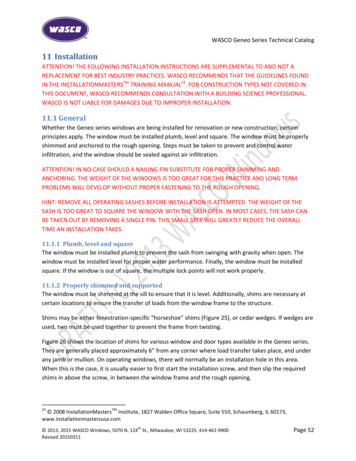
WASCO Geneo Series Technical Catalog11 InstallationATTENTION! THE FOLLOWING INSTALLATION INSTRUCTIONS ARE SUPPLEMENTAL TO AND NOT AREPLACEMENT FOR BEST INDUSTRY PRACTICES. WASCO RECOMMENDS THAT THE GUIDELINES FOUNDIN THE INSTALLATIONMASTERSTM TRAINING MANUAL23. FOR CONSTRUCTION TYPES NOT COVERED INTHIS DOCUMENT, WASCO RECOMMENDS CONSULTATION WITH A BUILDING SCIENCE PROFESSIONAL.WASCO IS NOT LIABLE FOR DAMAGES DUE TO IMPROPER INSTALLATION.11.1 GeneralWhether the Geneo series windows are being installed for renovation or new construction, certainprinciples apply. The window must be installed plumb, level and square. The window must be properlyshimmed and anchored to the rough opening. Steps must be taken to prevent and control waterinfiltration, and the window should be sealed against air infiltration.ATTENTION! IN NO CASE SHOULD A NAILING FIN SUBSTITUTE FOR PROPER SHIMMING ANDANCHORING. THE WEIGHT OF THE WINDOWS IS TOO GREAT FOR THIS PRACTICE AND LONG TERMPROBLEMS WILL DEVELOP WITHOUT PROPER FASTENING TO THE ROUGH OPENING.HINT: REMOVE ALL OPERATING SASHES BEFORE INSTALLATION IS ATTEMPTED. THE WEIGHT OF THESASH IS TOO GREAT TO SQUARE THE WINDOW WITH THE SASH OPEN. IN MOST CASES, THE SASH CANBE TAKEN OUT BY REMOVING A SINGLE PIN. THIS SMALL STEP WILL GREATLY REDUCE THE OVERALLTIME AN INSTALLATION TAKES.11.1.1 Plumb, level and squareThe window must be installed plumb to prevent the sash from swinging with gravity when open. Thewindow must be installed level for proper water performance. Finally, the window must be installedsquare. If the window is out of square, the multiple lock points will not work properly.11.1.2 Properly shimmed and supportedThe window must be shimmed at the sill to ensure that it is level. Additionally, shims are necessary atcertain locations to ensure the transfer of loads from the window frame to the structure.Shims may be either fenestration-specific “horseshoe” shims (Figure 25), or cedar wedges. If wedges areused, two must be used together to prevent the frame from twisting.Figure 26 shows the location of shims for various window and door types available in the Geneo series.They are generally placed approximately 6” from any corner where load transfer takes place, and underany jamb or mullion. On operating windows, there will normally be an installation hole in this area.When this is the case, it is usually easier to first start the installation screw, and then slip the requiredshims in above the screw, in between the window frame and the rough opening.23TM 2008 InstallationMasters Institute, 1827 Walden Office Square, Suite 550, Schaumberg, IL 60173,www.installationmastersusa.comth 2013, 2015 WASCO Windows, 5070 N. 124 St., Milwaukee, WI 53225, 414-461-9900Revised 20150311Page 52
WASCO Geneo Series Technical CatalogFigure 25: "Horseshoe" installation shims, also known as frame packers2424Picture courtesy of Glazpart Inc., 145 North Yeager Court, Pelham, Alabama 35124 USA, Tel: (205) 621 7845,glazpart@aol.com. Quality shims are available directly from this company.th 2013, 2015 WASCO Windows, 5070 N. 124 St., Milwaukee, WI 53225, 414-461-9900Revised 20150311Page 53
WASCO Geneo Series Technical CatalogEntry doors should beshimmed at every screwhole on the hinge side!Figure 26: Location of shims for various window types11.1.3 AnchoringOperating windows will have pre-drilled installation holes on the jambs and header. In each of theseholes, a screw is used to anchor the window frame to the building’s structure. Before being installed,th 2013, 2015 WASCO Windows, 5070 N. 124 St., Milwaukee, WI 53225, 414-461-9900Revised 20150311Page 54
WASCO Geneo Series Technical Catalogplace the screw through the screw cover. WASCO recommends #12 construction screws from SPAX orGRK fasteners.Figure 27: Installation hole (left), and with screw and cover (right)The sill should also be secured against movement. One method of doing this is to use installation straps(Figure 28 with window frame, Figure 24 with sill extension) spaced out so the maximum distancebetween the straps is 28”. Alternatively, if the distance from the sill to the rough opening is not toogreat, one of the innermost-screws may be removed from all of the lock strikes along the sill, andreplaced with a #8 x 3” screw. (Figure 29)Figure 28: Geneo installation strapth 2013, 2015 WASCO Windows, 5070 N. 124 St., Milwaukee, WI 53225, 414-461-9900Revised 20150311Page 55
WASCO Geneo Series Technical CatalogFigure 29: Replacing tilt & turn keeper screw to anchor sillNon-operating windows require the use of installation straps. These should be placed about 6” from thecorners of the visible glass and along all four sides so that the maximum distance between straps is 28inches.11.1.4 Water controlWindows need to be installed with precautions to (a) prevent water from infiltrating around the windowperimeter and (b) allow any water that does infiltrate to escape.11.1.5 Air sealingAir sealing may be accomplished through either the use of low-expansion foam specifically designed forwindows and doors, or by caulking the inside of the window to the rough opening. Backer rod may benecessary if caulking. Backer rod and caulk are preferred.When caulk will be used at the sealant, fiberglass bat should be used to insulate around the perimeter ofthe window before caulking.CAUTION! IMPROPER SELECTION OF FOAM MAY DAMAGE THE WINDOWS.HINT: FIBERGLASS BAT BY ITSELF WILL NOT PREVENT AIR INFILTRATION.th 2013, 2015 WASCO Windows, 5070 N. 124 St., Milwaukee, WI 53225, 414-461-9900Revised 20150311Page 56
WASCO Geneo Series Technical Catalog11.2 New constructionIn almost all cases, the window or door should be installed with a sill pan to ensure any water whichinfiltrates the flashing can escape.For conventional wood-frame construction, WASCO recommends a nailing flange. The window shouldbe flashed in accordance with the InstallationMastersTM manual. It is also possible to flash directly to theface of the window.th 2013, 2015 WASCO Windows, 5070 N. 124 St., Milwaukee, WI 53225, 414-461-9900Revised 20150311Page 57
WASCO Geneo Series Technical Catalog11.3 RenovationWhen the Geneo series is used for renovation, the window should be installed as a new constructionwindow; i.e., the entire old window, including extension jambs, should be removed.Before installing the Geneo series window or door, a sill pan should be installed. When installing thenew window, it is important that the integrity of the building’s water control layer be maintained.th 2013, 2015 WASCO Windows, 5070 N. 124 St., Milwaukee, WI 53225, 414-461-9900Revised 20150311Page 58
WASCO IS NOT LIABLE FOR DAMAGES DUE TO IMPROPER INSTALLATION. 11.1 General Whether the Geneo series windows are being installed for renovation or new construction, certain . Figure 26 shows the location of shims for various window and door types available in the Geneo series. They are generally placed approximately 6" from any corner where .