Transcription
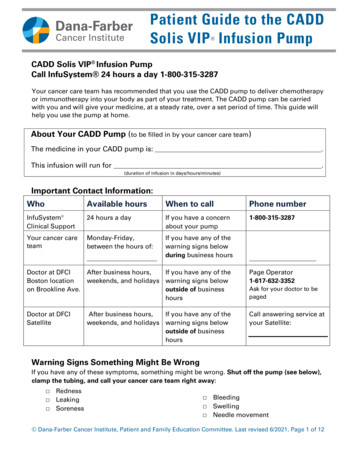
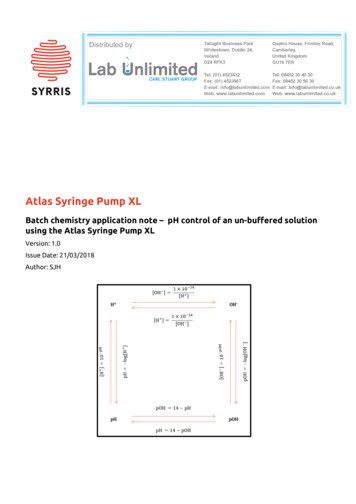
CADD-legacy PCA pumpModel 6300 - 100ml CassetteHOW TO START THE CADD PUMPPress and hold the stop/start buttonThree dashes will count down under theSTARTING messageSTOPPEDHOW TO STOP THE CADD PUMPPress and hold the stop/start buttonThree dashed will appear will count up under theSTOPPING messageHOW TO SET UP THE CADD PUMPObtain a new cassette and check medication order as per facility protocolEnsure all tubing is clamped.Insert batteries as per instruction bookAttaching a New CassetteOn the top of the new cassette there are two hooks on one side and a catch on the other.The two hooks fit into the left-hand side of the CADD pump and act as a hinge.The catch arcs up into the recess on the right hand side near the key lock.Place the pump upright on a firm flat surface. Press down so the cassette fits tightly againstthe pump.Using the key provided insert the key into the lock, push in, and turn counterclockwise untilthe line on the lock lines up with the arrow on the side of the pump and you feel the lockclick into place.Hope Healthcare Draft protocol for CADD – Legacy Model 6300 pump – January 2005.1
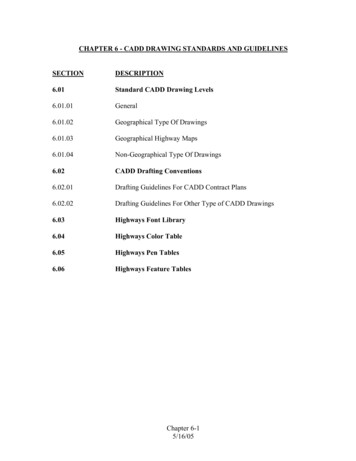
Programming CADD PumpProgram the CADD pump before priming to account for used cassette volume used to primelines and filters.Ensure CADD pump is in LL0: see Lock Levels.Ensure CADD pump is STOPPED.Press NEXT - Reservoir Volume will be displayed. Using theincrease button press down till 100.00 mls is shown. PressENTER/CLEAR button. If you do not press enter the value put in willnot be saved.STOPPEDReservoir Volume100.0mlPress NEXT - Units will be displayed. Ensure that it is Milliliters.UnitsMillilitersPress NEXT - Continuous Rate will be displayed. Using the increaseand the decrease button program in the rate in ml/hr as ordered. PressENTER/CLEAR button.Press NEXT - Demand Dose will be displayed. This is only used toset up the PCA function of the pump that will allow patients to givethemselves a demand dose. Set demand dose as per order or leave at"0.00".Press NEXT - Dose Lockout will be displayed. If "0.00" was selectedon the Demand Dose Screen then this display will not appear. If aDemand Dose was programmed a Dose Lockout interval is entered asordered using the increase and decrease buttons.Press ENTER/CLEAR button.Press NEXT - Dose Given will be displayed. Press ENTER/CLEARtwice to zero the doses given.Continuous Rateas ordered ml/hrDemand Dose0.00mlDose Lockout00 hrs 00 minDoses Given0dosesPress NEXT - Doses Attempted will be displayed. PressENTER/CLEAR twice to zero the doses attempted.Hope Healthcare Draft protocol for CADD – Legacy Model 6300 pump – JanuaryDoses2005.Attempted2doses0
Press NEXT - Given will be displayed. Press ENTER/CLEAR twiceto zero the amount given to the patient.Given0.00mlPress NEXT - Air Detector will be displayed. Ensure that it says"OFF". To change the Biomed Functions see Instruction Book.Air DetectorOffPress NEXT - Upstream Sensor will be displayed. When using theCassette it doesn't matter if the upstream sensor is on or off. Thisfunction is used when a bag or other container is used instead of acassette. This function will detect if the line kinks or occludes betweenthe bag/container and the CADD pump.Upstream SensorOnOnce the CADD pump is programmed the lines are ASEPTICALLY attached to theCADD pump.A new cassette for the CADD pump may be delivered in a number of ways.RNSH will deliver the Cassette with an extension set and one Flat EpiduralFilter attached. This Cassette has a life of 5 days.BAXTER will deliver the cassette without an extension set or with one ifrequested to by the pharmacist. This Cassette has a life of 7 to 10 days.Either way the lines delivered with the pump will be primed.Hope Healthcare Draft protocol for CADD – Legacy Model 6300 pump – January 2005.3
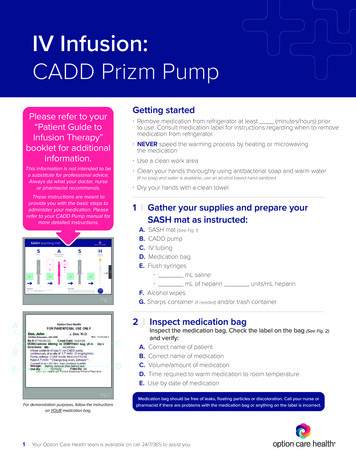
If the patient has an INTRATHECAL LINE insitu it will be connected to the CADD pumpin one of two ways. This can be via a port-a-cath in the abdomen or to an intrathecalcatheter that has been tunnelled under the skin and exits (usually) in the right abdomen.INTRATHECAL LINE - PORTACATHAseptically attach lines x1 - CADD pump Cassette x1 - Extension Set - Note: The Extension set has an Anti-Siphon Valve so theBLUE Luer Lock must be attached to the Cassette and the PURPLE Luer Lockmust be attached to the Flat Epidural Filters. If the Extension set is back tofront a HIGH-PRESSURE alarm will sound. x2 - Flat Epidural Filters x1 - Gripper NeedlePRIMING THE LINESEnsure that all lines are correctly attached and Asepsis ismaintained.Press the PRIME button and HOLD.PrimingThe display will show PrimingThree lines will count up. Then slightly release the button andpress down again and the CADD pump will begin priming. If thepriming stops slightly release and depress the prime button again.It will take between 2.5 and 3.0 mls to prime the lines x2 EpiduralFilter and the Gripper Needle.NURSING ALERTA PORT-A-CATH CONNECTED TO AN INTRATHECAL CATHETER CAN NOT BEFLUSHED OR ASPIRATED. EXTREME CARE SHOULD BE TAKEN WHENACCESSING THE PORT.ACCESS THE PORT-A-CATH AS PER HOSPITAL PROTOCOL.CENTAL LINE DRESSING TO PORT-A-CATH AS PER HOSPITAL PROTOCOLS.ENSURE THAT THE TUBING COMING OUT OF THE PUMP IS INSERTED INTOTHE AIR DETECTOR. SEE PAGE 35 OF THE OPERATORS MANUALSTART PUMPDOCUMENTHope Healthcare Draft protocol for CADD – Legacy Model 6300 pump – January 2005.4
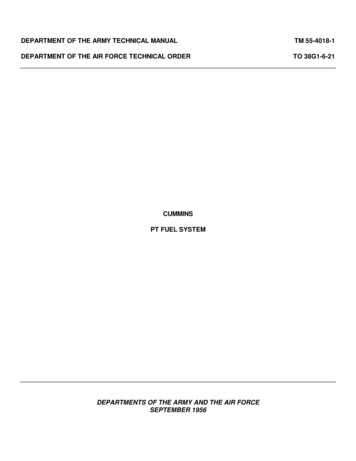
INTRATHECAL LINE - CATHETERAseptically attach lines x1 - CADD pump Cassette x1 - Extension Set - Note: The Extension set has an Anti-Siphon Valve so theBLUE Luer Lock must be attached to the Cassette and the PURPLE Luer Lockmust be attached to the Flat Epidural Filters. If the Extension set is back tofront a HIGH-PRESSURE alarm will sound. x1- Flat Epidural FiltersPRIMING THE LINESEnsure that all lines are correctly attached and Asepsis ismaintained.PrimingPress the PRIME button and HOLD.Three linesThe display will show Primingwill count up. Then slightly release the button and press downagain and the CADD pump will begin priming. If the primingstops slightly release and depress the prime button again. It willtake between 2.5 and 3.0 mls to prime the lines x1 Epidural Filter.When changing the cassette only the distal Flat Epidural Filter isdisconnected. At no time is the proximal Flat Epidural Filter disconnected from theIntrathecal Catheter.NURSING ALERTTHE WEAK POINT IN THE INTRATHECAL CATHETER LINE IS THE JOINBETWEEN THE TWO FLAT EPIDURAL FILTERS.CAUTION MUST BE EXERCISED WHEN DISCONNECTING THE DISTAL ANDPROXIMAL FILTERS. ASEPSIS IS ESSENTIAL.WHEN RECONNECTING THE NEW DISTAL FLAT EPIDURAL FILTER TO THEINSITU PROXIMAL FLAT EPIDURAL FILTER CARE MUST BE TAKEN NOT TOTIGHTEN THEM MORE THAN FINGER TIGHT.OVER TIGHTENING WILL RESULT IN STRIPPING OF THE THREAD AND THEFILTERS WILL LEAK.IF THE TWO FILTERS DO NOT SIT FLAT IT DOES NOT MATTER.OVER TIGHTENING WILL COMPROMISE THE INTEGRITY OF THE FILTERS.Hope Healthcare Draft protocol for CADD – Legacy Model 6300 pump – January 2005.5
Don STERILE GLOVES.Use the inner wrapper of the sterile gloves as a sterile fieldPlace both the PROXIMAL and DISTAL Flat Epidural Filters on the sterile field.While maintaining ASEPSIS wipe the male luer lock connector of the PROXIMAL FlatEpidural Filter with Alcowipes or Chlorhex and Alcohol.While holding the DISTAL Flat Epidural Filter (with extension set attached) remove the capfrom the female luer lock connector.Joint the PROXIMAL to the DISTAL Flat Epidural Filters without touching anything.ENSURE THAT THE TUBING COMING OUT OF THE PUMP IS INSERTED INTOTHE AIR DETECTOR. SEE PAGE 35 OF THE OPERATORS MANUALSTART PUMP.DOCUMENT.CLINICIAN'S BOLUSA STAT medication order must be obtained first.RunResVol**.* mlTo give a Clinician's Bolus the CADD pump must be in LLO.The CADD pump must be RUNNINGPress LOCKScroll DOWN till “997”appears on the displayPress LOCKClinician Bolus will be displayedENTER THE BOLUS ORDERED IN MLsPress ENTER/ CLEARTHE PUMP WILL DELIVER THE AMOUNT ENTERED AND RETURN TO RUNHope Healthcare Draft protocol for CADD – Legacy Model 6300 pump – January 2005.6
LOCK LEVELSThe CADD - Legacy PCA has three Lock Levels LL0, LL1 and LL2 see page 10 of theOperators Manual to see the lists of operations that are accessible in each of the lock levels.Page 37 of the Operators Manual states that. "The Lock Level must be changed to LL1 orLL2 to prevent the patient from having complete access to all programming and operatingfunctions."Any Programming or changes to programming or operating functions must be made in LL0TO CHANGE THE LOCK LEVELPress LOCKThe current lock level will appearPress the increase or decrease buttons until the desired locklevel appearsPress LOCKCode 0 will be displayedPress the increase button till "63" appearsPress LOCK to set to set the new lock levelHope Healthcare Draft protocol for CADD – Legacy Model 6300 pump – January 2005.7
Hope Healthcare Draft protocol for CADD - Legacy Model 6300 pump - January 2005. 2 Programming CADD Pump Program the CADD pump before priming to account for used cassette volume used to prime lines and filters. Ensure CADD pump is in LL0: see Lock Levels. Ensure CADD pump is STOPPED. Press NEXT - Reservoir Volume will be displayed. Using the