Transcription
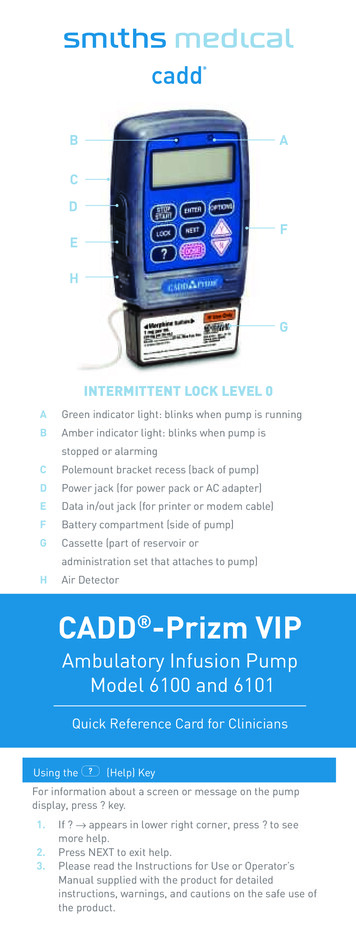
BACDFEHGINTERMITTENT LOCK LEVEL 0AGreen indicator light: blinks when pump is runningBAmber indicator light: blinks when pump isstopped or alarmingCPolemount bracket recess (back of pump)DPower jack (for power pack or AC adapter)EData in/out jack (for printer or modem cable)FBattery compartment (side of pump)GCassette (part of reservoir oradministration set that attaches to pump)HAir DetectorCADD -Prizm VIPAmbulatory Infusion PumpModel 6100 and 6101Quick Reference Card for CliniciansUsing the Å (Help) KeyFor information about a screen or message on the pumpdisplay, press ? key.1.2.3.If ? appears in lower right corner, press ? to seemore help.Press NEXT to exit help.Please read the Instructions for Use or Operator’sManual supplied with the product for detailedinstructions, warnings, and cautions on the safe use ofthe product.
WARNING: This Quick Reference Card should be usedby clinicians only. Do not permit patients to haveaccess to this card, as the information would allowaccess to all programming and operating functions.KeypadSTOP/STARTStops and starts the pumpLOCKDisplays or changes lock level(security level)?Help key: displays more information abouta screenENTERSets new value; selects choice from menu;clears screenNEXTAdvances to next programming screen;backs out of an option or menuDOSEInoperable in TPN delivery modeOPTIONSDisplays the Options Menu, pages throughoptions Answers yes; increases values onprogramming screen; pages throughmenus; pages through event logÎAnswers no; decreases values onprogramming screen; pages throughmenus; pages through event logPROGRAMMING / Setup SequenceTo go to the next programming screen without changing adisplayed setting, press NEXT. During programming, thepump may ask you to confirm certain settings; press or Îas appropriate.Battery mustbe installed;pump must bestopped and inLock Level 0.1.On Main Screen, press NEXT.Enter ReservoirVolume2.Press or Î to select desiredReservoir Volume.Press ENTER3.Enter DoseVolume4.5.Enter DoseVolume6.7.Enter DosePeriod8.9.Enter KVO RatePress or Î to select desired DoseVolume.Press ENTERPress or Î to select desired DoseVolume.Press ENTER.Press or Î to select desired DosePeriod.Press ENTER.10. Press or Î to select desired KVORate.11. Press ENTER.
PROGRAMMING / Setup Sequence (Continued)Enter Next1.Dose StartPress or Î to select desired dosestart time and date, or “immediate” ifTimeappropriate.2.Press ENTER.3.Verify the start time and press ifcorrect. To re-enter the start time,press Î.Verify Dose ratePump automatically calculates rate. Verifythat the cassette attached is appropriatefor the dose rate. (If rate is greater than125 mL/hr, a CADD-Prizm Ò ÆÓÌÏÎ highvolume administration set must be used.)Clear Milliliters4.Press NEXT.5.Press ENTER to clear the amountGivengiven; this updates the date and timemarkers.6.Check AirDetector StatusIf air detector is attached, check theAir Detector status, then press NEXT.7.ReviewProgramPress NEXT repeatedly to reviewprogram.Follow steps for attaching cassette, priming fluid path,starting pump.CycleDoseVolumeDelay(using Next DoseStart t Infusion CyclePump OperationsTo Change Lock1. Stop the pump.Level2.Press LOCK.3.Press or Î until desired lock levelappears.4.Press LOCK.5.Press or Î until lock level codeappears.6.Press LOCK.To Start or Stop1.Press STOP/START.Pump2.Press if the pump is stopped during a dose, thesub-sequent doses are delayed by theamount of time the pump is stopped. ifthe pump is stopped during delivery at theKVO rate, the start times of subsequentdoses are not affected.
Pump Operations (Continued)To View TimeTime remaining is the amount of timeRemainingremaining to deliver the current doseand dose cycle.1.Press OPTIONS.2.Press or Î until ImmediateTaper-Down appears.3.Press ENTER.NOTE: if dashes appear in place of times,the dose has been delayed by the NextDose start Time.To ChangePump must be in LL0.Next Dose1.Stop the pump.Start Time2.Press NEXT until Next Dose StartTime appears.3.Press or Î to select desired dosestart time and date, or “immediate”if appropriate.4.Press ENTER.5.Verify the start time and press ifcorrect. To re-enter the start time,press Î.To Set TimePump must be stopped and in LL0.of Day1.Press OPTIONS.2.Press until Time option appears.3.Press ENTER.4.Press or Î to select desired time.5.Press ENTER.6.Press .To Set DatePump must be stopped and in LL0.1.Press OPTIONS.2.Press until Date option appears.3.Press ENTER to display Date screen.4.Press or Î to select date.5.Press ENTER.6.Press .To SetAutoLock automatically changes lockAutoLocklevel to LL1 or LL2 when pump is startedin LL0. To change AutoLock setting,pump must be stopped and in LL0.Press ENTER.1. Press OPTIONS.2.Press until AutoLockoption appears.3.Press ENTER to displayAutoLock screen.4.Press or Î to select LL1 orLL2 or Not In Use.5.Press ENTER.6.Press .
Changing the CassetteTo RemoveUsedCassette1.Stop the pump.2.Close all tubing clamps.3.If necessary, use key to unlock usedcassette.4.Use side of key or coin to unlatch usedcassette.To AttachNewCassette5.Disconnect tubing from patient.6.Remove and discard used cassette.7.Close tubing clamp.8.Insert new cassette hooks into pump’shinge pins.9.Place pump with cassette on firmsurface and push down on top of pump.10. Use coin or side of key to latch cassette.11. The mark on latching button must lineup with solid dot on side of pump.WARNING: Attach the cassette properly. Adetached or improperly attached cassettecould result in unregulated gravityinfusion of medication from the fluidcontainer or a reflux of blood. Ifyou are using a CADD administrationset or CADD medication cassettereservoir that does not have the flowstop feature, you must use a CADD extension set with anti-siphon valveor a CADD administration set witheither an integral or add-on anti-siphonvalve to protect against unregulatedgravity infusion that can result from animproperly attached cassette.12. Gently twist and pull on cassette tomake sure it is attached properly.13. If Reset Reservoir to — mL? appears,press if appropriate.14. When Prime Tubing? appears,open tubing clamp and press if appropriate. Follow priminginstructions on pump’s screen.When primed, close tubing clamp.15. If applicable, thread tubing throughAir Detector.16. If AutoLock not in use / Change LockLevel from LL0? appears, press .Change the lock level to LL1 or LL2(see To Change Lock Level).17. When Start the Pump? appears,connect new tubing to patient’saccess site, open tubing clamp,and press .
Priming the Fluid Path Using the Prime OptionThe priming feature is available either:a.b.when you attach a cassette (above), orin the Options Menu. To access thePrime option in the Options menu:Pump must be in LL0 or LL1.1.2.3.4.Stop the pump.Press OPTIONS.Prime should be displayed; press ENTER.Follow priming instructions on pump’s screen.To Reset Reservoir Volume Without Changing Cassette.1.Stop the pump.2.Press NEXT to display Reservoir Volume screen.3.Press ENTER.4.If message appears asking you to reset the ReservoirVolume, press .Programming ScreensReservoir VolumeVolume of fluid in filled reservoirDose VolumeVolume of dose in millilitersDose DurationTime period over which dose willbe deliveredDose CycleTime from the start of one dose tothe start time of the next doseKVO RateKeep Vein Open rate allows deliveryof a minimal amount of drug tomaintain catheter patencyNext Dose StartTimeDate and time designated to startdelivery of next doseDose RateRate at which dose will be delivered(automatically calculated)Milliliters GivenDisplays total amount deliveredsince date and time shownAir DetectorStatusShows whether Air Detector isrequired, turned on or off(appears if Air Detector is attached)Alarms & TroubleshootingThe CADD-Prizm pump signals with audible alarms andmessages on the display when a condition requires yourattention. In addition to referring to this table, use the ? keywhile the alarm is occurring for information aboutthe alarm and corrective action.ReservoirVolume LowLevel of fluid in the reservoiris low. Prepare to install anew reservoirReservoirVolume ZeroReservoir volume is 0.0 ml.Press NEXT to stop alarm.Install new reservoirif appropriate.
Alarms & Troubleshooting (Continued)9-voltBattery Low9-volt battery is low butpump is operable.Change battery soon.9-volt BatteryDepleted9-volt battery is depleted andcannot operate pump;install fresh battery immediately.High PressurePossible blockage downstream (betweenpump and patient), clamp or kink in fluidpath. Find cause and remove blockage tocontinue. Or, press STOP/START to stoppump and silence alarm; remove blockageand restart pump.UpstreamOcclusion(Model 6101only)Fluid is not flowing from the reservoirto the pump. Check for a kink, a closedclamp or an air bubble in tubing betweenreservoir and pump. Press STOP/STARTto silence alarm for two minutes; removeobstruction and restart pump.Error DetectedPump fault occurred. Close tubing clamp,remove pump from service.Air In LineDetectedAir in fluid path. Press NEXT to silencealarm. Make sure tubing is threaded in AirDetector properly. If fluid path containsair, close clamps, disconnect from patientand prime fluid path.NOTE: When the pump is powered up inLLO, the Air Detector will automaticallybe turned on. If Air Detector is notrequired, turn it off in the OptionsMenu if you do not want to use it.3 Beeps Every5 Minutes;Stopped onMain ScreenPump is stopped. Start pumpif appropriate.Dosescheduledto start in Minutes / Startthe PumpPump is stopped, but a dose is scheduledto be delivered in the number of minutesindicated. In order for the dose to bedelivered, you must start the pump.Dose scheduledto start is nowoverdue / Startthe PumpPump is stopped, but a dose is overduefor its scheduled delivery. In order for thedose to be delivered, you must start thepump.Dose Durationis beinglengthenedYou have entered a new volume that wouldexceed the maximum rate of 350 ml/hr. Thepump automatically lengthened the doseduration to accommodate the volume youentered, but confirmationor a new duration is required.Dose Cycleis beinglengthenedThe dose duration you have enteredexceeds the dose cycle that is currentlyprogrammed. The pump automaticallylengthened the dose cycle, butconfirmation or a new cycle is required.
Recordkeeping FunctionsThe pump may be running or stopped to view functions or toprint.To View1.Press OPTIONS.Event Log2.Press or Î until Event Log optionappears.3.Press ENTER to display Event Log.4.Press Î to page back through Event Logentries or to page forward.5.When finished, press NEXT.To ClearPump must be in LL0 or LL1.Milliliters1.Stop the pump.Given2.Press NEXT repeatedly until MillilitersGiven screen appears.3.Press ENTER to clear and updatedate and time.To Print1.Turn printer on.Reports2.Connect printer cable to data in/out jack Rx Settings Event Logand to back of printer.3.If necessary, press until Printingappears.4.Press ENTER.5.Press or Î to select desired report.6.Press ENTER.7.When report is finished, detach printercable from pump.PRODUCT(S) DESCRIBED MAY NOT BE LICENSED OR AVAILABLE FOR SALE INCANADA AND OTHER COUNTRIESSmiths Medical ASD, Inc.St. Paul, MN 55112, USAPhone: 1-614-210-7300Toll-Free USA d your local contact information atwww.smiths-medical.com/customer-supportSmiths Medical is part of the global technology business smiths group plc.CADD, CADD-Prizm, Medication Cassette Reservoir Design and the SmithsMedical design mark are trademarks of Smiths Medical. The symbol indicatesthe trademark is registered in the U.S. Patent and Trademark Office and certainother countries. Product referenced is CE-marked. 2017 Smiths Medical. All rights reserved. IN19811EN-052017
CADD -Prizm VIP Ambulatory Infusion Pump Model 6100 and 6101 Quick Reference Card for Clinicians Using the Å (Help) Key INTERMITTENT LOCK LEVEL 0 A Green indicator light: blinks when pump is running B Amber indicator light: blinks when pump is stopped or alarming C Polemount bracket recess (back of pump) D Power jack (for power pack or AC .