Transcription
Clinician InformationCADD-Prizm VIPAmbulatory Infusion PumpModel 6100 and 6101
This booklet provides guidelines for the use, care and maintenance ofthe CADD-Prizm VIP Ambulatory Infusion Pump. The Operator’s Manualprovided with this product contains warnings and cautions that theuser should be aware of for the safe use of the product. If you have anyquestions regarding these systems, please contact Smiths Medical’sClinical Services Department at 1-800-258-5361.
This guide pertains only to the CADD-Prizm VIP (Variable InfusionProfile) Model 6100 and 6101 ambulatory infusion pump and the followingdelivery modes: PCAPCA 6210ContinuousCONTIN 6220(all revision letters) (all revision letters)TPNTPN 6230IntermittentINTERMT 6240(all revision letters)(all revision letters)WARNING: If the pump is dropped or hit, inspect the pump for damage. Do not use a pumpthat is damaged or is not functioning properly. Contact Customer Service toreturn a pump for service. If the pump is dropped or hit, the battery door may become broken or damaged.Do not use the pump if the battery door is damaged because the battery will notbe properly secured; this may result in loss of power or non-delivery of drug. Do not disclose to the patient the pump’s security codes or any other informationthat would allow the patient complete access to all programming and operatingfunctions. You must use a CADD extension set with anti-siphon valve or a CADDadministration set with either an integral or an add on anti-siphon valve toprotect against unregulated gravity infusion that can result froman improperly attached cassette. i
ii
Table of ContentsSection 1 General Description and Basic Operations1Description of the CADD-Prizm VIP Pump . 1 Pump Diagram . 2Callout Descriptions . 3Keypad . 3Installing a Battery . 5The Main Screen . 6Getting Help Using the Å Key . 7Lock Level Table . 8Changing the Lock Level . 9Changing Delivery Modes . 10Starting and Stopping the Pump . 11Section 2 Pump Programming12PCA Delivery ModePCA Cycle Graph and Programming Screens . 12PCA Programming . 13PCA: Programming with Upper Limits, Adjusting Doses inLock Level 1 . 17PCA: Starting a Clinician Bolus . 18PCA: Starting a Demand Dose . 18PCA: Stopping a Demand Dose or Clinician Bolus . 19Continuous Delivery ModeContinuous Cycle Graph and Programming Screens . 20Continuous Programming . 21CONTIN: Programming with Upper Limits, Adjusting Rate inLock Level 1 . 23TPN Delivery ModeTPN Cycle Graph and Programming Screens . 24TPN Programming . 25TPN: Starting Daily Infusion . 28Intermittent Delivery ModeIntermittent Cycle Graph and Programming Screens . 29Intermittent Programming . 30INTERMT: Stopping the Pump During the Cycle . 33Time Remaining . 34Changing the Next Dose Start Time . 34Resuming the Dose . 34iii
Section 3 Medication Reservoir or Administration Set35Removing a Used Reservoir or Administration Set . 35Attaching a New Reservoir or Administration Set . 36Priming the Tubing and Connecting to the Patient . 39Resetting the Reservoir Volume . 41Section 4 Options42Overview: Accessing Options . 42Immediate Taper-Down: TPN . 43Prime . 43Time Remaining: Intermittent . 43Extended History, Viewing: PCA . 44Changing Delivery Modes . 45AutoLock . 45Time . 46Date . 46Air Detector On/Off . 46Event Log, Viewing . 46Communications . 47Biomed Toolbox . 47Section 5 Accessories48Printing Reports . 48Power Pack or AC Adapter . 48Remote Dose Cord . 49CADD Pump Pouches . 50 Security Shell . 50Using the Lockable Polemount Bracket . 52Section 6 Troubleshooting and Reference54Alarms and Messages, Alphabetical List . 54iv
Description of the CADD-Prizm VIP Pump The CADD-Prizm VIP ambulatory drug delivery pump provides measureddrug therapy to patients in hospital or outpatient settings. Basic OperationsGeneral Description and Basic Operations Section 1The PCA (Patient-Controlled Analgesia) delivery mode is used for therapies that require a continuous rate of infusion, patient-controlled demanddoses, or both, such as patient-controlled analgesia.The Continuous delivery mode allows the infusion of drug at a constant,programmed rate.The TPN (Total Parenteral Nutrition) delivery mode allows the infusion ofnutritional solutions or other fluids, with optional tapering at the beginning and end of infusion.The Intermittent delivery mode allows the infusion of a specific volume ofdrug at a regular, programmed interval.Epidural/Subarachnoid AdministrationThe selected drug must be used in accordance with the indicationsincluded in the package insert accompanying the drug. Administrationof any drug by this pump is limited by any warnings, precautions, orcontraindications in the drug labeling.Analgesics Administration of analgesics to the epidural space islimited to use with indwelling catheters specifically indicated foreither short- or long-term drug delivery. Administration of analgesicsto the subarachnoid space is limited to use with indwelling cathetersspecifically indicated for short-term drug delivery.Anesthetics Administration of anesthetics to the epidural space islimited to use with indwelling catheters specifically indicated forshort-term drug delivery.WARNING: Do not administer drugs to the epidural space or subarachnoid space unlessthe drug is indicated for those spaces. To prevent the infusion of drugs that are not indicated for epidural space orsubarachnoid space infusion, DO NOT use administration sets that incorporateinjection sites. If a medication cassette reservoir, CADD extension set or CADD administrationset is used for epidural space or subarachnoid space drug delivery, it is stronglyrecommended that it be clearly differentiated from those used for other routesof infusion, for example, by color coding, or other means of identification. 1
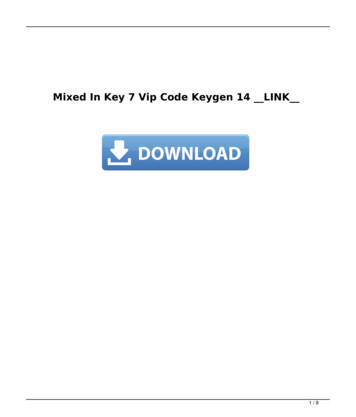
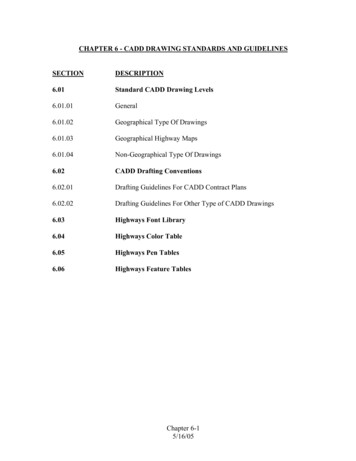
Section 1 General Description and Basic OperationsPump DiagramIndicator LightsAmberDisplayFront ViewGreenKeypadPower JackSTOPSTARTData In/OutAir DetectorPort CoverPowerData In/OutJackLOCK?ENTERNEXTDOSENSOPTIOYNNODETAIRINS ECTORTALLED Air Detector (optional)Upstream Occlusion Sensor(Model 6101 only)Rear te LockCassette Latch Cassette2
Callout DescriptionsIndicator lightsGreen: flashes when the pump is runningBasic OperationsGeneral Description and Basic Operations Section 1Amber: flashes when the pump is stopped or alerting to an alarm; litcontinuously when the pump is inoperableDisplayShows programming information and messagesPower jackConnects to a CADD External Power Source (EPS) System PowerPack or an AC adapter for wall outlet Data in/out jackUsed for attaching accessories: Interface Cable to connect to a PC Remote Dose Cord for remote operation of the dose keyCassetteThe portion of the reservoir or administration set that attaches to thebottom of the pumpPolemount bracket recessBracket slides into the recess on the back of the pump, for attachingthe pump to an IV poleKeypad starts and stops pump deliveryŒdisplays or changes the lock level; allows access to theclinician bolus in the PCA delivery modeÅdisplays more information for a screen or an alarm message saves a new value when programming; records a selectionfrom a menu; clears recordkeeping screens3
Section 1 General Description and Basic OperationsKeypad (continued)4„scrolls through programming screens without changing thesettings; returns you from the Biomed Toolbox menu to theOptions menu, or from the Options Menu to the main screenÍin the PCA delivery mode, delivers a programmed amountof medication‹ displays the Options menuanswers “yes,” increases values on programming screens,or scrolls through items on a menuÎanswers “no,” decreases values on programming screens,scrolls through items on a menu, or cancels printing
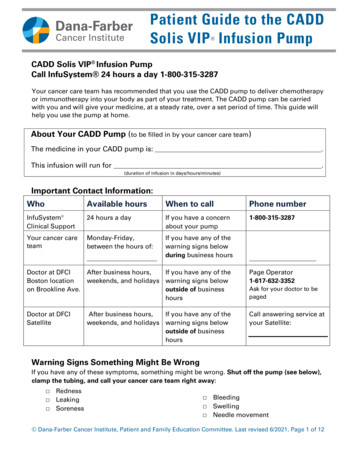
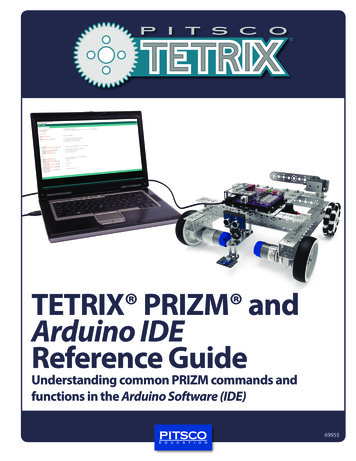
Installing a BatteryUse a fresh, 9 volt alkaline or lithium battery such as the DURACELLAlkaline MN 1604 or the ULTRALIFE Lithium U9VL battery. The pumpretains all programmed values while the battery is removed. If the pumpis running, you may connect an external power source to keep the pumprunning for 3 minutes while you change the battery. Basic OperationsGeneral Description and Basic Operations Section 1CAUTION: Do not store the pump for prolonged periods with the battery installed. Batteryleakage could damage the pump.WARNING: If the pump is dropped or hit, inspect the pump for damage. Do not use a pumpthat is damaged or is not functioning properly. Contact Customer Service toreturn a pump for service. If the pump is dropped or hit, the battery door may become broken or damaged.Do not use the pump if the battery door is damaged because the battery will notbe properly secured; this may result in loss of power or non-delivery of drug. There is no pump alarm to alert users that a battery has not been properlyinstalled or has become dislodged. An improperly installed or dislodged batterycould result in loss of power and non-delivery of drug. Do not use rechargeable NiCad or nickel metal hydride (NiMH) batteries. Do notuse carbon zinc (“heavy duty”) batteries. They do not provide sufficient powerfor the pump to operate properly.To install a battery1. Make sure the pump is stopped. Press theDoor w/Button»button on the battery door and slide thebattery door forward. Remove theused battery.«Prizm MatchBattery»2. Match the and - markings on the newbattery with the markings on the pump.Insert the battery. The pump will beep if thebattery is inserted correctly.3. Replace the battery door.5
Section 1 General Description and Basic OperationsThe Main ScreenThe main screen is the starting point for programming or viewing thepump’s settings. If no keys are pressed, the display will eventually revertto the main screen. The main screen within each delivery mode displaysinformation about the delivery status, as shown below.PCA Delivery ModePower source status*Delivery mode***PCA 6210X ***Battery LowRUNNINGRes Vol50.0 mlPress NEXT to advanceContinuous Delivery Mode*** CONT 6220X ***Battery LowRUNNINGRes Vol50.0 mlPress NEXT to advanceTPN Delivery Mode***TPN 6230X ***Battery Low RUNNING Res Vol50.0 mlPress NEXT to advanceRUNNING if the pump is runningDOSING if a demand dose is inprogressSTOPPED if the pump is stoppedRUNNING if the pump is runningSTOPPED if the pump is stoppedThe current reservoir volumeReminder that the NEXT key advances toprogramming screensRUNNING if delivery is tapering upRUNNING if delivering at theplateau rateRUNNING if delivery is tapering downRUNNING K if delivering the KVORUNNING I if immediatelytapering downSTOPPED if the pump is stoppedIntermittent Delivery Mode*** INT 6240X ***Battery LowDOSINGRes Vol50.0 mlPress NEXT to advanceDOSING if a dose is in progressKVO if the KVO rate is in progressKVO 0 if the pump is running but noKVO is programmedSTOPPED if the pump is stoppedDELAY if the dose is delayed by nextdose start time (KVO is delivering)* The Power Source Status will only display when the 9 volt battery is low, unlessthe pump has been customized to always show the type of power source in use.6
Getting Help Using the Å KeyFor more information about a screen or message on the pump’s display,press the Å key to view help screens.This is thecalculated amount offluid left in thereservoir.? Basic OperationsGeneral Description and Basic Operations Section 1This symbol in the lower rightcorner means there are additionalhelp screens. Press the Å keyagain to see the next help screen. To page through all the help screens, press Å repeatedly. Theoriginal screen will reappear when no further help is available. To exit help, press any key (other than the Å key). This will bringyou back to the original screen. If a help screen tells you to press a certain key, first exit help, thenpress that key.Help screens are lock level dependent. If the pump’s current locklevel prevents access to a certain function, the function will not bedescribed in the help screens.7
Section 1 General Description and Basic OperationsLock Level TableLock levels are used to limit patient access to certain programming andoperating functions.This table shows the features that can be accessed in each lock level.LL0 permits complete access to all programming and operating features.LL1 permits limited programming and access, and LL2 permits onlyminimal access.StoppedPump Operationsand ProgrammingLL0LL1LL2Stop/Start the pumpYesYesYesView Help screensYesYesYesPrintYesYesYesReset Reservoir VolumeYesYesYesReset Infusion Profile (TPN)YesYesYesChange the lock levelYes, w/codeYes, w/codeYes, w/codeChange the programYesWithin LL0 Limits*NoChange Next Dose StartTime (INTERMT)YesNoNoClear Given amountYesYesNoClear Dose Counters (PCA)YesYesNoYes,programmableYes,programmableYes, notprogrammablePrimeYesYesNoTime Remaining, view (INTERMT)YesYesYesOptionsImmediate Taper-Down(TPN)Extended History, view (PCA)YesYesYesYes, w/codeNoNoAutoLockYesView onlyView onlyTimeYesView onlyView onlyDateYesView onlyView onlyAir Detector On/OffYesView onlyView OnlyEvent Log, viewYesYesYesBiomed ToolboxYes, w/codeNoNoChange Delivery Modes* In PCA and CONTIN delivery modes8
Changing the Lock LevelBefore programming the pump, make sure the lock level is LL0 so youcan access all programming screens.Basic OperationsGeneral Description and Basic Operations Section 1After programming, the lock level must be changed to LL1 or LL2 toprevent the patient from having complete access to all programming andoperating functions.If AutoLock is not in use and the lock level is LL0 when you attach acassette, the message “AutoLock not in use / Change Lock Level fromLL0?” will appear; this allows you to set the lock level to LL1 or LL2 withthe steps below. For detailed information on lock levels, see page 8.NOTE: You may change the lock level at any time by stopping the pump andpressing Œ. Then begin with step 2 below.To change the lock level1. With this message displayed, press . (If you do not wish to change thelock level at this time, press Î.)2. The current lock level will appear.3. Press or Î until the desired locklevel (LL1 or LL2) appears.4. Press Œ again. “000” will appear.AutoLock not in use.Change Lock Levelfrom LL0?Press Y or NLock LevelLL0Lock LevelLL1Lock Level Code0005. Press or Î until the Lock LevelCode appears.Lock Level Code6. Press Œ to set the new lock level.Watch the display to verify that thecorrect lock level is being entered.Lock LevelLL1XXX Changing. 9
Section 1 General Description and Basic OperationsChanging Delivery ModesThe CADD-Prizm VIP pump contains four delivery modes: PCA, CONTIN,TPN, INTERMT. To change the mode, you must know the access code(Lock Level code plus 10). When you change the mode, the program willrevert to the default settings, and the event log will clear. Therefore, youmay wish to print the event log before changing the mode. Other Optionssettings will not be affected. To change the delivery modeThe pump must be stopped and in LL0.1. Press ‹.Press or Î until “DeliveryModes” appears, then press .2. Press or Î until the AccessCode appears (See the Operator’sManual; Lock Code 10).Then press .Options Delivery ModesPress § or fl or ENTERAccess CodeXXXNOTE: If the Lock Level code has beencustomized, use the new Lock Levelcode 10.3. Press or Î to select the desireddelivery mode. Then press .Select CONTIN 6220XPress § or fl or ENTER4. Press to confirm the change.The pump will go through the powerup sequence in the new deliverymode. If messages appear, refer tothe table on page 54 or press Åfor help.5. After the power up sequence, thismessage will appear followed by thefirst programming screen in the newdelivery mode.10Change Delivery Modeto CONTIN 6220X?Press Y or NPump is ready toprogramNEXT to continue
Starting the PumpWhen you start the pump, programmed values will be automaticallyreviewed. Then fluid delivery will begin as programmed and thegreen indicator light will blink. If the pump will not start, a messagewill appear on the display. Refer to the Alarms and Messages Tableon page 54.To start the pump1. Press “Start the Pump?”will appear.Basic OperationsGeneral Description and Basic Operations Section 1Start the Pump?Press Y or N2. Press . “Starting Pump”will appear.The pump will review the program,lock level, AutoLock setting,Air Detector status, time, and date.If AutoLock is in use, “AutoLock ischanging lock level to (LL1 or LL2)”will appear.Starting pump.AutoLock ischanging Lock Levelto LL2Stopping the PumpWhen the pump is stopped, no delivery occurs. “STOPPED” appears onthe main screen and the amber indicator light blinks.To stop the pump1. Press .If a demand dose or clinician bolus isin progress, “Stop Demand Dose?” or“Stop Clinician Bolus?” willappear. Press to stop the dose.2. When “Stop the Pump?” appears,press .Stop Demand Dose?Press Y or NStop the Pump?Press Y or N11
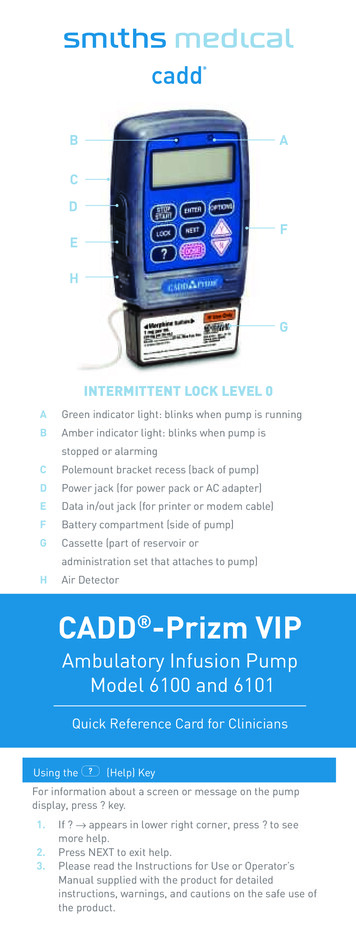
Section 2 Pump Programming - PCA Delivery ModePCA Cycle Graph and Programming ScreensThe PCA delivery mode provides the following methodsof delivery: Continuous Rate Demand Dose, activated by the patient Clinician Bolus, a loading dose activated by the clinician.You may program a continuous rate, a demand dose, or both.The clinician bolus is described later in this section.DosageClinician Bolus(used here asa loading dose)Continuous RateDemand DosesTimeThe following figure shows the programming screens in thePCA delivery mode:New Patient MarkerAir Detector (Review)(Units) GivenIf ExtendedHistory is onIf Air Detectoris installedDose Counters***PCA 6210X ***STOPPEDPress NEXT to advanceMax Doses Per HourDemand Dose LockoutIf a Demand Doseis programmedDemand DoseContinuous RateConcentrationUnitsReservoir Volume12If Units aremg or mcg
Pump Programming - PCA Delivery Mode Section 2PCA ProgrammingBefore programming:Stop the pump and change the Lock Level to LL0 as describedon page 9. Select the PCA delivery mode as described in Changing DeliveryModes on page 10. If the pump is already in the PCA delivery mode,you may select it again to clear all programming screens to theirdefault settings.1. Begin at the main screen Make sure the pump is in LL0. Make sure PCA and STOPPED appearon the main screen.*** Press „ to begin.Press NEXT to advancePumpProgramming PCA 6210X***STOPPED2. Enter the reservoir volume Press or Î to select the volumeof fluid in a filled reservoir. (If you donot wish to use the reservoir volumefeature, scroll down to “Not In Use”located before 1.)Reservoir Volume 100.0 ml Range: 1 - 9999 Press .3. Enter the unitsTo accept the current programming units,press „.Or, to change the units: Press or Î to select the desiredprogramming units. Press . Press to confirm the change.NOTE: If the prescription calls for milliliters,enter milliliters and skip to step 5.Units Milligrams Range: mg or ml Change Units toMilligrams?Press Y or N13
Section 2 Pump Programming - PCA Delivery Mode4. Enter the concentration of the drugThis screen will not appear if the units are milliliters; go to step 5. Press or Î to select thedesired concentration. (If youcannot select the desiredconcentration, it may have beenturned off in the biomed toolbox.)Press .Press to confirm the change.NOTE: If you change the concentration,you must enter the continuous rate anddemand dose.Concentration 1.0 mg/ml Range: 0.1 - 100 Change Concentrationto 1.0 mg/ml?Press Y or N5. Enter the hourly continuous rate Press or Î to select thedesired continuous rate of drugdelivery.Press .Continuous Rate 5.00 mg/hr Range: 0 - 30.00 NOTE: If “Change Rate to.?” appears, youmust confirm the rate because the unitsor concentration was changed, or therate is greater than or equal to 100 mg/hror mcg/hr. Pressto confirm, or pressand re-enter the rate.Î 6. Enter the demand dose amount Press or Î to select thedesired amount delivered whenpatient presses the dose key. Press .NOTE: If “Change demand dose to.?”appears, you must confirm the dosebecause the units or concentration waschanged, or the dose is greater than orequal to 100 mg or mcg. Presstoconfirm, or pressand re-enter the dose.Î14 Demand Dose 2.50 mg Range: 0 - 9.90
Pump Programming - PCA Delivery Mode Section 27. Enter the demand dose lockout timeIf demand dose is zero, this screen will not appear; go to step 10.Press or Î to select the desiredlockout time that must elapsebetween demand doses.Demand Dose Lockout 15 Min Press . Range: 5 min-24 hr WARNING: When you enter a newdemand dose lockout time, any lockouttime in effect will be cleared. A demanddose could be requested and deliveredimmediately upon starting the pump,resulting in over-delivery.PumpProgramming 8. Enter the max doses per hourIf demand dose is zero or the lockout is one hour or greater, thisscreen will not appear; go to step 10. Press or Î to select themaximum number of doses allowedper one hour period.Press .Max Doses Per Hour 2 Range: 1 - 4 NOTE: The number shown on this screen maybe outside of the range; this can happen whenthe demand dose lockout time is changed butthe max doses per hour number is notadjusted. If you scroll through the numbers,only numbers within the range will appear.WARNING: When you enter a new max dosesper hour value, any lockout time in effectwill be cleared. A demand dose could berequested and delivered immediately uponstarting the pump, resulting in over-delivery.9. Clear the dose countersIf demand dose is zero, this screen will not appear; go to step 10. Press if you wish to clear thenumber of demand doses attemptedsince date and time shown; even if thecounters are zero, this updates thetime and date markers.Dose CountersGiven/Attempt: 0/ 0since 06/08/96 10:35Press ENTER to clear15
Section 2 Pump Programming - PCA Delivery Mode10. Clear the units given Press if you wish to clear thetotal amount delivered since thetime and date shown; even if theamount is zero, this updates thetime and date markers.Milligrams Given0.00 mgsince 06/08/96 10:35Press ENTER to clear11. Verify the air detector statusThis screen will appear only if an air detector is installed. Make sure the setting is correct.NOTE: If the air detector is not required,this screen will show whether it is turnedon or off. Air DetectorRequired Review Only Press „ to continue. If you needto correct the air detector setting,see the Operator’s Manual.12. Enter a new patient marker (optional)This screen will appear only if the extended history is on.If you do not wish to add a newpatient marker, press „.If you wish to add a newpatient marker to the event log, Press .Press . This will clear theextended history from the lastpatient and add a marker to theevent log. The main screen willreappear.13. Review the programPress „ repeatedly to reviewthe programming screens. If youneed to reprogram a setting, press„ until the appropriate screenappears and change the setting asdescribed in this section.16To insert New PatientMarker and clearExtended Historypress ENTERClear ExtendedHistory and insertNew Patient Marker?Press Y or N
Pump Programming - PCA Delivery Mode Section 2PCA: Programming with Upper Limits,Adjusting Doses in Lock Level 1Programming the pump to use this feature1. During initial programming in LL0,enter the upper limit values for thecontinuous rate and/or demanddose. (These will be the maximumvalues when the pump is in LL1.)Demand Dose 5.00 mgPumpProgrammingIf a prescription allows for the continuous rate or demand dose to beadjusted during the course of therapy, you may wish to operate thepump in LL1. Then, when necessary, you can adjust the continuousrate or the demand dose values up to the maximum value that wasprogrammed in LL0. Range: 0 - 9.90 2. After you are finished programming,change the lock level to LL1.3. Decrease the continuous rate ordemand dose to its starting value,then press . “Range: Limited”indicates you cannot increase thevalue beyond the maximumprogrammed in LL0.Demand Dose 2.50 mg Range: Limited Adjusting the rate or dose while the pump is in useIf it becomes necessary to increase the continuous rate or demanddose during the course of therapy, stop the pump but remain in LL1.1. Press „ until the continuous rateor demand dose screen appears.2. Press or Î to select thedesired value, then press .“Range: Limited” indicates youcannot increase the value beyondthe maximum.Demand Dose 3.00 mg Range: Limited 3. Restart the pump if appropriate.17
Section 2 Pump Programming - PCA Delivery ModePCA: Starting a Clinician Bolus1. Make sure the pump is running (in anylock level). Start the pump if necessary.2. Press Œ.Clinician Bolus CodeXXX3. Press Î until the clinician boluscode appears on the display(See Operator’s Manual).4. Press Œ again.WARNING: To prevent the patient fromaccessing the clinician bolus function,do not let the patient know theclinician bolus code.5. Press or Î to select thedesired amount.6. Press or Í.Range 0 - 20.00 NOTE: If you enter a value of 100, a screenwill appear asking you to confirm the value.Pressto confirm, orto re-enterthe value. Clinician Bolus 10.00 mgÎ7. The screen will show the amountdecreasing as the bolus is delivered.Clinician Bolus10.00 mg Delivering. PCA: Starting a demand doseIf a demand dose has been programmed, the patient may start ademand dose while the pump is running. If no demand dose has beenprogrammed, the pump will display the message “Dose not delivered,No Dose programmed.”1. Make sure the pump is running(in any lock level). Start the pump ifnecessary.2. Press Í (or the button on theremote dose cord, if attached). Twobeeps will sound and the pump willbegin delivering the demand dose.18As the demand dose is delivered, themain screen will show “DOSING” inplace of “RUNNING.”Demand DoseStartedNEXT to continue***PCA 6210X***Low BatteryDOSINGRes Vol47.0 mlPress NEXT to advance
Pump Programming - PCA Delivery Mode Section 2PCA: Stopping a Demand Dose or Clinician BolusA demand dose or clinician bolus may be stopped in progress.1. Press .2. Press to stop the dose and tocancel the remainder of the dose.“Demand Dose Stopped” or “ClinicianBolus Stopped” will appear.3. When “Stop the Pump?” appears, press Î to remain running, orpress to stop the pump.Stop Demand Dose?Press Y or NDemand DoseStoppedPumpProgrammingOne beep will sound and themessage “Stop Demand Dose?” or“Stop Clinician Bolus?” will appear.Stop the Pump?Press Y or N19
Section 2 Pump Programming - Con
Section 6 Troubleshooting and Reference 54 Alarms and Messages, Alphabetical List . 54 IN19822.indd 4 10/24/2011 3:57:07 PM. 1 General Description and Basic Operations Section 1 Basic Operations Description of the CADD-Prizm VIP Pump The CADD-Prizm VIP ambulatory drug delivery .