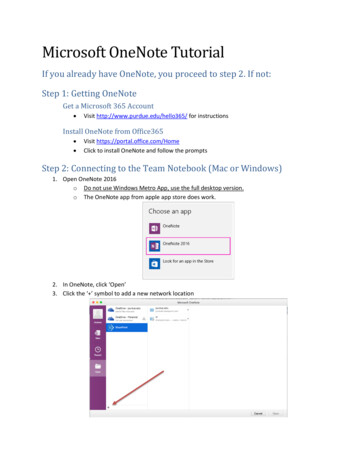
Transcription
whitepaperonenote tutorialUsing Microsoft OneNote 2003:A quick tutorialUsing OneNote tutorial
whitepaperonenote tutorialOneNote enhances productivity by enabling users toeffectively capture, efficiently organise and easily reuseinformation. With its intuitive interface – organised justlike a paper notebook – users can readily manage multiplesources of information, including: handwritten or typednotes, drawings, audio recordings, web page contentand other information. OneNote is an ideal tool forresearch, meetings, lectures, personal organisation andother information-related tasks.In this quick tutorial, you will learn the basics of howto use OneNote to manage the flow of information andideas. Click on any one of the following topics to learnmore:1. Introducing the e-notebook interface2. Create and delete sectionS3. Create and delete pages4. Prioritise important information with note flags5. Enter notes in a page6. Search your notes7. Integrate your notes with other applicationsUsing OneNote tutorial
whitepaperonenote tutorial1. Introducingthe e-notebookinterfaceHere’s what you will see when you first open OneNote :tip: Just like in other MS Office applications, you can organise your workspace ina way that works best for you. For example, you can move the formatting toolbarto a new location by dragging and dropping it to a new spot. You can also customise toolbars by adding or removing buttons from them.Using OneNote tutorial
whitepaperonenote tutorial2. Create and deletesectionsCreate new sections in your electronic notebook to organise your notes in a waythat makes sense to you. For example, if you are a student, you may want tocreate a section for each course you are taking. Each section can have as manypages in it as you want. See Lesson 3: Create and Delete Pages for more information.Sections are saved as separate .One files. Therefore, after you have added asection, you cannot select the “undo” option. You must delete the section toremove it.Section tabs are arranged horizontally along the top of a page. New sections areadded to the right of the currently selected section.To create a new section:1. Click the Insert menu.2. Click New SectionA new section tab is added to the right of the currently selected section(e.g., “Computer Science”).Using OneNote tutorial
whitepaperonenote tutorialhint: A new colour is automatically assigned each new section. To change thecolour, click the Format menu, choose Section Colour, and then select a colourby clicking it.3. Type a name for your new section.tip: You can also add a section by clicking the New Section icon on the Standardtoolbar.To delete a section:1. Click the section tab of the section you want to remove.2. Click the File menu.3. Select Current Section, and then click Delete.Using OneNote tutorial
whitepaperonenote tutorial3.Create and deletesectionsPages in OneNote are where you capture your notes within the individual sections you have created. You can name each page for quick and easy access tothe notes. For example, if you have a section for all the meetings you attend, youmay want to add a new page for each individual meeting and name the pages according to the meeting date or type.Page tabs are arranged vertically along the right side of a page. To move betweenpages, click the appropriate tab. New page tabs are added to the end of the list.To create a new page:Click the tab of the section in which you want to add a new page.For example, to add a new page within the Meetings section in the figure below,click the Meetings section tab.2. Click the Insert menu, and then click New Page.tip: You can also add a page by clicking the New Page icon, which is locatedright below the page tabs as well as on the Standard toolbar.3. A new page tab is added to the end of the list. Type a Title for your page in theTitle box.Using OneNote tutorial
whitepaperonenote tutorialTIP: You can move pages to other sections by right-clicking the page tab, selecting Move Page To and clicking the section into which you want to move the page.To delete a page:1. Right-click the appropriate page tab, and then click Delete.For example, to delete the “January 5” page in the “Meetings” section below,right-click the “January 5” page tab, and then click Delete.Using OneNote tutorial
whitepaperonenote tutorial4. Prioritise importantinformation withnote flagsWith OneNote , you can prioritise information by adding note flags anywhereyou want in your sections and pages. You can add notes to text, pictures anddrawing canvases.Adding note flags allows you to find important information quickly and easily. Youcan also prioritise your notes in a way that works best for you using any of thefollowing types of flags: To Do, Important, Question, Remember for later andDefinition. Each type of note flag has a different symbol, making it even easier foryou to identify and find your high-priority notes.To add a note flag:1. Click in the paragraph you want to flag.2. Click the Format menu, and then select Note Flags. Click a flag type.3. You can add more than one type of flag.In the example below, there are two note flags: Important and To Do. You candisplay shortcut icons to all the different note flag types. Click the View menu,Toolbars and Note Flags. The toolbar displays vertically along the left side of thepage.Using OneNote tutorial
whitepaperonenote tutorialNote: You can display shortcut icons to all the different note flag types. Click theView menu, Toolbars and Note Flags. The toolbar displays vertically along theleft side of the page.tip: Displaying your note flags in the Note Flags Summary task pane allows youto see all the notes you have flagged in your electronic notebook and createsdirect links to those pages. Click the View menu, and then clickNote Flags Summary.With OneNote , you can enter notes anywhere on the page, helping you captureyour notes in a way that suits your style and the way you think. You can add text,pictures and audio, and you can draw directly on the page with digital ink. Youcan also format and edit your notes using a variety of features.Using OneNote tutorial
whitepaperonenote tutorial5. Enter notes in a pageTo type notes on a page:Position the insertion point anywhere on the page, and then begin typing.tips: Format text by clicking the paragraph you want to format or by positioning the insertion point in the single word to format. Then, use the options on theStandard toolbar, such as B, I and U for bold, italic and underlined text.You can move groups of text around anywhere on the page by clicking the groupand dragging it to a new location.If you need more space on the page to write, click the Insert Extra WritingSpace icon, click on the appropriate page, and then drag the arrow down.To add a picture to a page:1. Position the insertion point on the page where you want to add the picture.2. Click the Insert menu, and then click Picture.Using OneNote tutorial10
whitepaperonenote tutorial3. Select the picture you want, and then click the Insert button.TIP: You can re-size pictures easily by selecting the picture and dragging thehandles left, right, up or down.To add a drawing to a page:1. Click the Pen icon.2. Click anywhere on the page, and then use your mouse or stylus to draw.Using OneNote tutorial11
whitepaperonenote tutorial6.Search your notesIn OneNote , there are several ways to search your notes in order to quickly andeasily retrieve the information you want. You can search by keyword, note flags orpage creation and modification date.To search your notes by keyword:1. Enter the word(s) you need to find in the Search box, and then click the Findbutton.2. Browse the results of your search by clicking the left and right arrows or byclicking the View List button.Clicking the left and right arrows takes you to each of the pages where the searchtool found your keyword.By clicking the View List button you can see a summary of all the places whereyour keyword was found. The results are grouped by page. You can go directly tothe page by clicking the page title.To search your flagged notes:1. Click the View menu, and then click Note Flags Summary.Using OneNote tutorial12
whitepaperonenote tutorial2. The Note Flags Summary task pane displays on the right side of your notebook.3. Clicking the note you are looking for will bring you directly to the appropriatepage.TIP: You can group note flags in a way that works best for you. For example, youcan group them by section or by date. Click the arrow beside the dropdown boxand select a grouping method.To browse pages by date:1. Click the View menu, and then click Page List.Using OneNote tutorial13
whitepaperonenote tutorial2. The Page List displays on the right side of your notebook.3. Click the arrow beside the dropdown menu, and then click Date.Pages are grouped according to when they were written or last updated. Theyare organised within 3 groups: Yesterday, This Week and Last Week.Using OneNote tutorial14
whitepaperonenote tutorial7.Integrate your noteswith other applicationsIntegrating your notes helps you get more done in less time. You can gather,store and organise all your notes in one spot for efficient management of all yourinformation.OneNote makes it easy for you to integrate your notes with other Office applications. You can copy and paste text, pictures and graphics from other applications and insert links to other files in your OneNote pages.To paste text, pictures or graphics into your OneNote pages:1. Copy the item from the other application.2. In OneNote , click on the page where you want the text or graphic to beplaced.3. Click the Edit menu, and then click Paste.TIP: To integrate pictures from web pages, simply drag the graphic from yourbrowser window to the place you want it on your OneNote page. To add textfrom web pages, select the text, and then copy and paste it into your OneNote page using the steps outlined above.To copy text and graphics from OneNote to another application:1. Click the item you want to copy.2. Click the Edit menu, and then click Copy.Using OneNote tutorial15
whitepaperonenote tutorial3. Open the application into which you want to paste the text or graphics.4. Paste the item (in Office applications, the paste function is typically found inthe Edit menu).To insert a link to another file:Drag the file into your OneNote page and drop it where you want the link to beinserted.In the example below, the Word file “Client List” was dragged and dropped intothe “January 5” page. Click the link to go directly to the Word file.Using OneNote tutorial16 2005. Toshiba Europe GmbH. While Toshiba has made every effort at the time of publication to ensure the accuracy of the information providedherein, product specifications, configurations, prices, system/component/options availability are all subject to change without notice. For themost up-to-date product information about your computer, or to stay current with the various computer software or hardware options, visitToshiba’s Web site at www.toshiba-europe.com.
onenote tutorial Using OneNote tutorial hint: A new colour is automatically assigned each new section. To change the colour, click the Format menu, choose Section Colour, and then select a colour by clicking it. . Type a name for your new section. tip: You can also add a section by clicking the New Section icon on the Standard toolbar.