Transcription
Instruction ManualRESIDENTIAL ELECTRICWATER HEATERSMODELS 6-120300 Maddox Simpson ParkwayLebanon, TN 37090Phone: 615-889-8900 Fax: 615-547-1000Technical Services email: 2tech@lochinvar.comwww.lochinvar.comFOR POTABLE WATERHEATING ONLYNOT SUITABLE FORSPACE HEATINGLISTEDLOW LEADCOMPLIANTGAMA certification applies to allresidential electric water heaters withcapacities of 20 to 120 gallons. Inputrating of 12 Kw or less.ALL TECHNICAL AND WARRANTY QUESTIONS: SHOULD BE DIRECTED TO THE LOCAL DEALER FROM WHOM THE WATER HEATER WAS PURCHASED.IF YOU ARE UNSUCCESSFUL, CONTACT RESIDENTIAL TECHNICAL ASSISTANCE AT 1-615-889-8900 OR VIA E-MAIL AT 2TECH@LOCHINVAR.COM.KEEP THIS MANUAL IN THE POCKET ON HEATER FOR FUTURE REFERENCEWHEN EVER MAINTENANCE ADJUSTMENT OR SERVICE IS REQUIRED.PRINTED IN THE U.S.A 09111PART NO. 322827-000
SAFE INSTALLATION, USE AND SERVICEYour safety and the safety of others is extremely important in the installation, use, and servicing of this water heater.Many safety-related messages and instructions have been provided in this manual and on your own water heater to warn youand others of a potential injury hazard. Read and obey all safety messages and instructions throughout this manual. It is veryimportant that the meaning of each safety message is understood by you and others who install, use, or service this water heater.This is the safety alert symbol. It is used to alert you to potential personal injury hazards. Obey all safety messages thatfollow this symbol to avoid possible injury or death.All safety messages will generally tell you about thetype of hazard, what can happen if you do not followthe safety message, and how to avoid the risk of injury.DANGERDANGER indicates an imminentlyhazardous situation which, if not avoided,could result in death or injury.WARNINGWARNING indicates a potentially hazardoussituation which, if not avoided, could resultin death or injury.CAUTIONCAUTIONCAUTION indicates a potentially hazardoussituation which, if not avoided, may resultin minor or moderate injury.CAUTION used without the safety alertsymbol indicates a potentially hazardoussituation which, if not avoided, could resultin property damage.The California Safe Drinking Water and Toxic Enforcement Act requires the Governor of California to publish a list of substancesknown to the State of California to cause cancer, birth defects, or other reproductive harm, and requires businesses to warn ofpotential exposure to such substances.This product contains a chemical known to the State of California to cause cancer, birth defects, or other reproductive harm. Thisappliance can cause low level exposure to some of the substances listed, including formaldehyde.IMPORTANT DEFINITIONS Qualified Installer: A qualified installer must have ability equivalent to a licensed tradesman in the fields of plumbing and electricalinstallation of these appliances. This would include a thorough understanding of the requirements of the National Electrical Code andapplicable local electrical and plumbing codes (and tools necessary to confirm proper installation and operation of the water heater) asthey relate to the installation of electric water heaters. The qualified installer must have a thorough understanding of the water heaterInstruction Manual. Service Agency: A service agency also must have ability equivalent to a licensed tradesman in the fields of plumbing and electricalinstallation of these appliances. This would include a thorough understanding of the requirements of the National Electrical Code andapplicable local electrical and plumbing codes (and tools necessary to confirm proper installation and operation of the water heater) asthey relate to the installation of electric water heaters. The service agency must have a thorough understanding of the water heaterInstruction Manual.2
GENERAL SAFETY3
INTRODUCTIONThank You for purchasing this water heater. Properly installed andmaintained, it should give you years of trouble free service.2. The installation must conform with these instructions and thelocal code authority having jurisdiction and the requirements ofthe power company. In the absence of local code requirementsfollow NFPA-70, the National Electrical Code (current edition),which may be ordered from: National Fire Protection Association,1 Batterymarch Park, Quincy, MA 02269.Abbreviations Found In This Instruction Manual: ANSI - American National Standards Institute ASME - American Society of Mechanical Engineers GAMA - Gas Appliance Manufacturers Association NEC - National Electrical Code NFPA - National Fire Protection Association UL - Underwriters Laboratories Inc.3. If after reading this manual you have any questions or do notunderstand any portion of the instructions, call the local utility orthe manufacturer whose name appears on the rating plate.4.PREPARING FOR THE INSTALLATION1. Read the “General Safety” section of this manual first and thenthe entire manual carefully. If you don’t follow the safety rules,the water heater will not operate properly. It could cause DEATH,SERIOUS BODILY INJURY, AND/OR PROPERTY DAMAGE.Carefully plan your intended placement of thewater heater. INSTALLATION OR SERVICE OF THISWATER HEATER REQUIRES ABILITY EQUIVALENT TOTHAT OF A LICENSED TRADESMAN IN THE FIELDINVOLVED. PLUMBING AND ELECTRICAL WORK AREREQUIRED.Examine the location to ensure the water heater complies withthe “Facts to Consider About the Location” section in this manual.5. For California installation this water heater must be braced,anchored, or strapped to avoid falling or moving during anearthquake. See instructions for correct installation procedures.Instructions may be obtained from California Office of the StateArchitect, 400 P Street, Sacramento, CA 95814.This manual contains instructions for the installation, operation,and maintenance of the electric water heater. It also containswarnings throughout the manual that you must read andunderstand. All warnings and all instructions are essential to theproper operation of the water heater and your safety. READ THEENTIRE MANUAL BEFORE ATTEMPTING TO INSTALL OROPERATE THE WATER HEATER.6. Massachusetts Code requires this water heater to be installed inaccordance with Massachusetts 248-CMR 2.00: State PlumbingCode and 248-CMR 5.00.TABLE OF CONTENTSSAFE INSTALLATION, USE AND SERVICE. 2GENERAL SAFETY. 3INTRODUCTION . 4Preparing for the New Installation . 4TABLE OF CONTENTS. 4TYPICAL INSTALLATION. 5MIXING VALVE USAGE . 6LOCATING THE NEW WATER HEATER . 6-7Facts to Consider About Location . 6Insulation Blankets . 7INSTALLING THE NEW WATER HEATER . 7Water Piping . 7Temperature-Pressure Relief Valve . 9Filling the Water Heater . 10T & P Valve and Pipe Insulation (Selected Models) . 10WIRING DIAGRAMS .11WIRING . 12TEMPERATURE REGULATION . 13Temperature Adjustment . 13FOR YOUR INFORMATION . 14Thermal Expansion . 14Strange Sounds. 14Operational Conditions . 14Water Odor . 14“Air” in Hot Water Faucets . 14High Water Temperature Shut Off System . 14PERIODIC MAINTENANCE . 15Anode Rod Inspection . 15Temperature-Pressure Relief Valve Operation . 15Draining . 15Thermostat Removal/Replacement . 15-16Element Cleaning/Replacement . 16-18Drain Valve Washer Replacement. 18Service . 18LEAKAGE CHECKPOINTS . 19TROUBLESHOOTING GUIDELINES. 20REPAIR PARTS LIST . 21-234
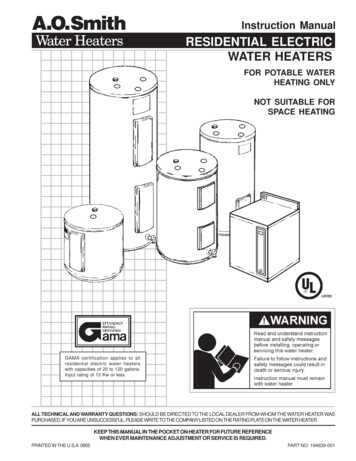
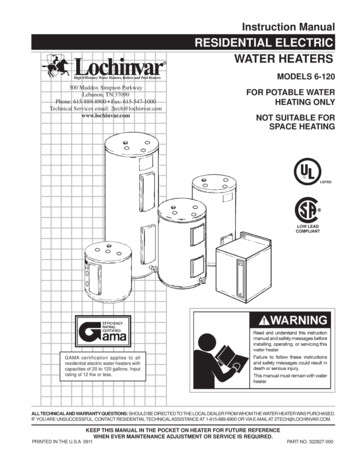
TYPICAL INSTALLATIONCOMPACTSUPRIGHTS / LOWBOYS† ELECTRICAL CONNECTIONS MAY BE LOCATED ON THE TOP ORS I D E , R E F E R TO Y O U R U N I T. A C T U A L M O D E L A N DILLUSTRATION MAY VARY DEPENDENT ON MODEL CAPACITYAND TYPE. SOME MODELS HAVE ALTERNATE INLET, OUTLETAND T&P VALVE LOCATIONS. THESE ALTERNATE LOCATIONSARE IDENTIFIED BY THE LABELING ON THE UNIT.TABLE TOPSINSTALL THERMAL EXPANSION TANK OR DEVICE IF WATERHEATER IS INSTALLED IN A CLOSED WATER SYSTEM.INSTALL SUITABLE DRAIN PANS UNDER HEATERS TO PREVENTDAMAGE DUE TO LEAKAGE. REFER TO WATER HEATERLOCATION, SEE “INSTALLING THE NEW WATER HEATER”SECTION.INSTALL VACUUM RELIEF IN COLD WATER INLET LINE ASREQUIRED BY LOCAL CODES.FIGURE 1.5
MIXING VALVE USAGEFIGURE 2.HOTTER WATER CAN SCALD:Water (Potable) Heating: All models are considered suitable forwater (potable) heating only.Water heaters are intended to produce hot water. Water heated to atemperature which will satisfy space heating, clothes washing, dishwashing, and other sanitizing needs can scald and permanently injureyou upon contact. Some people are more likely to be permanentlyinjured by hot water than others. These include the elderly, children,the infirm, or physically/mentally disabled. If anyone using hot water inyour home fits into one of these groups or if there is a local code or statelaw requiring a certain temperature water at the hot water tap, then youmust take special precautions. In addition to using the lowest possibletemperature setting that satisfies your hot water needs, a means suchas a mixing valve, should be used at the hot water taps used by thesepeople or at the water heater. Mixing valves are available from your localplumbing contractor. Consult a Qualified Installer or Service Agency.Follow mixing valve manufacturer’s instructions for installation of thevalves. Before changing the factory setting on the thermostat, read the“Temperature Regulation” section in this manual.LOCATING THE NEW WATER HEATERFACTS TO CONSIDER ABOUT THE LOCATIONsafety of the occupants in the building and for the most economicaluse of the appliance.Whether replacing an old water heater or putting the water heaterin a new location, the following critical points must be observed:1. Select a location indoors as close as practical or centralized tothe water piping system as possible. The water heater should belocated in an area not subject to freezing temperatures.2. Selected location must provide adequate clearances (4”) for servicingparts such as the thermostats, drain valve, and relief valve. Adequateclearance for servicing this appliance should be considered beforeinstallation, such as changing the anodes, etc.Carefully choose an indoor location for the new water heater,because the placement is a very important consideration for the6
3. The water heater should be located so it is not subject to physicaldamage by moving vehicles or area flooding. Water supply shut-off devices that activate based on thewater pressure differential between the cold water and hotwater pipes connected to the water heater.Installation of the water heater must be accomplished in such amanner that if the tank or any connections should leak, the flowwill not cause damage to the structure. For this reason, it is notadvisable to install the water heater in an attic or upper floor. Whensuch locations cannot be avoided, a suitable drain pan should beinstalled under the water heater. Drain pans are available from yourlocal plumbing contractor. Such a drain pan must have a minimumlength and width of at least 2 inches (51 mm) greater that the waterheater dimensions and must be piped to an adequate drain.INSULATION BLANKETSInsulation blankets are available to the general public for external useon electric water heaters but are not necessary with this product. Thepurpose of an insulation blanket is to reduce the standby heat lossencountered with storage tank heaters. Your water heater meets orexceeds the National Appliance Energy Conservation Act standardswith respect to insulation and standby loss requirements, making aninsulation blanket unnecessary.Water heater life depends upon water quality, water pressure and theenvironment in which the water heater is installed. Water heaters aresometimes installed in locations where leakage may result in propertydamage, even with the use of a drain pan piped to a drain. However,unanticipated damage can be reduced or prevented by a leak detector or water shut-off device used in conjunction with a piped drain pan.These devices are available from some plumbing supply wholesalersand retailers, and detect and react to leakage in various ways:Should you choose to apply an insulation blanket to this heater,you should follow these instructions below. Failure to follow theseinstructions can result in fire, serious personal injury, or death. Do not cover the temperature and pressure relief (T & P) valvewith an insulation blanket. Sensors mounted in the drain pan that trigger an alarm or turn offthe incoming water to the water heater when leakage is detected. Do not cover the instruction manual. Keep it on the side of thewater heater or nearby for future reference. Sensors mounted in the drain pan that turn off the water supply tothe entire home when water is detected in the drain pan. Do obtain new warning and instruction labels for placement onthe blanket directly over the existing labels.INSTALLING THE NEW WATER HEATERWATER PIPINGThis water heater shall not be connected to any heating systemsor component(s) used with a non-potable water heating appliance.Use properly sized water heaters for spa or hot tub use.Toxic chemicals, such as those used for boiler treatment shall notbe introduced into this system.Water supply systems may, because of such events as high linepressure, frequent cut-offs, the effects of water hammer among others,have installed devices such as pressure reducing valves, check valves,back flow preventers, etc. to control these types of problems. Whenthese devices are not equipped with an internal by-pass, and no othermeasures are taken, the devices cause the water system to be closed.As water is heated, it expands (thermal expansion) and closed systemsdo not allow for the expansion of heated water.HOTTER WATER CAN SCALD:Water heaters are intended to produce hot water. Water heated to atemperature which will satisfy space heating, clothes washing, dishwashing, cleaning and other sanitizing needs can scald and permanentlyinjure you upon contact. Some people are more likely to be permanentlyinjured by hot water than others. These include the elderly, children,the infirm, or physically/mentally disabled. If anyone using hot water inyour home fits into one of these groups or if there is a local code or statelaw requiring a certain temperature water at the hot water tap, then youmust take special precautions. In addition to using the lowest possibletemperature setting that satisfies your hot water needs, a means such asa mixing valve should be used at the hot water taps used by these peopleor at the water heater. Valves for reducing point of use temperature bymixing cold and hot water are also available.The water within the water heater tank expands as it is heated andincreases the pressure of the water system. If the relieving point ofthe water heater’s temperature-pressure relief valve is reached, thevalve will relieve the excess pressure. The temperature-pressurerelief valve is not intended for the constant relief of thermalexpansion. This is an unacceptable condition and must be corrected.It is recommended that any devices installed which could create aclosed system have a by-pass and/or the system have an expansiontank or device to relieve the pressure built by thermal expansion inthe water system. Expansion tanks are available for ordering througha local plumbing contractor. Contact the local water supplier and/or a service agency for assistance in controlling these situations.Consult a Qualified Installer or Service Agency. Followmanufacturer’s instructions for installation of the valves.Before changing the factory setting on the thermostat, read the“Temperature Regulation” section in this manual.7
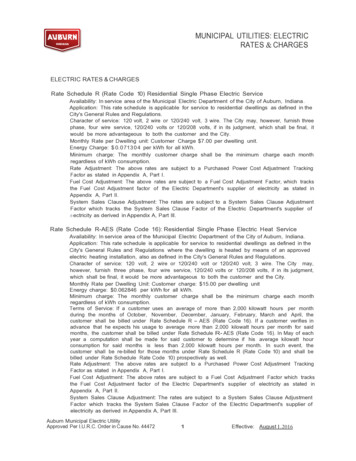
NOTE: To protect against untimely corrosion of hot and coldwater fittings, it is strongly recommended that di-electric unionsor couplings be installed on this water heater when connectedto copper pipe.WATER PIPING PRESSURE TESTThis section is only for the manufacturer installing thewater heater when the installation is to comply with H.U.D.Standards.When testing the water ways, H.U.D. Standards state: “Waterdistribution system: All water piping in the water distributionsystem shall be subjected to a pressure test. The test shallbe made by subjecting the system to air or water at 100 psifor 15 minutes without loss of pressure. When air pressureis used, the water heater shall not be connected duringthe test.”Figure 3 shows the typical attachment of the water piping to the waterheater. The water heater is equipped with 3/4 inch NPT water connections.NOTE: If using copper tubing, solder tubing to an adapter beforeattaching the adapter to the cold water inlet connection. Do notsolder the cold water supply line directly to the cold water inlet,it will harm the dip tube and damage the tank.FIGURE 3.8
The Discharge Pipe:TEMPERATURE- PRESSURE RELIEF VALVE Shall not be smaller in size than the outlet pipe size of the valve,or have any reducing couplings or other restrictions. Shall not be plugged or blocked. Shall be of material listed for hot water distribution. Shall be installed so as to allow complete drainage of both thetemperature-pressure relief valve, and the discharge pipe. Shall terminate at an adequate drain. Shall not have any shut-off valve between the relief valve andtank nor in the discharge pipe.This heater is provided with a properly certified combinationtemperature - pressure relief valve by the manufacturer.The valve is certified by a nationally recognized testing laboratorythat maintains periodic inspection of production of listed equipmentof materials as meeting the requirements for Relief Valves for HotWater Supply Systems, ANSI Z21.22 CSA 4.4, and the coderequirements of ASME.If replaced, the valve must meet the requirements of local codes, butnot less than a combination temperature and pressure relief valvecertified as indicated in the above paragraph.The temperature-pressure relief valve must be manually operatedat least once a year. Caution should be taken to ensure that (1) noone is in front of or around the outlet of the temperature-pressurerelief valve discharge line, and (2) the water manually dischargedwill not cause any bodily injury or property damage because thewater may be extremely hot.The valve must be marked with a maximum set pressure not toexceed the marked hydrostatic working pressure of the water heater(150 psi 1,035 kPa) and a discharge capacity not less than thewater heater input rate as shown on the model rating plate.For safe operation of the water heater, the relief valve must notbe removed from its designated opening nor plugged.The temperature-pressure relief valve must be installed directly intothe fitting of the water heater designed for the relief valve. Positionthe valve downward and provide tubing so that any discharge willexit only within 6 inches (153 mm) above an adequate drain, orexternal to the building or structure. Be certain that no contact ismade with any live electrical part. The discharge opening must notbe blocked or reduced in size under any circumstances. Excessivelength, over 30 feet (9.14 m), or use of more than four elbows cancause restriction and reduce the discharge capacity of the valve.No valve or other obstruction is to be placed between the relief valveand the tank. Do not connect tubing directly to discharge drainunless a 6 inch air gap is provided. The relief valve must be allowedto discharge water in sufficient quantities, should circumstancesdemand, to prevent bodily injury, hazard to life, or property damage.If the discharge pipe is not connected to a drain or other suitablemeans, the water flow may cause property damage.FIGURE 4.9
If after manually operating the valve, it fails to completely reset andcontinues to release water, immediately close the cold water inletto the water heater, follow the draining instructions, and replace thetemperature-pressure relief valve with a new one.T&P VALVE and PIPE INSULATION (On Selected Models)FILLING THE WATER HEATERNever use this water heater unless it is completely full ofwater. To prevent damage to the tank and heating element,the tank must be filled with water. Water must flow from thehot water faucet before turning “ON” electrical supply to thewater heater. The manufacturer will not warrant any elementsdamaged by failure to follow instructions.Remove insulation for T&P Valve and pipe connections from carton.Fit pipe insulation over the incoming cold water line and the hot waterline. Make sure that the insulation is against the top cover of the heater.Fit T&P Valve insulation over valve. Make sure that the insulationdoes not interfere with the lever or outlet of the T&P valve.To fill the water heater with water:Secure all insulation using tape.1. Close the water heater drain valve by turning the handleto the right (clockwise). The drain valve is on the lowerfront of the water heater.PIPE INSULATION2. Open the cold water supply valve to the water heater.NOTE: The cold water supply valve must be left openwhen the water heater is in use.3. To insure complete filling of the tank, allow air to exit byopening the nearest hot water faucet. Allow water to rununtil a constant flow is obtained. This will let air out of thewater heater and the piping.4. Check all water piping and connections for leaks. Repairas needed.5. Never alter or modify the certified construction of the waterheater or its components, or bypass any safety features.Doing so voids all warranties.FIGURE 5.10
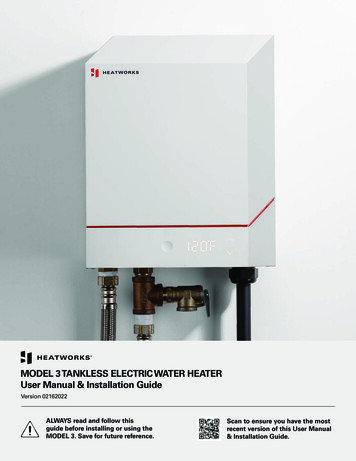
WIRING DIAGRAMSFOR ACTUAL WIRING CIRCUIT OF UNIT - REFERENCE CIRCUIT TYPE LISTED ON RATING PLATE.FIGURE 6.11
WIRING1. Provide a way to easily shut off the electric power when workingon the water heater. This could be with a circuit breaker or fuseblock in the entrance box or a separate disconnect switch.2. Install and connect a circuit directly from the main fuse or circuitbreaker box. This circuit must be the right size and have its ownfuse or circuit breaker.3. If metal conduit is used for the grounding conductor:Never use water heater unless it is completely full of water. Toprevent damage to the tank and heating element, the tank must befilled with water. Water must flow from the hot water faucet beforeturning on power.A. The grounding electrode conductor shall be of copper,aluminum, or copperclad aluminum. The material shall be ofone continuous length without a splice or joint.B. Rigid metal conduit, intermediate metal conduit, or electrical,metallic tubing may be used for the grounding means if conduitor tubing is terminated in fittings approved for grounding.You must provide all wiring of the proper size outside of thewater heater. You must obey local codes and electric companyrequirements when you install this wiring.C.If you are not familiar with electric codes and practices, or if you haveany doubt, even the slightest doubt, in your ability to connect the wiringto this water heater, obtain the service of a competent electrician.Contact a local electrical contractor and/or the local electric utility.Flexible metal conduit or flexible metallic tubing shall bepermitted for grounding if all the following conditions are met: The length in any ground return path does not exceed 6 feet. The circuit conductors contained therein are protected byovercurrent devices rated at 20 amperes or less. The conduit or tubing is terminated in fittings approved forgrounding.For complete grounding details and all allowable exceptions, refer tothe current edition of the National Electrica
Carefully choose an indoor location for the new water heater, because the placement is a very important consideration for the safety of the occupants in the building and for the most economical use of the appliance. Whether replacing an old water heater or putting the water heater in a new location, the following critical points must be .