Transcription
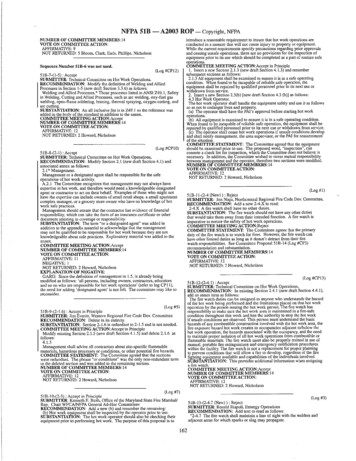
Employer Portal – Quick Reference GuideThis document is a quick reference guide to all the processes that can be accomplished using the GeminiEmployer Portal. The document also contains a checklist of all the tasks that the user must complete whensetting up the employer account and the subsequent frequency (after account set up) for the same tasks.Tasks to Complete During Initial Employer Account Set-Up:Done TaskNo.Frequency(After InitialSet-Up)1.UserRegistration*One-time onlyN/A2.User LoginAs NeededAs /AReview data atinitial set-up;make changes ifnecessaryReview data atinitial set-up;make changes rmation7.Maintain FlexPlan(s)Add Flex Plan(s)at initial set-up*if applicable8.Maintain SickLeave(s)Add SickLeave(s) at initialset-up9.MaintainBoard PaidTRSAdd Board PaidTRS at initial setup *if applicable10.MaintainPayrollSchedule(s)Add PayrollSchedule(s) atinitial set-up5.06.09.21TaskActionRequired atInitial Set-UpAdd Banking atinitial set-upAs NeededAs NeededAs NeededAnnually(Beginning ofEach FiscalYear)Annually(Beginning ofEach FiscalYear)Annually(Beginning ofEach FiscalYear)Annually(Beginning ofEach FiscalYear)Gemini PortalNavigationProcedureDocumentLocationRefer to EmployerPortal - UserRegistrationFollow link ininvitation emaildocumentRefer to EmployerGemini WebsitePortal - User LoginURLdocumentRefer to EmployerLanding page of the Portal - EmployerPortal once the user Dashboardlogs indocumentEmployerInformation MenuRefer to Employer Demographics Portal - LocationsLocationsdocumentEmployerInformation MenuRefer to Employer Demographics Portal - ContactsContactsdocumentRefer to EmployerReporting Menu Portal - BankingBankingdocumentEmployerInformation MenuRefer to Employer Participation Portal - Flex PlanFlex PlandocumentEmployerInformation MenuRefer to Employer Participation Portal - Sick LeaveSick LeavedocumentEmployerInformation MenuRefer to Employer Participation Portal - Board PaidBoard Paid TRSTRS documentReporting Menu Payroll ScheduleRefer to EmployerPortal - PayrollSchedule documentPage 1 of 21
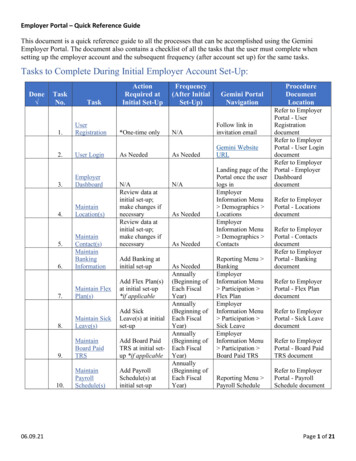
Employer Portal – Quick Reference GuideTasks Related to Payroll Contribution Report:TaskNo.TaskFrequency(After InitialSet-Up)After Every PayPeriod.ContributionReporting – File1. Upload ProcessContributionReporting –2. Replication ProcessError Correction3. and AdjustmentsPayment4. Remittance5. Reporting History06.09.21Payrollcontributionreport can besubmitted usingany of the 2methods – UploadFile or FileReplicationAs NeededGemini PortalNavigationEmployer Menu Reporting New ReportORPayroll Reporting Widgeton Employer Dashboard New Payroll ReportPart of the contributionreporting processWith Each PayrollContributionPart of the contributionReportreporting processReporting Menu As NeededReporting HistoryBack to TopProcedure Document LocationRefer to the following documents: Employer Portal - ContributionReporting: File Upload Processdocument Employer Portal - In ProgressReports document Employer Reporting FileFormat document Employer Reporting FileValidations documentRefer to the following documents: Employer Portal - ContributionReporting: Replication Processdocument Employer Portal - In ProgressReports document Employer Reporting FileFormat document Employer Reporting FileValidations documentRefer to Employer Portal Adjustments documentRefer to Employer Portal Contribution Reporting: FileUpload Process documentORRefer to Employer Portal Contribution Reporting: ReplicationProcess documentRefer to Employer Portal Reporting History documentPage 2 of 21
Employer Portal – Quick Reference GuideUser Registration Back to TopUser registration is a process where first time Gemini users can register themselves withinthe Portal.TRS will proactively send all current System Administrators an invitation email.All additional employer contacts will have to be added by the System Administrator.Registration requires multi-factor authentication.The link in the invitation email is only valid for 24 hours. Contact TRS if the email link has expired.Quick Steps:o Follow link in invitation email to open the registration pageo Enter employer TRS codeo Read and agree with portal terms and conditionso Verify user identity using the verification code received via emailo Create passwordo Proceed to account loginUser Login User login is a process where a user will authenticate themselves (using a two-step authentication process)to gain access to the Gemini portal.This authentication must be completed each time the user wants to access the Gemini Portal.Quick Steps – Login:o Access the Gemini Employer Portal pageo Enter email address and account passwordo Verify user identity using the verification code received via emailo Continue to employer dashboardQuick Steps - Logout:o Access the Action button next to the username on the top right section of the dashboard screen andselect Sign Outo Confirm sign out on the pop-up boxQuick Steps - Change Password:o Access the Action button next to the username on the top right section of the dashboard screen andselect Change Passwordo Enter email address and account passwordo Confirm old password and set new passwordQuick Steps - Forgot Password:o Access the Gemini Employer Portal pageo Click the Forgot your password? link on the sign in pageo Enter registered email addresso Verify user identity using the verification code received via emailo Set new passwordMaintain Location(s) Back to TopLocated within Employer Information under DemographicsLocations will be used for:06.09.21Page 3 of 21
Employer Portal – Quick Reference Guide o Physical correspondences between the employer and TRSo Assigning address locations for the employer contactsEach employer is allowed one (1) Primary Location and has the option to list Secondary Locations on theEmployer Portal.If there is any changes in the employer's location(s), the changes should be updated in the Gemini EmployerPortal.The Primary Location displayed in the Gemini Employer Portal is the current address on file at TRS for theemployer.Secondary Location - Not required. To be used only if an Employer has a secondary location for a contactWhen a Primary Location address is edited, the former location address is moved to the Location Historytable.A location address listed in the Location History table can be reactivated as a Secondary LocationPrimary Location – Edit:o Click the Action button to the left of the primary location address and select Edito Following fields are required: Address Line 1, City, State, Zip Code and Countyo Effective date will automatically populate with the next day’s date and can be editedo Click Save when finishedSecondary Location – Add:o Select Add Secondary Location on the right side of the Location tableo Following fields are required: Address Line 1, City, State, Zip Code and Countyo Secondary location can have an effective date up to 60 days into the futureo Select Save when finishedSecondary Location – Edit:o Click the Action button left of the address record and then select Edito Make required edits and select Save when finishedSecondary Location – Inactivate:o Click the Action button left of the address record and then select Inactivateo Select Yes to confirmLocation History – Reactivate:o Click the Action button left of the address record and then select Reactivateo Confirm Yes on the reactivation pop-upMaintain Contact(s) Back to TopLocated within Employer Information under the Demographics sectionActive contacts will be used for physical correspondence and communication between the employer andTRSContacts area will be used to maintain user accounts for the Employer PortalContacts who will require user access to the Employer Portal must have a valid email provided to receivethe registration and authentication emails for the PortalEmployer Contacts Maintenance Tips:Set the active contact to a Primary Contact if this contact should be the first point of contact for that contacttype topicThe Gemini system requires one (1) designated Primary contact for the Reporting Contact Type06.09.21Page 4 of 21
Employer Portal – Quick Reference Guide Only one active contact can be designated as the Primary contact for each Contact TypeBack to TopSecurity Role designation is only necessary for contacts who have user access to the PortalUpdating Security Roles will impact the user’s access and permissions within the PortalEmployer Portal users can be assigned more than one Security Role if the user will be performing variousroles for the organizationContacts who no longer work for the organization should be Inactivated from the contact listBefore inactivating a primary contact, locate another active contact and update them to primary for the samecontact type(s)Inactive contacts will move to the Contacts History table and will no longer have access to the PortalIf a new employee is replacing an existing active contact, do not update the existing contact’s profile withthe new employee’s information. First, inactivate the existing contact and then add the new employee as anew contactContacts who currently have access to the Portal but no longer need it should be updated using the RemoveUser optionRemoving a contact’s user access to the Portal will not impact the contact’s active status as an employercontactAdd New Contact:o Click the Add New Contact buttono Complete the required fields: Prefix, First Name, Last Name, Title, and Locationo Select at least one contact type out of 7 types – Reporting, Accounting, Technology, Health Insurance,Superintendent/Director, Other, and SSP Contacto As applicable, select the Primary Contact box to the right of each Contact Typeo Enter work phone, ext., mobile phone, fax number and emailo Click Save when finishedSend an Invite (for Portal Registration):o Select the Action button to the left of the contact’s nameo Security Role box pop-up will appearo Select at least one security role out of 4 roles - System Administrator, Payment Remitter, Read OnlyStaff and Payroll Reportero Click Send InviteEdit Contact:o Select the Action button to the left of the employee’s nameo Select Edito Edit required information and click Save when finishedUpdate Security Roles:o Select the Action button to the left of the employee’s nameo Select Security Roleso Select the appropriate role(s)o Select Save when finishedInactivate Contact:o Select the Action button to the left of the employee’s nameo Select Inactivateo Select Yes to inactivate06.09.21Page 5 of 21
Employer Portal – Quick Reference Guide Remove User:o Select the Action button to the left of the employee’s nameo Select Remove Usero Select Yes to remove userContact History – Reactivate Contact:o Locate the inactive contact and select the Action button to the left of their nameo Select Reactivateo Follow the steps under the Send an Invite section if the newly reactivated contact will need user accessto the PortalMaintain Banking Information Back to TopThe Banking area of the Gemini Employer Portal is located within the Reporting menu.Use the Banking section to designate bank account(s) that will be used to remit contribution payments toTRS for the defined benefit and the defined contribution plans.Defined benefit is the plan used to pay the current member and employer contributions (member TRS,employer TRS, member and employer THIS). Defined contribution is the Supplemental Savings Plan (SSP)offered by TRS.If there is any changes in the employer's banking information, the changes should be updated in the GeminiEmployer PortalThe Banking History section will display the employer’s historical and inactivated bank accountinformationAdd a Bank Account:o Click on the Add Account button at the top of the Banking tableo Enter the bank’s routing number and click Search to find the name associated with the routing numbero Enter the account number, select the account type (Checking or Savings), enter an account name, andselect a retirement plan from the dropdown box (All, Defined Benefit, Defined Contribution)o Enter a Begin Date using the first date on which TRS should begin using this bank account forpayments. The Begin Date cannot be prior to the current dateo Enter an End Date if TRS should stop using this account for payments on a certain day. The End Datecan be left blanko Read through the EFT authorization program and terms of use statement that is applicable for theentered banking information. To agree to the terms of this agreement, click thecheckbox.This is mandatoryo Select Save when finishedEdit Bank Account:o A bank account can only be edited if the current calendar date is a date prior to or an exact match of theBegin Date on the Bank Account record.o Locate the bank account record to be edited and select the Action button to its lefto Select Edit and make required editso Once all edits have been made, click thecheckboxo Click Save when finished06.09.21Page 6 of 21
Employer Portal – Quick Reference Guide Inactivate Bank Account:o If a bank account has been closed or is no longer needed for TRS contribution payments, the bankaccount should be inactivatedo Locate the bank account record to be inactivated and select the Action button to its lefto Select Edit and enter a date in the End Date fieldo The End Date must be a future date from the current calendar date but no greater than 90 days from thecurrent date.o Click thecheckboxo Click Save when finishedDelete Bank Account:o Bank accounts that have been used by the employer to remit a payment to TRS will not be eligible to bedeletedo Locate the bank account record to be deleted and select the Action button to its lefto Select Deleteo Select Yes to proceed with deletionMaintain Flex Plan(s) Back to TopThe Flex Plan area of the Gemini Employer Portal is located within EmployerInformation under the Participation section.Employers are required to report to TRS if they have a reportable flexible benefit plan.After June 30th each year, the Flex Plan record(s) for the prior year will automatically be moved to the FlexPlan History section.Add a Flex Plan:o Click Add Flex Plan button at the top of the Flex Plan tableo Select one of the fiscal years listed (current and one subsequent fiscal year will be available forselection)o Select Administrator or Teacher from the Job Category field If teachers and administrators have the same flexible benefit plan, create a record for each jobcategory even if the amounts are the same for both groupso Enter the Amount of the flexible benefit plan. The amount reportable is equal to the amount of the salaryoption If different members under the same Job Category have varying flex plan benefit amounts, create aseparate Flex Plan record for each flexible benefit plan amount.o Indicate if the Flex Plan record is available to all new hires or if it is a grandfathered plan – If new hires are not eligible to receive the flexible benefit plan upon hire, select the ‘No’(Grandfathered) button If new hires are eligible to receive the flexible benefit plan upon hire, select the ‘Yes’ (Add-On)button.o If the Flex Plan record is a grandfathered flexible benefit plan, answer the switching allowed orswitching not allowed question – For plans that allow eligible members to ‘switch’ between the insurance and the salary benefit, selectthe ‘Yes’ (Switching Allowed) button06.09.21Page 7 of 21
Employer Portal – Quick Reference GuideFor plans that do not allow eligible members to switch from the insurance benefit to the salarybenefit, select ‘No’ (Switching Not Allowed) button.o Provide additional information in the Comments sectiono Click Save when finishedEdit Flex Plan:o Flex plan records can only be edited if: There have not been any payroll reports submitted to TRS that include a positive flex plan paymentreason; and Present day is within the same fiscal year as that of the flex plan record attempted to be editedo Locate the flex plan to be edited and select the Action button to its lefto Select Edit and make required editso Click Save when finishedDelete Flex Plan:o Flex plan records can only be deleted if there have not been any payroll reports submitted to TRS withthe same fiscal year and job category matching that of the record to be deletedo Locate the flex plan to be deleted and select the Action button to its lefto Select Deleteo Select Yes to proceed with deletiono If the plan record cannot be deleted, the following message will appear – “A Flex Plan payment hasalready been received for this Job Category this fiscal year. This record cannot be deleted”. ContactTRS for further assistance Maintain Sick Leave(s) Back to TopThe Sick Leave area of the Gemini Employer Portal is located within the EmployerInformation under the Demographics section.Employers are required to report to TRS the normal annual allotment of sick leave for teachers andadministrators.After June 30th each year, the Sick Leave record(s) regarding the prior year’s sick leave information willautomatically be moved to the Sick Leave History section.Add Sick Leave:o Click the Add Sick Leave button at the top of the Sick Leave tableo Select one of the fiscal years listed (current and one subsequent fiscal year will be available forselection)o Select Administrator or Teacher from the Job Category field If teachers and administrators have the same sick leave normal annual allotment, create a record foreach job category even if the amounts are the same for both groups.o Enter the amount of normal annual allotment(s) – Include personal days, business days, and any other non-vacation days that can be used as sick leave If there is a tiered normal annual allotment or there are members who are covered under the selectedjob category who receive a varying number of sick leave days, enter all of the normal annualallotments in the fiscal year being reportedo Click the enter button on the keyboard to retain the entered amounto Pressing enter will generate the “ ” button06.09.21Page 8 of 21
Employer Portal – Quick Reference Guide o Click the “ ” button to enter additional allotment amountso Repeat this step until all allotments have been entered for the Sick Leave recordo Provide additional information in the Comments sectiono Click Save when finishedEdit Sick Leave:o Locate the leave record to be edited and select the Action button to its lefto Select Edit and make required editso Click Save when finishedMaintain Board Paid TRS The Board Paid TRS area of the Gemini Employer Portal is located within EmployerInformation under the Participation section.Employers are required to report to TRS if they pay any portion of a member’s TRS 9 percent retirementcontributions.After June 30th each year, the Board Paid TRS record(s) regarding the prior year’s board paid TRSinformation will automatically be moved to the % Board Paid TRS History section.Add Board Paid TRS:o Click the Add Board Paid TRS button at the top of the Board Paid TRS tableo Select Administrator or Teacher from the Job Category field Only one entry per job category per fiscal year can be createdoSelect one of the fiscal years listed (current and one subsequent fiscal year will be available forselection)oEmployer pays any portion of member contribution checkbox – Click the checkbox if the district pays any portion of any member’s 9 percent TRS retirementcontribution to indicate yes/true. Leave the checkbox un-checked if the district does not pay any portion of any member’s 9 percentTRS retirement contribution to indicate no/not true.o Provide additional information in the Comments sectiono Click Save when finishedEdit Board Paid TRS:o Locate the record to be edited and select the Action button to its lefto Select Edit and make required editso Click Save when finishedMaintain Payroll Schedule Back to TopBack to TopEmployers are required to create a Payroll Schedule(s) prior to uplo
The document also contains a checklist of all the tasks that the user must complete when setting up the employer account and the subsequent frequency (after account set up) for the same tasks. . The Payroll Schedule area of the Gemini Employer Portal is located within the Reporting menu. Separate