Transcription
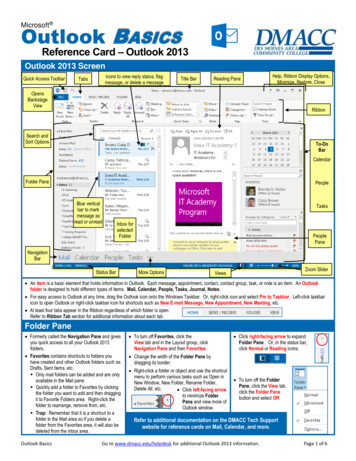
Outlook BASICSMicrosoft Reference Card – Outlook 2013Outlook 2013 ScreenQuick Access ToolbarIcons to view reply status, flagmessage, or delete a messageTabsTitle BarReading PaneHelp, Ribbon Display Options,Minimize, Restore, CloseOpensBackstageViewRibbonSearch andSort OptionsTo-DoBarCalendarFolder PanePeopleBlue verticalbar to markmessage asread or unreadTasksInbox forselectedFolderPeoplePaneNavigationBarIStatus BarMore OptionsZoom SliderViews An item is a basic element that holds information in Outlook. Each message, appointment, contact, contact group, task, or note is an item. An Outlookfolder is designed to hold different types of items: Mail, Calendar, People, Tasks, Journal, Notes. For easy access to Outlook at any time, drag the Outlook icon onto the Windows Taskbar. Or, right-click icon and select Pin to Taskbar. Left-click taskbaricon to open Outlook or right-click taskbar icon for shortcuts such as New E-mail Message, New Appointment, New Meeting, etc. At least four tabs appear in the Ribbon regardless of which folder is open:Refer to Ribbon Tab section for additional information about each tab.Folder Pane Formerly called the Navigation Pane and givesyou quick access to all your Outlook 2013folders. Favorites contains shortcuts to folders youhave created and other Outlook folders such asDrafts, Sent Items, etc. Only mail folders can be added and are onlyavailable in the Mail pane. Quickly add a folder to Favorites by clickingthe folder you want to add and then draggingit to Favorite Folders area. Right-click thefolder to rearrange, remove from, etc. Trap: Remember that it is a shortcut to afolder in the Mail area so if you delete afolder from the Favorites area, it will also bedeleted from the Inbox area.Outlook Basics To turn off Favorites, click theView tab and in the Layout group, clickNavigation Pane and then Favorites. Click right-facing arrow to expandFolder Pane. Or, in the status bar,click Normal or Reading icons. Change the width of the Folder Pane bydragging its border. Right-click a folder or object and use the shortcutmenu to perform various tasks such as Open inNew Window, New Folder, Rename Folder,Delete All, etc. Click left-facing arrowto minimize FolderPane and view more ofOutlook window. To turn off the FolderPane, click the View tab,click the Folder Panebutton and select Off.Refer to additional documentation on the DMACC Tech Supportwebsite for reference cards on Mail, Calendar, and more.Go to www.dmacc.edu/helpdesk for additional Outlook 2013 information.Page 1 of 6
Navigation Bar Located at the bottom of the Folder Pane. Provides access to each of the Outlookfeatures, such as Mail, Calendar, Tasks, etc. Click the Navigation Bar button for the folder orview that you want to open.Mail: Contains mail-related folders like Inbox,Sent Items and Search Folders. Mail viewappears by default whenever you start Outlook.Or, press Ctrl 1.Calendar: Enables viewing and scheduling ofappointments, events, and meetings. Click toview calendar or hover the mouse over theCalendar icon to view a pop-up preview of itemsscheduled for the current day. You can alsoclick a date in the preview to show the calendaritems for that day without switching away fromthe current folder. Or, press Ctrl 2.People: Referred to as the People Hub and thenew name for Contacts. Use to store and keeptrack of addresses, numbers, and e-mailaddresses. Click to view contacts or hover themouse over the People icon to view the contactsthat you have added to your Favorites listlocated in the To-Do Bar. Or, press Ctrl 3.Tasks: Use to organize to-do lists, track taskprogress, and delegate tasks. Hover the mouseon the Tasks icon to see a list of active tasks.Or, press Ctrl 4.Notes: Use like electronic Post-It Notes to writedown information. Or, press Ctrl 5.Folder List: Displays a list of all your Outlookfolders. Or, press Ctrl 6.Shortcuts: Shortcuts to Outlook Today andMicrosoft Office Online website. Or, pressCtrl 7. You can also add shortcuts to foldersand locations in Outlook as well as to file foldersand websites. Right-click a Navigation Bar icon for menu ofoptions. Ex: Open in New Window. Below is an example of the Navigation Bar inCompact View. Tips: Hoveryour mousepointer on aNavigationBar icon for aSneak Peekview of yourcalendar,tasks, andcontactslisted asFavorites. Click Dockthe peekto turn on inthe To-Do Bar. Click the ellipsisbuttontoexpand list and openNavigation Optionsdialog box. To change between normal and compact view,change the order of the buttons and determinehow many to show, click Navigation Options. To remove, click Remove the peek in the ToDo Bar.Status Bar Appears at bottom of window and presents information about the current folder and selected items, connection status for Exchange Server, Normal orReading View icons, and zoom slider which changes the text zoom for the message displayed in the Reading Pane. Right-click Status Bar for menu ofavailable options.Reading Pane The Reading Pane displaysinformation about the selectedOutlook item. For example, inthe mailbox, it displays the textof a selected e-mail message. You can view messages safelyin the Reading Pane –potentially malicious scripts orattachments are not activated oropened automatically. By default, the Reading Pane appearsto the right of the Inbox. It can also beviewed at the bottom or turned off. To configure the Reading Pane, click File, Options,click Mail in the left pane and then click Reading Pane. Click the View tab and select ReadingPane for options. You can compose replies to messages in the Reading Pane without needing to open the replyin a separate window. Click Reply, Reply All, Forward, or IM. The InfoBar is the banner near the top of an open email message and resides in the ReadingPane. It tells you whether a message has been replied to or forwarded, along with the onlinestatus of a contact who is using Lync. Double-click a name in the InfoBar to view details suchas phone number, office location, email address, etc. If the InfoBar displays a message that you replied to or that you forwarded, click thatmessage and choose Find Related Messages to search for messages in thesame conversation as the selected message.InfoBar The Reading Pane header displays the message’s attachments. Double-click an attachment toopen it, or right-click the attachment and choose other tasks on the shortcut menu such asQuick Print, Save As, Save All Attachments, etc. When receiving a meeting request, the Reading Pane displays Accept and Decline buttons sothat you can accept or decline a meeting request without opening the request. When a meeting invitation is selected, the Reading Pane shows a snippet of your calendar withthe proposed meeting and the adjacent items to help you determine if you can attend themeeting.Outlook BasicsDouble-clickname foradditionalinformationGo to www.dmacc.edu/helpdesk for additional Outlook 2013 information.Page 2 of 6
To-Do Bar The To-Do Bar enables you to view items foryour Calendar, People (Contacts), and Tasks. By default, the To-Do Bar feature is turned off inOutlook 2013. It appears at the right side of the Outlook windowand is set on a folder-by-folder basics. Meaningit can be on in Mail view but off in Calendar view. Click View tab andselect To-Do Barfor options. Tip: In 2013 you canno longer drag anemail message to adate on the To-Do Bar calendar. Youcan however still drag the message ontothe Calendar icon on the Navigation Bar. Click X to closethe To-Do Bar oron the View tab,click To-Do Bar Off Tip: When in Calendar View, click in the Tasks Listarea and type the task subject. Double-click the taskitem to open the task form. Drag a task from the TaskList to the calendar to schedule an appointment.MiscellaneousOutlook RibbonTabs The Ribbon usually operates in the context of the currently selected folder. So when you have the Inbox folder open, the tabsand commands apply primarily to the Inbox. When the Calendar folder is open, the buttons displayed contain commands towork with new appointments, new meetings, etc. Besides the File tab, the Home, Send/Receive,Folder, and View tabs always appear and the Search tab appears when you click in the Search box. File: Refer to section called Backstage View. Home: This tab is the place to go to create new items and access the most common commands for items in the selectedfolder. As an example, the Home tab for the Inbox contains commands for replying to messages, creating and using QuickSteps, moving messages, and performing other common email tasks. Send/Receive: Use this tab to synchronize folders (send/receive email, for example), show send/receive status, and setconnection and download preferences. Since our DMACC email is on an Exchange server, most of these features areautomatically performed for us. Folder: Use this tab to access folder-specific tasks such as setting permission for folder, cleaning up the folder, recoveringdeleted items, etc. View: Use the View tab to access various views for the current folder, create and manage views, and set options for thevarious interface panes such as the To-Do Bar, Reading Pane, People Pane, Folder Pane, etc. Search: This tab appears only when you click in the Search box, and it offers options that you can use to define your searchcriteria and access search options and other tools. Others: Calendar Tools/Appointment tab appears when you click on an appointment in the calendar. AttachmentTools/Attachments tab appears when you click on an attachment in an email message.People Pane Appears at the bottom of the Reading Pane and displays information about the person(s) associated with the selected item. To turn the People Pane on or off, click the View tab, click People Pane, and choose the desired state. Drag the top border to resize the People Pane or click the arrow to collapse or expand the People Pane.Quick AccessToolbar Appears above the File tab and provides easy access to the commands you usemost frequently. Contains default commands of Send/Receive and Undo.MoreOptions To customize, click the More arrow for options such as Print, Save As, Reply,Reply All, etc. Or, click More Commands for a long list of all commandsavailable. Or right-click a command button and select Add to Quick Access toolbar. To work with Outlook in Touch Mode, click the More arrow and selectTouch/Mouse Mode from the menu of options. You can now toggle betweenMouse and Touch Mode by clicking the Touch/Mouse Mode button on the QuickAccess Toolbar.Outlook BasicsGo to www.dmacc.edu/helpdesk for additional Outlook 2013 information.Page 3 of 6
Miscellaneous (cont)Items intheFolderPaneBackstageViewMailbox (your name): Provides a preview of your day; summarizesappointments, tasks, and new Email messages. Called OutlookToday.Deleted Items: Works like the Windows Recycle Bin; where youcan find deleted Outlook items. To bypass the Deleted Items folder,press and hold down the Shift key while deleting. You will receive aconfirmation message.Inbox: Contains all of your incoming Email messagesSent Items: Stores copies of messages you have sent.Drafts: Stores draft messages that you haven’t yet completed.Junk Email: Contains messages that Outlook considers spam.Check periodically for incorrectly flagged messages.News Feed: Collects status and activity updates for people whoare a part of your social network using Outlook’s social Connector.Outbox: Temporarily stores any messages that you’ve composedthat have not been sent.RSS Feeds: Allows you to access content that you’ve subscribedto via RSS feed, such as news and blogs.Search Folders: Provides quick accesss to color categorizedmessages, messages flagged for follow-up, messages with largeattachments, and unread messages.Notes: Works like electronic sticky notes; allows you to jot downquick bits of information.Folder List: Displays all the folders in Microsoft Outlook.Shortcuts: Contains shortcuts to other folders that you addyourself.Journal: Records information about items you send or receive andfiles you create (not shown by default). Clicking on the File tab takes you to Backstage View. Click the back arrowor press Esc to return to the Outlook window. To change default settings for how Mail, People (Contacts), Calendar and Tasks aresetup, click the Options button. Make the changes click OK. Info: View account settings, set Automatic replies (Out of Office Manager), cleanupyour mailbox, create and manage rules and alerts and manage Add-ins. Open and Export: Open another calendar, Outlook data file or perform theimporting/exporting of data files. Save As: Save the message as a template or in other Outlook support formats. Save Attachments: Save attachments under a different name or location. Print: Preview and print the current message. Office Account: View your Office.com account details. Options: Customize how the program saves, displays, and proofs documentsby setting program options. Exit: Exit the Outlook program.Using the Out ofOffice Assistant Automatic Replies let you automatically generate replies to incoming messages when you are not inthe office. Since this feature is a server-side component for Exchange Server, this feature works evenwhen Outlook 2013 is not running. DMACC’s version of Exchange Server lets you specify the time period when you will be out bydetermining the start date and the end date. You also have the cabability to specify different messages for external use and internal use. As anexample, you can send a message to other DMACC employees stating things such as additionalcontact information, etc., where for those outside the DMACC environment only state that you are out ofthe office. You can now also use fonts, colors, and formatting in your replies.Note: The Out of Office response is only sent the first time a message comes from a given sender. When subsequentmessages from that sender are sent, an Out of Office response is no longer sent. This procedure cuts down on the number ofmessages generated and keeps the senders from becoming annoyed by numerous Out of Office replies.1. Click the File tab and select Automatic Replies to open the Automatic Replies dialog box.2. Select the Send Automatic replies option.3. If desired, click the Only send during this time range check box and specify the time range towhich you want messages to be replied. If nothing is specified, the replies will beginimmediately.4. Type your auto-reply on the Inside My Organization and/or Outside My Organization tab.5. Click OK.6. If an end time has not been entered, to switch the Automatic Replies off, navigate to theAutomatic Replies dialog box, select the Do not send automatic replies option, click OK.Outlook BasicsGo to www.dmacc.edu/helpdesk for additional Outlook 2013 information.Page 4 of 6
Miscellaneous (cont)Start OutlookAutomaticallyIf the first thing you do after you log into your computer is to open Outlook, then you may want it to startautomatically saving you the trouble of having having to open it yourself.1. Click the Start button and select All Programs from the menu.2. Scroll down and right-click Start-up. Select Open from the menu.The Startup folder window will appear.3. Click the Start button again and select All Programs. Scroll down and open the Microsoft Office 2013 folder.4. While holding down on the Ctrl key, click and drag the Microsoft Outlook 2013 shortcut to the Startup folder window. TheOutlook 2013 shortcut will appear in the Startup folder window. Next time you start your computer, Outlook will automaticallyopen.To change the folder that Outlook starts in, example, the Calendar instead of Mail:1. Click the File tab on the Ribbon and select Options.2. Click the Advanced tab.3. Under the “outlook start and exit” heading, click the Browse button to open the Select Folder dialog box.4. Select the folder you want Outlook to open to.5. Click OK to close the Select Folder dialog box.6. Click OK to close the Outlook Options dialog box.Using InstantSearch Select the folder you want to search in and type your search terms in theInstant Search box at the top of the Inbox. By default, Outlook searches only the folder that you have open and startsdisplaying the results as soon as you type, automatically filtering out olderresults when there are a large number of items. The search results are displayed in the pane below the Instant Search box. To refine your search and get fewer results, typemore text. To cancel or clear a search, click the Clear Search X.Or, click Close Search located at the end of the Search Tools contextual tab. Most searches will probably be for Email messages but you can also use the Instant Search feature in Calendar, Contacts, Tasks,Notes, Folder Lists, and Journal. When you click in the Instant Search box, a Search Tools contextual tab will appear with additional options such as whichfolders to include, search for attachments, etc. Click the Recent Searches button in the Options group for a list of your 10 most recent searches. To open the Search Options dialog box and customize settings such as folders to be included, highlight color, etc., click File,Options, and then click Search. For additional information, click the Outlook Help buttonUsingMicrosoftLync inOutlookOne of the many features of Microsoft Lync is an instant messaging application that lets you type quickconversations back and forth with someone in your contacts. Note: If you don’t have Microsoft Lync installed on your office machine, refer to documentation on the DMACC Tech Supportwebsite: Tech Support Sign In Training Documents Office 365–Lync Lync 2013 Installation Instructions.To learn how to setup and use Lync, refer to additional documentation on Getting Started, Audio and Video Settings,Sharing and Collaboration, and Lync Meetings.To send an Instant Message to a Contact:1. Locate a contact’s name and view their online status. You can find names in an open Email message, a message window or the Reading Pane. An online status indicator appears next to the contact’s nameThis indicator tells you if the person is online, away, busy, or offline.2. Click the contact’s name to view their Contact Card.3.4.Outlook Basicsand search for Instant Search.Click the Send an instant message to buttonon the contactcard.Type a message in the window and press Enter. Hopefully the Contact will reply with a message. When the conversation isfinished, click the Close button.Go to www.dmacc.edu/helpdesk for additional Outlook 2013 information.Page 5 of 6
Miscellaneous (cont)Using Help andAdditionalResources For a specific topic, click the Outlook Help buttonon the Ribbon or press F1 to open the Help window. Type what youwant to search for in the Search/Help box. Press Enter. Items include Articles, Videos,and Training Tip: Try searching for ‘Oulook videos’. To browse popular searches or access additional documentation, videos, etc., click on a topic listed under Popularsearches, Getting started, or Basics and beyond. Check out the resources posted on the DMACC Tech Support website. www.dmacc.edu/helpdesk click Sign In button Training Documents Microsoft Office Outlook Calendar. Search for Outlook 2013 on www.youtube.com.Command ShortcutsContextualmenusA contextual menu displays a list of commands related to a specific object or area. To open a contextualmenu, right-click an object or area for a list of commands that are relevant to the object or area you haveclicked.Mini ToolbarThe Mini Toolbar appears when you select text in a new item window andcontains common text formatting commands. To display the Mini Toolbar,select text and then click the desired command from the Mini Toolbar.Key TipsKey Tips are tiny letters and/or numbers, called badges, that appear on theQuick Access Toolbar and all of the tabs on the Ribbon. Press the Alt keyfor them to appear or disappear.KeystrokeshortcutsA keystroke shortcut is an easy way to give a command and is performed by pressing a combination of keyson the keyboard. For a complete list of shortcuts, click the Outlook Help buttonand search forKeyboard shortcuts. This list can also easily be printed.Basic NavigationCommon CommandsCalendarPress Alt to display Key Tips.Right-click for a menu of commands toappear.Help --------------------------------------------- F1Switch to Mail --------------------------- Ctrl 1Switch to Calendar -------------------- Ctrl 2Switch to Contacts -------------------- Ctrl 3Switch to Tasks ------------------------ Ctrl 4Switch to Notes ------------------------ Ctrl 5Switch to Folder Listin Folder Pane ----------------------- Ctrl 6Switch to Shortcuts-------------------- Ctrl 7Switch to next message(with message open) ------------------ Ctrl PeriodSwitch to previous message(with message open)----------- Ctrl CommaIn the Reading Pane, goto the previous/nextmessage ------------- Alt Up/Down ArrowIn the Reading Pane, pagedown/up through text ---------- Spacebar orShift SpacebarMove between Panes ----------------- Tab orShift TabMove around within theFolder Pane --------------------- Arrow KeysExpand or collapse a Folderor group ----------- Right/Left Arrow KeysGo to a different folder -------------- Ctrl YGo to the Search box -------- F3 or Ctrl EClear the Search Results -----------------EscExpand Search to include all items withinselected folder (All Mail Items, All Calendar Items,etc.) --------------------------------- Ctrl Alt AUse Advanced Find -------- Ctrl Shift FSave (except in Tasks) -------------------- Ctrl SSave & Close --------------------------- Alt SCreate an Appointment (from anyOutlook view)---------------------- Ctrl Shift ACreate a MeetingRequest----------------------- Ctrl Shift QSet up Recurrence for OpenAppointment or Meeting -------------Ctrl GForward Appointmentor Meeting------------------------------- Ctrl FReply to a Meeting Requestwith a Message ------------------------ Ctrl RReply All to a Meeting Requestwith a Message ------------- Ctrl Shift RShow 10 Days in the Calendar ----- Alt 0Show [x] Days in theCalendar ------------------------------- Alt [x]Go to a Date ----------------------------Ctrl GSwitch to Month View ----------------- Alt Switch to Full Week View ------------- Alt Switch to Work Week View -- Ctrl Alt 2Go to Next/PreviousDay ---------------- Ctrl Right/Left ArrowsGo to Next/PreviousWeek ---------------- Alt Down/Up ArrowsGo to Next/PreviousMonth ------------------ Alt Page Down/UpGo to Start of Week ------------- Alt HomeGo to End of Week ---------------- Alt EndGo to PreviousAppointment ------------------- Ctrl CommaGo to Next Appointment ------Ctrl PeriodOutlook Basics(except in Mail)Save As (only in Mail) --------------------------F12Preview and Print --------------------- Ctrl PUndo ------------------------------------- Ctrl ZMove an item----------------- Ctrl Shift VCopy an item ----------------- Ctrl Shift YCheck Spelling-------------------------------- F7Address Book ---------------- Ctrl Shift BNew Item (item created depends uponcurrent View: Mail, Calendar, People, etc.)---- Ctrl NAdd Quick Flag to UnopenedMessage -----------------------------------InsertDisplay Flag for Follow UpDialog box -------------------- Ctrl Shift GMailSwitch to Inbox --------------- Ctrl Shift ICreate a Message (from anyOutlook view) ---------------------Ctrl Shift MCheck Names -------------------------- Ctrl KSend-------------------------------------- Ctrl SReply ------------------------------------- Ctrl RReply to All ------------------- Ctrl Shift RReply with MeetingRequest --------------------------Ctrl Alt RForward a Message ------------------ Ctrl FForward as Attachment------- Ctrl Alt FCheck for Mail -------------------------------- F9Open a Received Message -------- Ctrl OMark as Read -------------------------- Ctrl QMark as Unread ----------------------- Ctrl UDelete Message ----------------- Delete KeyPeople & TasksCreate a Contact ------------ Ctrl Shift CCreate a Contact Group -- Ctrl Shift LCreate a Task ---------------- Ctrl Shift KGo to www.dmacc.edu/helpdesk for additional Outlook 2013 information.Page 6 of 6
Outlook 2013 Screen I An item is a basic element that holds information in Outlook. Each message, appointment, contact, contact group, task, or note is an item. An Outlook folder is designed to hold different types of items: Mail, Calendar, People, Tasks, Journal, Notes. For easy access to Outlook at any time, drag the Outlook icon onto the .