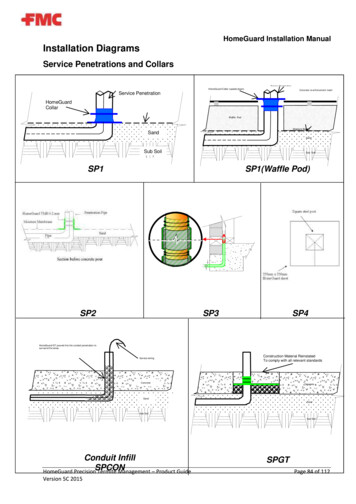
Transcription
HomeGuard Precision Termite ManagementHomeGuard Blue InstallationSupplementThis manual is and will remain the property of FMC Australasia Pty Ltd. No part of this manual can becopied and/or reproduced without the written permission of FMC Australasia Pty Ltd. FMC Australasia Pty Ltd 2007 FMC, HomeGuard are registered trademarks of FMC Corporation, Philadelphia, USA.Sheet Patent Pending Number- 2005901087CSIRO Building approval Number 323APVMA Registration approvals 59621, 60988, 60989 and 61290HomeGuard Collars Patent No.14520/2005 to 14523/2005HomeGuard TMB – Product GuideVersion 2 -2006Page 1 of 19
INTRODUCTIONHomeGuard Blue is a single impregnated sheet, 0.25mm thick Termite Moisture Barrierthat has recently been added to the HomeGuard Range of products. HomeGuard Blue isspecifically designed as a cost effective perimeter cavity termite barrier system and is tobe used in combination with the existing components in the HomeGuard Precision TermiteManagement System.Under the Australian Standard AS3660.1 Termite Management Part 1: New building workHomeGuard Blue is classified as a termite barrier in a non-soil matrix and can be utilisedas a chemical and/or a physical Termite Management System meeting the ‘PerformanceAppraisal’ requirements of the Building Code of Australia (BCA).HomeGuard Blue is a 0.25mm Termite Moisture Barrier that is designed forinstallation in the perimeter cavity. In accordance with AS 2870 the installation of anadditional commercial damp proof course is required on top of the HomeGuardBlue sheet.HomeGuard Blue Sheet.HomeGuard Blue 0.25mm roll 50M *0.3MHomeGuard Blue embossedsurfaceHomeGuard Blue comes with the same quality and certification that isalready expected from the HomeGuard family of products and should beused in combination with other components of the HomeGuard precisionTermite management System. Used in a combination with HomeGuardCollars HomeGuard Blue is also backed by the standard HomeGuardwarranty.* Refer to conditions and limits of the HomeGuard warrantyHomeGuard Collars.HomeGuard TMB – Product GuideVersion 2 -2006Page 2 of 19
Perimeter Cavity installations of HomeGuard Blue with a separate DPCPerimeter Cavity installations using HomeGuard Blue – is only installed as a termitebarrier system in the perimeter cavity with a separate standard Damp Proof Courseinstalled above the Termite Barrier for AS 2870 compliance.HomeGuard should be set to the top of the slab edge using 15mm concrete clouts withwashers horizontally across the perimeter cavity to extend to the outer edge of the firstcourse of bricks. The HomeGuard Blue TMB must be securely pinned to the slab with thebottom plate timbers or the first course of inner bricks.Note:An additional Damp Proof Course should be installed above the HomeGuard Blue TMB to complywith building codes in accordance with AS 2780.Penetration Collars can be constructed using HomeGuard Blue. Refer to the HomeGuardmanual and follow the steps for using TMB 0.2mm.(Refer to specific installation drawings for more details.)Timber/brickFaceBrickDPCHomeGuardTMB Blue75mmminHomeGuard TMB – Product GuideVersion 2 -2006FGLPage 3 of 19
Perimeter cavity detail – single rebate (PCB1)In all cases it is important that the finished ground level is at least 75mm away from theHomeGuard Blue joint within the external masonry wall. In all cases where a separateBuilders DPC is being installed it is to be installed above the HomeGuard Blue TMB sheetand extend up the inside of the perimeter cavity and be pinned to the stud timbers in thetraditional way and according to AS 2780.HomeGuard Blue TMB sheet shall be affixed to the concrete slab using 15mm concreteclouts with washers spaced at a minimum of 30 cm. Ensure that the sheet passes fullyunder the bottom plate. The leading edge of the sheet should extend across the perimetercavity and tie into the external brickwork below the builders DPC.A minimum fall of 75mm is needed between the top of the damp course and the weepholes in the external brick face.Timber/BrickFaceBrickDPCHomeGuardTM B Blue75mmminFGLPerimeter cavity detail – single rebate (PCB1)HomeGuard TMB – Product GuideVersion 2 -2006Page 4 of 19
Perimeter cavity detail – multi rebate (PCB2)The paragraph below refers to construction drawings PCB2 and PCB2 (South Australia).In all cases it is important that the finished ground level is at least 75mm away from theHomeGuard Blue joint within the external masonry wall. In all cases where a separateBuilders DPC is being installed it is to be installed above the HomeGuard Blue sheet andextend up the inside of the perimeter cavity and be pinned to the stud timbers in thetraditional way and according to AS 2780.HomeGuard Blue sheet shall be affixed to the concrete slab using 15mm concrete cloutswith washers spaced at a minimum of 30 cm. Ensure that the sheet passes fully under thebottom plate. The leading edge of the sheet should extend across the perimeter cavityand tie into the external brickwork below the builders DPC.A minimum fall of 75mm is needed between the top of the damp course and the weepholes in the external brick face.Timber/BrickFace BrickDPCHomeGuardTMB Blue75mmminFGLPerimeter cavity detail – multi rebate (PCB2)HomeGuard TMB – Product GuideVersion 2 -2006Page 5 of 19
Perimeter cavity detail- multi rebate (PCB2) For South AustraliaUsing this method, HomeGuard Blue installation will require a slightly different cornerconstruction method; for instructions on this method, refer to the South Australian Cornerinstallation diagram below.Timber/BrickBrickworkDPCHomeGuardBlue TM B75mmminFGLHomeGuard TMB – Product GuideVersion 2 -2006Page 6 of 19
South Australian corner constructionExternal corner.(1)Cut a strip of HomeGuard Blue 300mm x 300mm.(2) Fold the square of sheet in half.(3) Cut 150mm to the centre of the square along the fold line.(1)(2)(3)300mm150mm300mm(4) Place this strip on the horizontal surface of the slab at the corner. Push one side of thecut flap up the horizontal side of the slab and lay the other side of the flap along the brickline and pin the sheet tightly into the corner so that the leading edge is pinned very tightinto the corner angle.HomeGuard TMB – Product GuideVersion 2 -2006Page 7 of 19
(5) Install HomeGuard Blue as normal until you get to the corner. Snip a 60mm cut at thetop of the corner and again at the bottom so that the HomeGuard Blue can be foldedround the corner. Pin HomeGuard Blue to the inside edge of the slab. Ensure that the holebetween the bottom strip and the perimeter Cavity material is covered and secure withpins and tape.60mmCorner OverlapCompleted External CornerHomeGuard TMB – Product GuideVersion 2 -2006Page 8 of 19
Internal corner.Bottom Plate Area of the slab is cut 60mm on the corner and the HomeGuard Blueis bent round the slab edge and fold on the brick line is pulled UP. Fold is then pinned inthe mortar line. No cutting of the DPC is required. DPC is then secured to the inner side ofthe slab. At all times ALL holes need to be patched.This installation still requires the HomeGuard Blue to be firmly secured under the bottomplate and in the mortar line. The use of a parging agent like Selleys All Clear can assistin the parging of the HomeGuard Blue to the concrete in the perimeter cavity. Any holescaused by miss fired pins should be patched with patches.This install is restricted to areas where the slab is poured with a pre formed rebate asfound in exposed slab constructions in SA. It is also suitable for 2 and 3 brick rebateinstalls where the conventional Home Guard corners are too bulky or buckle whencrossing the perimeter cavity at a 30 degree of 45 degree angle.Inner Corner FoldTape or Glue foldedsheet flat to existingsheet.Completed External and Internal Corner (South Australia)HomeGuard TMB – Product GuideVersion 2 -2006Page 9 of 19
Perimeter cavity detail - Render (BPC3)In all cases it is important that the finished ground level is at least 75mm away from theHomeGuard Blue joint within the external masonry wall. In all cases where a separateBuilders DPC is being installed it is to be installed above the HomeGuard Blue sheet andextend up the inside of the perimeter cavity and be pinned to the stud timbers in thetraditional way and according to AS 2780.HomeGuard Blue sheet should be affixed to the concrete slab using 15mm concreteclouts with washers spaced at a minimum of 30 cm. Ensure that the sheet passes fullyunder the bottom plate. The leading edge of the sheet should extend across the perimetercavity and tie into the external brickwork below the builders DPC.A minimum fall of 75mm is needed between the top of the damp course and the weepholes in the external brick face.Timber/BrickRenderBrickworkStrike JointDPCHomeGuardTMB Blue75mmminFGLPerimeter cavity detail - Render (BPC3)HomeGuard TMB – Product GuideVersion 2 -2006Page 10 of 19
Perimeter cavity detail - non-monolithic infill (BPC4)In all cases it is important that the finished ground level is at least 75mm away from theHomeGuard Blue joint within the external masonry wall. In all cases where a separateBuilders DPC is being installed it is to be installed above the HomeGuard Blue sheet andextend up the inside of the perimeter cavity and be pinned to the stud timbers in thetraditional way and according to AS 2780.HomeGuard Blue sheet shall be affixed to the concrete slab using 15mm concrete cloutswith washers spaced at a minimum of 30 cm. Ensure that the sheet passes fully under thebottom plate. The leading edge of the sheet should extend across the perimeter cavityand tie into the external brickwork below the builders DPC.A minimum fall of 75mm is needed between the top of the damp course and the weepholes in the external brick face.Timber/BrickFaceBrickDPCHomeGuard TMB Blue75mmFGLPerimeter cavity detail - non-monolithic infill (BPC4)HomeGuard TMB – Product GuideVersion 2 -2006Page 11 of 19
Perimeter cavity detail - Waffle pod (BPC5)In all cases it is important that the finished ground level is at least 75mm away from theHomeGuard Blue TMB joint within the external masonry wall. In all cases where aseparate Builders DPC is being installed it is to be installed above the HomeGuard BlueTMB sheet and extend up the inside of the perimeter cavity and be pinned to the studtimbers in the traditional way and according to AS 2780.HomeGuard Blue TMB sheet shall be affixed to the concrete slab using 15mm concreteclouts with washers spaced at a minimum of 30 cm. Ensure that the sheet passes fullyunder the bottom plate. The leading edge of the sheet should extend across the perimetercavity and tie into the external brickwork below the builders DPC.A minimum fall of 75mm is needed between the top of the damp course and the weepholes in the external brick face.Timber/BrickBrickworkDPCHomeGuardTMB Blue75mmminFGLWAFFLEPODPerimeter cavity detail - Waffle pod (BPC5)HomeGuard TMB – Product GuideVersion 2 -2006Page 12 of 19
Stiffened raft slab – with edge beam (BPC6)In all cases it is important that the finished ground level is at least 75mm away from theHomeGuard Blue TMB joint within the external masonry wall. In all cases where aseparate Builders DPC is being installed it is to be installed above the HomeGuard BlueTMB sheet and extend up the inside of the perimeter cavity and be pinned to the studtimbers in the traditional way and according to AS 2780.HomeGuard Blue TMB sheet shall be affixed to the concrete slab using 15mm concreteclouts with washers spaced at a minimum of 30 cm. Ensure that the sheet passes fullyunder the bottom plate. The leading edge of the sheet should extend across the perimetercavity and tie into the external brickwork below the builders DPC.A minimum fall of 75mm is needed between the top of the damp course and the weepholes in the external brick face. In most installations no additional Blue TMB materials areneeded.Timber/BrickHomeGuardTMB BlueDPCFGLStiffened raft slab – with edge beam (BPC6)HomeGuard TMB – Product GuideVersion 2 -2006Page 13 of 19
HomeGuard Blue – Corners.( Normal construction)Forming of corners is an integral component to the integrity of the HomeGuard PerimeterCavity System. HomeGuard Blue does not require any cutting to form the corners.(exceptfor South Australia). Care should be taken to ensure the complete and continuousinstallation of HomeGuard Blue sheet around the edge of the slab with no gaps in thefitted corners.Step 1Lay and affix HomeGuard Blue TMB sheet to the slab edge using concrete cloutswith washers spaced every 30 cm. Lay and fix the full perimeter installation on thehorizontal slab edge before attending to the corners.Concrete SlabSlab rebateHomeGuard Blue SheetSecure sheet onto the slab with clouts every 30cmStep 2Lift the internal edge on the corner so as to create an exposed envelope. Due tothe nature of the fold, one side of the folded sheet will be opened and requiretaping closed.Concrete SlabUse tape to seal the openingcaused by the fold. The sheet doesnot need to be cut anywhere.HomeGuard TMB – Product GuideVersion 2 -2006Page 14 of 19
Step 3Fold the taped edges a second time and secure to the existing barrier using tape or aspray adhesive.Concrete SlabSlab rebateHomeGuard Blue TMB SheetFold the sheeting aroundcorner. Tape the Foldopening with approved tapeor spray adhesive.Concrete SlabUse an approved FMC cloth tape orspray adhesive to keep the folds flatwith the rest of the barrier.HomeGuard TMB – Product GuideVersion 2 -2006Page 15 of 19
Face Brick – Detail (Mis1B)Timber FrameFace Bricksee detail75mmminHomeGuardDPC 0.5 mmFGLStrike Joint.If the thickness of the render exceeds 3mm a strike joint must be made during the brickingand rendering process to demote the HomeGuard Blue line. Modern bagging material lessthan 3mm in thickness does not require a strike joint.The finished ground level must be a minimum of 75 mm below the line.1.Formation of a strike joint during the bricking procedure to expose the edge ofthe HomeGuard Blue TMB sheet.2.Strike joint in finishedrendered wall to denote tHomeGuard BLUE TMBline.HomeGuard TMB – Product GuideVersion 2 -2006Page 16 of 19
Other applications.Refer to the HomeGuard manual for full details on the installation of the full HomeGuardrange of products or contact your local Area Manager or the HomeGuard Help line1800 066 355 for further information.Contact Phone numbersStateContactPhoneQLDChris Hill0407 483 941NSWTrent Giddings0411 717 663Vic / SATroy Dawson0417 648 064HomeGuard TMB – Product GuideVersion 2 -2006Page 17 of 19
Installation Diagrams – Perimeter Cavity with a Separate ce BrickFaceBrickDPCDPCHomeGuardTMB Blue75mmminHomeGuardTMB Blue75mmminDPCHomeGuardBlue TM BFGLFGL75mmminPCB1PCB2FGLPCB2 (South ckBrickworkFaceBrickBrickworkDPCHomeGuard TMB BlueDPCHomeGuardTMB BlueDPCHomeGuardTMB B5Timber/BrickHom eGuardTM B BlueDPCFGLPCB6HomeGuard TMB – Product GuideVersion 2 -2006Page 18 of 19
HomeGuard TMB – Product GuideVersion 2 -2006Page 19 of 19
HomeGuard Blue is classified as a termite barrier in a non-soil matrix and can be utilised as a chemical and/or a physical Termite Management System meeting the 'Performance Appraisal' requirements of the Building Code of Australia (BCA). HomeGuard Blue is a 0.25mm Termite Moisture Barrier that is designed for