Transcription
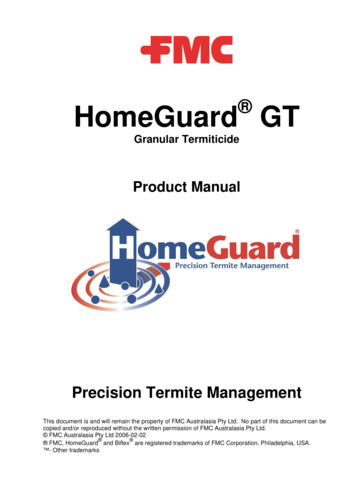
HomeGuard GTGranular TermiticideProduct ManualPrecision Termite ManagementThis document is and will remain the property of FMC Australasia Pty Ltd. No part of this document can becopied and/or reproduced without the written permission of FMC Australasia Pty Ltd. FMC Australasia Pty Ltd 2006-02-02 FMC, HomeGuard and Biflex are registered trademarks of FMC Corporation, Philadelphia, USA. - Other trademarks
Introduction to HomeGuard GTHomeGuard GT is another integral part of the HomeGuard system that should be used incombination with HomeGuard sheet and HomeGuard Collars. HomeGuard GT fitssituations where the installation of the traditional HomeGuard sheet products is not suitedto the building design under construction. The application of the granule suits constructionsituations where the voiding of cavity moisture is a key requirement as it facilitatesdrainage of cavity moisture while maintaining the integrity of the termite barrier. It is alsoideal in situations where the installation of HomeGuard Sheet is not possible because theframe of the structure has already been erected.The product is a novel plastic granule formulation containing 1 g/kg of bifenthrin. Thebifenthrin is distributed entirely throughout the plastic granule where it exhibits repellencyand insecticidal activity against all termite species. The granule does not exude bifenthrin,rather its activity is expressed throughout the polymer granule matrix.Polymer matrixused as a carrier.0.1% Bifenthrin is fullyimpregnated throughoutinto the GranuleUnder the Australian Standard AS3660.1 Termite Management Part 1: New building workHomeGuard is classified as a termite barrier in a non-soil matrix and can be utilised as achemical and/or a physical Termite Management System meeting the ‘PerformanceAppraisal’ requirements of the Building Code of Australia (BCA).HomeGuard GT provides robust protection of a structure via two actions: Kills termites upon contact Repels termites away from the barrierHomeGuard GT system componentsHomeGuard GT is used in specific situations as a perimeter cavity barrier. The productcan be used in combination with the other HomeGuard Precision Termite systemcomponents, which include the HomeGuard sheet products and HomeGuard Collars.HomeGuard GT can also be used as a stand-alone Perimeter cavity installation in somesituations. It is especially suitable for double brick constructions.
Installation instructions for Perimeter CavitiesThe following illustration diagrams indicate the most common situations whereHomeGuard GT can be installed in the perimeter cavity. The diagrams should be used asa guide to the correct installation of HomeGuard GT. HomeGuard GT form part of thetotal Precision Termite management system and integrate with the other components ofthe system. Penetrations should be installed with HomeGuard Collars while theHomeGuard sheet plays an important role in the Cover Strip on the outer masonry wall.2.1 Perimeter CavityA variety of perimeter cavity treatment options are available depending on the slab design.In all cases it is important that the finished ground level is at least 75mm below the toplevel of the HomeGuard GT and to ensure there is a 75mm inspection zone. In all casesthe HomeGuard GT perimeter treatment is required to be 75 mm deep in the perimetercavity. The installation should be in contact with the cover strip of HomeGuard sheetwhich is installed over the full width of the external brick. This will provide a continuousbarrier around the structure (refer to label). HomeGuard GT is suitable for all perimetercavity widths built in accordance with the Australian Standards requirements. Where GT isto be placed in the weep hole level, weep holes should be fitted with approved stoppersthat are available commercially, these will stop Granules flowing out of the cavity whilstallowing the voiding of cavity moisture and the circulation of air into the wall cavity. Thereare two varieties of stoppers available. One is built in with the new building and is installedwhen the bricks are being laid. The second option is to install the stopper into the weephole after the wall has been built and these fit into existing weep holes. For moreinformation on these commercially available stoppers contact the HomeGuard Help line.Figure 1: Schematic of typical perimeter cavity installation of Home Guard GT. Note minimum depth ofGranules is 75mm. The Barrier course can either be capped with a cover strip of DPC or BlueFigure 2: Top view of perimeter cavity showing HomeGuard GT installation with HomeGuard Bluecoversheet across outer brick. Note HomeGuard GT installed level with top of brick.
HomeGuard BlueCover StripHomeGuardGT at 75mmdeep
Installation of HomeGuard GT – Perimeter Cavity Once the first course of bricks have been laid, insert weep hole ‘pest stoppers’ to allweep holes around the cavity (if required) Check the perimeter cavity and remove obstructions (i.e. mortar slag) that maydisrupt the even depth of the granules Fill the cavity void with HomeGuard GT to the required depth of a minimum 75mm. Lay a cover strip (HomeGuard Blue or DPC) on top of the barrier course of bricks sothe sheet is in contact with the granules (110mm-150mm wide). All corners are to be constructed so the cover strip is continuous around theperimeter. Construct the corners using the HomeGuard Blue continuous cornertechnique. Use an approved adhesive to hold the Strip to the bricks Commercial Damp Proof Course can then be installedCommercialBuilders DPCFamealreadyerected.Concrete SlabHomeGuard Blue or DPC Cover StripPerimeter Cavity filled with HomeGuardGT.
Perimeter Cavity DetailsPerimeter cavity detail – single Rebate (GTPC1)Perimeter cavity detail – single Rebate (GTPC1)
Perimeter cavity detail – multi rebate (GTPC1) SAPerimeter cavity detail – multi rebate (GTPC1) SA
GT Penetration Changes (SP GT)Changing the location of the penetration after the slab has been poured will require reprotection. Use HomeGuard GT as follows (and see diagrams over page): Contact construction manager or builder prior to performing any installationsrequiring removal of construction materials (e.g. portions of concrete slab) Construction manager and / or builder is responsible for any cutting or removal ofconstruction materials Ensure that there will be sufficient depth to apply at least 40mm of GT and 40mm ofconcrete or Mortar When the base of the void is prepared, install the HomeGuard GT ensuring that allareas around the pipe are encompassed by the granules Install the GT to a minimum depth of 40mm Replace the HomeGuard collar in the correct position over the service penetration ormake a new sheet collar. Cut a piece of HomeGuard sheet large enough to cover the area of the GT(See step 2) Construction materials can now be reinstated. It is the responsibility of theconstruction manager or builder to ensure the structural integrity of the constructionmaterials is restored sufficiently to meet all relevant standards and building approvals. Ensure that any deep ‘over cuts’ from the concrete saw are either covered with apiece of HomeGuard sheet or filled with an approved selastic. A limited HomeGuard warranty applies for this procedure if the rest of the structurehas been installed with HomeGuard according to the manual.
STEPS FOR MOVING PENETRATIONS IN SET CONCRETE SLABS (SP GT)Service PenetrationHomeGuard Collar(or sheeting collar)SlabMoistureBarrierSandSTEP 1Sub SoilService Penetration MovedHomeGuard CollarHomeGuard SheetInstall HomeGuard GT at min 40mm depthSlabMoistureBarrierSandSTEP 2Sub SoilRe-instated Concrete slabSlabMoistureBarrierSandSTEP 3Sub Soil
Construction Cavities/ Expansion Joints/ Pipe RemovalConstruction CavitiesFor protection of voids in the slab which have been exposed due to certainconstruction types, follow the steps outlined below. Make sure that the cavity is free from any obstructions which may hinder theflow or settlement of the granules. When the cavity is prepared, install the HomeGuard GT making sure that it fillsthe cavity up to the level of the slab’s base (minimum 40mm). Once this is done, cut a piece of HomeGuard Sheet to cover the area of thecavity. Replace the HomeGuard collar or make a new sheet collar over the servicepenetration (if required).Above and Left: Using GT for retro protection of service pipes.
GT Conduit VoidlTo safeguard against termites from entering a structure through cabling conduit, pourHomeGuard GT granules into the conduit following the steps set out below. For thisprocess, it is advisable to communicate with the builder and electrician for safety andtiming purposes. Ensure that there are no ‘live’ electricity cables exposed near the conduit. Ensure that there are no more cables to be pulled through that particularconduit Make sure the cable for the treatment conduit has been pulled through and hasbeen left exposed and accessible. Using a funnel, pour GT down the opening of the conduit until it nearly reachesthe top of the opening. Gently tap the conduit to settle the granules.Service wiringHomeGuard GT poured intothe conduit penetration tosurround the wiresHomeGuard CollarConcrete Slab FloorMoistureBarrierSandSub Soil
HomeGuard GT is used in specific situations as a perimeter cavity barrier. The product can be used in combination with the other HomeGuard Precision Termite system components, which include the HomeGuard sheet products and HomeGuard Collars. HomeGuard GT can also be used as a stan