Transcription
GS1 Healthcare Barcode Scanner 4.4Quick Guidev1.2, Approved, September 2021Support: hds-support@gs1hu.org
GS1 Healthcare Barcode Scanner Quick GuideSupport: hds-support@gs1hu.orgDocument SummaryDocument ItemCurrent ValueDocument NameGS1 Healthcare Barcode Scanner - Quick GuideDocument DateSeptember 2021Document Version1.2Document Issue1Document StatusApprovedDocument DescriptionGS1 Healthcare Barcode Scanner Quick GuideContributorsNameOrganizationTania SniochGS1 Global OfficeZsolt BócsiGS1 HungaryEdit AignerGS1 HungaryTibor JavellákGS1 HungaryTibor GottdankGS1 HungaryLog of ChangesReleaseDate of ChangeChanged BySummary of Change1.029.03.2019Tania Snioch, Zsolt BócsiUpdate for version 4.x1.110.07.2020Tibor Gottdank, Zsolt BócsiUpdates, text edit1.214.09.2021Tania Snioch, Zsolt Bócsi, Tibor GottdankUpdates for version 4.4DisclaimerGS1 , under its IP Policy, seeks to avoid uncertainty regarding intellectual property claims by requiring the participants inthe Work Group that developed this GS1 Healthcare Barcode Scanner Quick Guide to agree to grant to GS1 members aroyalty-free licence or a RAND licence to Necessary Claims, as that term is defined in the GS1 IP Policy. Furthermore, attentionis drawn to the possibility that an implementation of one or more features of this Specification may be the subject of a patentor other intellectual property right that does not involve a Necessary Claim. Any such patent or other intellectual propertyright is not subject to the licencing obligations of GS1. Moreover, the agreement to grant licences provided under the GS1 IPPolicy does not include IP rights and any claims of third parties who were not participants in the Work Group.Accordingly, GS1 recommends that any organization developing an implementation designed to be in conformance with thisSpecification should determine whether there are any patents that may encompass a specific implementation that theorganisation is developing in compliance with the Specification and whether a licence under a patent or other intellectualproperty right is needed. Such a determination of a need for licencing should be made in view of the details of the specificsystem designed by the organisation in consultation with their own patent counsel.THIS DOCUMENT IS PROVIDED “AS IS” WITH NO WARRANTIES WHATSOEVER, INCLUDING ANY WARRANTY OFMERCHANTABILITY, NONINFRINGMENT, FITNESS FOR PARTICULAR PURPOSE, OR ANY WARRANTY OTHER WISE ARISINGOUT OF THIS SPECIFICATION. GS1 disclaims all liability for any damages arising from use or misuse of this Standard, whetherspecial, indirect, consequential, or compensatory damages, and including liability for infringement of any intellectual propertyrights, relating to use of information in or reliance upon this document.GS1 retains the right to make changes to this document at any time, without notice. GS1 makes no warranty for the use ofthis document and assumes no responsibility for any errors which may appear in the document, nor does it make acommitment to update the information contained herein.GS1 and the GS1 logo are registered trademarks of GS1 AISBL.v1.2, Approved, August 2021 2021 GS1 AISBLPage 2 of 29
GS1 Healthcare Barcode Scanner Quick GuideSupport: hds-support@gs1hu.orgTable of Contents1Introduction . 42Registration . 43General overview of the system. 54Mobile application . 64.14.25HBS on iOS . 74.1.1Login . 74.1.2Mode selector . 74.1.3Settings . 84.1.4Create new records - Manual input and scan . 94.1.5History . 124.1.6Digital Link mode . 12HBS on Android . 144.2.1Login . 144.2.2Mode selector . 144.2.3Settings . 154.2.4Create new records - Manual input and Scan . 164.2.5History . 194.2.6Digital Link mode . 20The GS1 Healthcare Barcode Scanner website . 215.1Registration, Login, Forgotten password. 215.2List and Record details . 225.2.15.35.4Statistics . 265.4.15.5Record details . 22Survey . 24Dashboard . 26Administration . 28v1.2, Approved, August 2021 2021 GS1 AISBLPage 3 of 29
GS1 Healthcare Barcode Scanner Quick GuideSupport: hds-support@gs1hu.org1IntroductionThis document is a short guideline on how to use the GS1 Healthcare Barcode Scanner (HBS).This guide is for the application version 4.4.Should you have any questions related to the mobile or web application, do not hesitate to contact usat hds-support@gs1hu.org.2RegistrationRegistration websites are available on the following URL:https://hbsa.gs1.org/Registration process:1. Fill out the User registration form on the website and click Register.2. If you cannot find your company in the Company/MO list, go to the Company registrationpage and register your company first.3. After completing the User registration form, an email will be sent to your account. Clickon the activation link received from HBS Support. (If you wish to be your company’sSupervisor, you can select this option during your registration process.The Supervisor is responsible for creating surveys in the app and assigning users to thesesurveys. If you elect to be the Supervisor for your organisation and one already exists, youwill be advised at the completion of your registration.4. The HBS system administrator will review your data. You will receive a notification mail whenyour registration is completed.5. Once you receive the notification email about the approval of your registration, you can loginto the mobile application and website.If you wish to identify the supervisor from your company, please check the Contacts menu on thewebsite (available after login) to see the details of this person. If there is no supervisor at yourcompany, please contact hds-support@gs1hu.org and we will work with you to have a supervisornominated.v1.2, Approved, August 2021 2021 GS1 AISBLPage 4 of 29
GS1 Healthcare Barcode Scanner Quick GuideSupport: hds-support@gs1hu.org3General overview of the systemThe GS1 Healthcare Barcode Scanner is a system composed of three main components.1. Mobile application with the following main functions: Barcode scanning (or entering barcode content manually) Checking encoding of barcodes and 2D codes against the rules of GS1 GeneralSpecifications Creating records by adding extra information to the scanned barcode (e.g. scan time,scan location, product category, images, comments etc.) Grouping records into surveys Uploading records to the cloud-based server (therefore making them available on theHBS website) Retrieving the history of the uploaded records GS1 Digital Link: accessing one or more pieces of digital information about items viascanning barcodes2. Cloud-based server to store the uploaded records and manages user rights. It is connectedboth to the mobile application and website.3. Website with the following main functions: Company and user registration Retrieving the history of the uploaded records, applying filters Survey management Retrieving statistical information based on uploaded records Export images into .zip file Export records into CSV (Excel)v1.2, Approved, August 2021 2021 GS1 AISBLPage 5 of 29
GS1 Healthcare Barcode Scanner Quick GuideSupport: hds-support@gs1hu.org4Mobile applicationThe mobile application is available on iOS and Android. This can be downloaded from AppStore orGoogle Play.Note: Because of the specialties (e.g. UI design principles) of the Android and iOS operation systems,the screens of HBS application running on these two platforms slightly differ. For this reason,we are presenting the usage of the application on Android and iOS platforms in separatesubchapters.v1.2, Approved, August 2021 2021 GS1 AISBLPage 6 of 29
GS1 Healthcare Barcode Scanner Quick GuideSupport: hds-support@gs1hu.org4.1HBS on iOS4.1.1LoginUse GS1 Healthcare Barcode Scanner with your own account: login name(email address) and private password, then click the Sign in button.Note: At first login, a disclaimer appears that must be accepted inorder to use the application: ’To verify the physical parametersof your GS1 barcode, for example x-dimension, height, printquality, please contact your local GS1 Member Organisation.’Note: To stay logged in select the ‘slider button’ on the right of thescreen.4.1.1.1 Forgotten passwordIf you have forgotten your password, you can recover it using the Lost yourpassword? function on the Login screen.4.1.2Mode selectorAfter login there is a mode selector for the application. You can choose thefollowing modes: Check mode Survey mode Demo survey mode Digital link modeIn Check mode you can scan and check the encoding of barcodes against theGS1 General Specifications one by one then upload them to the HBS server.In Survey mode you can group together records which are scanned at aspecific site. There are 3 other values which you can set to each scan: Packaging level Product category Internal codeFor more information on how to set up a survey, please see section 4.3In Survey demo mode all the features of the Survey mode are availableexcept the Upload function. In this mode you can try the Survey mode withoutuploading the survey records to the website.In Digital Link mode you can scan a GS1 barcode (e.g., attached to apharmaceutical or medical device) and access one or more pieces of digitalinformation about that item. (The user connects, via a Digital link resolver, to the target digital content.)v1.2, Approved, August 2021 2021 GS1 AISBLPage 7 of 29
GS1 Healthcare Barcode Scanner Quick GuideSupport: hds-support@gs1hu.org4.1.3SettingsBefore you start scanning barcodes, please carefully check the Settings and make any necessary changes.Choose from the list the Check Mode,Survey Mode, Survey Demo Mode orDigital Link Mode.You can choose product category here from thedropdown list. This is then set as the default forall products scanned, unless changed.Select On and you do not have to log in eachtime you launch the application.Select On to use theauthentication and login.TouchIDforChoose your Language from the drop-down list.You can find a list of Scanning environments.Set your Default location.Select On and the app automatically takes animage of the barcode you are scanning.Choose between 20, 40 or 80 rows per page.All the photos you attach to the records arecached on the mobile device. You can clear thecache with this button.Choose a Digital Link resolver.Note: Scanning environments are based on the GS1 General Specifications. The default value ofscanning environment set in the application is Regulated healthcare trade items.Note: An additional feature of mobile application is the possibility to send a report about a barcodethat is not encoded in line with GS1 standards from the user to the relevant GS1 MO supervisorvia email. This operation can be performed if the status of the scan is ‘Non-standard’, and thescan contains at least one GS1 ID Key.v1.2, Approved, August 2021 2021 GS1 AISBLPage 8 of 29
GS1 Healthcare Barcode Scanner Quick GuideSupport: hds-support@gs1hu.org4.1.4Create new records - Manual input and scanIn order to create a new record, chooseon the History screen, thenclick on the barcode in the centre of the New record screen.You can add one or more barcodes to the record manually (by clicking theEnter code button) or via scanning (by clicking the Scan button) on thebottom of the screen. This is an important function in survey mode whenthere are multiple barcodes on a product.To finish a record, select Save.Manual input is used if the barcode won’t scan. In case of manual input, first you must select the symbol type,then type in the data content. If you need to enter multiple data elements (AIs), the process is the following:1. Select AI (Application Identifier), if applicable (e.g. there is no need to enter an AI in case of EAN/UCCsymbols).2. Click into the Code field on the right of the selected AI.3. Enter code for the AI.4. Click the Add AI button at the bottom of the screen.5. Select the next AI.6. In case you entered all the necessary data elements (AIs data), click the Save button.v1.2, Approved, August 2021 2021 GS1 AISBLPage 9 of 29
GS1 Healthcare Barcode Scanner Quick GuideSupport: hds-support@gs1hu.orgYou can delete the entered barcode by using the swipe left function.You can change the following settings on the New record screen: In Check mode: scanning environment and product category can be modified. In Survey mode and Demo mode: scanning environment, product category and packaging levelcan be modified.Note: Changes made in the New Record screen apply the settings above only to the current record.For a permanent setting changes, see the Settings menu.v1.2, Approved, August 2021 2021 GS1 AISBLPage 10 of 29
GS1 Healthcare Barcode Scanner Quick GuideSupport: hds-support@gs1hu.orgYou can add maximum three photos and one comment to each record by clicking on the icons at the top rightcorner of the New record screen.In Survey mode you can add an internal code to the record by clicking on the arrow at the bottom left cornerof the screen.You can save the record on the device for future batch upload (click Save button) or you can upload itimmediately by clicking Upload button. You can cancel the current record by clicking Cancel button.Note: To record a product with no barcode, go to the new record screen, add a comment or maximum3 photos and Save or Upload your record.If the scanned barcode is not in line with the GS1Standards, you can advise the GS1 MemberOrganisation that issued the global company prefixcontained in the GS1 barcode about encoding issues.Pressing the Send report button, an email(containing your contact email address for morinformation), will be sent to the relevant GS1member Organisation.v1.2, Approved, August 2021 2021 GS1 AISBLPage 11 of 29
GS1 Healthcare Barcode Scanner Quick GuideSupport: hds-support@gs1hu.org4.1.5HistoryThe History screen is the main screen of the application. This is what is displayed after a successful scan, andfrom this menu creating a new record or adjusting settings can be initiated.Click here to filter the list of records.If the record is reported to the relevant MO,the report icon changes to blue. Otherwise,it is grey.If the record has a comment, the commenticon changes to blue. Otherwise, it is grey.If an image is attached to the record, thecamera icon changes to blue. Otherwise, itis greyShows if the record was made in Normal orin Survey mode.The History function is a chronological list of earlier created records. Here the user can also apply filters thathelp us narrowing the list accordingly.You can switch between the list of uploaded records and the list of the records waiting for upload at the top ofthe History screen.The records waiting for upload are editable – you can delete them (swipe) or you can click on the record andyou will get to the New record screen to make any edits.The records already uploaded to the server cannot be edited, but you can add new photos and comments.4.1.6Digital Link modeThe GS1 Digital Link enables access to digital content by scanning a GS1 barcode. The Digital Link mode isdesigned to demonstrate how Digital Link works. In Digital Link mode you can scan a GS1 barcode (e.g.,v1.2, Approved, August 2021 2021 GS1 AISBLPage 12 of 29
GS1 Healthcare Barcode Scanner Quick GuideSupport: hds-support@gs1hu.orgattached to a pharmaceutical or medical device) and access one or more pieces of digital information aboutthat item.As a first step, select the Resolver through which the item information is to be accessed. Use the Digital Linkaccess settings. To learn more about how to connect to a Digital Link Resolver see the following viceIn order to get information about an item, scan a GS1 barcode (e.g. GS1 Data Matrix) by tapping on the Scanbutton. If information is available on the Resolver server, the app will display the list of URLs where the differenttypes of item information (e.g. product data, traceability information, related documents etc.) are available.v1.2, Approved, August 2021 2021 GS1 AISBLPage 13 of 29
GS1 Healthcare Barcode Scanner Quick GuideSupport: hds-support@gs1hu.org4.2HBS on Android4.2.1LoginUse GS1 Healthcare Barcode Scanner with your own account: login name (emailaddress) and private password, then click the Sign In button.Note: At first login, a disclaimer appears that must be accepted in order touse the application: ’To verify the physical parameters of your GS1barcode, for example x-dimension, height, print quality, pleasecontact your local GS1 Member Organisation.’Note: To stay logged in select the ‘slider button’ on the right of the screen.4.2.1.1 Forgotten passwordIf you have forgotten your password, you can recover it using the Forgot password?function on the Login screen.4.2.2Mode selectorAfter loginmodes: there is a mode selector for the application. You can choose the followingCheck modeSurvey modeSurvey demo modeDigital link modeIn Check mode you can scan and check the encoding of barcodes against the GS1General Specification one by one then upload them to the HBS server.In Survey mode you can group together records which are scanned at a specific site.There are 3 other values which you can set to each scan: Packaging level Product category Internal codeFor more information on how to set up a survey, please see section 4.3In Survey demo mode all the features of the Survey mode are available exceptthe Upload function. In this mode, you can try the Survey mode without uploadingthe survey records to the website.In Digital link mode you can scan a GS1 barcode (e.g. attached to a pharmaceuticalor medical device) and access one or more pieces of digital information about thatitem. (The user connects, via the Digital link resolver, to the nominated digital content.)v1.2, Approved, August 2021 2021 GS1 AISBLPage 14 of 29
GS1 Healthcare Barcode Scanner Quick GuideSupport: hds-support@gs1hu.org4.2.3SettingsBefore you start scanning barcodes, please carefully check the Settings and make any necessary changes.Choose from the list the Check Mode,Survey Mode, Survey Demo Mode orDigital Link Mode.You can choose product category here fromthe dropdown list. This is then set as thedefault for all products scanned, unlesschanged.Select On and you do not have to log in eachtime you launch the application.Choose your Language from the drop-down list.See a list of Scanning environments.Set your Default location.Select On and the app automatically takes animage of the barcode you are scanning.Choose between 20, 40 or 80 rows per page.Choose a Digital Link resolver URLNote: Scanning environments are based on the GS1 General Specifications. The default value ofscanning environment set in the application is Regulated healthcare trade items.Note: An additional feature of the mobile application is the possibility to send a report about a barcodethat is not encoded in line with GS1 standards from the user to the relevant GS1 MO supervisorvia email. This operation can be performed if the status of the scan is ‘Non standard’, and thescan contains at least one GS1 ID Key.v1.2, Approved, August 2021 2021 GS1 AISBLPage 15 of 29
GS1 Healthcare Barcode Scanner Quick GuideSupport: hds-support@gs1hu.org4.2.4Create new records - Manual input and ScanIn order to create a new record, choosescreenon the History screen, then click Scan button on the New recordYou can add one or more barcodes to the record manually (by clicking the Enter button) or via scanning (byclicking the Scan button). This is an important function in Survey mode when there are multiple barcodes ona product.To finish a record, select Save.Manual input is used if the barcode won’t scan. In case of manual input, first you must select the symbol type,then type in the data content.If you need to enter multiple data elements (AIs) the process is the following:1. Select AI (Application Identifier), if applicable (e.g. there is no need to enter an AI in case of EAN/UCCsymbols).2. Tap into the Code field on the right of the selected AI.3. Enter code for the AI.4. Click thebutton at the bottom of the screen.5. Select the next AI.In case you entered all the necessary data elements (AIs data), click the button at the top left corner ofthe screen.v1.2, Approved, August 2021 2021 GS1 AISBLPage 16 of 29
GS1 Healthcare Barcode Scanner Quick GuideSupport: hds-support@gs1hu.orgYou can delete the entered barcode by using the swipe left function.You can change the following settings on the New record screen: In Check mode: scanning environment and product category can be modified. In Survey mode and Demo mode: scanning environment, product category and packaging levelcan be modified.Note: Changes made in the New Record screen apply settings above only to the current record. Fora permanent setting changes, see the Settings menu.You can add maximum three photos and one comment to each record.In Survey mode you can add an internal code to the record by tapping on the Internal code icon.You can save the record on the device for future batch upload (click Save button) or you can upload itimmediately by clicking the Upload button.Note: To record a product with no barcode, go to the new record screen, add a comment or maximum3 photos and Save or Upload your record.v1.2, Approved, August 2021 2021 GS1 AISBLPage 17 of 29
GS1 Healthcare Barcode Scanner Quick GuideSupport: hds-support@gs1hu.orgAdd maximum three photos to the record.Add a maximum of one comment to each record.Save the record for future (batch) upload.Upload the record immediately to the server.Add further barcodes to the record manually.Add further barcodes to the record by scanning.If the scanned barcode is not in line with the GS1Standards, you can advise the GS1 MemberOrganisation that issued the global company prefixcontained in the GS1 barcode about encoding issues.Pressing the Send report button, an email(containing your contact email address for morinformation), will be sent to the relevant GS1member Organisation.v1.2, Approved, August 2021 2021 GS1 AISBLPage 18 of 29
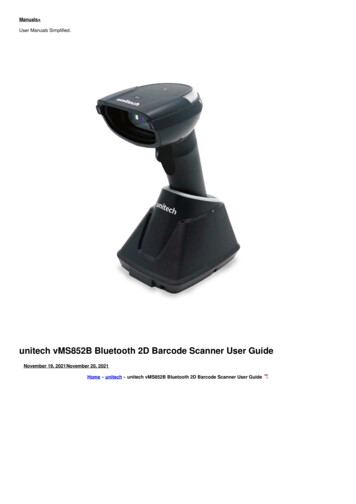
GS1 Healthcare Barcode Scanner Quick GuideSupport: hds-support@gs1hu.org4.2.5HistoryThe History screen is the main screen of the application. This is what is displayed after a successful scan, andfrom this menu creating a new record or adjusting settings can be initiated.The History function is a chronological list of earlier created records. Here the user can also apply filters thathelp us narrowing the list accordingly.Click here to filter the list of records.If the record is reported to the relevant MO,the report icon changes to blue. Otherwise,it is grey.If the record has a comment, the icon changes toblue. Otherwise, it is grey.If any image is attached to the record, the cameraicon changes to blue. Otherwise, it is greyShows if the record was made in Normal mode orin Survey mode.You can switch between the list of uploaded records and the list of the records waiting for upload at the top ofthe History screen.The records waiting for upload are editable – you can delete them (swipe) or you can click on the record andyou will get to the New record screen to make any edits.The records already uploaded to the server cannot be edited, but you can add new photos and comments.v1.2, Approved, August 2021 2021 GS1 AISBLPage 19 of 29
GS1 Healthcare Barcode Scanner Quick GuideSupport: hds-support@gs1hu.org4.2.6Digital Link modeThe GS1 Digital Link enables access to digital content by scanning a GS1 barcode. The Digital Link mode isdesigned to demonstrate how Digital Link works. In Digital Link mode you can scan a GS1 barcode (e.g.,attached to a pharmaceutical or medical device) and access one or more pieces of digital information aboutthat item.As a first step, select the Resolver through which the item information is to be accessed. Use the Digital Linkaccess settings. To learn more about how to connect to a Digital Link Resolver see the following viceIn order to get information about an item, scan a GS1 barcode (e.g. GS1 Data Matrix) by tapping on the Scanbutton. If information is available on the Resolver server, the app will display the list of URLs where the differenttypes of item information (e.g. product data, traceability information, related documents etc.) are available.v1.2, Approved, August 2021 2021 GS1 AISBLPage 20 of 29
GS1 Healthcare Barcode Scanner Quick GuideSupport: hds-support@gs1hu.org5The GS1 Healthcare Barcode Scanner websiteHBS users can view the history of their uploaded record, record details, check result details (validation againstGS1 General Specifications), record images and comments on the GS1 Healthcare Barcode Scanner website.In addition, company supervisors can create and manage surveys on the website.The website is accessible on the following URL: https://hbsa.gs1.org/5.1Registration, Login, Forgotten passwordYou can sign into the GS1 Healthcare Barcode Scanner website with your own login name and password. Ifyou have forgotten your password, you can use the Forgot your password? link to ask a new password.Note: At first login, a disclaimer appears that must be accepted in order to use the application: ’Toverify the physical parameters of your GS1 barcode, for example x-dimension, height, printquality, please contact your local GS1 Member Organisation.’v1.2, Approved, August 2021 2021 GS1 AISBLPage 21 of 29
GS1 Healthcare Barcode Scanner Quick GuideSupport: hds-support@gs1hu.org5.2List and Record detailsRecords from history cannot be modified on List page, but the records created out of Survey mode can bedeleted within 48 hours after creation. You can also use dynamic filtering and other functions like record details,gallery and record delete.It is possible to export the images related to the list of records (Export images) or export the list of recordsas CSV (Export list as CSV).5.2.1Record detailsThe Record details view can be accessed from Record history. It shows all available information organisedinto groups: GSLib details Scanning Location Commenting Survey Attached Imagesv1.2, Approved, August 2021 2021 GS1 AISBLPage 22 of 29
GS1 Healthcare Barcode Scanner Quick GuideSupport: hds-support@gs1hu.orgRecord filtering can be performed in Basic or Advanced modev1.2, Approved, August 2021 2021 GS1 AISBLPage 23 of 29
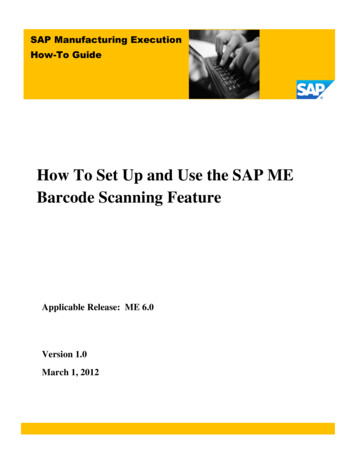
GS1 Healthcare Barcode Scanner Quick GuideSupport: hds-support@gs1hu.org5.3SurveyThe app is used in Survey mode to conduct surveys, scan hundreds of barcodes, add pictures and send theinformation to the administration website where records are available for further statistics and analysis.Note: The Survey menu is only available for Supervisor users.In order to create a survey, the Supervisor needs to provide survey data by the Add new survey function.After creating a survey, the supervisor can add users to the given survey by the Edit function.In Survey details window, the Supervisor can set survey name, survey description and clear date. Supervisorcan also add new user not only from own company but from other companies by adding user email address.Note: The deadline for deleting records is the closing date of the survey set by theSupervisor. Other records, created out of Survey mode, can be deleted within 48 hoursafter creation.v1.2, Approved, August 2021 2021 GS1 AISBLPage 24 of 29
GS1 Healthcare Barcode Scanner Quick GuideSupport: hds-support@gs1hu.orgOnly those users can participate in a survey who are in the list of Survey users.The compa
GS1 Healthcare Barcode Scanner Quick Guide Support: hds-support@gs1hu.org v1.2, Approved, August 2021 2021 GS1 AISBL Page 5 of 29 3 General overview of the system The GS1 Healthcare Barcode Scanner is a system composed of three main components. 1. Mobile application with the following main functions: