Transcription
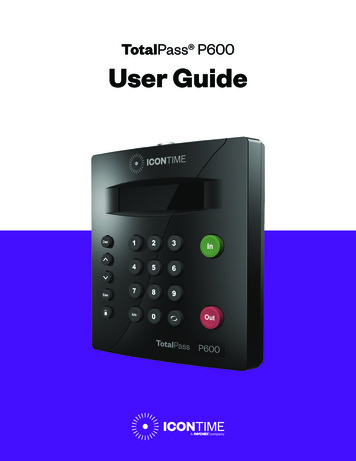
TotalPass B600User Guide
Copyright 2020 Icon Time. All rights reserved.Reproduction of this document in whole or in part is strictly prohibited. This document may containtypographical or copy errors. TotalPass, Icon Time, the Icon Time logo, and all other Icon Timeproduct names mentioned in this document are registered trademarks of Icon Time.Icon Time9000 SW Gemini Drive, Bldg. 8Beaverton, OR 97008Contact Support: 1-800-847-2232 #1Contact Sales: 1-800-847-2232 #3www.icontime.com
Table of ContentsChapter 1: Getting Familiar with Your Time Clock. 8Welcome .8System Requirements.8Features .9Available Totalpass Upgrades .9Connection/Setup .10Logging In.10Support and Troubleshooting .10Integration with Payroll .10Register Your Time Clock .10Navigating the Time Clock Software .10Home Page.11Lists Menu .11Reports Menu .11Payroll Menu .12Files Menu.12Settings Menu .12Help Menu .12Chapter 2: Setting Your Time Clock Preferences.13Setting Your Pay Preferences . 13Setting Your Overtime Preferences . 14Enhanced Overtime Preferences . 14Setting Your Punch Preferences . 15Setting Employee Input Preferences . 16Setting Your Device Preferences .17Email/Backup Preferences. 18What is an SMTP Server?. 18Outgoing Email Settings (SMTP Server). 19Common SMTP Server Settings .20Chapter 3: Email Alerts .21Setting Your Alert Preferences . 21Alert Setup . 21Creating Custom Fields . 22Chapter 4: Setting Up Your Employees.24Employee List . 24Make Employees Inactive. 24Customizing the Columns . 24 2020 Icon Time. All rights reserved.Page 3
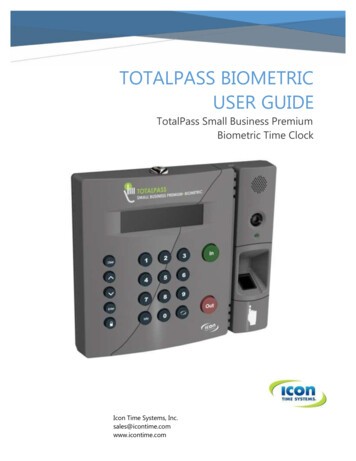
Time Remaining Before Overtime. 24Adding Employees. 25Employee Information . 25Employee Settings. 25Lunch Time Deduction .26Web Punch Time Clock Settings. 27Biometric Settings . 27Accrual Settings. 28Non-Work Hours and Benefit Time (Vacation, Sick, Personal) . 28Delete Employee’s Punches.29Chapter 5: Using Biometric Fingerprint Entry.30Time Clock Keypad Functions.30Enrolling Employees Fingerprints Using Self Enroll . 31Biometric Settings . 31Biometric Settings by Employee . 31System-wide Biometric Preferences . 31Finger Scan Preferences . 32Photo Verification Preferences . 32Chapter 6: Clocking In and Out . 33Punching In and Out . 33Biometric Finger Scan Entry. 33Proximity Badge Entry.34Web Punch Entry .34Tracking Paid Breaks .34Department Change (Punch In and Out Transfer).34Entering Tips, Job Numbers or Piece Counts .35Collecting Employee Inputs on an In Punch.35Collecting Employee Inputs on an Out Punch .35Chapter 7: Department and Supervisors . 36Departments .36Customize Your Department .36Customize Revision Zones .36Assigning/Changing Departments . 37Removing a Department. 37Supervisors . 37Setting Supervisor Permissions. 37Assigning Employees to a Supervisor .38Supervisor Login.39Chapter 8: Generating Reports .40 2020 Icon Time. All rights reserved.Page 4
Report Overview .40Adding a Punch.40Adding Non-Work Hours (Holiday and Non-Worked) . 41Editing a Punch .42Using Batch Edits.42Viewing Additional Reporting Details .42Punches from Failed Biometric Punch Verification .43Accrual Summary Report .44Using the Attendance Report .44Using the Timecard Report .44Using the Individual Timecard Report.45Using the Department Report .45Using the Timecards by Department Report .45Create Custom Reports .46Generating Reports on custom Field Values – Labor Distribution .46Chapter 9: Sending to Payroll .49Create Payroll Export File.49Paylocity Export Payroll Process .50ADP Workforce Now Export Payroll Process . 51QuickBooks Export Payroll Process . 51Configuring Payroll . 52QuickBooks Online Configuration.53Chapter 10: Alternate Employee Entry Options.54Web Punch Entry .54Setting Up Your Employees – Web Punch .54Punching In/Out Using Web Punch Entry .54Clocking In/Out from GPS Enabled – Location Tracking .55Setting Authorized IP Address by Employee .56Running Reports with Web Punch . 57Using Proximity Badges . 57Assigning Proximity Badges to an employee . 57Locking the Time clock Terminal Keypad . 57Punching In/Out Using Proximity Badges .58Chapter 11: Maintaining Your Time Clock . 59Setting up Scheduled Automatic Backups .59Creating a Data Backup .59Data Backup from the Software Interface.59Data Backup to a USB Flash Drive .60Restore Time Clock Data Backup .60 2020 Icon Time. All rights reserved.Page 5
Restore a Time Clock Data Backup from the Software Interface .60Restore a Time Clock Data Backup from a USB Flash Drive . 61Removing Data from Your Time Clock . 61Updating Your Time Clock . 61Updating Your Time Clock from the Software Interface.62Updating Your Time Clock Using a USB Flash Drive .62Auto-Update .62Changing Your Time Clock Software Interface Password .64Resetting the Software Interface Password .64Resetting the Supervisor Mode Security Code .64Chapter 12: Time Clock Terminal Supervisor Mode . 65Log Into Supervisor Mode .65Parent Clock Supervisor Mode Settings .65View IP Address .65Network Settings .65LAN Settings .65Wi-fi Settings.65Assign Badges .66Set Date/Time.66View Serial # .66View Version # .66Download Backup.66Restore Backup.66Enable Upgrade. 67Reset Password . 67Erase All Memory . 67Convert to Child . 67Download Log . 67Additional Child Clock Supervisor Mode Settings. 67View Parent IP . 67Force Connect . 67Force Full Sync. 67Show Sync Status . 67Convert to Parent. 67Chapter 13: Connecting to the Clock .68Wifi Connection .68Connecting Using the Clock Interface .68Connecting Using a WPS Button.69Connecting Using a WPS with PIN.69 2020 Icon Time. All rights reserved.Page 6
Connecting Using the Software Interface.70Ethernet Connection .
2020 Icon Time. All rights reserved. Page 3 Table of Contents Chapter 1: Getting Familiar with Your Time Clock . 8