Transcription
F3 TREADMILLOwner’s Manual8972801 REV B-3
CORPORATE HEADQUARTERS5100 River RoadSchiller Park, Illinois 60176 U.S.A.847.288.3300 FAX: 847.288.3703Service phone number: 800.351.3737 (toll-free within U.S.A., Canada)Global Website: www.lifefitness.comINTERNATIONAL OFFICESAMERICASNorth AmericaLife Fitness Inc.5100 N River RoadSchiller Park, IL 60176 U.S.ATelephone: (847) 288 3300Fax: (847) 288 3703Service Telephone: (800) 351 3737Service Email: customersupport@lifefitness.comSales/Marketing Email:consumerproducts@lifefitness.comOperating Hours: 7:00 am-6:00 pm (CST)BrazilLife Fitness BrasilAv. Cidade Jardim, 900Jd. PaulistanoSão Paulo, SP 01454-000BRAZILSAC: 0800 773 8282Telephone: 55 (11) 3095 5200Fax: 55 (11) 3095 5201Service Email: suporte@lifefitness.com.brSales/Marketing Email: lifefitness@lifefitness.com.brService Operating Hours:9:00 - 17:00 (BRT) (Monday-Friday)Store Operating Hours:9:00 -20:00 (BRT) (Monday-Friday)10:00 - 16:00 (BRT) (Saturday)Latin America & Caribbean*Life Fitness Inc.5100 N River RoadSchiller Park, IL 60176 U.S.ATelephone: (847) 288 3300Fax: (847) 288 3703Service Email: customersupport@lifefitness.comSales/Marketing Email:commercialsales@lifefitness.comOperating Hours: 7:00am-6:00pm (CST)EUROPE, MIDDLE EAST, & AFRICA (EMEA)Netherlands & LuxemburgLife Fitness Atlantic BVBijdorpplein 25-312992 LB BarendrechtTHE NETHERLANDSTelephone: ( 31) 180 646 666Fax: ( 31) 180 646 699Service Email: service.benelux@lifefitness.comSales/Marketing Email:marketing.benelux@lifefitness.comOperating Hours: 9.00h-17.00h (CET)United Kingdom & IrelandLife Fitness UK LTDQueen AdelaideEly, Cambs, CB7 4UBTelephone: General Office ( 44) 1353.666017Customer Support ( 44) 1353.665507Fax: ( 44) 1353.666018Service Email: uk.support@lifefitness.comSales/Marketing Email: life@lifefitness.comOperating Hours:General Office: 9.00am - 5.00pm (GMT)Customer Support: 8.30am - 5.00pm (GMT)Germany & SwitzerlandLife Fitness Europe GMBHSiemensstraße 385716 UnterschleißheimGERMANYTelephone: ( 49) 89.31 77 51.0 (Germany)( 41) 0848 000 901 (Switzerland)Fax: ( 49) 89.31 77 51.99 (Germany)( 41) 043 818 07 20 (Switzerland)Service Email: kundendienst@lifefitness.comSales/Marketing Email: kundenberatung@lifefitness.comOperating Hours: 08.30 -16.30h (CET)AustriaLife Fitness AustriaVertriebs G.m.b.H.Dückegasse 7-9/3/361220 ViennaAUSTRIATelephone: ( 43) 1.61.57.198Fax: ( 43) 1.61.57.198.20Service Email: kundendienst@lifefitness.comMarketing/Sales Email: kundenberatung@lifefitness.comOperating Hours: 08:30-16.30.h (MEZ)SpainLife Fitness IBERIAC/Frederic Mompou 5,1º1ª08960 Sant Just Desvern BarcelonaSPAINTelephone: ( 34) 93.672.4660Fax: ( 34) 93.672.4670Service Email: info.iberia@lifefitness.comSales/Marketing Email: info.iberia@lifefitness.comOperating Hours:9.00h-18.00h (Monday-Thursday)8.30h-15.00h (Friday)BelgiumLife Fitness Benelux NVParc Industrial de Petit-Rechain4800 VerviersBELGIUMTelephone: ( 32) 87 300 942Fax: ( 32) 87 300 943Service Email: service.benelux@lifefitness.comSales/Marketing Email:marketing.benelux@lifefitness.comOperating Hours: 9.00h -17.00h (CET)All Other EMEA countries &Distributor Business C-EMEA*Bijdorpplein 25-312992 LB BarendrechtTHE NETHERLANDSTelephone: ( 31) 180 646 644Fax: ( 31) 180 646 699Service Email: service.db.cemea@lifefitness.comSales/Marketing Email:marketing.db.cemea@lifefitness.comOperating Hours: 9.00h-17.00h (CET)ASIA PACIFIC (AP)JapanLife Fitness JapanNippon Brunswick Bldg., #8F5-27-7 SendagayaShibuya-Ku, TokyoJapan 151-0051Telephone: ( 81) 3.3359.4309Fax: ( 81) 3.3359.4307Service Email: service@lifefitnessjapan.comSales/Marketing Email: sales@lifefitnessjapan.comOperating Hours: 9.00h-17.00h (JAPAN)China and Hong KongLife Fitness Asia Pacific LTDRoom 2610, Miramar Tower132 Nathan RoadTsimshatsui, KowloonHONG KONGTelephone: ( 852) 2891.6677Fax: ( 852) 2575.6001Service Email: HongKongEnquiry@lifefitness.comSales/Marketing Email: ChinaEnquiry@lifefitness.comOperating Hours: 9.00h-18.00hAll Other Asia Pacific countries &distributor business Asia Pacific*Room 2610, Miramar Tower132 Nathan RoadTsimshatsui, KowloonHONG KONGTelephone: ( 852) 2891.6677Fax: ( 852) 2575.6001Service Email: HongKongEnquiry@lifefitness.comSales/Marketing Email: ChinaEnquiry@lifefitness.comOperating Hours: 9.00h-18.00hItalyLife Fitness Europe GmbHSiemensstraße 385716 UnterschleißheimGERMANYTelephone: ( 39) 02-55378611Service: 800438836 (In Italy)Fax: ( 39) 02-55378699Service Email: assistenzatecnica@lifefitness.comSales/Marketing Email: info@lifefitnessitalia.comOperating Hours: 08:30 - 16:30h (CET)1
Before using this product, it is essential to read this ENTIRE operation manual and ALL installation instructions.This will help in setting up the equipment quickly and in instructing others on how to use it correctly and safely.Note: This equipment generates, uses and can radiate radio frequency energy, and if not installed and used in accordance with the operation manual, may cause harmful interference to radio communications. However, there is no guarantee that the interference will not occur in a particular installation. If this equipment does cause harmful interference toradio or television reception, which can be determined by turning the equipment off and on, the user is encouraged to tryto correct the interference by one or more of the following measures: Re-orient or relocate the receiving antenna. Increase the separation between the equipment and the receiver. Connect the equipment into an outlet on a circuit different from that to which the receiver is connected. Consult the dealer or an experienced radio/TV technician for help.Class HB (Home): Domestic use.CAUTION: Any changes or modifications to this equipment could void the product warranty.Any service other than cleaning or user maintenance, must be performed by an authorized service representative. Thereare no user-serviceable parts.2
TABLEOFCONTENTS1.Important Safety Instructions . . . . . . . . . . . . . . . . . . . . . . . . . . . . . . . . . . . . . . . . . . . . . . . . . . . . . . . . . . .52.Life Fitness F3 Treadmill Design Illustration . . . . . . . . . . . . . . . . . . . . . . . . . . . . . . . . . . . . . . . . . . . . . . .73.Assembly . . . . . . . . . . . . . . . . . . . . . . . . . . . . . . . . . . . . . . . . . . . . . . . . . . . . . . . . . . . . . . . . . . . . . . . . . .83.1Unpacking . . . . . . . . . . . . . . . . . . . . . . . . . . . . . . . . . . . . . . . . . . . . . . . . . . . . . . . . . . . . . . . . . . . . . . . . .83.2Component List & Hardware . . . . . . . . . . . . . . . . . . . . . . . . . . . . . . . . . . . . . . . . . . . . . . . . . . . . . . . . . . .83.3Installing Uprights . . . . . . . . . . . . . . . . . . . . . . . . . . . . . . . . . . . . . . . . . . . . . . . . . . . . . . . . . . . . . . . . . . .93.4Installing the Console3.5Attaching the Power Cord . . . . . . . . . . . . . . . . . . . . . . . . . . . . . . . . . . . . . . . . . . . . . . . . . . . . . . . . . . . .123.6Calibration . . . . . . . . . . . . . . . . . . . . . . . . . . . . . . . . . . . . . . . . . . . . . . . . . . . . . . . . . . . . . . . . . . . . . . . . .124.Setup . . . . . . . . . . . . . . . . . . . . . . . . . . . . . . . . . . . . . . . . . . . . . . . . . . . . . . . . . . . . . . . . . . . . . . . . . . . .135.Activity Zone and Heart Rate Sensor Overview . . . . . . . . . . . . . . . . . . . . . . . . . . . . . . . . . . . . . . . . . . .156.Service and Technical Data . . . . . . . . . . . . . . . . . . . . . . . . . . . . . . . . . . . . . . . . . . . . . . . . . . . . . . . . . . .176.1Troubleshooting . . . . . . . . . . . . . . . . . . . . . . . . . . . . . . . . . . . . . . . . . . . . . . . . . . . . . . . . . . . . . . . . . . . .176.2Preventive Maintenance Tips . . . . . . . . . . . . . . . . . . . . . . . . . . . . . . . . . . . . . . . . . . . . . . . . . . . . . . . . . .196.3How to Adjust and Tension the Striding Belt . . . . . . . . . . . . . . . . . . . . . . . . . . . . . . . . . . . . . . . . . . . . . .206.4Using and Testing the Safety Stop Pull Cord . . . . . . . . . . . . . . . . . . . . . . . . . . . . . . . . . . . . . . . . . . . . . .216.5How to Obtain Product Service . . . . . . . . . . . . . . . . . . . . . . . . . . . . . . . . . . . . . . . . . . . . . . . . . . . . . . . .217.Specifications . . . . . . . . . . . . . . . . . . . . . . . . . . . . . . . . . . . . . . . . . . . . . . . . . . . . . . . . . . . . . . . . . . . . . .228.Warranty Information . . . . . . . . . . . . . . . . . . . . . . . . . . . . . . . . . . . . . . . . . . . . . . . . . . . . . . . . . . . . . . . .23. . . . . . . . . . . . . . . . . . . . . . . . . . . . . . . . . . . . . . . . . . . . . . . . . . . . . . . . . . . . . . .11 2011 Life Fitness, a division of Brunswick Corporation. All rights reserved.3
This Operation Manual describes the functions of the following product:Life Fitness Treadmill Model:F3Thank you for purchasing a Life Fitness treadmill. Before using this product please read this user manual in its entiretyto ensure that you have the knowledge to safely and properly operate all of the features on your treadmill. We hope youachieve the product experience on your treadmill that you expect, but if you do have any service issues please go to theHow to Obtain Product Service section which will provide information on obtaining domestic and international productservice. See Specifications in this manual for product specific features.Statement of Purpose: The Treadmill is an exercise machine that enables users to walk or run in place on a moving surface.CAUTION:Health-related injuries may result from incorrect or excessive use of exercise equipment. The manufacturerSTRONGLY recommends seeing a physician for a complete medical exam before undertaking an exerciseprogram, particularly if the user has a family history of high blood pressure or heart disease, is over the age of45, smokes, has high cholesterol, is obese, or has not exercised regularly in the past year. Themanufacturer also recommends consulting a fitness professional on the correct use of this product.If at any time while exercising, the user experiences faintness, dizziness, pain, or shortness of breath,he or she must stop immediately.4
1IMPORTANT SAFETY INSTRUCTIONSWARNING: READ ALL INSTRUCTIONS BEFORE USING THE TREADMILL. SAVE THESE INSTRUCTIONS.DANGER: To reduce the risk of electrical shock, always unplug this Life Fitness product before cleaning orattempting any maintenance activity.WARNING: To reduce the risk of burns, fire, electric shock, or injury, it is imperative to connect each product to aproperly grounded electrical outlet.WARNING: The treadmill should not be operated when folded up.WARNING: This treadmill has immobilization software. Only activate the software immobilization when the treadmillis not in use. Refer to this Owner’s Manual for instructions on immobilizing the treadmill. Keep the instructions out ofthe reach of children.WARNING: Fold the treadmill into the upright and locked position BEFORE rolling it over on its side or picking it upfrom the floor. The base or folding frame can swing around unexpectedly if this procedure is not followed.WARNING: Do not move the treadmill by lifting the console. Do not use the console as a handlebar during aworkout.WARNING: Heart rate monitoring systems may be inaccurate. Over exercising may result in serious injury or death.If you feel faint stop exercising immediately.WARNING: Allow the running surface to come to a complete stop prior to folding it up.WARNING: Equipment should be installed on a stable base and be properly leveled.WARNING: Any adjustment devices that could interfere with the user’s movement should not be left projecting.Risk of injury to persons – To avoid injury use extreme caution when stepping onto or off of a moving belt. To disconnect, turn power OFF at the ON/OFF switch, then remove plug from electrical outlet. Never operate a Life Fitness product if it has a damaged power cord or electrical plug, or if it has been dropped,damaged, or even partially immersed in water. Contact Life Fitness Customer Services. Position this product so the power cord plug is accessible to the user. Keep the power cord away from heated surfaces. Do not pull the equipment by the power cord or use the cordas a handle. Do not run the power cord on the floor, under or along the side of the treadmill. If the electrical supply cord is damaged it must be replaced by the manufacturer, an authorized service agent, ora similarly qualified person to avoid a hazard. Do not use this product in areas where aerosol spray products are being used or where oxygen is beingadministered. Such substances create the danger of combustion and explosion. Always follow the console instructions for proper operation. This appliance is not intended for use by persons (including children) with reduced physical, sensory or mentalcapabilities, or lack of experience and knowledge, unless they have been given supervision or instruction concerning use of the appliance by a person responsible for their safety. Children should be supervised to ensure that they do not play with the appliance. Do not use this product outdoors, near swimming pools, or in areas of high humidity. Never operate a Life Fitness product with the air openings blocked. Keep air openings free of lint, hair or anyobstructing material. Never insert objects into any openings in this product. If an object should drop inside, turn off the power, unplugthe power cord from the outlet and carefully retrieve it. If the item cannot be reached, contact Life FitnessCustomer Services. Never place liquids of any type directly on the unit, except in a bottle holder or accessory tray. Lidded containersare recommended. When using the treadmill, wear shoes with rubber or high traction soles. Do not use shoes with heels, leathersoles, cleats or spikes. Make sure no stones are embedded in the soles. Do not use this product in bare feet.Keep all loose clothing, shoelaces and towels away from moving parts. Do not reach into or underneath the unit, or tip it on its side during operation. Keep an open area of 6.5 feet (2 meters) by 3 feet (1 meter) behind the treadmill clear of any obstructions,including walls, furniture and other equipment.5
6 Allow LCD consoles to “normalize” with respect to temperature for one hour before plugging the unit in and/orusing. Use the handrails whenever additional stability is required. In case of emergency, such as tripping, the usershould grab the handrails and place his/her feet on the side platforms. The handrails may be held to enhancestability as needed, but are not for continuous use. Never walk or jog backwards on the treadmill. Immobilize the treadmill so the motors will not run when the unit is not in use. To do this, press and hold boththe SPEED DOWN ARROW and the STOP key on the Activity Zone. Use caution when folding and unfolding the treadmill. Do not let the treadmill lower to the floor unassisted.Guide the deck to the floor by hand. Use this unit only for its intended use as described in this manual. Do not use attachments not recommended bythe manufacturer. In conformity with the European Union Machinery directive 2006/42/EC, this equipment runs at sound pressurelevels below 70 dB(A) at the average operating speed of 8 km/hr. The universal electrical grounding symbol is:
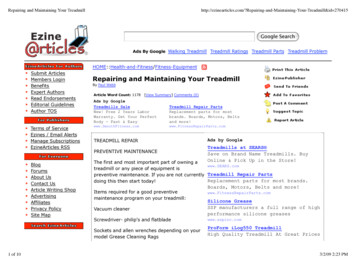
2LIFE FITNESS F3 TREADMILL DESIGN ILLUSTRATIONUSB PortiPod Docking StationConsoleHeadphone JackReading RackActivity ZoneWater Bottle HolderContact Heart Rate SensorsConsole BridgeAssemblyHandlebar ExtensionF3 with Track ConsoleLeft UprightEmergency StopRight UprightOn / Off SwitchCircuit BreakerPower CordMotor CoverSide RailRunning Belt / Running DeckRoller End CapTransport WheelBase Frame AssemblyFolding Release LeverRear Roller Adjustment Bolts7
3ASSEMBLYFor safety, and to save time and effort, read this Owner’s Manual completely before installing your Life Fitness Treadmill.Place the treadmill near where it will be used before beginning the unpacking procedure.3.1UNPACKINGThese unpacking instructions assume you have already done the following: Removed the top of the shipping carton. Removed this Owner’s Manual from the top of the packaged material.The best method for unpacking the rest of the treadmill is as follows: Remove all items on top of the running belt. Break down the sides of the inner shipping carton. DO NOT remove or unlatch the strap that is positioned over the walking surface. Follow assembly instructions starting on page 9.WARNING: Fold the treadmill into the upright and locked position before rolling it over on its side or picking it up fromthe floor. The base or folding frame can swing around unexpectedly if this procedure is not followed.3.2COMPONENT LIST & HARDWAREIdentify the following components after unpacking your treadmill:1. Left Upright . . . . . . . . . . . . . . . . . . . . Qty: 18. M8 X 15MM Bolt (Black) . . . . . . . . . . Qty: 42. M8 X 60MM Bolt . . . . . . . . . . . . . . . . Qty: 69. M8 X 15MM Bolt (Silver) . . . . . . . . . . Qty: 23. Star Washers . . . . . . . . . . . . . . . . . . Qty: 1510. 6MM Hex Head Wrench . . . . . . . . . . Qty: 14. Right Upright . . . . . . . . . . . . . . . . . . . Qty: 15MM Hex Head Wrench . . . . . . . . . . Qty: 15. Console Bridge . . . . . . . . . . . . . . . . . Qty: 111. Power Cord (120V) . . . . . . . . . . . . . . Qty: 16. M8 X 25MM Bolt . . . . . . . . . . . . . . . . Qty: 312.Emergency Stop Lanyard. . . . . . . . . Qty: 17. Handlebar Extensions . . . . . . . . . . . Qty: 213. M8 X 15MM Tapered Bolt (Silver) . . Qty: 6M8 X 15MM BOLT (8 & 9)STAR WASHER (3)M8 X 15MM TAPERED BOLT (13)102030405060M8 X 25MM BOLT (6)M8 X 60MM BOLT (2)708090100110Tool Needed for Assembly: 6MM Hex Wrench (included) 5MM Hex Wrench (included)8120130140150160
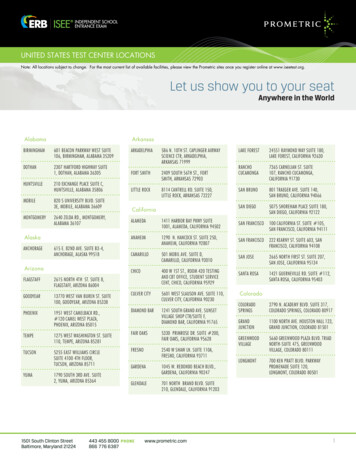
3.3INSTALLING UPRIGHTSLocate the LEFT UPRIGHT (1). The upright is marked “L”. Position the LEFT UPRIGHT near inside of the left bracket.a) Connect the two electrical connectors at the bottom of the upright.b) Set the upright in position while feeding the cable into the upright.c) Install all hardware and finger tighten at this time. Secure the LEFT UPRIGHT to the left bracket by using threeM8 X 60MM SILVER BOLTS (2) and three STAR WASHERS (3). Secure the front of the upright by installing oneM8 X 15MM SILVER BOLT (9) and one STAR WASHER (3).CAUTION: Do not pinch the wire when attaching the left upright to the left upright bracket. Carefully feed any excesswire into the upright tube. Connectors must be inside the upright tube after installation.1932Locate the RIGHT UPRIGHT (4). The upright is marked “R”. Position the RIGHT UPRIGHT near the inside of the rightbracket. Install all hardware and finger tighten at this time. Secure the RIGHT UPRIGHT to the right bracket by usingthree M8 X 60MM SILVER BOLTS (2) and three STAR WASHERS (3). Secure the front of the upright by installing oneM8 X 15MM SILVER BOLT (9) and one STAR WASHER (3).9
Position the console bridge (5) near the top of the uprights. Attach the wire connectors leading from the left upright andthe console bridge. Be sure the connectors are fully seated together. Feed any excess wire into the hollow inside the leftupright.Attach the console bridge to the uprights using six M8 x 15mm Tapered Bolts (13), three for each upright. Leave thebolts finger-tight at this time.CAUTION: Do not pinch the wire when attaching the left upright to the console bridge.Attach one handlebar extension (7) on each side of the console bridge, using two black M8 x 15mm (8) Bolts and twoStar Washers (3) on each side.57138133810
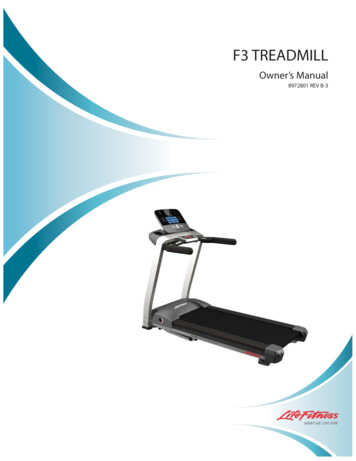
3.4INSTALLINGTHECONSOLERemove the pre-installed bolt (A) from the back of the main console (B). Position the main console near the top of theconsole bridge and attach the connectors leading from the console bridge to the corresponding tabs on the back of themain console. The main console harness (C) is the largest connector. The Activity Zone harness (D) is the mid-size connector. The grounding wire (E) is the small green and yellow wire that inserts onto any of the three metal circuit boardreceptacles on the Go Console or to the connector leading from the back of the Track Console. The safety switch connector (F) is the 5-Pin connector. Be sure the connectors are fully seated together. Feed any excess wire into the console bridge.Attach the main console to the console bridge using three M8 x 25mm BOLTS (6) and three STAR WASHERS (3). Tightenthe bolts securely.CAUTION: Do not pinch the wires when attaching the main console to the console bridge.Securely tighten all the bolts that were left finger-tight.Track Console ConnectionDBGo Console ConnectionFCABECEADFB53611
3.5ATTACHINGTHEPOWER CORDInsert the female plug of your treadmill’s power cord into the male outlet next to your treadmill’s power switch.Note: F3 treadmills shipped in the USA and Canada are supplied with a North American line cord. Attach the cord suitedto your area.3.6CALIBRATIONBefore using your treadmill please follow the calibration instructions below. Please stand to the side of your treadmillduring calibration.1. Turn treadmill on, or if on press the RESET key.2. The console will display "PLEASE WAIT" or "WAIT".3. When "PLEASE WAIT" or "WAIT" disappears and the screen is blank press and hold the PAUSE key until"DIAGNOSTICS" appears.4. Use the arrow keys to scroll through the diagnostics menu to "CALIBRATION" or "CALIB".5. Press enter to select "CALIBRATION" or "CALIB".6. Press the START key located on the activity zone to begin calibration.7. Your treadmill will now automatically cycle through a series of tests including speed and incline adjustments inorder to complete calibration.8. When successfully completed the console will display "PASS".***If there was an error during calibration the console will display "FAIL".***If a failure occurred press STOP twice and restart the process at Step 1.***If failure occurs again take note of the error number display and contact Life Fitness Customer SupportServices at 1-800-351-3737 (U.S.A. and Canada).9. Upon successful completion press the RESET key three times to exit calibration mode.12
4SETUPELECTRICAL POWER REQUIREMENTSMost Life Fitness Treadmills are intended for use on a normal 120 volt circuit in the United States and Canada. Below isa table that provides the current rating for this product based on supply voltage. Make sure that the treadmill modelsupports the proper line voltage for the installation location before plugging into the outlet. Line voltage is noted on theproduct’s serial label.Supply Voltage (VAC)120230Frequency (Hz)50 / 6050 / 60Maximum Current (Amps)1210ELECTRICAL GROUNDING REQUIREMENTSThis Life Fitness product must be properly grounded. If the unit malfunctions or breaks down, proper groundingprovides the path of least resistance for the electric current, which reduces the risk of shock to anyone touching or usingthe equipment. Each unit is equipped with an electrical cord, which includes an equipment grounding conductor and agrounding plug. The plug must be inserted into an outlet that has been properly installed and grounded in accordancewith all local codes and ordinances. A temporary adapter must not be used to connect this plug to a two-pole receptaclein North America. If a properly grounded, correct amperage outlet is not available, a qualified electrician must install one.DANGER: A risk of electrical shock may result from improper connection of the equipment’s grounding conductor. Checkwith a qualified electrician if you are unsure about proper grounding techniques. Do not modify the plug provided withthis product. If it will not fit an electrical outlet, have a proper outlet installed by a qualified electrician.TURNINGTHEUNIT ONTo turn the treadmill on, locate the ON/OFF power switch at the front of the treadmill near the power cord and turn it ON.HOW TO STABILIZE THE LIFE FITNESS TREADMILLAfter placing the unit where it will be used, check its stability. Ifthere is even a slight rocking motion or the unit is not stable,determine which stabilizing leg is not resting on the floor. Toadjust, turn the STABILIZING LEG (A) or (B) until the rockingmotion ceases and both stabilizing legs rest firmly on the floor.Note: If excessive vibration occurs during use, adjust the heightof the levelers (A) closer to the uprights. Do not adjust the heightof the levelers (B) further from the uprights.Note: It is extremely important that the stabilizing leg be correctlyadjusted for proper operation.CHECKINGTHEBELTAfter the treadmill has been installed and stabilized, the belt mustbe checked to confirm proper tracking. First, ensure the powercord is plugged into a suitable outlet, as described in the aboveElectrical Requirements section. Then turn the treadmill on.Stand on the side rails of the treadmill and straddle the belt. Tostart the belt, press the WALK key, then press the SPEED UParrow key until the treadmill reaches 4.0 mph/ 6.4 kph. If thestriding belt appears off-center, see the instructions in Tracking(Centering) An Existing Or New Striding Belt (Section 6.3).9 mm18 mmNote: Normal belt operating position is for the belt to be locatedwithin the belt travel position indicators on the motor cover (seeillustration to the right). If the belt is not in this position, seeSection 6.313
FOLDING AND UNFOLDINGTHETREADMILLThe treadmill’s deck can be folded up when not in use. To do so, make sure that the incline is set to 0%, then simplygrab the deck and lift it until it locks into place. To lower the deck again, push the running surface in with one hand andpull the release handle to slowly lower it to the ground. Make sure the deck is completely lowered before using thetreadmill.POWER SWITCHLocated on the front panel at the base of the treadmill, the ON/OFF switch has two positions - "I" (one) for ON and "0"(zero) for OFF.MOVINGTHETREADMILLTurn the treadmill off and disconnect its power cord, then raise its deck.Note: If adjustments were made to the front levelers during setup, make sure to tighten the levelers snug against thebase frame before moving.The treadmill may now be moved on its front platform wheels by pushing and pulling on its handrails. Do not attempt tomove the treadmill by pushing or pulling on the deck or deck support tubing.IMMOBILIZING THE TREADMILLWhen it is necessary to immobilize the treadmill, press and hold both the SPEED DOWN ARROW and the STOP keyson the activity zone. Use the same key sequence to mobilize the treadmill.14
5ACTIVITY ZONE AND HEART RATE SENSOR OVERVIEWACTIVITY ZONEThe Go System Activity Zone (C) offers control over the basic operations of the treadmill, using the buttons gMidHighRunIJD. Start: Causes the belt to begin moving at 0.5 mph and 0% elevation.E. Stop: Causes the belt to slow to a gradual stop. One push pauses the workout, two pushes display workout information, and three pushes reset the workout.F.Incline Arrows: Change the belt’s incline gradually, increasing (UP ARROW) or decreasing (DOWN ARROW) theincline by 0.5% each time the user presses an arrow.G. Speed Arrows: Change the belt’s speed gradually, increasing (UP ARROW) or decreasing (DOWN ARROW) thespeed by 0.1 mph each time the user presses an arrow.H. Low/Med/High: Changes the belt’s incline immediately to a preset value. Initially these buttons are set to changethe incline to 1.5% (Low), 3% (Mid) and 5% (High). However, the user can set these buttons to new values by firstchanging the belt’s incline to the desired new value, then holding down the button the new value will be assigned tountil the treadmill beeps.I.Walk/Jog/Run: Changes the belt’s speed immediately to a preset value. Initially these buttons are set to change thespeed to 2 mph (Walk), 4 mph (Jog) and 6 mph (Run). However, the user can set these buttons to new values byfirst changing the belt’s speed to the desired new value, then holding down the button the new value will beassigned to until the treadmill beeps.J. E-Stop Magnet: This circular magnet connects to the E-Stop Lanyard, which must be clipped to the user’s clothingwhen the treadmill is in use. Pulling the lanyard so that it comes free of the magnet will stop the treadmill’s stridingbelt. This serves as a safety feature, stopping the belt should the user stumble or fall. Replacing the magnet willshow the Workout Summary data.Note: Removing the E-Stop Magnet stops the walking belt and incline motor, but all parts are still electrically energized. In case of electrically caused errors, remove the power cord from the electrical outlet.15
HAND PULSE SENSOR SYSTEMThe hand pulse sensors (K) are the built-in heart rate monitoring system on the treadmill. During a workout, grasp thesensors that are set into the handlebars. For an accurate reading, use a comfortable grip. The console displays the heartrate after 15 to 20 seconds.K16
6SERVICE AND TECHNICAL DATA6.1TROUBLESHOOTINGProblemCause / SolutionYou may be in “Energy Saver Mode”. Press the “Energy Saver” button tosee if console turns on.The treadmill console does not turnon when the ON/OFF switch isturned on.Check to see if the treadmill is plugged in and if the ON/OFF switch is on.If the ON/OFF switch is on, verify that the treadmill power cord is notdamaged and the wall outlet is functioning (tripped breaker in house).If the ON/OFF switch is on verify that all the customer assembly connections are working properly. Unplug and re-plug each connection to verify.Look to see if any of the cables were pinched during assembly.I am having problems bolting the partstogether when assembling the unit.1. Do not tighten the screws until the uprights, console and handrailsare all installed.2. Check the screw threads for any damage.3. Tighten the hardware after all components are installed.The treadmill shak
1 IMPORTANT SAFETY INSTRUCTIONS WARNING: READ ALL INSTRUCTIONS BEFORE USING THE TREADMILL. SAVE THESE INSTRUCTIONS. DANGER: To reduce the risk of electrical shock, always unplug this Life Fitness product before cleaning or attempting any maintenance activity. WARNING: To reduce the risk of burns, fire, electric shock, or injury, it is imperative to connect each product to a