Transcription
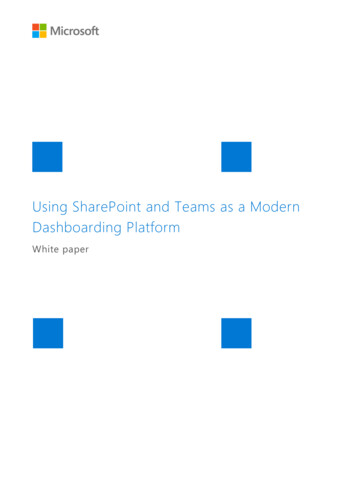
SharePoint Training Manual – Events CalendarEvents CalendarCreating an Events Calendar and Events1. Click on the Gear Button drop-down menu located at the top right hand side of the page.2. Select Site contents from the drop-down menu.3. On the site contents page, click on add an app button.4. The Apps you can add list appears. To create the calendar list that stores the events, click on theCalendar icon.5. A dialog box will display. Enter the name that will identify this list and click OK.Keep in mind that the name could be helpful if it identifies what is stored in this calendar.6. You will be redirected back to the Site Contents page with the new Events Calendar icon thatdisplays new! below the title. Click on the new calendar item .Last Modified: 08/27/18
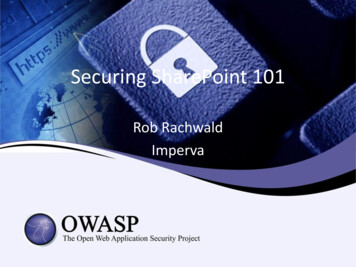
SharePoint Training Manual – Events Calendar7. Before adding events to the calendar, event categories must be created (if needed).Click on CALENDAR tab in the ribbon bar at the top of the page. Then click on List Settings.8. Scroll to the Columns section and click on Category.9. On the Edit Column page, enter all Category names in the Type each choice on a separate lineedit box, scroll to the bottom and click OK.10. The calendar Settings page will reappear. Click on the calendar name to be directed back to yourlist.Last Modified: 08/27/18
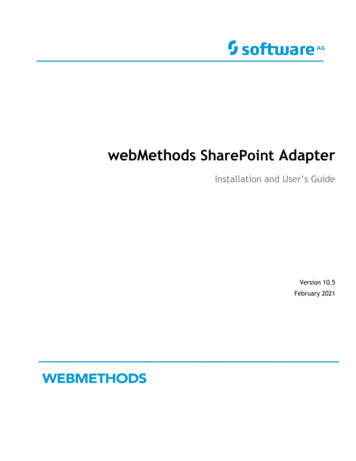
SharePoint Training Manual – Events Calendar11. The Calendar is now displayed and is ready to create events.To add an event, hover the bottom right of the date for the event.Click the Add link and a New Item dialog box will appear.12. Complete all the required fields along with any additional information desired.When compete, click Save.Repeat the process to create all events needed.Add Event Calendar to a Page1. Navigate to the page on which the Calendar will be placed.2. Edit the page by clicking Edit in the ribbon bar. Once the page is in edit mode, locate one webpart zone where the Calendar will be located. Within the zone, click Add a Web Part. A webpart section will display at the top of the page.3. Click on the following and then click Add in the lower right hand corner of this display.Last Modified: 08/27/18
SharePoint Training Manual – Events Calendar Categories: WidgetsParts: Calendar Note: If the Add button is not visible, click on the Browse tab in the ribbon at the top left .The page will be refreshed and the Calendar will be added to the page.4. The page will then refresh and the new Calendar will be visible within the zone.5. It is now necessary to connect the web part to the calendar list (that stores the events created).Be sure to be in Edit mode and click on the Edit Widget button in the toolbar of the newCalendar app.Last Modified: 08/27/18
SharePoint Training Manual – Events Calendar6. This will open the Configuration properties panel. Click on the Configure Datasource - Configurebutton. The data source panel will open for the Calendar list.7. The Calendar Options window appears.Select List Scope options:Specific List (default) – this option will connect (and display) to one specific calendar that youselect.All Lists based on a List Template – this option is an advanced feature that will connect (and rollup and combine) all calendars and should only be touched by the power user that has hadadvanced instruction.8. Select Web Source options:To find the Calendar list, select the web source by expanding the site. Click on the location of theweb source.Last Modified: 08/27/18
SharePoint Training Manual – Events CalendarImmediately below this selection, verify the Selected Path is correct. If not, return to Select WebSource above and reselect.Then, scroll to select the Calendar Widget item from the dropdown Select Source List.Click OK on this panel and OK on the Configuration properties panel to save changes.9. Save the page to see the Calendar appear on the page.If the connection has been completed, the events will be listed on the page. Clicking on the titleof an event will display additional information about that event.Manage the Look of the Event Calendar1. Be sure to be in Edit mode and click on the Edit Widget button in the toolbar of the newCalendar app.Last Modified: 08/27/18
SharePoint Training Manual – Events Calendar2. This will open the Configuration properties panel. Click on the Manage The Look - Configurebutton. The Events panel will open for the Calendar list.Event Paging OptionsDescription(what will appear if this field is checked)Show HeadingsHeadings above the events will bedisplayed on the calendar list.Show CategoriesIf categories are defined and selectedfor an event, it will appear on thecalendar list.Show DescriptionIf a description is entered for anevent, it will display on the calendarlist.Show Paging ButtonsPagination will appear below thecalendar list.Rows Per Page OptionRows Per PageLast Modified: 08/27/18DescriptionSelection for the number of events
SharePoint Training Manual – Events Calendarthat will appear in the calendar listfor each page displayed.Click OK on this panel and OK on the Configuration properties panel to save changes. Note: ‘Connections’ is an advanced section that will configure data elements and should onlybe touched by the power user that has had advanced instruction.Sample of a Calendar list:Last Modified: 08/27/18
SharePoint Training Manual - Events Calendar Last Modified: 08/27/18 Events Calendar Creating an Events Calendar and Events 1. Click on the Gear Button drop-down menu located at the top right hand side of the page. 2. Select Site contents from the drop-down menu. 3. On the site contents page, click on add an app button. 4.