Transcription
TimelineWeb PartSharepoint 2010 Installation Instructions AMREIN ENGINEERING AGVersion 1.0April 2014
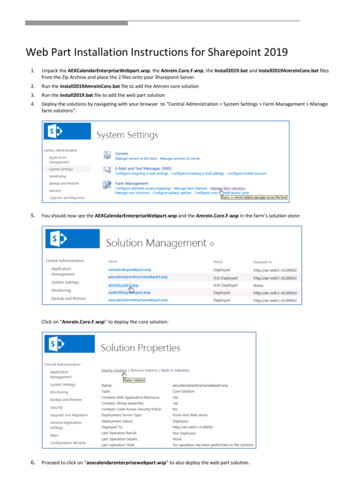
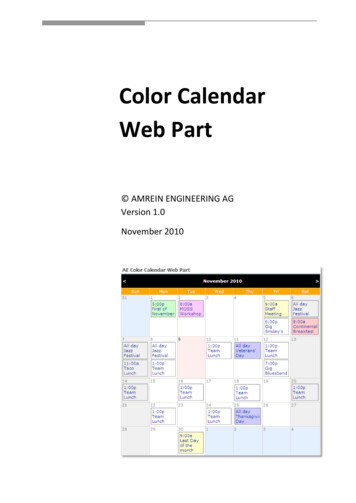
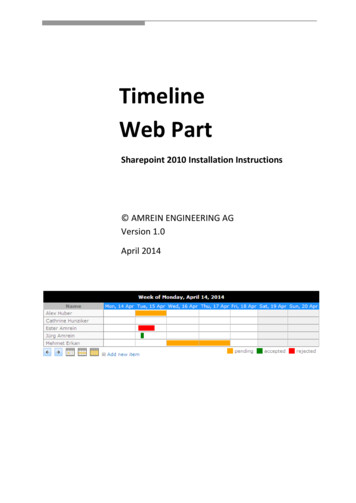
DescriptionThe AE Timeline Web Part displays the appointments of the selected Sharepoint calendar as a Timeline. The appointments canbe grouped by a Calendar column which displays each group as a separate row. This allows to easily visualize theappointments as for example room bookings etc.A “Category” column can be specified to color code the appointments in the timeline display.The Web Part can be used with Windows Sharepoint 2007, 2010 and 2013.PrerequisitesBefore you attempt to install the solutions you need to make sure that you have the following installed on your server(s):Microsoft SharePoint 2010, 2013, MOSS 2007 or WSS 3.0InstallationManual Installation1.download and unpack the AETimelineWebpart.zip file.The ZIP archive contains the AETimelineWebpart.dll and the AETimeline.webpart files.2.drop the DLL file either into the SPS web application BIN directory or into the GAC of your Sharepoint server(c:\windows\assembly).3.add the following line to the " SafeControls " section of your Web.Config file.Please make sure that the line is added as one single line (no line breaks): SafeControl Assembly "AETimelineWebpart, Version 1.0.0.0, Culture neutral, PublicKeyToken 8a09fba372e00af3" Namespace "AETimelineWebpart" TypeName "*" Safe "True" / 4.from your Sharepoint Application’s top site go to "Site Actions/Site Settings/Modify All Site Settings/Galleries/WebParts"5.use the "Upload" menu option to upload the AETimeline.webpart file.Automatic Installation1.Unpack the AETimelineWebpart.wsp and Install.bat files from the Zip Archive and place the 2 files onto yourSharepoint Server.2.Add the Solution by either running Install.bat (use install2010.bat for SP 2010 or install2013.bat for SP 2013) ormanually entering:stsadm -o addsolution -filename AETimelineWebpart.wsp3.Deploy the solution by navigating with your browser to “Central Administration System Settings FarmManagement Manage farm solutions”:
4.You should now see the AETimelineWebpart.wsp in the farm’s solution store:Click on “AETimelineWebpart.wsp” to deploy the solution:
5.Proceed to activate the feature by navigating to the “Site Actions/Site Settings” page in your top-level site:Choose “Site collection features” to navigate to the Site Collection Features page:Activate the “AE Timeline Web Part” featureAdding the Web Part to a PageNavigate to a page where you would like to place the web part and choose "Site Actions/Edit Page"Add the web part to the appropriate zone. The web part is listed in the "Amrein Engineering" gallery section :
Web Part ConfigurationConfigure the following Web Part properties in the Web Part Editor "Miscellaneous" pane section as needed:oSite Name:enter the name of the site that contains the Banner Picture Library:- leave this field empty if the Library is in the current site (eg. the Web Part isplaced in the same site)- enter a "/" character if the Library is contained in the top site- enter a path if the Library in in a subsite of the current site (eg. in the form of"current site/subsite")User Password: enter the password of the above useraccountoCalendar Name:Enter the name of the Sharepoint Calendar to be displayed.oView Name:Optionally enter the desired List View of the Calendar specified above. A ListView allows you to specify specific data filtering and sorting.Leave this field empty if you want to use the Calendar’s default view.oGroup By:enter the name of the column to be used to group the results (each group willbe displayed on a separate row).Examples:RoomApplicantoCategory Column:optionally enter the name of the column to be used for color coding theevents.oCategory Colors:You can individually color the calendar entries for each category by specifyingthe desired color (prefixed by an 'equal' sign) for each Calendar category.oProperty Filter:enter an optional Filter condition to filter the events.Combine multiple conditions with AND and OR.Examples:Department 'IT'Department 'Sales'Department IN ('Sales', 'Development', 'IT')LastName NOT IS NULL AND Department 'Sales'[Start Time] {today}[End Time] {today-7}You can pass Querystring parameters in the page URL to the Filter byembedding the Querystring name(s) in curly braces:Example:Department '{Dept}'(produces Department 'IT' if the URL contains .yourpage.aspx?Dept IT)oDefault View:Enter the desired default view (Day, Week or Month)oDay Start Hour:Enter the desired start hour of the workday as a value between 0 and 23(military format).Example: 8
oDay End Hour:Enter the desired end hour of the workday as a value between 0 and 23(military format).Example: 17oUse AM/PM time format:either display the time in AM/PM or military format.ooHide Weekends: display or hide the weekends in the calendaroShow Day View Hour Ruler:either turn on or off the hour ruler in the week view display.oShow Category Legend:either display or hide the Category colors legend at the bottom of thecalendar.oShow 'Add New Item' Button:either display or hide the 'Add new calendar item' link at the bottom. Pleasenote that the link is only visible for users with the corresponding calendar"Author" rights.oFooter:optionally display a footer text in the bottom area. You can use HTML tags toformat the text.oLocalization:optionally enter the following 7 values (separated by semicolons) in your locallanguage if you want to override the English strings corresponding to theAlternating Row Color: enter the optional color of the alternating rowbackground (leave blank to use default).Enter either the HTML color names (as eg. "red" etc.) or use hexadecimalRRGGBB coding (as eg. "#CCFFCC").Name (Name column header)Week ofall dayAdd new itemExample (German):Raum;Woche vom;ganzer Tag;neuer EintragoPage Refresh Interval:enter the optional page refresh interval in minutes (0 no page refresh)oCache Retention Time:Enter the data cache retention time in Minutes (enter “0” to disable datacaching)oLicense Key: enter your Product License Key (as supplied after purchase of the"Timeline Web Part" license key). Leave this field empty if you are using thefree 30 day evaluation version or if you choose one of the License Activationdescribed below.
License ActivationYou have the following 3 options to enter your License Key:1. Enter the License Key into the corresponding “License Key” field in the web part configuration pane (see Description above).2. WSP Solution Deployment:Add the License.txt file (as supplied by AMREIN ENGINEERING after having purchased a license) to the Solution at thefollowing location:Sharepoint 2010:c:\Program Files\Common Files\Microsoft Shared\Web Server harepoint 2013:c:\Program Files\Common Files\Microsoft Shared\Web Server .Manual Deployment:Add the License Key to your web.config (typically found at c:\inetpub\wwwroot\wss\virtualdirectories\80) appSettings section as follows: appSettings . add key "AETL" value "AETL-x-xxxxx-xxxxx-xx-xx" / /appSettings Replace the “x” characters with your actual key values.Please note that this method requires you to manually add the key to each Sharepoint application.
be grouped by a Calendar column which displays each group as a separate row. This allows to easily visualize the appointments as for example room bookings etc. A "Category" column can be specified to color code the appointments in the timeline display. The Web Part can be used with Windows Sharepoint 2007, 2010 and 2013. Prerequisites