Transcription
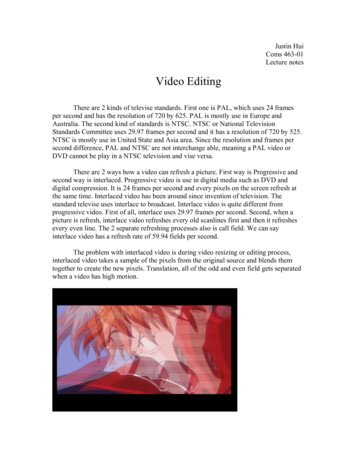
Justin HuiComs 463-01Lecture notesVideo EditingThere are 2 kinds of televise standards. First one is PAL, which uses 24 framesper second and has the resolution of 720 by 625. PAL is mostly use in Europe andAustralia. The second kind of standards is NTSC. NTSC or National TelevisionStandards Committee uses 29.97 frames per second and it has a resolution of 720 by 525.NTSC is mostly use in United State and Asia area. Since the resolution and frames persecond difference, PAL and NTSC are not interchange able, meaning a PAL video orDVD cannot be play in a NTSC television and vise versa.There are 2 ways how a video can refresh a picture. First way is Progressive andsecond way is interlaced. Progressive video is use in digital media such as DVD anddigital compression. It is 24 frames per second and every pixels on the screen refresh atthe same time. Interlaced video has been around since invention of television. Thestandard televise uses interlace to broadcast. Interlace video is quite different fromprogressive video. First of all, interlace uses 29.97 frames per second. Second, when apicture is refresh, interlace video refreshes every old scanlines first and then it refreshesevery even line. The 2 separate refreshing processes also is call field. We can sayinterlace video has a refresh rate of 59.94 fields per second.The problem with interlaced video is during video resizing or editing process,interlaced video takes a sample of the pixels from the original source and blends themtogether to create the new pixels. Translation, all of the odd and even field gets separatedwhen a video has high motion.
This can present a problem with our video editing because the completed video isdistracting and unprofessional looking as a result. There are 3 ways to fix this problem.First solution is just ignore the problem because both dvd and television is built to displayinterlaced video. If the vide is show on a normal television, it is extremely difficult tospot the interlaced fraud. The main problem will be post in computer monitor and HDTVdisplay. The second solution is use deinterlace. Deinterlace is a process of reconstructingthe 2 fields in every frame back to a single frame. In another word, deinterlace combinethe odd and even scanline back into a single frame. The third solution is use inversetelecining. In order to broadcast a 24 frame per second film into a 29.97 fps (59.94 fieldsper second) NTSC television signal, a process call telecining is used. Inverse telecining isthe opposite of that, which is turn back 59.94 fields per second back to 24 frames persecond.There are 2 kinds of video compression. First is lossless compression. Similar toprograms like winzip and winrar, Lossless compression has no quality loss aftercompressing and decompressing a video. The second kind is lossy compression. Thereare quality losses during compressing and decompressing a video file. Lossy compressioncan be farer defined into 2 catalogs. First, encoding each frame as its own picture is callintra frame. Intra frame is consisted to be high quality because every frame gets its owncompression. Second catalog is inter frame, which rely on keyframes to compress video.An important frame is identify and compress fully, the rest of the other frames willpartially compress to save room in inter frame.In this section, we’ll talk about some of the more popular video compressioncodes. First, DV is a lossy compression that uses intra frame, which mean there arequality loss during compression and decompression process, but every frame of the videogets equal compression. DV code is generally very high quality but require large storagespace. Huffyuv is another compression code. Huffyuv is lossless compression, whichmeans no quality loss after video compression and decompression. In turn of qualityHuffyuv is the best video code out there, but the downside is it require 4 times of storagespace compared to DV. MPEG1 has been around since the 80’s. Although it is old,MPEG1 is consisted to be the most comparable video forma around. It can be play inmany different platform such as PC, apple, dvd player, vcd play, and pocketpc. Thedownside is in order to get good quality, MPEG1 require more bits per second (large filesize). MPEG2came out in the mid to late 90’s and it is the cousin of MPEG1. MPEG2has better quality than MPEG1, but the higher quality only fully realize in full tvresolution, meaning larger file size. MPEG2 also takes up cpu power to process. ASF is aversion of MEPG4 and it is mostly use for video streaming. The major downside is thereis no custom ability for example, resolution is limited and it is prone to errors. Divx 3.11alpha is also a version MPEG4 developed by Microsoft. Divx compress video better thanMPEG1 with fewer bits (smaller size and higher quality). The problem with divx is itisn’t as compatible as MPEG1 and it require more cpu power for playback.In this presentation, We’ll use Adobe Premiere in our demonstration. The systemrequirements are following:
500 Mhz Pentium Processor 64 mb ram Large hard drive Large monitorGenerally, these system requirements are very minimum require in order to run Premiere,but it is recommend that you get a hold of the fastest computer possible to allow the fullperformance of Premiere. The advantage of Adobe Premiere is easy to understandinterface, easy to import or export files and it’s all in one editing program that can doaudio and video effects, transition, insert/delete clips, edit clips, subtitle and overlay. Thedisadvantage of Premiere is the software does not like heavy video compression codessuch as divx and xvid. Premiere is very cpu and memory intensive. These problems willusually cause premiere crash without warming.The interface of Adobe Premiere consists of 4 window layout.A)B)C)D)Project WindowMonitor WindowTimeline WindowPalettes WindowProject window is to store all video, audio and picture clips. It has folders to organizeclips. In the left corner has a preview monitor to preview clips.
Monitor Window is use to preview source clips from project window, play back clips intimeline window and edit clips from source that will insert to timeline window. Monitorwindow has 3 different kinds of view mode.1. Dual view – consist of source preview monitor on left and timeline previewmonitor on right2. Single view – consist only one preview monitor for timeline window.3. Trim mode – consist of 2 monitor for different place of the timelineTimeline window is the actual place where video editing is happen. Video can be insert,delete, edit, and overlay clips. Transition and effect can be added to the timeline. Thereare 2 timeline modes:1. Single track editing - has one the base video track (layer). All of the transitionsand different video clip are add to this track.2. A/B track editing – separate base video track into 3 different tracks (Video 1A,Transition, and Video 1B). When you insert video clips, the first clip must beplace in video 1A first, and the next clip must be place into video 1B, then nextclip need to be place video 1A and so on. Any transition needs to be place at thetransition track between clips.
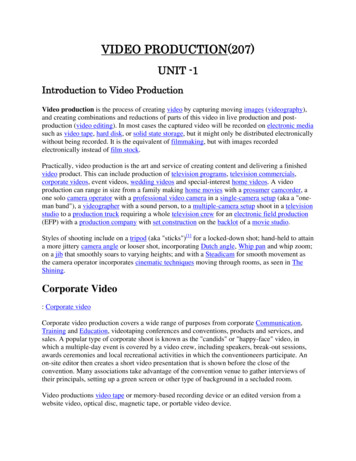
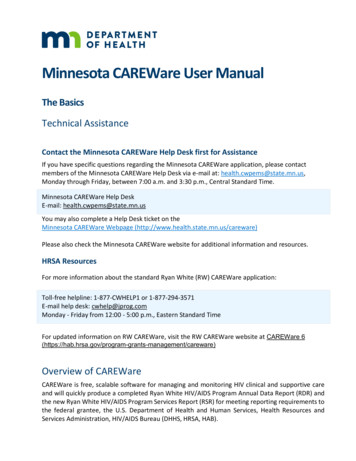
In reality, single track and A/B track editing is basically the same. They both can do thesame function. It is totally up to the preference of the user.Palettes window separate into 3 sections. First isthe transition and effects section. This is where it storeover 100 different transitions and effects. The secondsection is timeline navigation/history. This section keep alog of all the action you did during your project, if youneed to jump back to the precious action, all you need todo is click on one of the log. The last section is call theEffects control. It is an option that allows the use tocontrol each effect that is implement into the timeline.This section will give you the basic walk around on how to video edit using AdobePremiere. For demonstrations purposes, I will only show you how to video edit usingSingle Track Timeline Mode.1. Everything began in the Project Window, we canimport source clip by right click on your mouse - Import - File. You can import any picture, video oraudio files. Folders can be created to keep files in theProject Window organize. On the left image showhow an imported Project Window will look.2. When you double clip a video clip inthe Project Window, the Previewmonitor will show up. We use thePreview Window to select the clip thatwe want to insert into the timeline. Theleft image shown the basic function ofPreview Window:1) Step back frame by frame2) Step forward frame by frame
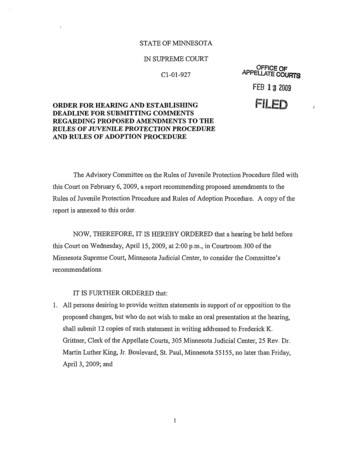
3) Stop video4) Play video an normal speed5) Continue to play video in selected area (A and B)6) Play video once in the selected area (A and B)7) Duration of selected clip (A and B)8) Overall time of the clip9) Select the beginning mark of the clip (where clip began)10) Select the ending mark of the clip (where clip end)11) Select to import either only audio, video or both into the timeline.A. Using 9 to select the beginning of the video clip that will be export to thetimelineB. Using 10 to select the ending of the video clip that will be export of thetimeline3. After the clip has been selected, we can drag the clip from the Preview window toa video track in the timeline. Any track of the video time line is fine, but one thinkto remember is video track 1 is the only track that a transistion can be place, andvideo track 2 and above are the only track that allow video/audio fading.A. A new inserted clip after drag from Preview WindowB. The red line control the fading level of video clipC. The triangle is use to expand the video track, which give user thefading control in BD. Selected clip to be preview in monitor window or export tocompression. In order to preview, users must let Premiere toprocess the video first. It is easily done by using the enter button inyour keyboardOne thing to remember is the video/audio tracks are like layers in Photoshop. If aclip is place on a higher track than the rest of clips, it’ll overlay the video on topoff the existence clips. Video and audio clips can be more around the timeline. Ifthe user feel the need to add a clip between existence clips, all the user has to dois use the mouse and drag the clips around.
4. To add Transitions and effects, the user need to select the desired transition oreffect, and drag them into the timeline window.A. After a transition is drag from the Palettes Window. Notice the blue box isbetween 2 different video clips. Note: transition only be able to place atvideo track 1B. After an effect is drag from the Palettes Window. Notice the green line onthe top of the video clip.C. Effect Controls of B in the Palettes WindowWhen the video editing process is complete, It is time to export all of the clipsfrom the timeline window and compress the project by doing the following: File -
export timeline - movie. Then go to setting and select the desired video compressioncode and setting.QuestionShort answer:1.2.3.4.5.what are the major disadvantages of Adobe Premiere?What are the major advantages of Adobe Premiere?What are the ways to fix interlaced problem?What’s the different between lossless compression and lossy compression?List the 4 major interface window in Adobe Premiere.T/F:6. ASF is the most comparable video compression around.7. Palettes Window is use in Adobe Premiere to import source clips.8. In Adobe Premiere, a transition can be place into video track 2 or higher in thetimeline even with A/B track editing mode selected.9. There are no performances different between A/D track editing mode and Singletrack editing mode.10. In Adobe Premiere, a video effect must be place between 2 video clips in thetimeline window.Multiple choose:11. PAL video uses how many frames per second?a. 59.94 fpsb. 24 fpsc. 29.97 fpsd. 29 fps12. NTSC video uses how many frames per second?a. 59.94 fpsb. 24 fpsc. 29.97 fpsd. 29 fps13. The resolution of NTSC broadcast isa. 1024 by 768b. 800 by 600c. 720 by 625d. non of the above14. The resolution of PAL broadcast isa. 1024 by 768
b. 800 by 600c. 720 by 625d. non of the above15. In order to broadcast 24 frames per second movie into a NTSC television, whatprocess does it need to do so?a. Interlacingb. Deterlacingc. Teleciningd. Inverse telecininge. Non of the aboveAnswers:1. Premiere is the software does not like heavy video compression codes such asdivx and xvid. Premiere is very cpu and memory intensive. These problems willusually cause premiere crash without warming.2. Adobe Premiere is easy to understand interface, easy to import or export files andit’s all in one editing program that can do audio and video effects, transition,insert/delete clips, edit clips, subtitle and overlay.3. Ignore the problem, deinterlace, and inverse telecining4. Lossless compression has no quality loss after compressing and decompressing avideo. Lossy compression has quality losses during compressing anddecompressing a video file.5. Project Window, Monitor Window, Timeline Window, and Palettes Window.6. F7. F8. F9. T10. F11. B12. C13. D14. C15. D
Timeline window is the actual place where video editing is happen. Video can be insert, delete, edit, and overlay clips. Transition and effect can be added to the timeline. There are 2 timeline modes: 1. Single track editing - has one the base video track (layer). All of the transitions and differ