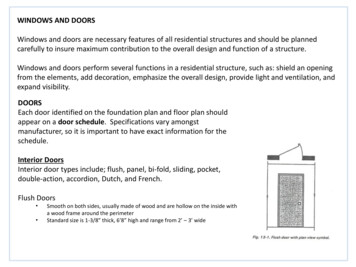
Transcription
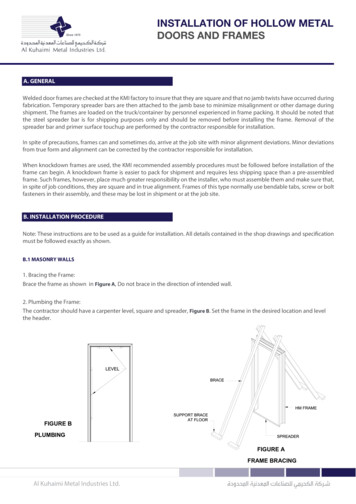
INSTALLATION OF HOLLOW METALDOORS AND FRAMESA. GENERALWelded door frames are checked at the KMI factory to insure that they are square and that no jamb twists have occurred duringfabrication. Temporary spreader bars are then attached to the jamb base to minimize misalignment or other damage duringshipment. The frames are loaded on the truck/container by personnel experienced in frame packing. It should be noted thatthe steel spreader bar is for shipping purposes only and should be removed before installing the frame. Removal of thespreader bar and primer surface touchup are performed by the contractor responsible for installation.In spite of precautions, frames can and sometimes do, arrive at the job site with minor alignment deviations. Minor deviationsfrom true form and alignment can be corrected by the contractor responsible for installation.When knockdown frames are used, the KMI recommended assembly procedures must be followed before installation of theframe can begin. A knockdown frame is easier to pack for shipment and requires less shipping space than a pre-assembledframe. Such frames, however, place much greater responsibility on the installer, who must assemble them and make sure that,in spite of job conditions, they are square and in true alignment. Frames of this type normally use bendable tabs, screw or boltfasteners in their assembly, and these may be lost in shipment or at the job site.B. INSTALLATION PROCEDURENote: These instructions are to be used as a guide for installation. All details contained in the shop drawings and specificationmust be followed exactly as shown.B.1 MASONRY WALLS1. Bracing the Frame:Brace the frame as shown in Figure A, Do not brace in the direction of intended wall.2. Plumbing the Frame:The contractor should have a carpenter level, square and spreader, Figure B. Set the frame in the desired location and levelthe header.FIGURE BPLUMBINGTHEFIGURE AFRAME BRACINGAl Kuhaimi Metal Industries Ltd.
INSTALLATION OF HOLLOW METALDOORS AND FRAMESB.1 MASONRY WALLS3. Spreader:The typical wood spreader, Figure C, must be square and fabricated fromlumber no less than 1 in. (25.4 mm) thick. Correct length is the dooropening width between the jambs at the header. Cut clearance notches forframe stops, Spreader must be nearly as wide as frame depth for properinstallation. Do not remove spreaders until the frames are set permanentlyin the wall.A second wood spreader at the mid or strike point on the frame, Figure D,must be used in addition to the one at the base of the frame to maintain aproper door opening and to prevent bowing of the jambs. The temporaryspreaders often welded to the base of the jambs of frames with weldedcorners, are not intended to be used during the installation of the frameinto the wall. These temporary spreaders are used to prevent shippingdamage only.FIGURE CWOOD SPREADER4.Tee Anchoring:Figure E. As wall is laid up, locate the anchors at the hinges in the hingejamb and at a corresponding position in the strike. Grout frame fully as thewall laid up around the frame. Continually check plumb and, square andtwist in the jamb as wall progresses.FIGURE DSPREADERLOCATIONFIGURE ETYPICAL MASONRYINSTALLATIONAl Kuhaimi Metal Industries Ltd.
INSTALLATION OF HOLLOW METALDOORS AND FRAMESB.2 CHANNEL TYPE - STEEL STUD WALLS1. Bracing, Plumbing and using the spreader:The methods noted under Masonry Walls also apply to this wallcondition. See Figure F and Figure I; also see Figure B, C & D.2. Anchoring:Figure G. Steel Stud Anchors, welded to the back of the jamb.FIGURE FSPREADER LOCATIONFIGURE GZEE ANCHORFIGURE HFLOOR ANCHORAttach jambs to floor through the floor anchor Figure H.2. Center the studs in the frame throat. Attach thesteel studs to floorand ceiling runners. Attachsteel studs to anchors with self tappingscrews or by welding, Figure I. Center the studs in the frame throat. Attachthe steel studs to floor and ceiling runners. Attach steel studs to anchorswith self tapping screws or by welding, Figure I.Continually check the plumb and square of the frame and check jambsfor twist as the wall progresses.3.Wall Construction: It is very important that the steel studmanufacturer's recommendation on thickness and general constructiontechnique be followed to ensure a solid and stable opening.Al Kuhaimi Metal Industries Ltd.
INSTALLATION OF HOLLOW METALDOORS AND FRAMESC. COMPLETED DRY WALL1. Wall Construction: It is very important that the stud manufacturer's recommendation on thickness and general constructiontechnique be followed to ensure that a solid and stable opening is achieved. For example, double studding at the opening isnecessary; the header stud must be the same width as the jamb stud. It is particularly important that the overlapping of verticaland horizontal steel studs be avoided since this produces oversize walls.This, in turn, could create significant installation problems when drywall frames are used.2. Rough Stud Openings: It is important that KMI frame be identified and our recommendationon the opening size be followed. A variety of anchoring techniques precludes the establishmentof a definite rough opening standard.3. Installation Sequence: Typical installation cycle is as follows: Figure J.a) Slide the header in place over the wall approximately in the center of opening. Figure Jb) Install one jamb by sliding it over the wall at the top.Push the bottom of the member until it is approximatelyvertical.c) Install the other jamb in a similar manner. The frame should be installedwith all excessive rough opening clearances thrown to the hinge side. Theweight of the door will tend to cause movement, within the opening,toward the strike jamb.Al Kuhaimi Metal Industries Ltd.
INSTALLATION OF HOLLOW METALDOORS AND FRAMESd) Join the horizontal header to the jambs. Figure K. This is normally done by inserting tabs into theslots, tightening the screws or a combination of both.e) Plumb and square the opening and check the jambs for twist. A carpenter'ssquare and level are normally employed for this purpose , although some installersprefer to hang the door at this point, permitting the door to perform this functionFRAME HEADTAB WELDEDTO JAMBFIGURE KTYPICAL KNOCKDOWNFRAME CORNER CONNECTIONSTRIKE/HINGEJAMBD. EXISTING MASONRY WALL OPENINGS1. Anchoring: Install minimum four anchors per jamb. Locate the anchors at the hinges and as close to the bottom as feasible,in the hinge jamb and in a corresponding position in the SHIM strike jamb.2. Wall Preparation: Place the frame in the completed wall opening. Figure L. Check for square ness. Mark the wall through theholes in the jamb provided at the anchor points. Drill appropriate holes at the marks. Install the sleeve anchors.3. Install Frame: Insert bolts (3/8 in. flat-head sleeve anchors must be used on fire rated frames) through the frame soffit into theexpansion shields. Figure M. Shim behind anchors above bolts to ensure a plumb frame. The methods of plumbing the frame,and the use of the spreader noted under Masonry Wall, also apply to this wall condition. Tighten the screws. Continually checkplumb, square, and twist in the jamb as tightening progresses.Caulk or grout clearance between frame and wall.FIGURE MEXPANSION BOLTINSTALLATIONTHERMAL BREAKFRAMEAl Kuhaimi Metal Industries Ltd.
INSTALLATION OF HOLLOW METALDOORS AND FRAMESE. GROUTING OF FRAMESPlaster guards and junction boxes are intended to protect hardware preparations and tapped mounting holes from masonrygrout of 4 in. (100 mm) max. slump consistency which is hand toweled in place. If a lighter consistency grout (greater then 4 in.(127 mm) slump when tested in accordance with ASTM C143) is to be used, special precautions must be taken in the field bythe installation contractor to protect the hardware preparations. Any grout or other bonding material shall be promptlyF. RUBBER SILENCERSTo insure that rubber silencers are clean and undamaged when installation is complete, as they are usually installed after thefield painting is done, either by adhesion or by insertion into holes provided in the frame.When frames are built into masonry construction, the rubber silencer must be installed prior to grouting. This avoids groutfilling the silencer hole.1.Rubber Silencer Installation: Use the installation tool with the point cut off. Insert nail into the hole in the silencer to elongateit. Moisten the end of the silencer and insert it into pre-punched hole in the frame stop, then remove tool.G. CARE AFTER INSTALLATIONDoors installed prior to completion of construction may be subjected to damage from other trades because of improper protection or carelessness on the part of construction workers.Primed or painted surfaces which have been scratched or otherwise marred during installation (including field welding) and/orcleaning, shall promptly be finished smooth, cleaned, treated for maximum paint adhesion and touched up with a rust inhibited primer.Acid washing of the masonry construction adjacent to door and frame installations will damage the primer coat on the steelsurfaces. If not cleaned immediately, rusting of the surfaces will occur. For this reason steel doors & frames must be protected.If exposed to an acid wash, all primed or painted steel surfaces must be thoroughly cleaned with particular attention beinggiven to hidden areas such as those areas under glazing stops.Al Kuhaimi Metal Industries Ltd.11th Street, First industrial cityP.O. Box 545, Dammam 31421, Saudi ArabiaTel.: 966 13 847 2777Fax: 966 13 847 2591info@alkuhaimi.comwww.alkuhaimi.comCopyright 2017 by Al Kuhaimi Metal Industries Ltd (KMI), All rights reserved. No part of this publication may be reproduced, distributed, or transmittedin any form or by any means, without the prior written permission of KMI, except in the case of noncommercial uses permitted by copyright law.Ver. 1.0 June 2017
proper door opening and to prevent bowing of the jambs. The temporary spreaders often welded to the base of the jambs of frames with welded corners, are not intended to be used during the installation of the frame into the wall. These temporary spreaders are used to prevent shipping damage only. 4.Tee Anchoring: Figure E. As wall is laid up .