Transcription
Indiana Department of AdministrationProcurement DivisionPeopleSoft eProcurementVerify and Complete thePurchase OrderVersion 18.6-121
Table of ContentsFinancials Procedure Overview . 3Complete the Initial Processing . 5Locate/Open the Purchase Order . 51. Complete the Header Details (required) . 82. Edit Comments . 93. Line Comments . 114. Complete the Tier 2 Details (required) . 125. Respond to Leased Assets (required) . 156. Save. 15Asset Information on the Purchase Order lines . 16View a Printable Version. 18Changing the Vendor’s Address . 21Note the Vendor ID . 21Navigate to the Vendor File. 21Review the Summary Tab . 23Access the Vendor Details page . 26Update the Vendor Details page . 26Setting Purchase Order Lines for Services to Amount Only . 27Changing the Payment Terms . 28View the Approvals . 30Approve the Purchase Order . 31Complete the Final Processing. 321. Finalize Document . 322. Budget Check . 323. Dispatch . 33Document Status . 342
Financials Procedure Overview3
4
Complete the Initial ProcessingLocate/Open the Purchase OrderMenu NavigationeProcurement Buyer Center Manage Purchase OrdersThe user should enter the desired criteria to locate the Purchase Order (PO) if it is notalready displayed under the List of Purchase Orders banner.Business Unit (required)This should default to the correctBusiness Unit if not; the usermust enter the five digit businessunit number.BuyerThe user can enter/look up theBuyer ID of the buyer assignedto the PO at creation. This is notneeded to search.Vendor IDThe user can enter/look up theten digit PeopleSoft vendor ID ifknown. This is not needed tosearch.Date From/Date ToThe user can limit the searchframe based on the date of POcreation. This will locate onlyPOs created during the timeframe specified.PO IDThe user can enter the ten digitPO number retrieved from theManage Requisitions page. Thisis the best search criteria toenter.The user must click Search so the PO(s) that match the criteria will be displayed in theList of Purchase Orders section.5
If attachments came forward from the Requisition, they will be displayed to the far rightof the Purchase Order (PO) ID as a paperclip. The user can click the paperclip to openthe attachment.There will be a View button for each attachment. The user can click it to view, print orsave a copy if desired. The user can repeat this process for each attachment. Whenfinished, the user can close the tab(s) and click Return to go back to the ManagePurchase Orders page.6
The user must click the link in the PO ID column to open the desired Purchase Order(PO).Before the user can save/print the PO he/she must edit/complete the Header Details,complete the Tier 2 Details and respond to the Leased Assets question. Adding/editingComments and entering/editing Line Comments are optional.If the PO Status is Open with a green checkmark to the left of the Red X (clicking itbegins the process to cancel the PO), then the user must click the checkmark andrespond yes to the question that says “Do you wish to save the current document?” toproceed.7
11. Complete the Header Details (required)The user must click the Header Details link to access and verify/complete allnecessary information for the Header Details Page.PO TypeIf it does not default correctly from theRequisition Type chosen, then the usercan click the magnifying glass to selector enter the correct one.Tax Exempt/IDThe checkbox must be selected. Theuser can enter the agency’s tax-exemptnumber or leave the State’s as defaulted- 0003118568001.Billing LocationThe user must verify that the defaultBilling Location is correct. If not, theuser should select a Billing Location byclicking the magnifying glass andselecting the correct location.MethodThe default is Print (the user will beresponsible to print and send the PO tothe vendor).*** If processing a PO that is set toelectronically dispatch (typically from apunch-out QPA Requisition), then itshould default as EDX. Please leave itas EDX so that it will electronicallydispatch to the vendor. ***Once the user has verified/entered all necessary information he/she should click OK tobe taken back to the Maintain Purchase Order page to finish processing.8
22. Edit CommentsIf the user clicks the link, it will allow him/her to enter Header Comments which willprint at the top of the Purchase Order (PO).The user will be taken to the PO Header Comments page where standard commentsmay be selected and/or comments may be entered manually. The user can edit oradd the desired information in the field or use the Display comment text in modalwindow icon to enlarge the field. If the comments entered or selected should appearon PO being sent to vendor, the user must click on the Send to Vendor checkboxlocated below the comment field. The user can click the plus icon to the right ofInactivate to repeat this process to add all comments desired.9
To add a standard comment, the user must click the Use Standard Comments link.This will open the Standard Comments page where the user must enter/select aComment Type and a Comment ID.Comment IDThe user can enter or click themagnifying glass to retrieve theavailable choices and select thecomment ID needed. Once it isselected the actual comments willpopulate in the Comments box forverification.Comment TypeThe user can enter or click themagnifying glass to retrieve theavailable choices and select thecomment type needed.Once the user has the desired comment he/she must click OK to return to the POHeader Comments page.When finished entering Header Comments, the user should click OK to return to theMaintain Purchase Order page.10
3Line InformationPrice – this is the unit of measureprice that came forward from theRequisition.Item – this field will be populated ifthe item came from a line itemQuantity Purchase Agreement(QPA) contract.Merchandise Amount – this is thequantity times the price.Description – there may be arrowspointing up and/or down if it is longerthan what can be displayedStatus – this is the status of theRequisition which was expedited.PO Qty – this quantity came forwardfrom the Requisition and should notbe updated.Schedule – when the user clicksthis iconit will display the DueDate, Ship To, PO Qty, Price andMerchandise Amount on the line.From the Schedules page, the usercan access theDistribution/Chartfields icontoreview the remainder of thechartfield information (GL Unit,Fund, Account, Program, Dept, BudRef, etc.) that came forward from theRequisition.UOM – this unit of measure thatcame forward from the Requisition.It should not be updated.Category – this is the UnitedNations Standard Products andServices Code (UNSPSC) categorythat came forward from theRequisition.3. Line CommentsIf the user clicks the icon, it will allow him/her to access the PO Line Commentpage to review existing or enter new Line Comments which will print underneaththe Purchase Order (PO) line if marked as Send to Vendor.11
If the user desires to add line comments, then he/she should follow the same directionsas the Edit Comments section above.44. Complete the Tier 2 Details (required)The user must click the Tier 2 Details tab to access the page to enter the MinorityBusiness Enterprise, Woman Business Enterprise, Indiana Veteran BusinessEnterprise sub-participation percentages for the Purchase Order (PO) if there areany. This information must be entered in order to save the PO.12
For QPA purchases, the Tier 2 information from the QPA contract will be populatedwhen the user clicks Load QPA Tier 2 Info. If a new line is added to the PO, the Tier2 information will automatically increase the total participation. If a QPAcontract does not have Tier 2 information, it will automatically enter none or thefollowing comment will be displayed “This Purchase Order is not associated with aTier 2 contract” where the user should respond with OK and select “None”. Theuser must only click Load QPA Tier 2 Info button when using QPA contracts.For all other purchases, the user must check the solicitation documents (like theRequest for Quotation solicitation package) for the Sub-Contractor Commitmentform. If the prime vendor is using Minority, Woman, and/or Veteran subparticipation, that will be indicated along with the name of the company and whethera percentage or a dollar is amount total of the bid.T2 TypeThe user must click on the dropdown arrow to view the available four choices; None,Minority, Woman and Veteran. If there is no sub-participation, then the user shouldselect “None” and return to the PO Form tab to finish processing. Otherwise, oncethe user has selected the type of sub-participation it will open a new field under theBidder ID column.13
Bidder IDThe user should enter the ten digit Bidder ID if known. If not, then the usershould click the magnifying glass to the right of the field to search for certifiedMinority, Woman and/or Veteran businesses using any of the criteria available.The best way to search is by the Name 1 which is the company’s legal name; theuser should change the dropdown to “Contains” and enter a portion of it. Thesearch results provided will be based on the T2 Type selected. For example, ifthe user selected Woman, then only certified Woman owned businesses will beavailable. Once the correct bidder is found the user can click anywhere on thedesired row and it will populate the Bidder ID and Name fields.The user cannot select the prime vendor on the Tier 2 Details tab because it willnot save.PercentageThe user must enter the percentage of the Minority, Woman and/or Veteran subparticipation.14
To add any additional sub-participation, the user should click on the blue to adda new row of information and follow all the steps for each additional entry. Oncethe user has entered all sub-participation he/she can click Refresh and it willcalculate the sub-participation percentages and dollar amounts and list them atthe bottom of the page. The total for the sub-participation cannot be 100% as theuser will not be able to save the PO.When finished with sub-participation number(s), the user must click the PO Formtab to finish processing.55. Respond to Leased Assets (required)The user must click the Leased Assets link and indicate whether or not thePurchase Order (PO) is for a Leased Asset prior to saving.The user must respond by clicking the radio button in front of No or Yes as appropriateand click OK to return to the PO Form tab.If the items are leased assets, then the agency will need to follow the instructions in theLease Guide for ePro Users posted on the IDOA Procurement website athttp://www.in.gov/idoa/2934.htm6. SaveThe user will need to click Save at the bottom of the PO Form tab.615
Asset Information on the Purchase Order linesA Purchase Order (PO) that contains at least one line item identified as an asset willhave a note in the upper right hand corner stating “Asset Lines Highlighted Red”. In thelines area the line items identified as assets will be highlighted and each one must beaddressed as shown below.The user will need to click the Schedule icon (highlighted above) to navigate to theSchedules page and click on the Distribution/Chartfields icon (highlighted below) inorder to access the Asset Information tab.16
The item below has defaulted (the AM Unit and Profile ID fields are populated) as anasset based on the dollar amount and UNSPSC category chosen on the Requisition line.If the item is to remain as an asset, the user must enter/look up the Empl ID (EmployeeID number) of the agency Asset Manager.If the user does not want the item to remain an asset, then he/she must remove theinformation from the AM Unit and Profile ID fields on each line of the Purchase Order(PO) as needed. Once the asset information is removed from a PO line, it will not bedesignated as an asset on the resulting Receipt line. The user can also make an iteman asset that is not automatically set as one by adding or using the magnifying glass tolocate the appropriate AM Unit, Profile ID and Empl ID on each line as needed.The definition of an Asset Management (AM) asset is a capital asset purchase (or lease)where the total cost is 500 or more (single line item) and the expected life is one yearor longer.Purchases of assets are not required to go to AM if the cost is less than 500 (single lineitem), unless the agency has a requirement to include certain items of a lesser value.For example, the Indiana State Police would like to track firearms under the amount of 500 and can mark them as assets on the Requisition/Purchase Order.When finished verifying/adding information the user should click OK to return toSchedules page and click the Return to Main Page link to return to the PO Form tab tofinish processing and Save.17
View a Printable VersionTo view/print a copy of the Purchase Order (PO) the user can click on the ViewPrintable Version link in the lower left hand corner.The following message will be displayed where the user must respond with Yes toproceed.A new window will open with Report Manager (this page works much like ProcessMonitor). If the new window is not displayed, check the Windows Task Bar for an openwindow titled Report Manager.To proceed, under the Process List banner the Run Status column must display“Success” and the Distribution Status column must display “Posted” on the process justbegun. The user can click Refresh about every eight seconds or so until both havebecome the required status. At that point, the user must click the Details link on thesame row to be taken to the next page.18
On the Process Detail page the user must click on the View Log/Trace link.The user must locate and click the link with the name ending in PDF to open the file toreview/print/save a copy of it.A new window will open the pdf file of the Purchase Order (PO). The user should verifythat everything is correct, including the vendor’s addresses. If so, then he/she cansave/print a copy and go to the Approve the Purchase Order process if he/she has theauthority. If not, the agency Head Procurement Agent will likely approve it.19
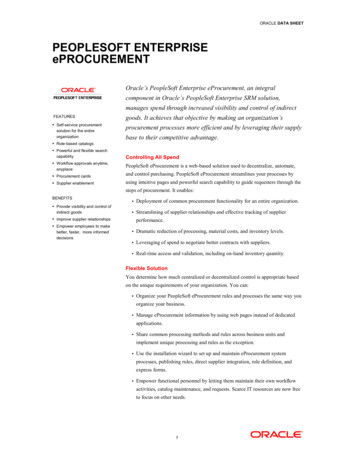
213453. If set up, header comments willprint just underneath thePurchase Order Instructions &Comments banner.1. The upper left will contain theVendor’s remit to address, orderaddress and contact information.2. The upper right will contain someidentifying information includingthe PO number, the ship toaddress, bill to address andBuyer information.4. The Purchase Order Line Detailsbanner and the line iteminformation will print below theheader comments.5. If set up, line comments willdisplay just below the line iteminformation.If there is anything wrong with the Purchase Order, the user should make a note of theproblems and close the window. The user should return to the PO to make anynecessary changes and save.20
Changing the Vendor’s AddressIf necessary, the user can change the vendor’s addresses. The user will need to locatethe appropriate Location in the vendor database; it is a specific combination of anordering address and remitting address. If the user does not have access to the vendorfile, then he/she should submit a GMIS issue asking for view only access.Note the Vendor IDThe user should make a note of the vendor’s ID number located near the top left cornerof the PO Form tab.Navigate to the Vendor FileIn the top right corner, the user can click the New Window link. A new window will opento allow the user to navigate to the vendor database. The current window displaying thePO Form tab will remain open for easy access.21
In the new window the user should navigate to the Vendor File as follows:Main Menu Vendors Vendor Information Add/Update VendorThe user can enter any of the search criteria on the Find an Existing Value tab.Name 1The user can change the dropdownto “contains” and can enter a uniqueportion of the vendor’s name or usethe magnifying glass to look it up.Vendor IDThe user can enter the ten digitPeopleSoft Vendor number if known.This is the best way to search.Short Vendor NameThis is generally the first tencharacters of a vendor’s name; itdoes not include any punctuation.The user should change thedropdown to “contains” and enter thefirst 10 characters to search the fileor use the magnifying glass to look itup. This is the least recommendedway to search.AOS Vendor IDThe user can enter the full ninedigits of the Federal ID or changethe dropdown to contains and entera portion of it. If the user enters onlya portion, all vendors that have thatcombination in their ID will bereturned.The user should click Search to either be taken to the specific vendor searched for orhe/she will be given a list of the vendors that meet the search criteria to select from.22
Review the Summary TabThe summary tab of the selected vendor will be displayed. The top of the page containsthe following information.Vendor IDThis is the ten digit PeopleSoftnumber assigned to the vendor.Remit To:This displays the remit address forthe default location for this vendor.There might be other remitaddresses associated with thisvendor, but only the default locationis displayed here.Vendor Short NameThis is generally the first 10characters of the vendor’s name.Vendor NameThis is the vendor’s legal name asrecorded with the Auditor of State.StatusThis displays the current status ofthe vendor. The status must be“Approved” to be able to use thevendor.OrderThis displays the order address forthe default location for this vendor.There might be other orderaddresses associated with thisvendor, but only the default locationis displayed here.The bottom half of the page has two items for the user to review: the Active Addressesand All Locations with Order & Remit Addresses.23
Under the Active Addresses bannerAddress Line 1, 2, City, State, ZipCodeThe information will be populated inthe columns accordingly.AddrThis column displays the numberassigned to the address.DescriptionThis column typically displays thelast four digits of the Federal idnumber. If “No Auditor of StatePayment” is displayed, it cannot beused for remittance purposes.Name 1 and Name 2These columns could display analternate name (doing business as,formerly known as, etc.) for thevendor.24
Under the All Locations with Order & Remit Addresses bannerLocations TabLocationThis field displays the locationnumber assigned. The Locationmust have the word “REMIT” at thebeginning to be used for remittancepurposes unless it is tied to a QPAcontract. The Pay Method field willhave a notation if the vendor is setup to receive Automated ClearingHouse (ACH) payments. The Loc(Location) Name may display a QPAnumber if the location is tied to one.Used forThis field displays the type ofaddress for this location. The onlytwo types required are Order to andRemit to.AddrThis field displays the addressnumber associated with the type ofUsed for. These refer to the ActiveAddresses above this area.DescrThis field displays the last four digitsof the Federal ID and any sub codesif applicable. The user will also see“No Auditor of State Payment” foraddresses that are not registeredwith the Auditor of State and/orcannot be used as a remit address.Loc StatusThis field displays if the location isactive or not. The user should onlyuse active locations, as an inactivelocation will cause the PurchaseOrder (PO) to error.Address TabLocationThis field displays the correspondingaddress associated with the Remitand Order Addresses from theLocation Tab.Once the user has found the correct vendor location and Order Address number, he/shecan close the window displaying the Vendor Information return to the Purchase Order.If there is no location available offering the correct combination of order and remitaddresses, then the user must contact the Auditor of State vendor coordinators with thepertinent information, so that a new location can be set up.25
Access the VendorDetails pageThe user can click theVendor Details linknext to the vendor field.Update the VendorDetails pageOn the Vendor Details page the user will need to enter two items:LocationThe user should enter the six digitlocation number noted duringresearch.AddressThe user should enter the Orderingaddress number noted duringresearch. No zeros are neededbefore the number.Once the user has entered both of these items he/she can click Refresh to review andshould click OK to return to the PO Form tab.26
Setting Purchase Order Lines for Services to Amount OnlyIf a receipt and/or payment needs to be issued by a dollar amount and not a set priceper unit of measure, the Requisitioner should have set up the line with a quantity of one,an appropriate unit of measure (service, each, lot, annual, etc.) and the correspondingunit pricing. If not, the information will be adjusted once it is set to “Amount Only”. Theuser should verify/update the fields as needed.On each line required, the user should click the Attributes tab and click the checkboxlabeled Amount Only.27
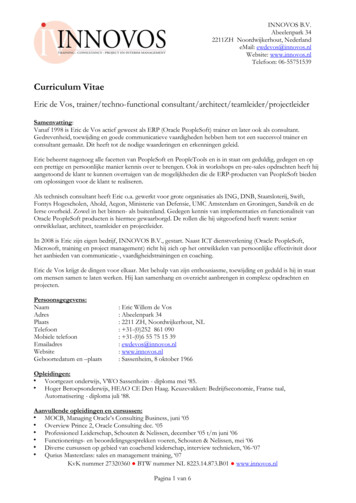
Changing the Payment TermsPayment terms are used to calculate the net due date, discount due date, and discountamount calculations for Vendor payments. Accounts Payable uses these payment termsand timing methods to schedule payments for invoices and to calculate amountsremitted to vendors.Payment terms may specify either a single payment or multiple payments. Paymentterms may specify a discount for early payment, for example 2% discount if paid in 10days, otherwise, the full amount is due in 30 days. See 2NT30 where a discount of20.00 is taken if paid within 10 days of the invoice date. Payment terms may set a rebatepercentage - a percentage reduction for each day early the payment is made.Payment terms may also set delay days, see the screenshot below for 15TH. If theinvoice is dated between the first and the 10th, the payment will be scheduled for the15th of that month. If the invoice is dated the 11th through the end of the month, thepayment will be scheduled on the 15th of the following month.Multiple payment terms will create multiple payments for a single invoice and voucher.For example, annual building rent of 125,000 may be invoiced at the beginning of theyear and 12 payments will be created, one each month for the next year.Payment terms calculate the scheduled payment date based on the invoice date. TheAuditor of State attempts to create the payment two business days before the scheduleddue date.The State of Indiana uses AREAR as the default payment terms except for employeeswhere the default is ZERO (for immediate payment). Payment terms other than thedefault should be included in a Purchase Order after negotiation of the best price andterms available.A payment will not be created until the voucher has been fully approved, even when theapproval occurs after the calculated payment due date.To change the payment terms, the user must click on the Vendor Details link.28
The user can click on the magnifying glass to the right of the Terms field in order toselect the appropriate payment term based on the contract language.Once selected, the user should click OK to return to the PO Form tab.29
View the ApprovalsThe user can click the View Approvals link in the lower left hand corner.The user must click Yes to the question asking if you wish to save the current documentso that it can be saved and the View Approvals page displayed. When finishedreviewing, the user must click the Return to Purchase Order link to return to the POForm tab.30
Approve the Purchase OrderThe user (if authorized) or the agency Head Procurement Agent can access a PurchaseOrder that requires approval through his/her worklist. Once the item is opened thefollowing page will be displayed.The approver should review the header information, line details and review/add otherApprovers as needed prior to clicking Approve or Deny. Approval Comments must beentered before clicking the Deny button.If the PO is over the agency’s delegation, then the user must submit a GMIS issue withthe following information: Business Unit, PO number, PO Type and Contract informationif applicable. Once reviewed and approved by IDOA Procurement the agency Buyer willbe notified and will need to Finalize, Budget Check and Dispatch the PO. The agencywill be responsible for any copies to the vendor and the agency Accounts Payable area.31
Complete the Final ProcessingMenu NavigationeProcurement Buyer Center Manage Purchase OrdersOnce the Purchase Order (PO) is fully approved, the user will need to access it tocomplete three final process (Finalize, Budget Check and Dispatch) before it is ready tobe sent to the awarded vendor.211.Finalize DocumentWhen completed the process releases any funds that were pre-encumbered in theRequisition stage that are under the amount of the PO. The user must click the FinalizeDocument icon . If for some reason the process needs to be reversed, the user canclick the2.Undo Finalize Entire Document icon.Budget CheckWhen the process is complete and the status is “Valid” the funds will be encumbered.The user must click once on the Budget Check iconto initiate the process. The POstatus must be “Approved” in order to run the budget check process.Once the Budget checking process is completed the Budget Status and the Doc Tol(Document Tolerance) Status will update. The final status for both Budget and Doc Tolmust be Valid and Valid, before the user can finish processing. If there is an error foreither of these statuses, the user should contact the agency Head Procurement Agentfor assistance.If the user clicks Pre Check Budget, it will let the user know if the funds areavailable at that moment in time, but it will not encumber the funds. This step is notnecessary to proceed, so please consult with your agency as to if/when this step shouldbe completed.Purchase Orders set up for electronic dispatch (EDX as the Dispatch Method) must notbe manually dispatched. The user must stop at this point! The status can be monitoredthrough eProcurement Manage Requisitions. When the dispatch process has occurred,it will update from PO Created to PO Dispatched.32
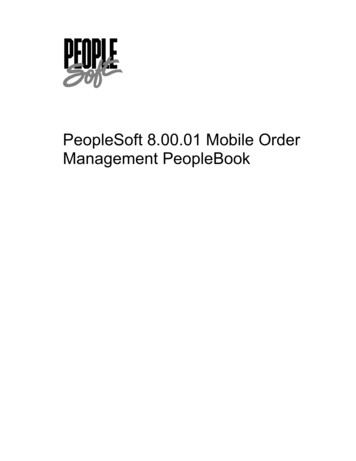
33.DispatchIn order for the user to run the Dispatch process, the Purchase Order (PO) must havethe PO Status as Approved, Budget Status as Valid and Doc Tol Status as Valid. Theuser must click Dispatch to be taken to the Dispatch Options page.No adjustments are required onthe Dispatch Options page; theuser must click OK to proceed.The user will be asked if he/shewould like notification when thedispatch process is complete.IDOA recommends that the userclick Yes and wait for the process to finish.Once it is complete, the user will be taken back to the Maintain Purchase Order pagewhere the PO Status will listed as Dispatched. The PO must be dispatched before aReceipt can be issued.The user should click Save. If not done earlier, the user should go through the processto View a Printable Version of the PO to print/save it for transmitting/sending to thevendor.33
Document StatusEvery component of PeopleSoft Financials has a Document Status page associated withit. For Purchase Orders it is located atMenu NavigationMain Menu Purchasing Purchase Orders Review PO Information DocumentStatusThis page will give information about the PO at the top of the page and then everydocument currently associated with it will be displayed at the bottom under theAssociated Document banner. It can include things like Requisitions, Contracts,Receipts, Accounts Payable Vouchers and Payments. Blue links can be opened and thecontent reviewed.Once the goods/services have been physically received from the vendor the Receivers
Procurement Division . PeopleSoft eProcurement . Verify and Complete the Purchase Order . Version 18.6-12 . 2 Table of Contents . Services Code (UNSPSC) category that came forward from the Requisition. Price - this is the unit of measure price that came forward from the