Transcription
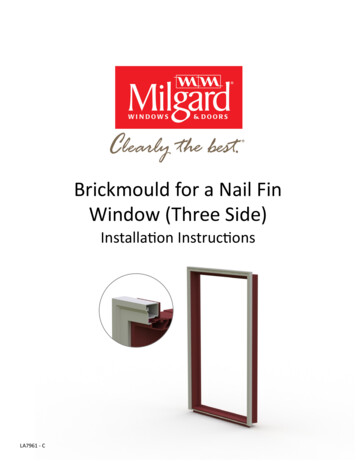
Brickmould for a Nail FinWindow (Three Side)Installa on Instruc onsLA7961 ‐ C
Nail Fin BrickmouldFor Milgard Essence Series Windows and Doors Install Window per AAMA 2400‐10 installa on standard. Read instruc ons from beginning to end before assembling or installing Brickmould. Brickmould is not compa ble with other Milgard Window or Door offerings. Do not use Brickmould on other manufacturers’ products. Window must be properly installed and flashed prior to Brickmould installa on. Milgard Nail Fin Brickmould does not provide structural support or func on as a water barrier. Use exterior grade high quality sealents. For compa ble TiteBond Sealant colors refer to page 13.Required ToolsScrewdriver with #2 Phillips bitCaulking GunLA7961 ‐ C2
Nail Fin Brickmould PartsBrickmould with Groove FillerPARTDESCRIPTIONPART NUMBERBrickmould with Stucco KeyPARTDESCRIPTIONPART ADEREX7815XX3BRICKMOULD‐GROOVE FILLEREX7852XX3BRICKMOULD‐STUCCO KEYEX7812XX4CORNER KEYIM7965MI4CORNER KEYIM7965MI5#8‐5/8” FLAT HEAD SS SCREWFA0442SS5#8‐5/8” FLAT HEAD SS SCREWFA0442SS6TRIM CLIPHA7826MI*6TRIM CLIPHA7826MI*7PERMANENT TRIM CLIPHA8300MI7PERMANENT TRIM CLIPHA8300MI8(WINDOW FRAME)VARIES8(WINDOW FRAME)VARIES9FOAM PLUGMI75149FOAM PLUGMI7514*HA8300CPML provides a more permanent connec‐on.LA7961 ‐ C3
Notes For Proper InstallaƟonBrickmould lip rests on the face of the frame.Brickmould lip does not rest inside the accessorygroove.If siding will not be applied around Brickmould, use HA8300CPML. HA8300CPML provides a more permanentconnec on. Trim is difficult to remove if using HA8300CPML.HA8300CPMLLA7961 ‐ C4
Special InstrucƟons for Shape and Radius Windows Install Window per AAMA 2400‐10 installa on standard. Milgard provides the Brickmould for Shape and Radius windows already clipped to the window frame. Remove the trim by gently pulling on any corner. Skip to step 4 for trim clip a achment.LA7961 ‐ C5
Nail Fin Brickmould CornersTop MiterExterior ViewInterior ViewBo om Groove FillerExterior ViewInterior ViewBo om Stucco KeyBrickmould Stucco Key Flush shownExterior ViewInterior ViewBrickmould shown in yellowWindow Frame shown in blueLA7961 ‐ C6
Corner Key Assembly1Determine Header, Sill, and Leg Trim Pieces. Insert Corner Keys into Brickmould miter ends.Note: Milgard installs theGroove Filler or Stucco Keybefore shipping the window.2LA7961 ‐ CInject sealant into Corner Keys (half a squeeze into one hole per corner is all that is needed).7
Install Screws3Install #8 x 5/8” Flat Head ScrewsMiter Corners: Start screw into onehole. Start other screw into secondhole and ghten un l head is flushwith Brickmould.LA7961 ‐ C8
Trim Clip AƩachment4Install Trim Clips onto upper Frame Corners.Space Trim Clips 1.5” away fromcorner. Tap two Trim Clips intotop corners.Trim Clip5Install Permanent Trim Clip 1.5" away from boƩom of each Window Jamb.Permanent Trim ClipLA7961 ‐ C9
Trim Clip AƩachment (ConƟnued)If any side of the Window is47” or longer, tap Trim Clipsinto side.Note: Use HA8300CPMLinstead of HA7826MI for astronger connec on.Spacing between Trim Clips should not exceed 4 . Add addi onal Trim Clipswhere necessary for a more secure fit.LA7961 ‐ C10
Foam Plug InstallaƟon6LA7961 ‐ CSqueeze Foam Plug into open end of Brickmould. Push Foam Plug unƟl it is flush with end ofBrickmould. Repeat for other open end.11
Trim InstallaƟon7LA7961 ‐ CApply 1/4” diameter 2” long beads of sealant to back of Brickmould. Space beads 18” apart.12
Trim InstallaƟon (ConƟnued)8Push Brickmould onto Window Frame unƟl it seats fully.9Brickmould does not snap onto Permanent Trim Clip. To avoid damaging Brickmould, placewood block directly over Brickmould in Permanent Trim Clip area. Tap Brickmould ontoPermanent Trim Clips.LA7961 ‐ C13
Clean Up Wipe up any excess sealant. Clean up scuff marks with soap and water.TiteBond WeatherMaster Sealant CompaƟble ColorsMilgard PaleƩe ColorLA7961 ‐ CTitebond WeatherMaster ColorReferenceMilgard Part NumberBark44061SE7673ARBlack E7673CIClassic Brown44211SE7673LWEspresso45661SE7673EXEvening 673IVPea ETwilight44031SE7673BL14
07/17/2015NDSDOA3848ECNEG05/22/2015NDSVMLA7961 ‐ CDESCRIPTIONRELEASEDATEDRAWN APPD.15
2 LA7961 ‐ C Install Window per AAMA 2400‐10 installa on standard. Read instruc ons from beginning to end before assembling or installing Brickmould. Brickmould is not compa ble with other Milgard Window or Door offerings. Do not use Brickmould on other manufacturers' products. Window must be properly installed and flashed prior to Brickmould installa on.