Transcription
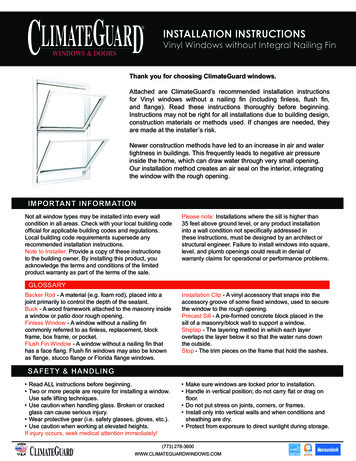
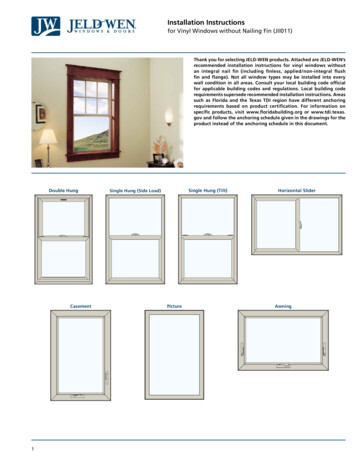
Installation Instructionsfor Vinyl Windows without Nailing Fin (JII011)Thank you for selecting JELD-WEN products. Attached are JELD-WEN’srecommended installation instructions for vinyl windows withoutan integral nail fin (including finless, applied/non-integral flushfin and flange). Not all window types may be installed into everywall condition in all areas. Consult your local building code officialfor applicable building codes and regulations. Local building coderequirements supersede recommended installation instructions. Areassuch as Florida and the Texas TDI region have different anchoringrequirements based on product certification. For information onspecific products, visit www.floridabuilding.org or www.tdi.texas.gov and follow the anchoring schedule given in the drawings for theproduct instead of the anchoring schedule in this document.Double HungCasement1Single Hung (Tilt)Single Hung (Side Load)PictureHorizontal SliderAwning
Installation Instructionsfor Vinyl Windows without Nailing Fin (JII011)7 STEP INSTALLATION STICKERThe 7 Installation Steps below are included withthe product:1. Inspect Product: Products should be inspected for shipping damage,color, configuration, handing, etc. Additionally, inspect products forany manufacturing anomalies prior to installation (e.g. warp, bow,squareness). Contact Dealer or JELD-WEN if issues are identified.2. Inspect Rough Opening (R.O.): Inspect R.O. prior to installation ofthe product. Correct any deviation that would prevent the window/doorproduct from being installed plumb, level, square and without twist.3. Install Sill Pan: A sill pan is required prior to window/door productinstallation (refer to the latest version of ASTM 2112 for sill pandefinitions). Sill pan should have a positive slope and must be installedonto the sill of the R.O. in a weather-tight manner and able to drain to theexterior. For aftermarket sill pans, such as SureSill , follow manufacturer’sinstructions. For sill pans without a positive slope, place 1/4” tall plasticshim 2” from each corner and no more than 8” on-center in between(excludes Canada).4. Temporarily Fasten and Shim Product: Position window/doorproduct into R.O. and apply a screw through-frame/fin at an upper corner.Verify product is level. Add shims along the sides and head to makeproduct square, plumb and without twist (min. of 3 shims per side –top, bottom, middle).5. Fasten Product (Size and Spacing): Unless specified by instructionsor code, most products should be secured with a #8 pan-head (orlarger diameter head), corrosion-resistant screw; embedment must bea minimum of 1 1/4” into the structural framing. Place a shim at eachthrough-frame screw location. NOTE: Florida, Texas and other jurisdictionsmay have additional requirements – check local code. Additionally,folding nail fins and some exterior trim options are not structural, sothrough-frame fastening is required. See installation instructions for screwsize and spacing. As a default, screw spacing is 4” from corners and 8”on-center.26. Install Drip Cap: The use of a drip cap on all window/door productsis recommended, regardless if supplied. A drip cap is required on anyvertical mulled/joined products, regardless if supplied. NOTE: A drip capmay not be suitable for some product lines (e.g. brickmould vinyl, flush fin,vinyl flat casing, various wall systems), regardless these product lines needto be incorporated into the wall in a weather-shedding manner.7. Create “Interior” Air Seal: A “continuous” interior air seal is required(use low expansion window-door foam or backer rod and sealant)between the window/door frame and the R.O. framing (jamb extensionis not to be considered part of the frame). An air space should remainbetween the nail fin/exterior sealant joint and the interior air seal.NOTE: Shims may need to be cut back, so the interior air seal is“continuous” between the window/door frame and rough opening.Additionally, some wall systems may not allow for the application of aninterior air seal.Weather Proofing of the Rough Opening (R.O.) and/or Productis the responsibility of the Installer: JELD-WEN recommends the use ofindustry-recognized flashing systems, such as OSI (www.ositough.com) orother professional sources.NOTE: It is the responsibility of the Owner, Architect or GeneralContractor to select products in compliance with applicable laws andbuilding codes.These 7-steps serve as the basic/default steps during theinstallation process and are in conjunction with the followinginstallation instructions, which better refine fastener spacing,shimming, fastener location, additional information onapplying loose parts/components, product handling/storageand all other product related aspects/considerations, found atwww.jeld-wen.com.
Installation Instructionsfor Vinyl Windows without Nailing Fin (JII011)IMPORTANT INFORMATION TABLE OF CONTENTS GLOSSARYPLEASE NOTE: Installations where the sill is higher than 35feet above ground level, or any product installation into a wallcondition not specifically addressed in these instructions, must bedesigned by an architect or structural engineer. Failure to installwindows into a square, level, and plumb openings could result indenial of warranty claims for operational or performance problems.NOTE TO INSTALLER: Provide a copy of these instructions to thebuilding owner. By installing this product, you acknowledge theterms and conditions of the limited product warranty as part of theterms of the sale.ContentsSafety and Handling. . . . . . . . . . . . . . . . . . . . . . . . . . . . . . . . . . . . . . . 3Materials and Tools . . . . . . . . . . . . . . . . . . . . . . . . . . . . . . . . . . . . . . . 4Inspect Product. . . . . . . . . . . . . . . . . . . . . . . . . . . . . . . . . . . . . . . . . . . 4Inspect Rough Opening (R.O.). . . . . . . . . . . . . . . . . . . . . . . . . . . . . . . 5Install Sill Pan. . . . . . . . . . . . . . . . . . . . . . . . . . . . . . . . . . . . . . . . . . . . 6Temporarily Fasten and Shim Product. . . . . . . . . . . . . . . . . . . . . . . . . 6Fasten Product (Size and Spacing). . . . . . . . . . . . . . . . . . . . . . . . . . . . 7Install Drip Cap. . . . . . . . . . . . . . . . . . . . . . . . . . . . . . . . . . . . . . . . . . 12Create “Interior” Air Seal. . . . . . . . . . . . . . . . . . . . . . . . . . . . . . . . . . 12GlossaryBacker Rod (backing material)A material (e.g. foam rod), placed into a joint primarily to control thedepth of the sealant.BuckA wood framework attached to the masonry inside a window or patiodoor rough opening.Finless WindowA window without a nailing fin commonly referred to as finless,replacement, block frame, box frame or pocket.Flush Fin WindowA window without a nailing fin that has a face flange (trim only). Flushfin windows may also be known as flange, stucco flange or Floridaflange windows.Head ExpanderA vinyl accessory used to cover the head of the window in someretrofit applications.Installation ClipA vinyl accessory that snaps into the accessory groove of some fixedwindows used to secure the window to the rough opening.ShiplapThe layering method in which each layer overlaps the layer below it so thatwater runs down the outside.Sill AdapterA replacement frame component attached to the sill of a finless windowbeing installed into an existing window frame with a sloped sill. Thecomponent cancels out the sloped sill of the existing double-hung, helpingto support the front edge of the window sill.StopThe trim pieces on the frame that retains the sashes.Weep Hole (weep channel)The visible exit or entry part of a water drainage system used to direct anddrain water out of a window.SAFETY AND HANDLINGSafety Read and fully understand ALL manufacturers’ instructions beforebeginning. Failure to follow proper installation instructions may result inthe denial of warranty claims for operational or performance problems. Do not work alone. Two or more people are required. Use safelifting techniques. Use caution when handling glass. Broken or cracked glass can causeserious injury. Wear protective gear (e.g. safety glasses, gloves, ear protection, etc.). Operate hand/power tools safely and follow the manufacturer’soperating instructions. Use caution when working at elevated heights. If disturbing existing paint, take proper precautions if lead paint issuspected (commonly used before 1979). Your regional EPA(www.epa.gov/lead) or Consumer Product Safety Commission officesprovide information regarding regulations and lead protection.3WARNING: Drilling, sawing, sanding or machining wood productscan expose you to wood dust, a substance known to the Stateof California to cause cancer. Avoid inhaling wood dust or use adust mask or other safeguards for personal protection. For moreinformation go to www.P65Warnings.ca.gov/wood.Window Handling Make sure operable windows are locked prior to installation.Heed material manufacturers’ handling and application instructions.Handle in a vertical position; do not carry flat or drag on the floor.Do not put stress on joints, corners or frames.Store window in a dry, well-ventilated area in vertical, leaning positionto allow air circulation; do not stack horizontally. Protect from exposure to direct sunlight during storage. Install only into vertical walls and when conditions and sheathingare dry.IF INJURY OCCURS, IMMEDIATELY SEEK MEDICAL ATTENTION!
Installation Instructionsfor Vinyl Windows without Nailing Fin (JII011)MATERIALS AND TOOLSJELD-WEN exterior window and door products should be installedin accordance with JELD-WEN’s recommended installationinstructions, which are printed on the product label or can be foundon our website: www.jeld-wen.com.NOTE: Alternative installation methods and flashing systemsmay be utilized at the installer’s or owner’s discretion and, insuch situations, the installation should be done in accordancewith the flashing manufacturer’s instructions. Follow all materialmanufacturers’ instructions for proper use and compatibility. Whenusing flashing, spray adhesive/primer, sealant and foam products,we recommend using the same manufacturer and verifyingcompatibility. It is the End User’s responsibility to determineif dissimilar materials are compatible with the substrates inthe application.Needed Materials #8 pan-head or washer-head, corrosion-resistant screw. Minimumembedment of 1 1/4" into the structural framing (or as required bylocal code). For securing the sill in masonry applications, 3/16" self-tapping concretescrews (gasket-head optional or as required by local code). Minimumembedment of 1 1/4" into the structural framing (or as required bycode). Apply sealant to the self-tapping concrete screw threads andhead of the screw. For Wind Zone 3 (WZ3) Products (Tilt Single Hung, Side Load SingleHung, Tilt Double Hung and Horizontal Slider Windows): #8 x 2 1/2"flat head screws (stainless steel recommended) are needed to gothrough and anchor the bracket to the rough framing (two screwsper bracket).1Potential Needed Tools Utility knife/shearsJ-rollerHammerTape measureCaulking gunLevel (4' minimum recommended) Drill with bitsPry barScrewdriverHacksawPutty knifeINSPECT PRODUCTRemove Packaging Remove shipping materials such as corner covers, shipping blocks,shrink wrap or pads. If there is a protective film on the glass, do notremove it until installation and construction are complete. Do not remove the installation label until after the inspection of the jobis complete.Inspect Window Cosmetic damage. Product squareness (diagonal measurements not more than1/4" different). Correct product (size, color, grid pattern, handing, glazing, energyefficiency requirements, etc.). Cracked frame welds or other frame damage. For side-by-side mulled units, a drip cap that extends the length of theframe plus 1/8" overhang on each end is required.4 Sill Pan Material: Ridged sill pan, self-adhered flashing (SAF), liquidapplied flashing or a combination of the materials listed. Sealant: We recommend OSI QUAD Max Sealant or equivalent (forinterior air seal). This sealant can be used in any application and can bepainted or ordered in a color matched product if desired. Polyurethane low expansion Window and Door foam: We recommendOSI QUAD Foam or equivalent (for interior air seal). Backer rod: 1/8" larger than the widest portion of the gap (used inconjunction with sealant bead for interior air seal). Non-compressible or non-water degradable shims. Drip cap (if not supplied).Additional Materials Needed if Installing into an ExistingWindow Frame: Composite or solid wood (cedar or redwood recommended) or exteriorgrade plywood for shimming. If installing into an existing aluminum window, dimensions should be1/2" shorter than the length of the sill track and 1/4" taller than thedepth of the track. If installing into an existing wood window, dimensions should be1/4" thick, length of the existing frame sill minus 1" and the width ofthe new vinyl window side jamb minus 1/4".If any of the above conditions represent a concern, or if you expectenvironmental conditions to exceed the window’s performancerating, do not install the window. Contact your dealer or distributorfor recommendations.
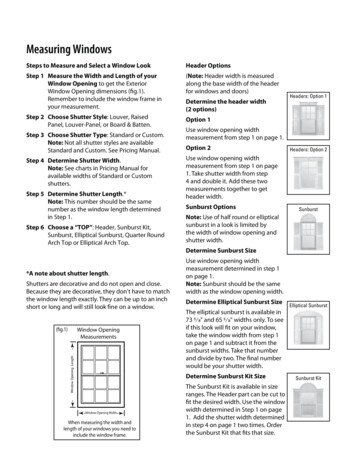
Installation Instructionsfor Vinyl Windows without Nailing Fin (JII011)2INSPECT ROUGH OPENING (R.O.) Verify the width and height of the rough opening is 1/2" larger thanthe window width and height. Openings for mulled units should be3/4" larger than the window width and height. Verify the rough openingVerify Square, Level and Plumbis square. The (A) and (B)measurements should be thesame. Suggested deviationfrom square is no moreAthan 1/4". Verify the rough opening isEClevel and plumb (C, D andE). Suggested deviation fromDsquare is no more than 1/8".B The rough opening sill shouldnot be crowned or sagged(D), but rather level or sloped(positive slope) to the exterior. The exterior face of the rough opening should be in a single plane (E)with less than 1/8" twist from corner to corner.For Retrofit InstallationsVerify the rough opening framing is structurally sound. Contact your localwaste management entities for proper disposal or recycling of productsbeing removed.This installation guide only addresses masonry/block wall,sheathed wall, open-stud construction and existing window frame.If installing into an opening other than what is identified, consult abuilding professional.Masonry/Block Wall ConstructionThis installation assumesthat a framework of studs(often called a buck) hasalready been properlyfastened in a weatherproofmanner to the concrete/masonry wall. The windowwill be mounted to the buckin a weatherproof manner.BuckFully Sheathed Wall ConstructionSheathing is applied tothe exterior of the wallframing. The windowwill be mounted intothe rough opening in aweatherproof manner.HeaderKingstudTrimmerstudsOpen-Stud ConstructionSheathing is absentand building wrap isapplied atop of the wallframing. The windowwill be mounted intothe rough opening in aweatherproof manner.Existing Window Frame InstallationThe existing windowframe is left in placeand the window will beinstalled into the frame in aweatherproof manner.5Existingwindow frameSheathing
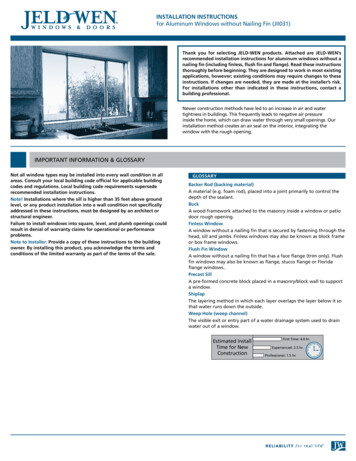
Installation Instructionsfor Vinyl Windows without Nailing Fin (JII011)3INSTALL SILL PANPrepare/Shim the Sill1. Install a sill pan in aweatherproof manner onthe rough sill (refer to ASTM2112 for types of sill pans).Always allow water to drainout of the pan and ontothe building wrap, drainageplane or to the exterior.NOTE: If using a rigid sillpan, apply a continuousbead of sealant to theinterior of the upturned legof the sill pan.2. Apply a continuous bead ofsealant to the interior of theupturned leg of the sill pan(if using a rigid sill pan).1. Place shims on the roughsill as needed to levelthe window and preventsagging or bowing. Shimsshould be aligned in thefollowing fashion: Near the exterior edge ofthe sill. 1 shim placed 3/4" to 1"in from each side wall ofthe rough opening. No more than 24 incheson center betweenadditional shims.46"2 1/2"3/4" - 1"24" O.C.Prepare Existing Window Frame (Aluminum Frame):1. Remove the sashes and/orMeetingglass in the existing window.stile2. Remove all hardware andwindow components not aSealantpart of the frame (meetingstile, jamb liners, lockingmechanisms or otherhardware etc.).3. Seal all four corners of thewindow frame as shown.4. Notch grooves across thebottom of the continuoussupport (see materials list)Continuousto allow for water drainagesupportthrough the weep holes.Set the continuous supportinto the exterior sill track,creating a level surface atthe sill.NotchesTEMPORARILY FASTEN AND SHIM PRODUCTWARNING! To avoid injury, use at least two people to install.Adequately support the window until completely fastened.Installation Clips: If installation clips are to be used, reference Section 5for proper clip application prior to setting the window.Existing Window Frame: If installing into an existing window frame witha sloped sill, reference Section 5 for proper stop-in application prior tosetting the window.Through Frame Fastening: If installing by placing screws through themain window frame begin by shimming the product in place using thesteps below. Place shims 4"- 6" from each corner on the side and head jambs.Evaluate the window position with the opening for plumb, level, squareand twist (Reference the Product Installation Tolerance Table). Place the shims at the interlock Jamb Adjusterof hung windows or in theTurn clockwise to firstcenter for all other windows.click and adjust as neededNOTE: Some hung windowshave a “jamb jack” along eachside. Engage the #8 x 2" flathead screw until the first clickis heard and then adjust theside jamb as needed, prior toadding shims.6 For mulled units ensure there is a shim located 1/2" either side ofthe mull joint. Shims may be temporary held in place with sealant. Steps may not pertain to existing aluminum frames or sloped sill.NOTE: For large, heavy or mulled units, shim at 8" on-centerand no more than 2" from each corner to maintain proper sillalignment. This shimming schedule also pertains to regions wherethe ambient air temperature reaches or exceeds 95 F (35 C).Product Installation Tolerance TableProducts must be installed in a manner that Does Not exceed thetolerance belowPlumb /- 1/8"Level /- 1/8"Twist /- 1/8"Square /- 1/8" product sized up to 20 sq. ft. /- 1/4" product sized over 20 sq. ft.
Installation Instructionsfor Vinyl Windows without Nailing Fin (JII011)4TEMPORARILY FASTEN AND SHIM PRODUCT (CONTINUED) Add additional shims asnecessary to ensure properalignment of the windowframe. Larger windows usuallyneed additional shims. Shimscan be secured with sealant oradhesive. NOTE: Shims shouldbe cut back 1/4" - 1/2" fromthe interior face of the mainwindow Interior5FASTEN PRODUCT (SIZE AND SPACING)Window Install and FasteningFastener Location TableVinyl windows without a nailing fin can be installed in a variety ofways. These instructions address the installation into a framed opening,existing non-sloped window frame and existing sloped sill (pocket)window frame. Each of these methods is described below as well assome general considerations.Products are fastened according to performance grade (some holesmay be pre-drilled). Performance Grade (PG) is located on thepurchase paperwork or gold AAMA label fixed somewhere on theframe, generally in the head jamb. Look for something like thisexample: R-PG20-122X76 (48X30)-HS. If this label is missing, use thePG50 and above fastener pattern.General Installation Considerations Stud Framed Opening: These instructions address securing thewindow by A.) Through frame fastening or B.) Installation clips. Existing Non-Sloped Sill Window Frame: This is considered tobe a non-pocketing installation method. These instructions addresssecuring the window by A.) Through frame fa
Installation Instructions for Vinyl Windows without Nailing Fin (JII011) Thank you for selecting JELD-WEN products. Attached are JELD-WEN’s recommended installation instructions for vinyl windows without an integral nail fin (including finless, applied/non-integral flush fin and flange). Not all