Transcription
SOLIDWORKS PDM – Complete Guide to Client installationTable of ContentsOverview .2Installing the PDM Clients.2Installation for PDM Viewer and Contributor Clients .3Installation for PDM CAD Editors .3Creating the Local View .4Troubleshooting: Checking Local User has Vault Attach Access .7Troubleshooting: Client Connection to Server .8Local View Display Settings .8BOM Display Options . 12Map SOLIDWORKS Options to Point to PDM Client . 14Task Host Configuration . 16Table of FiguresFigure 1: PDM Standard Client Options .3Figure 2: PDM Professional Client Options .4Figure 3: View Setup .5Figure 4: Select Server to Connect .5Figure 5: Select Vault to Attach .6Figure 6: Select Access Location of Local View .6Figure 7: Archive Server Attach Access Settings .7Figure 8: View Details .8Figure 9: Arrange Metadata. 8/9Figure 10: Card Preview .9Figure 11: Local View Display Option . 10Figure 12: @Tab Property Manger . 10Figure 13: Mapping of Configuration Specific Properties. 111
Figure 14: eDrawings Preview Options . 11Figure 15: Activate a Computed BOM . 12Figure 16: Display Show Bill of Materials . 12Figure 17: Activated BOM View . 13Figure 18: Bill of Materials Permissions . 13Figure 19: Map Document Templates . 14Figure 20: Map Design Library . 15Figure 21: Map Toolbox and PDM . 15Figure 22: Map PDM Templates to SOLIDWORKS . 16OverviewCongratulations on completing your PDM Standard Jumpstart, or PDM Professional services herewith GoEngineer! Please keep this documentation with you to help install the remaining PDMclients and configure all the additional components. There are 5 main steps to fully set up a PDMclient machine:1.2.3.4.5.Install the PDM client or modify SOLIDWORKS to add in the PDM clientCreate a local view to see vault files on your local machineConfigure local view display settingsMap the SOLIDWORKS file locations to the vaultConfigure task host configuration if your workflow uses a Task Add-in.Throughout this document are links that lead to additional information on that topic. Thatinformation is valuable; this document serves to help organize that information in a logical andconsistent manner without the need to redo the existing content.Installing the PDM ClientsWhether installing the PDM client as a PDM Viewer, a PDM Contributor, or a PDM SOLIDWORKSCAD Editor (manage PDM CAD data inside of SOLIDWORKS), it requires installation media forSOLIDWORKS. More information on the different PDM license types for PDM Professional and PDMStandard can be found here. If you are in need of SOLIDWORKS installation media, you candownload it from our website here. If you are modifying an existing installation, make sure that thelocal machine is pointed to the location of the installation media.2
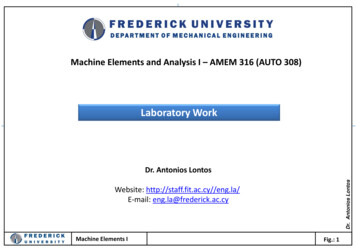
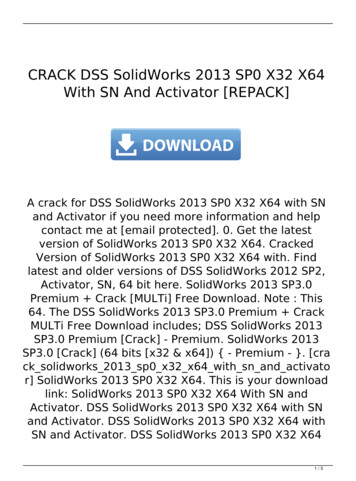
Installation for PDM Viewer and Contributor ClientsPDM Viewer and Contributor licenses do not require the local machine to have SOLIDWORKSinstalled. GoEngineer has step-by-step instructions on how to install these license types on a localmachine that doesn’t have SOLIDWORKS installed by clicking the link here.Installation for PDM CAD EditorsIf you currently have SOLIDWORKS installed and wish to add on the PDM component, click the linkhere. On the last step to change the PDM options, select the PDM Client options and be sure youchoose the PDM product that corresponds with your implementation.For example, if you have PDM Standard, you are installing for a PDM CAD Editor license, and youonly want SOLIDWORKS for PDM integration, select the boxes below:Figure 1: PDM Standard Client Options3
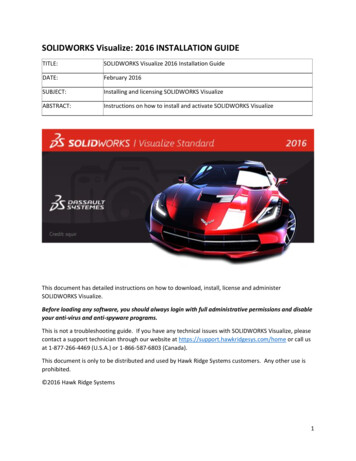
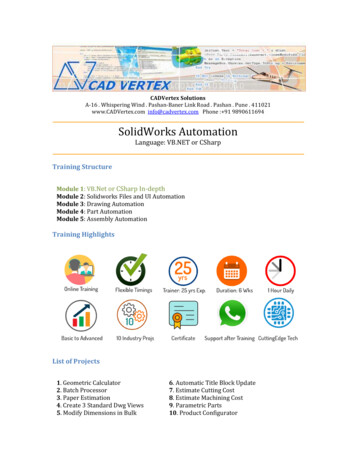
If you have DraftSight and would like to manage the DraftSight CAD data in PDM within DraftSight,select the DraftSight Add-in as well.In the below example for PDM Professional, a PDM CAD Editor and integration to SOLIDWORKSand Microsoft Office, the user would select the boxes below:Figure 2: PDM Professional Client OptionsCreating the Local ViewWhen logging into the client computer in which you are installing the PDM Client, make sure to login to a user account within the Windows domain or a domain included in the Archive ServerConfiguration on the PDM Server. More information on troubleshooting local view attachment canbe found in the Troubleshooting: Checking Local User has Vault Attach Access section below.4
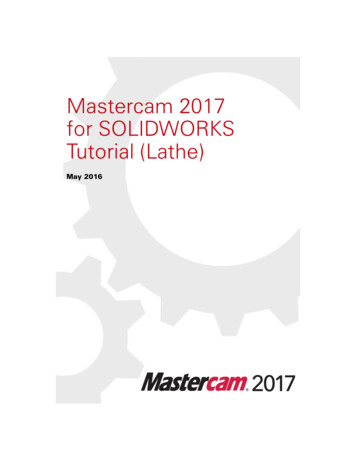
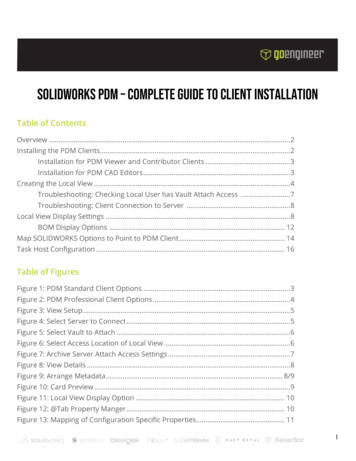
There are a few ways to create the local view for the PDM Vault. One of the easiest ways is to usethe View Setup tool. On the Windows taskbar, press Start and search for View Setup.When the welcome screen appears press Next.Figure 3: View SetupSelect the box for the server to connect to and press Next.Figure 4: Select Server to ConnectThen choose what database to connect to the local view to. In my case, I have some attached andsome that are not. Most likely, you will have only one vault to connect to. Simply check the box tochoose the database and press Next when finished.5
Figure 5: Select Vault to AttachThe next screen will ask where you would like the local view to be installed. For attach location, it isbest to choose the C:\ root folder, or the root folder of another local drive so that thesubdirectories within the vault do not exceed the windows 256-character limit in the file exploreraddress bar. Placing the local view at the root level folder also makes it easier for users to log in.Then, in the attach type, select whether you want the local PDM view to be accessible by all locallogins or just the current user login.Figure 6: Select Access Location of Local View6
Press Next to review and complete the local view installation. More detailed information ondeleting and creating local views can be found here.Troubleshooting: Checking Local User has Vault Attach AccessIf in the process of connecting the local view and you are unsure if the user account can attach alocal view, or are having difficulty connecting, check the Archive Server Configuration on the PDMserver to see if you are using a local user login within the local windows domain defined in thesettings of the Archive Server. If any of these terms are unfamiliar to you, please contact our techteam at GoEngineer and your IT professional.To see the archiver server settings, navigate to the server machine, press Start search for PDMArchive Server. Once the tool is open, press Tools Default Settings and press the Securitytab as shown below in Figure 7.Figure 7: Archive Server Attach Access Settings7
Troubleshooting: Client Connection to ServerPlease make sure the client machine has a connection to the server. If you are accessing PDM on aclient machine that is not on the LAN, please ensure that your VPN is turned on and connected tothe WAN. If you are experiencing any issues connecting to the vault, see our comprehensive bloghere.Local View Display SettingsOnce the local view is set up there are a few options you might want to change to make the userinterface inside of file explorer easier to manage. It’s important to arrange the display in thewindows file explorer to easily see the columns and metadata. The first time logging into the vault,the default view may be something other than the metadata Details. Once you first log in to thevault view, right mouse click in the blank space in the file explorer, then select View Details asshown below in Figure 8.Figure 8: View DetailsThen drag the columns so the data is organized in the order you wish. Here is an example in Figure9 below:8
Figure 9: Arrange MetadataNext, I will show some display settings that I prefer on my machine. I first go to Display anduncheck Card Preview as shown in Figure 10. This option allows for more room for the eDrawingspreview in the Preview tab in the file explorer local view.Figure 10: Card PreviewRegarding the eDrawings preview, there are a few options within the Display Options that Iprefer. My personal preference is to use the options shown below in Figure 11.I uncheck the simulation results in check in because the Simulation (SIM) result files must go into aworkflow if you want them in the vault, otherwise, they remain local files only. It gets messy, thefiles can get very huge, and the eventual storage requirements for multiple versions of SIM resultscan fill up the Archive server. We discourage customers from storing SIM result files in the vault.We encourage customers to vault the SIM reports. We have a helpful article that explainsSimulation results and PDM for more information that can be found here.9
Figure 11: Local View Display OptionWithin the SOLIDWORKS properties, there are two major tabs: Custom and Configuration Specific.The Configuration Specific properties will always take precedence over the custom properties. InSOLIDWORKS PDM, the @ tab is the same as Custom Properties in SOLIDWORKS as shown inFigure 12.Figure 12: @Tab Property Manager10
In my vault, I do not hide the @ tab, as myself and most customers only work with their fileproperties and not the configuration-specific properties. We discourage customers from usingconfigurations for different part numbers when working with PDM because you cannotindependently revise or workflow a configuration.Figure 13: Mapping of Configuration Specific PropertiesThe display option to show the bitmap for SOLIDWORKS files will allow the file explorer to runfaster. With this option checked and with the preview tab open, a bitmap image appears of theCAD model instead of loading it in eDrawings with each click. Furthermore, the Show full UI inSOLIDWORKS Preview allows for a menu bar in the eDrawings preview to move, rotate, measure,markup, change views, etc. more easily.Figure 14: eDrawings Preview Options11
BOM Display OptionsIt’s possible in PDM to use this same Display to view activated bills of material. First, press anassembly in the file explorer, then press the Bill of Materials tab and select to activate the BOM asshown below:Figure 15: Activate a Computed BOMNote: All display options shown here are merely suggestions to serve as a guide for the displayoptions on your PDM client.Then Select Display Show Bill of Materials (Figure 16) and the activated BOM(s) will be the onlything filtered in the file view as shown below in Figure 17.Figure 16: Display Show Bills of Materials12
Figure 17: Activated BOM ViewThis will only work if the PDM user or group permission on the PDM Administration tool is set toActivate and if See a Computed BOM in the Bills of Materials section in the PDM Administrationtool as shown below in Figure 18.Figure 18: Bill of Materials Permissions13
These are just my settings for display in the local view. All of the display options shown here aremerely suggestions to serve as a guide for the display options on your PDM client. A more detailedlook at local view options can be found in our more comprehensive document here.Map SOLIDWORKS Options to Point to PDM ClientFor PDM CAD Editor licenses, it is important to map the options in SOLIDWORKS to locations inPDM to utilize the full automation.Launch SOLIDWORKS on the local machine, navigate to Tools Options File Locations Document Templates and add the location in the local view where your standardized templatesare located as shown in Figure 19 below.Figure 19: Map Document TemplatesDo the same thing if you would like to map a centralized location for design library parts. In Figure20 below, I am adding the location of my library components to the Library Folder in my PDMDefault Vault.14
Figure 20: Map Design LibraryIf you are managing the SOLIDWORKS Toolbox in PDM as a centralized location for all similarhardware, map the Toolbox location as well. In the SOLIDWORKS options, select the HoleWizard/Toolbox and change the location to map to the location in PDM in Figure 21.Figure 21: Map Toolbox and PDM15
A more detailed overview for using Toolbox and PDM, including important administrator cacheoptions, can be found here. In fact, any Library in the PDM vault should refresh the cache duringlogin as shown in Figure 22 below.Press OK on the options to solidify the changes and press Yes on the permissions boxes thatsubsequently appear.Then, after you hit okay and close the options, go back into the SOLIDWORKS options one moretime, press Default Templates, and select each three-dot menu button, highlighted in Figure 22below, to map the appropriate corresponding template from the PDM vault. A great way to ensureusers always utilize the templates from PDM is to select the option to Always use the defaultdocument templates.Figure 22: Map PDM Templates to SOLIDWORKSTask Host ConfigurationTask host configuration is an essential step for PDM configurations with add-in tasks or customadd-in tasks. Without task host enabled, the custom add-ins will not work on the local machine. Forthose with PDM Standard, this step is necessary if you have automatic PDF generation in yourworkflow.We recommend logging into the vault as an Admin, but you can log in as a user who haspermissions for Task Host Configuration within the PDM administration tool. GoEngineer has a16
helpful document with prerequisites for configuring tasks host here. In addition, we have detailedinstructions for how to configure the task host in our documentation here.17
SOLIDWORKS PDM - Complete Guide to Client installation . . download it from our website here. If you are modifying an existing installation, make sure that the . Simulation results and PDM for more information that can be found here. 10 . Figure 11: Local View Display Option .