Transcription
OCEANS 12Multifunction Dual Stereo ReverbCongratulations on your purchase of the Oceans 12, our dual stereo reverb tourde-force. Dive into uncharted sonic depths with its myriad features: twosimultaneous, independent, stereo reverb engines, series and parallel control forthe dual reverbs, 24 presets, external expression and footswitch input, and more.Plus, with an array of new controls like Tide for stereo image alteration, Lo-fi fordiffusion reduction, infinite attenuation, send level for FX LOOPs, and split reverbs,your customization options are nearly limitless. The Oceans 12 is the reverb pedalto end all reverbs!WARNING: Your Oceans 12 comes equipped with an Electro-Harmonix 9.6DC-200BIpower supply. The Oceans 12 requires 150mA at 9VDC with a center negative plug. Useof the wrong adapter or a plug with the wrong polarity may damage your Oceans 12 andvoid the warranty. Do not exceed 10.5VDC on the power plug. Power supplies rated forless than 150mA will cause the Oceans 12 to act unreliably.- FEATURES Two simultaneous, independent, stereo reverb enginesSeries or parallel dual reverb configurations12 Reverb Types per engine yield a multitude of reverb effectsMultiple modes available for each Reverb Type, including new modes exclusiveto the Oceans 12Easy pushbutton access to extra features like reverb tails, momentary effectmode, and alternate knob functions24 presets may be saved and recalled: one preset for each Reverb Type ofeach reverb engineTwo-in-one expression/external-footswitch jack: control any combination ofthe Oceans 12’s knobs with an external expression pedal, or connect anexternal 1-, 2- or 3-button footswitch for augmented pedal controlInfinite hold, 1-second global pre-delay, tap tempo for Echo reverbAdditional send/return signal routing option for mono setupsHigh quality buffered analog bypass and soft switching1
TABLE OF CONTENTSNotes and Specifications3Reverb Types and Descriptions3Quick Start Guide4Summary Chart10Controls and LEDsDual Reverb Select Button and LEDsControl KnobsReverb Type Knob, Preset LED, and Mini KnobsIlluminated ButtonsSend/Return FX LoopMode Button and LEDsFootswitches and LEDs7781213151718Connections20Reverb Type and Mini Knob Details22Dual Reverb28External Footswitch Functionality30Expression Pedal Use and Setup31Tap Tempo on the Oceans 1234Preset Use and Setup36Restoring Factory Settings38Warranty Information and Compliance392
NOTES AND SPECIFICATIONS Audio input impedance for mono left input: 1M Audio input impedance for stereo left input: 2M Audio input impedance for right input: 2M Audio output impedance for each output: 550 Current draw: 150mAMaximum input signal level: 11 dBuBypass: high quality analog buffered bypass when TAILS modeis disabled. DSP bypass when TAILS is enabled.REVERB TYPES AND m and versatile reverb algorithms modeled after alively room and a spacious performance hall.Vintage 1962 Fender 6G15 reverb unit emulation andthe classic spring algorithm from the EHX Holy Grail.Two emulations of a smooth, bright metal plate reverbcommonly found in high-end recording studios during the1960’s and 70’s.A rendition of the reverse reverb trick commonlyperformed in studios, as well as true reversed echoes.Simple digital delay which feeds into a plate reverb.A classic, periodic volume envelope applied to both thedry and wet mix of a hall reverb.A lush combination of various modulations for creamyrich reverb tails.A dynamic trio of experimental reverb algorithms: swell,gate, and duck.Auto infinite reverb, with optional chorus or flange, thatlistens to your playing and crossfades to a new reverbwash upon detection of newly-struck notes and chords.Two configurations of a rich octave-shifted wash ofharmony in a reverberant cloud.Two configurable bidirectional pitch-shifts that addstartling dimensionality to the reverb tail.Reverb excited by tunable resonators, and configurableself-oscillating filters on the reverb tail.3
QUICK START GUIDEPLUGGING IN THE OCEANS 121. Connect the supplied EHX9.6DC AC Adapter into the 9V jack at thetop of the Oceans 12. Plug the AC Adapter into an AC outlet.2. Connect your guitar or other instrument into the L IN jack using astandard 1/4” instrument cable. Connect the L OUT jack to your ampwith another standard 1/4” instrument cable.3. For stereo operation, connect R OUT to another amp.DIALING IN A STANDARD REVERB EFFECT1. Ensure none of the buttons at the top left of the Oceans 12, like TAILS,are lit. If any of the buttons are lit or blinking, press the button onceto disable it.2. Ensure that REVERB A is selected by confirming that its SELECT LEDis lit. This LED is located in the center of the unit, in the section labeledSELECT. If the SELECT LED of REVERB B is lit, press the small whiteSELECT button to toggle reverb selection back to REVERB A.3. Turn on REVERB A by pressing its footswitch located on the bottomleft of the Oceans 12. The white bypass LED should turn on.4. Rotate the REVERB TYPE knob clockwise to the ROOM setting for astandard reverb, if not already selected.5. Set the two smaller knobs to the right of the REVERB TYPE knob totheir middle positions.6. Set the decay time with the TIME knob, the tone with the TONE knob,the predelay time with the PREDELAY knob, and the reverb volumewith the FX LVL knob.CHOOSING A REVERB TYPE1. Rotate the REVERB TYPE knob in either direction until the desiredREVERB TYPE LED is lit.2. Check the table on the Oceans 12 below the mini knobs to see thecorresponding parameters that can be adjusted for the chosen ReverbType. Turn the mini knobs to experiment with different reverb effects.4
USING DUAL REVERB1. At any given time on the Oceans 12, only one of the reverb enginesis selected for editing. The SELECT LED indicates which reverb enginethis is. In general, reverb-editing controls affect only the selectedreverb engine.2. The default selected reverb engine should be Reverb A, andaccordingly you should see the green LED labeled “A” lit.3. If Reverb A isn’t already on, turn it on by pressing the left footswitch.Once it’s on, the white LED in the center moon graphic will be lit.4. Next, tap the right footswitch corresponding to Reverb Engine B. Thisturns on Reverb B, and its blue SELECT LED as well as itscorresponding white Reverb Type LED will light. Because Reverb B isnow the most recently engaged reverb engine, the Oceans 12 makesReverb B the currently-selected engine and blinks its blue LED toindicate this.5. Now the reverb effects of both Reverb A and Reverb B are applied, inparallel by default, to your playing. Edits to the knobs and buttons willaffect Reverb B.6. To change your selection back to Reverb A, you can press the MODEbutton. Doing so will switch the selection back to Reverb A, and itsgreen LED will blink to indicate this.7. To bypass/engage either of the reverb engines, simply tap theirrespective footswitches.8. See page 28 for detail on dual reverb operation and control.DUAL REVERB CONFIGURATIONS1. When dual reverbs are engaged, you can choose which configuration– parallel or series – in which to arrange them.2. To edit this, press the button labeled FUNCTION towards the top ofthe Oceans 12. It should blink, along with both of the SELECT LEDs,to indicate that the controls of the Oceans 12 are now performing theiralternate functions, whose graphic labels are colored teal.3. The alternate functions of the two mini knobs in the REVERB TYPEtable are labeled at the bottom of the table: SRS/PRL and A B.Briefly, the left mini knob controls series v. parallel configuration, whilethe right mini knob controls series order and parallel mix of the tworeverbs.4. See page 28 for more details on dual configurations.5
USING AN EXPRESSION PEDAL1. Connect your expression pedal to the EXP/FSW jack.2. While the EXP MODE button is off, the expression pedal acts like avolume control for your dry signal before it enters the Oceans 12.3. While the EXP MODE button is enabled, the expression pedal sweepsall parameters that are assigned to it for the current Reverb Type ofthe selected dual reverb.4. You may assign any knobs you like to be swept by the expressionpedal. Additionally, each knob may have a custom range and direction.See page 31 of the manual to learn how to create an ExpressionSetting for each Reverb Type of both dual reverb selections.SAVING A PRESET1. Once you have created a sound that you would like to save, press andhold the REVERB TYPE knob.2. After half a second, the PRESET LED will begin blinking rapidly.Continue holding down the REVERB TYPE knob.3. After two seconds of holding down the REVERB TYPE knob, thePRESET LED will stop blinking and light up solid. You can now releasethe REVERB TYPE knob.4. Your preset is saved in the currently selected Reverb Type. You maysave one preset for each of the 12 Reverb Types of Reverb A, and onepreset for each of the 12 Reverb Types of Reverb B.RECALLING A PRESET1. Turn the REVERB TYPE knob to the Reverb Type you want to recall.2. Press and release the REVERB TYPE knob. The preset sound loads andthe PRESET LED lights solid.3. If you turn a knob or change a button setting, the PRESET LED willblink rapidly to indicate a preset is loaded but the setting has beenaltered.6
CONTROLS AND LEDS- DUAL REVERB SELECT BUTTON AND LEDS On the Oceans 12, one of the reverb engines isalways currently selected, regardless of whethersingle or dual reverbs are engaged. All of the LEDson the Oceans 12 – the Reverb Type LED, the modebutton LEDs, the preset LED, the illuminatedbuttons, and the bypass LED -- always reflect the status of the currentlyselected reverb engine. The SELECT button allows you to toggle thisselection between Reverb A and Reverb B. When you do, you’ll see thatthe LEDs update to the status of the newly-selected reverb engine. Youcan also use an external footswitch to toggle between selected reverbs;see page 30 for more details on external footswitches.If dual reverbs are engaged, the Oceans 12 will slowly blink one of theSELECT LEDs to indicate which of the reverb engines is the currentselection. The Reverb Type LED of the corresponding reverb engine willalso blink synchronously. The SELECT button still toggles the reverbengine selection; pressing it will blink the SELECT LED of the other reverbengine to indicate that it, now, is currently selected.Additionally, for convenience, the selection of the current engine willalways default to the last-engaged one. In other words, whenever youturn on a reverb engine with its footswitch, it immediately becomes thecurrent selection.See page 28 for more details and instructions on Dual Reverb operation.7
- CONTROL KNOBS -The four knobs on the left side of the Oceans 12 control the mainparameters of the reverb effects. These knobs have different functionsdepending on the status of the illuminated FUNCTION button (see thesection about Illuminated Buttons on page 13 for details on FUNCTION).The top row of white labels specifies the reverb-specific functions of theknobs, which are active when the FUNCTION button is off. The bottomrow of teal labels specifies the alternate functions of the knobs, which areactive when the FUNCTION button is blinking.Reverb parametersREVERB LVL – Wet/dry control that sets the balance between your drysignal and the reverb effects produced by the Oceans 12. When thisknob is at the minimum position, the output is only your dry signal. Asthe knob is turned up, the reverb output increases in volume. As theknob is turned past 2 o’clock, the dry signal decreases in volume. Whenthe knob is at the maximum position, the output is reverb only.PREDELAY – For all Reverb Types except ECHO, SHIMMER, andRESONANT, the PREDELAY knob sets the pre-delay time for the reverbblock in all Reverb Types except ECHO. Pre-delay allows the musician toput a time delay between playing a note and hearing the onset of reverbfor that note. The total range of pre-delay is from 0 to 1 seconds. Asyou turn the knob clockwise, the pre-delay time will increase. See theSummary Chart on page 10 to see what Reverb Types have differentsettings for this knob.TIME – In all Reverb Types except REVERSE and DYNA, the TIME knobcontrols the decay time of the Oceans 12 reverb. As this knob is turnedclockwise, the reverb time gets longer and longer, reaching infinite in allmodes except SPRING, ECHO, and DYNA when the knob is as far as itwill go. See the Summary Chart on page 10 to see what Reverb Typeshave different settings for this knob.8
TONE – In all Reverb Types, TONE controls the tone or EQ of the reverbsignal, so it’s omitted from the columns of the Summary Chart on thefollowing page. As this knob is turned clockwise, the sound of the reverbgets brighter. As you turn TONE counter-clockwise, the sound of thereverb gets darker.Alternate FUNCTION parametersINF LVL – Works as an attenuation control for the infinite/sustainreverb sound. The default setting is fully clockwise, which correspondsto no attenuation, or full infinite/sustain volume. The infinitely sustainedreverb volume decreases as the knob is turned counter-clockwise,reaching zero at fully counter-clockwise.SEND LVL – Controls the signal level of the FX SEND when the Oceans12 is in SEND/RETURN FX LOOP mode with a mono setup. See page 15for details on operating the SEND/RETURN FX LOOP. This is a globalparameter whose value is independent of reverb engine.LO-FI – Controls the degree of reduction of diffusion and echo densityin the reverb tails. As the diffusion and echo density decrease, certainqualities of the reverb tail, such as fullness and smoothness, start todiminish, allowing for creative low-fidelity manipulation of your favoritereverbs. When the knob is turned fully counter-clockwise, LO-FI turnsoff. As the knob is turned clockwise, LO-FI turns on, and thecorresponding LED labeled LF next to the MODE button lights up. Thedegree of the LO-FI effect is increased as the knob is turned clockwise.TIDE – Controls the amount of TIDE effect applied to the reverb output.When stereo outputs are used on the Oceans 12, TIDE subtly modulatesthe pan of the stereo output to gradually evolve the sound stage. Whenthe knob is turned fully counter-clockwise, TIDE turns off. As the knobis turned clockwise, TIDE turns on, and the corresponding blue LEDlabeled TIDE next to the MODE button lights up. The frequency of themodulated pan is slowly increased as the knob is turned clockwise.9
Reverb TypeMODEDescriptionsROOMSpace typeSPRINGAlgorithmselectPLATEPlate typeREVERSEAlgorithmselectMODE Effect1. Room2. Hall1. 6G152. Holy Grail1. Original2. Dark Plate1. Swoosh2. Rev. echoPREDELAYTIME---------------------Swoosh timeReverse time1. 1/8ECHOEcho rhythm2. 1/4N/AReverbblend------------3. Dotted 1/81. TriangleTREMLFO shape2. Square3. SineMODModulationtype1. Chorus2. Flerb3. Chorus Flerb1. SwellDYNAAlgorithmselect2. Gate-----3. DuckHold time---1. HallAUTO-INFReverb base2. Chorus------3. NTAlgorithmselect1. Original2. Delay1. Interval edit2. Mix edit--Shimmerdelays---1. ChimesChimedelays2. Filtered---10------
Mini Knob 1Mini Knob 2Infinite Sustain?Tap tempo?Predel. feedbackMod. depthYesNoSpring lengthPreamp drivePredel. feedbackPlate sizeYesNoPredel. feedbackMod. depthYesNoEcho feedbackEcho delayYesYesLFO rateLFO depthYesNoMod rateDepthRateFeedbackYesNoNoYesNoBlend---Swell time---YesNoRelease timeThresholdNoNoRelease timeThresholdYesNoCrossfade timebetween washesTrigger sensitivityNoNoMod rateMod depthYesNoShift interval #1Shift interval #2YesNoDry/shifted mixShift #1/#2 mixGainTuningYesNoQ factorCenter frequency11
- REVERB TYPE KNOB, PRESET LED, AND MINI KNOBS -REVERB TYPE KnobThis knob is a rotary encoder that selects which of the Oceans 12’s ReverbTypes is active. The list ranges from ROOM at the top to RESONANT atthe bottom. You can choose which Reverb Type is selected for each reverbengine.One preset can be saved for each Reverb Type using the REVERB TYPEknob. For details on preset operation, see page 36. The PRESET LEDprovides a visual indication for the current preset state:PRESET LED Off: You are in What You See Is What You Get(WYSIWYG). All current knob positions represent the effect beinggenerated.PRESET LED On: The preset is loaded for the currently selected ReverbType.PRESET LED Blinking: There are two situations where the PRESETLED blinks: 1) while saving a preset or 2) changing a knob or buttonsetting after loading a preset. If you load a preset and then move aknob, the new knob position takes over for only that particularparameter and the PRESET LED blinks. If you return the recently movedknob to the position that is saved in the preset, the PRESET LED lightssolid again.Miniature Parameter KnobsTo the right of the REVERB TYPE knob are two mini knobs whose functionschange depending on the selected Reverb Type, mode, and status of theilluminated FUNCTION button. On the face of the Oceans 12, below themini knobs, there is a table listing the available mini knob functions foreach Reverb Type. Detailed descriptions of mini knob functions start onpage 22 of this manual. When the FUNCTION button is blinking, the miniknobs control the teal-highlighted parameters at the bottom of the ReverbType table.12
- ILLUMINATED BUTTONS -EXP MODE Button – When this button is lit, EXP MODE is enabled. Whenan external expression pedal or control voltage is connected to theEXP/FSW jack on the rear of the Oceans 12, you can control anycombination of knob parameters with your foot. When the EXP MODEbutton is disabled (button is not lit), the external expression pedal acts asa volume pedal for the dry signal and the signal into the reverb effect.This button is also used to set up Expression Settings (see page 31 for thisprocedure).MOMENT Button – Enabling MOMENT changes the functions of theREVERB A and REVERB B footswitches to only allow the reverb effectswhile the footswitch is pressed down. The reverb effects are bypassedwhen the footswitch is released. When MOMENT is disabled, the REVERBA and REVERB B footswitches work like normal latching footswitches,toggling between bypass and effect modes with each press and release.TIP: Use the MOMENT button in conjunction with tails to pinpoint exactlywhich notes or segments of a phrase receive reverb effects. However, beaware that, by default, holding down the REVERB A or REVERBfootswitches while their engines’ respective TAILS are on triggers infinitesustain. To toggle infinite capability and save it for an external footswitch,see the Footswitches and LEDs subsection on page 18.TAILS Button – When TAILS is enabled, the reverb continues to playafter its engine switches to bypass, with the decay time set by the TIMEknob. Switching the reverb engine to bypass occurs by either disengagingit with the footswitch, or switching the currently selected reverb enginewith the MODE button. Anything you play after entering bypass will notgo through the reverb effect. If the pedal is set for infinite decay (i.e. theTIME knob is set to maximum), the reverb continues until you turn downthe TIME knob or switch to a different Reverb Type. When TAILS isdisabled, all reverbs stop as soon as their engines are bypassed.FUNCTION Button – This button selects which set of parameters –primary or alternate -- is controlled by the main knobs and the mini knobs.When FUNCTION is pressed, the button and the two SELECT LEDs willblink concurrently, and all other LEDs and controls on the Oceans 12 willbe disabled, to indicate that you are now editing alternate parameters.13
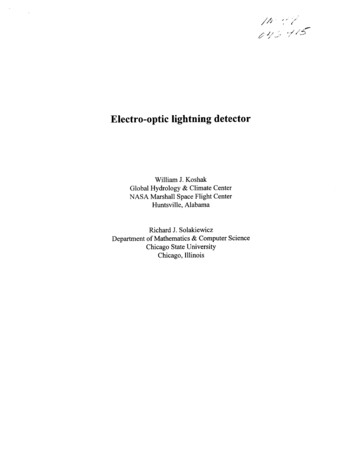
For the main knobs, the alternate functions are INF LVL, SEND LVL, LOFI, and TIDE, respectively. For the mini parameter knobs, these functionsare SRS/PRL and A B. More details about these alternate knobparameters can be found in the Dual Reverb section on page 28.The FUNCTION button can also toggle signal splitting, where Reverb A issent to L OUT and Reverb B is sent to R OUT, as illustrated in the diagrambelow.If the FUNCTION button is held down for 2 seconds while the FUNCTIONmode is not already on, all of the Oceans 12’s blue and green LEDs willstart to blink rapidly, indicating that the two signals of the two reverbengines are now being split into L and R outputs. To disable signal-splittingand bring the Oceans 12 back to regular stereo operation, hold down theFUNCTION button when FUNCTION isn’t already on. The blue and greenLEDs will again start blinking rapidly to indicate that the turn-off procedurehas begun. After 2 seconds, signal splitting will be disabled. The on/offstatus of this routing scheme is remembered even after power-cycling.Signal splitting is disabled if the SEND/RETURN FX LOOP is on.14
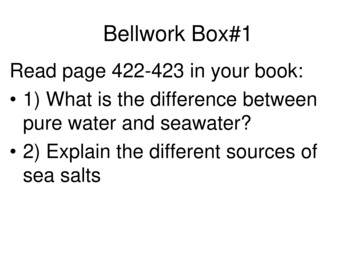
- SEND/RETURN FX LOOP The Oceans 12 has the ability to create a special, wet, mono FX LOOPeither before or after the reverb block. See the following diagram:The SEND is output through the R/SEND OUT jack. The return isconnected to the R/RETURN IN jack. Tip: useful for when you’d like aneffect in your chain, for example a fuzz or filter, to affect only the reverbtails, i.e. without affecting your dry signal.The amount of signal routed to the SEND path is controlled by the SENDLVL, the alternate parameter of the PREDELAY knob. This knob controlsthe SEND LVL whenever FUNCTION is on. (See page 13 for details onthe FUNCTION button). When the knob is turned fully counterclockwise, the SEND LVL is zero. The SEND LVL increases as the knob isturned clockwise, reaching unity when fully clockwise. Note: the defaultvalue of the SEND LVL is zero. When a SEND/RETURN configuration isactive, be sure to adjust the SEND LVL to your desired amount.The status of the Send/Return FX loop is always either pre-reverb, postreverb, or OFF (i.e., regular stereo operation). If the status is either prereverb or post-reverb, the green S/R LED on the bottom-left of the unit(pictured below) will be lit after the pedal is powered up. The Oceans12 will remember the FX loop status, even after removing power.15
To toggle pre-reverb SEND/RETURN, power-cycle the Oceans 12 whileholding down the FUNCTION button. If the SEND/RETURN status waspreviously post-reverb or OFF, it will now be pre-reverb. Similarly, if theSEND/RETURN status was previously pre-reverb, it will now be turnedOFF.To toggle post-reverb SEND/RETURN, power-cycle the Oceans 12 whileholding down the TAILS button. If the SEND/RETURN status waspreviously pre-reverb or OFF, it will now be post-reverb. Similarly, if theSEND/RETURN status was previously post-reverb, it will now be turnedOFF.The SEND LVL is a global parameter that will not be tracked by presets.The configuration (pre vs. post) of the Send/Return as well as its SENDLVL, however, are remembered across power cycles.Turning on the Send/Return FX Loop also disables the signal-splittingstereo control of the FUNCTION button.If the configuration of Send/Return FX Loop is pre-reverb, but nothingis inserted into the R/RETURN jack, the FX Loop connection is shortedand the send channel connects directly to the return for regular monooperation.16
- MODE BUTTON AND LEDS -Each Reverb Type on the Oceans 12 has either two or three unique modesof operation. Pressing the MODE button cycles through these availablemodes. The LED labels 1, 2, or 3 show the current mode. When you switchReverb Types, the Oceans 12 will recall the last mode you were using inthat Reverb Type.Below the three numbered LEDs are two LEDs labeled LF and TIDE. Thesetwo LEDs indicate whether LO-FI and/or TIDE, respectively, are currentlyon. LO-FI and TIDE are activated and controlled by turning on theFUNCTION button and adjusting the main knobs whose alternate labelsare LO-FI and TIDE.17
- FOOTSWITCHES AND LEDS The Oceans 12 has two footswitches which perform the same functionsfor their respective reverb engines. The left footswitch controls Reverb A,and the right footswitch controls Reverb B. Each footswitch has thefunctionalities described below.Footswitch FunctionsBYPASS – The BYPASS functionality of the footswitch works like thatof a standard latching footswitch when the MOMENT button is not lit:press and release to toggle between bypass and effect modes. Whenthe center white LED in the Oceans 12 graphic is lit, at least one of thereverb engines is engaged and the unit is in effect mode.If the MOMENT button is lit, then the selected reverb engine is normallyin bypass mode unless you press and hold the footswitch, at which pointit goes into effect mode. Release the footswitch and it returns to bypassmode.TAP – In ECHO reverb, press and release the footswitch two or moretimes to set the delay time with your foot. The tap time and the currentMODE setting determine the actual delay time. After tapping in a delaytime, you may cycle through the MODE settings to find the desired delaytiming. The blue TAP LED at the bottom left of the Oceans 12 (picturedbelow) will blink at the selected echo rhythm of your tapped tempo.INFINITE – If TAILS is on, then press and hold one of the footswitchesto ramp up the reverb decay time of the associated reverb engine toinfinitely sustain. The white INF LED at the bottom left of the Oceans 12(pictured above) will blink rapidly to indicate that infinite sustain isengaged. Release the footswitch to ramp back down to the currentfeedback setting. You may continue playing your instrument while theinfinite reverb decay is sustaining; the Oceans 12 will apply fresh reverbfrom the second reverb engine to your new playing, indicated by therapid blinking of its SELECT and Reverb Type LEDs. While INFINITE issustaining, you may edit any of the knobs – these control changes will18
be applied to the fresh reverb of the second reverb engine, and will beremembered when you switch back to that reverb engine.You may also use an external footswitch to trigger INFINITE sustain.See page 30 for details on external footswitch functionality.You can also disable the local footswitches’ control of TAP and INFINITEfunctions. (The functions will still be enabled via external footswitch).Tip: This is useful if you don’t use an external footswitch and you’d liketo prevent accidental tempo taps from occurring, or if you’d like to usethe footswitches in a held-down capacity (e.g., with MOMENT andTAILS) without triggering the INFINITE sustain.To disable/enable local footswitch control of TAP and INFINITE:1.2.3.4.Unplug the Oceans 12 from power.Press and hold the REVERB B footswitch while plugging powerback in to the Grand Canyon.The BYPASS LED will flash 7 times if tap tempo and infinite aredisabled. The LED will flash 2 times if tap tempo and infinite areenabled.If the Oceans 12 is reset to factory defaults (see page 38), thefootswitch’s tap tempo and infinite functionality will be enabled.KICKING THE SPRING TANK – In SPRING reverb, if “TAILS” is on(see “Controls” on page 3) in Mode 1 (Fender 6G15) in either reverbengine, quickly double tap the footswitch to "kick" the emulated springtank. If an external footswitch is connected to the EXP/FSW jack, thenyou must use that one instead of the internal one (TAILS must still beon). This will send a loud bouncy jolt through the OCEANS 12, as itwould a real spring reverb unit. This action can be performed whenusing dual reverbs in any configuration (i.e., both series and parallel).19
CONNECTIONSL INPUT Jack – This ¼” jack is either the mono audio input or the leftstereo input to the Oceans 12. In mono, the input impedance is 1M . Instereo, the input impedance is 2M .R INPUT Jack – This is the right input jack in a stereo setup. This inputcan also be the RETURN signal if using SEND/RETURN mode (see page15). The input impedance is 2M .L OUT Jack – Use this output for a mono setup. In a stereo setup this isyour left output. The output impedance is 550 .R OUT Jack – This is the right output jack in a stereo setup. This outputcan also be the SEND signal if using SEND/RETURN mode (see page 15).The output impedance is 550 .Combo EXP/FSW Jack – This input jack accepts either an expressionpedal or an external footswitch. The Oceans 12 can automaticallydifferentiate which of the two is connected.EXP – Connect an expression pedal with a TRS plug to this jack to allowexternal control over any of the Oceans 12’s knobs, or use it like a volumepedal on the dry signal before it hits the reverb effects. See page 31 for adescription on how to set up and control the Oceans 12 with an externalexpression pedal.The polarity of the expression pedal’s plug must have the sleeve connectedto the heel position (usually GND), Ring connected to the toe position andthe Tip connected to the wiper. The nominal expression pedal impedanceis 10kΩ though most other values will work fine. Please do not go below6kΩ on your expression pedal’s potentiometer impedance. Somesuggested Expression Pedals: EHX Expression Pedal, M-Audio EX-P,Moog EP-2 and EP-3, Roland EV-5 or Boss FV-500L. Additionally, theEXP IN jack can be connected to a CV source using a TS plug; theacceptable control voltage range is 0V to 5V.20
FSW - Connect an external momentary footswitch to this ¼” jack. Theexternal footswitch may be either a single footswitch (TS plug), a dualfootswitch (TRS plug), or a triple footswitch (TRS plug) such as the EHXTriple Foot Controller. The external footswitches must be momentary andnormally open so that when the switch is pressed down a connection ismade between the sleeve and either the tip, ring or both. See page 30 fora description of all functions available on the external footswitches.9V Power Jack – Plug the output of the Oceans 12’s supplied EHX9.6DC200mA AC adapter to the 9V power jack located at the top of the pedal.The Oceans 12 requires 150mA at 9VDC with a center-negative plug. Donot exceed 10.5VDC on the power jack. Note: Expect unreliable behaviorif the power supply rating is less than 150mA.21
REVER
on the Oceans 12 – the Reverb Type LED, the mode button LEDs, the preset LED, the illuminated buttons, and the bypass LED -- always reflect the status of the currently selected reverb engine. The SELECT button allows you to toggle this selection between