Transcription
PEX 500-C-TICKINFORMATION&OPERATINGINSTRUCTIONSMODEL: 56384886CAUTION: DO NOT OPERATE MACHINE UNTIL YOU HAVE READALL SECTIONS OF THIS INSTRUCTION MANUALIMPROPER USE OF THE MACHINE WILL VOID THE WARRANTYFORM NO. 56042658 REV A
A-2 / ENGLISHTABLE OF CONTENTSPageIntroduction.A-3Parts and Service.A-3Nameplate.A-3Uncrating the Machine.A-3Cautions and Warnings.A-4Grounding Instructions.A-5Know Your Machine. A-6 – A-7Know Your Switch Plate.A-8Preparing the Machine for Use.A-9Operating the Machine. A-10 – A-11After UseAfter Using the Machine.A-12MaintenanceMaintenance Schedule.A-12Power Cord Maintenance.A-12Troubleshooting.A-13Technical Specifications.A-13SECTION II – Parts List. 15Decal System. 16-17Pallet System 500-1 C-TICK. 18-19Pallet System 500-2 C-TICK. 20-21Recovery System. 22Solution System. 23Wiring Diagram. 24-25Options & Accessories. 25Water Flow Diagram. 26A-2 - FORM NO. 56042658 - PEX 500-C-TICK
ENGLISH / A-3INTRODUCTIONThis manual will help you get the most from your HydraMaster carpet extractor. Read it thoroughly before operating the machine.This product is intended for commercial use only.PARTS AND SERVICERepairs, when required, should be performed by your Authorized HydraMaster Service Center, who employs factory trained service personnel, andmaintains an inventory of HydraMaster original replacement parts and accessories.Call the HYDRAMASTER DEALER named below for repairs or service. Please specify the Model and Serial Number when discussing your machine.MODIFICATIONSModifications and additions to the cleaning machine which affect capacity and safe operation shall not be performed by the customer or user withoutprior written approval from HydraMaster. Unapproved modifications will void the machine warranty and make the customer liable for any resultingaccidents.NAMEPLATEThe Model Number and Serial Number of your machine are shown on the Nameplate, located on the rear base of the machine. This information isneeded when ordering repair parts for the machine. Use the space below to note the Model Number and Serial Number of your machine for futurereference. Be sure to register your warranty online at spxMODELSERIAL NUMBERUNCRATING THE MACHINEWhen the machine is delivered, carefully inspect the shipping carton and the machine for damage. If damage is evident, save the shipping carton sothat it can be inspected. Contact the HydraMaster Customer Care Department immediately to file a freight damage claim at 800.426.1301.FORM NO. 56042658 - PEX 500-C-TICK - A-3
A-4 / ENGLISHIMPORTANT SAFETY INSTRUCTIONSThis machine is only suitable for commercial use, for example in hotels, schools, hospitals, factories, shops and officesother than normal residential housekeeping purposes.When using any electrical appliance, basic precautions should always be followed, including the following:NOTE: Read all instructions before using this machine.WARNING!To reduce the risk of fire, electric shock, or injury: This machine is not intended for use by persons (including children) with reduced physical, sensory or mental capabilities, or lackof experience and knowledge.Do not leave the machine unattended when it is plugged in. Unplug the unit from the outlet when; not in use, before cleaning themachine, prior to servicing or performing any maintenance on the machine, and when replacing parts or converting the machineto another function.To avoid electric shock, do not expose to rain or snow. Store and use machine indoors only, store in a heated location. Do notlet the machine or wand freeze.Do not allow to be used as a toy. Close attention is necessary when used near children.High pressure cleaners shall not be used by children or untrained personnel.Use only as described in this manual. Use only the manufacturer’s recommended attachments.Never add water over 130º F/54º C to the solution tank.Always use a defoamer when foaming occurs to prevent vacuum motor damage.Do not let the pump run dry.Do not use with damaged cord or plug. If the machine is not working as it should, has been dropped, damaged, left outdoors ordropped into water, return it to a service center.Turn off all controls before unplugging.Do not pull by the cord, use the cord as a handle, close a door on the cord, or pull the cord around sharp edges or corners. Donot run the machine over the cord. Keep the cord away from heated surfaces. To unplug, grasp the plug, not the cord.Do not handle the plug, the cord or the machine with wet hands.Extension cords must be 12/3 and no longer than 50 feet. Replace the cord or unplug immediately if the ground prong becomesdamaged.Connect to a properly grounded outlet only.Do not put any object into openings. Do not use with any opening blocked; keep free of dust, lint, hair, and anything that mayreduce air flow.Keep loose clothing, hair, fingers, and all parts of body away from openings and moving parts.Do not pick up anything that is burning or smoking, such as cigarettes, matches, or hot ashes, or any health endangering dusts.Do not use to pick up flammable or combustible liquids such as gasoline or use in areas where they may be present.Risk of explosion – Do not spray flammable liquids.Use extra care when cleaning on stairs.Wear gloves or use rags when removing quick disconnects to prevent burns.Liquid ejected at the spray nozzle could be dangerous as a result of its temperature, pressure, or chemical content.High pressure jets can be dangerous if subject to misuse. The jet must not be directed at persons, live electrical equipment orthe machine itself.Do not use the machine within range of persons unless they wear protective clothing.Do not direct the jet against yourself or others in order to clean clothes or foot-wear.High pressure hoses, fittings and couplings are important for the safety of the machine. Use only hoses, fittings and couplingsrecommended by the manufacturer.To ensure machine safety, use only original spare parts from the manufacturer or approved by the manufacturer.Water that has flown through backflow preventers is considered to be non-potable.Do not use the machine if a supply cord or important parts of the machine are damaged, e.g. safety devices, high pressurehoses, trigger gun.A-4 - FORM NO. 56042658 - PEX 500-C-TICK
ENGLISH / A-5GROUNDING INSTRUCTIONSThis appliance must be grounded. If it should electrically malfunction, grounding provides a path of least resistance for electric current to reducethe risk of electric shock. This appliance is equipped with a cord having an equipment-grounding conductor and grounding plug. The plug must beplugged into an appropriate outlet that is properly installed and grounded in accordance with all local codes and ordinances.DANGER!Improper connection of the equipment-grounding conductor can result in a risk of electric shock. Check with a qualifiedelectrician or service person if you are in doubt as to whether the outlet is properly grounded. Do not modify the plugprovided with the appliance. If it will not fit the outlet, have a proper outlet installed by a qualified electrician.Replace the plug if the grounding pin is damaged or broken.The Green (or Green/Yellow) wire in the cord is the grounding wire. When replacing a plug, this wire must be attached to the grounding pin only.Extension cords connected to this machine should be 12 gauge, three-wire cords with three-prong plugs and outlets. DO NOT use extension cordsmore than 50 feet (15 m) long.WARNING! If an extension cord is used, the plug and socket must be of watertight construction. Inadequate extension cords can be dangerous.FORM NO. 56042658 - PEX 500-C-TICK - A-5
A-6 / ENGLISHKNOW YOUR MACHINE12345678910Solution Hose Quick DisconnectSolution Tank Fill OpeningVacuum Hose BarbDrain HoseHandlesRoller BallsWheelCastorSolution FilterRecovery Tank Shutoff FloatA-6 - FORM NO. 56042658 - PEX 500-C-TICK
ENGLISH / A-7KNOW YOUR MACHINE (CONTINUED)1112131415161718192021Recovery Tank LidSwitch PlateWand Storage ClipPressure Adjustment KnobPressure GaugePressure Relief ValveCord Retainer Straps (four)Hour Meter (Optional)Wand Retainer BracketPigtail Power CordsHose Hangers (two)FORM NO. 56042658 - PEX 500-C-TICK - A-7
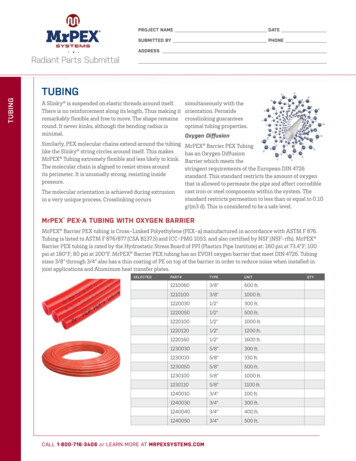
A-8 / ENGLISHKNOW YOUR SWITCH PLATEABCDSolution Pump Switch - This switch turns the solution pump ON and OFF.Vacuum Switch - This switch turns the first of the two vacuum motors ON and OFF.Vacuum Switch - This switch turns the second of the two vacuum motors ON and OFF.Heat Switch - This three position switch controls the water temperature. Position (I) is low temperature, Position (O) isOFF and Position (II) is high temperature.ABA-8 - FORM NO. 56042658 - PEX 500-C-TICKCD
ENGLISH / A-9PREPARING THE MACHINE FOR USE1234Inspect the machine, hoses, and cleaning tools for cleanliness and completeness.Screw the Recovery Tank Lid (11) closed. Ensure the drain cap is closed tightly.Pre-spray spots and heavy traffic areas before extracting with the detergent of your choice. Mix the pre-spray according to the detergentmanufacturer’s directions.Fill the solution tank with clear water (12 gal. / 45.5 L capacity). If desired, add a detergent or rinse of your choice (we recommend aCRI approved detergent). If you choose to add a detergent to the solution tank, be sure to mix well, and always follow the use & dilutioninstructions on the detergent label. Only use a detergent with a pH between 5 and 10. Although this machine is designed to supply instanthot water, the addition of warm water to the solution tank would increase heater efficiency. Never use water above 130º F/54º C in thesolution tank.CAUTION!Use low-sudsing, liquid detergents designed for carpet extraction.FORM NO. 56042658 - PEX 500-C-TICK - A-9
A-10 / ENGLISHOPERATING THE MACHINE12345Follow the instructions in the Preparing the Machine for Use section of this manual.Turn off all the switches. Plug the power cords into properly grounded outlets. Do not connect both cords to the same outlet.Attach the priming hose to the machine and place the open end into the solution tank.Turn ON the solution pump (A) and let it run until the pump is fully primed (approximately 30 seconds to 1 minute). Once the pump is primed,turn off the pump and remove the priming hose.Connect a solution line to the Solution Hose Quick Disconnect (1). Attach the other end of the solution line to the cleaning tool.NOTE: If there is pressure built up in the solution lines, it may be difficult to connect a solution line to the Quick Disconnect (1). If this is the caseplace the Pump Switch (A) into the OFF (O) position. Momentarily turn the Pressure Relief Valve (16) from the green “checkmark” position tothe red “X” position and back again to the green “checkmark” position, this will relieve the pressure to allow a solution line to be connected tothe quick disconnect port.CAUTION!Always operate the machine with the Pressure Relief Valve in the Green “checkmark” position to avoid possible damage.67Connect a vacuum hose to the Vacuum Hose Barb (3). Attach the other end of the vacuum hose to the cleaning tool.To use heated water for cleaning, press the Heat Switch (D) into either the Low Temperature position (I) or the High Temperature position (II).Wait two minutes for the heat exchanger to reach temperature.8 Press the Pump Switch (A) to ON (I).9 Press the Vacuum Switches (B & C) to ON (I). The machine can be used with only one vacuum motor running for less suction i.e. cleaningupholstery.10 Spray through your tool a few times to fill the lines with solution. Begin cleaning.11 To adjust the solution spray pressure; rotate the Pressure Adjustment Knob (14) clockwise to increase pressure andcounterclockwise to decrease pressure. The pump spraying pressure will be observable at the Pressure Gauge (15)while spraying. Make sure the cleaning tool is spraying when adjusting the pressure, otherwise the pressure readingwill be inaccurate.12 Watch the fluid entering the Recovery Tank Lid (11). If there is a large amount of suds in the recovery tank, add a defoamer chemical to therecovery tank.CAUTION! Empty the recovery tank before the fluid or foam enters the vacuum motor. If foam or liquid escapes from the machine, switch off immediately.CAUTION!Always make sure the float is clean and travels freely before turning on the machine. A float that is stuck will cause thevacuum motor to suck in water, resulting in vac motor damage.13 The recovery tank has a Recovery Tank Shutoff Float (10) to block the vacuum system when the recovery tank is full. You can tell when thefloat closes by the sudden change in the sound of the vacuum motor. When the float closes, the recovery tank must be emptied. The machinecan continue to dispense solution, but will not pick up water with the float closed.14 Monitor the water level in the solution tank. Do not let the pump run dry. When the solution tank gets low, turn off the pump and the vacuummotor(s), refill the solution tank with water and the proper ratio of cleaning detergent. Empty the recovery tank and continue cleaning.15 When the operator has completed the job; vacuum all unused solution from the solution tank into the recovery tank, turn off the pump, vacuummotor(s) and heat exchanger. Unplug the machine.16 Push the machine to a designated waste water “DISPOSAL SITE” and empty the recovery tank. To empty, loosen the Velcro strap retaining theRecovery Tank Drain Hose (4) into its side storage location, then remove the plug (hold the end of the hose above the water level in the tank toavoid sudden, uncontrolled flow of waste water).17 Follow the instructions in the After Using the Machine section of this manual.A-10 - FORM NO. 56042658 - PEX 500-C-TICK
ENGLISH / A-11OPERATING THE MACHINEFORM NO. 56042658 - PEX 500-C-TICK - A-11
A-12 / ENGLISHAFTER USING THE MACHINE123456To empty the solution tank, open Solution Tank Fill Opening (2) and vacuum out all unused solution into the recovery tank using the vacuumhose. Rinse the tank with clean water.Turn all the Power Switches (A, B, C & D) to OFF (O). Unplug the Power Cords (20). Coil the cords and secure them to the rear of the machineusing the four Cord Retainer Straps (17).To empty the recovery tank, loosen the Velcro strap retaining the Recovery Tank Drain Hose (4) into its side storage location. Direct the hose toa designated waste water “DISPOSAL SITE” and remove the plug (hold the end of the hose above the water level in the tank to avoid sudden,uncontrolled flow of waste water). Rinse the tank with clean water. Inspect the drain hose; replace if kinked or damaged.Disconnect the solution and vacuum hoses from the machine, at the Solution Hose Quick Disconnect (1) and Vacuum Hose Barb (3) respectively.Flush the vacuum hose with warm water to wash any debris out of the vacuum hose and cleaning tool. Inspect them for damage. Fold downthe Hose Hangers (21) and the hoses can be wrapped around the machine for storage. Set the wand on the Wand Retainer Bracket (19) andsecure to the back of the machine at the Wand Storage Clip (13).Wipe the machine with a damp cloth. Do not use abrasive chemicals or solvents.Perform any required maintenance before storage.MAINTENANCE SCHEDULEMAINTENANCE ITEMCheck / Clean Tanks & HosesCheck / Clean Recovery Tank Shut-Off FloatClean Extraction Wand/ToolInspect & Clean Solution Filter*Check Carbon BrushesDaily Weekly Yearly * Have a HydraMaster service technician check the vacuum motor carbon brushes once a year or after 300 operating hours. Check the pump motorcarbon brushes every 500 hours or once a year.IMPORTANT!Motor damage resulting from failure to service the carbon brushes is not covered under warranty. See the Limited WarrantyStatement.7Store the machine indoors in a clean, dry place with the recovery tank lid open. Keep from freezing.POWER CORD MAINTENANCEOnce a week (or more often if necessary), check the power cords for cracked or damaged insulation, exposed wires in the cord or plug, and damagedor missing ground pin. Repair or replace damaged cord or plug immediately.A-12 - FORM NO. 56042658 - PEX 500-C-TICK
ENGLISH / A-13TROUBLESHOOTING:IF THIS OCCURSNO SPRAYLOW PUMP PRESSUREPUMP DOES NOT RUNLOW SUCTIONNO SUCTIONLOW HEATNO HEATCHECK THISSolution tank is empty, or filter is plugged.Clogged spray tip(s).Pump not running or not primed.Valve on wand not operating.Solution hose not completely connected to hose or to machine.Check to see that the pressure relief valve is fully seated in the green checkmark “operating” position(500 models only).This pump motor runs on AC voltage, so it should start running as soon as you turn on the switch. If thepump motor does not start running, check the wiring to the switch and to the motor. Check the switch tosee if it is “open”.Debris is plugging cleaning tool or vacuum hose.Drain hose cap is not completely closed.Recovery tank lid is not seated or gasket is damaged.Ball in the float is blocking air flow. Turn off the vacuum so the ball will drop down, or the recovery tankis full and needs to be emptied.No power to motor(s).Test the switches.Test the vacuum motors.Spraying too long. Try spraying for 12-15 seconds, or about three strokes.Heat exchanger needs to be flushed.Wrong tool being used. Too much water passing through. Longer hose or larger diameter hose, thanstandard.Heat is not turned on.No power in the wall outlet - check to see if the breaker has tripped.Call your distributor for additional help.TECHNICAL SPECIFICATIONS (as installed and tested on the unit)ModelModel No.Voltage/frequencyRated CurrentProtection Class (electrical)Protection GradeSound Pressure Level(IEC 60704-2-1)Total WeightSolution Tank CapacityRecovery Tank CapacityPEX 500-C-TICK56384886230 V / 50 Hz15 AmpClass 1IPX468.7 dB LpA, 3 dBKpA112 lbs. (50.8 kg)12 gal (45.5 L)10 gal (37.8 L)FORM NO. 56042658 - PEX 500-C-TICK - A-13
PARTS LISTTABLE OF CONTENTSDESCRIPTIONPAGEDecal System. 16-17Pallet System 500-1 C-TICK. 18-19Pallet System 500-2 C-TICK. 20-21Recovery System. 22Solution System. 23Wiring Diagram. 24-25Options & Accessories. 25Water Flow Diagram. 26WHEN ORDERING PARTS* Use the part numbers from the “Ref. No.” columns in this parts list. If the “Ref. No.” column is blank; look under the“Kit” column to identify which kit contains the part in question, then use the kit callout, for example “K1”, to find the “Ref.No.” for that kit.Kit Item Ref. No. Qty 1130341623122316312Washer Flat 3/16 Zinc PlatScrew-BHS-Brass-10-32x3/8-MSWasher EPDM 7/32 X 1/8Chain-CoverCaster Swivel 4 Gray Non MANut, Hex Nyl Loc 10-24Scr- Hex SS 1/4-20 X .75Scr, Hex Hd Loc 1/4-20 x .50Wsh, Flt SS .260 X 1.000 X .074Solution TankHinge Plate561131031Kit-Hardware Solution Tank805905*Specify the model and serial number of the machine.*Use the space below to record the model and serial number for future reference.Model7/2016Serial No.56042658 - PEX 500-C-TICK15
PARTS LISTDECAL SYSTEM C-TICK2453116PEX 500-C-TICK - 560426587/2016
PARTS LISTDECAL SYSTEM C-TICKKit Item123457/2016Ref. tionLabel Caution / Extension CordLabel Gauge Priming Warning 2Decal-PEX 500Label Danger Electric ShockDecal-CRI Gold56042658 - PEX 500-C-TICK17
PARTS LISTPALLET SYSTEM 500-1 C-TICKTo Barb On Unloader Valve63To Quick Disconnect8To Barb On Pressure Relief Assy646279To Unloader Valve92To Pressure Relief Assy6057To Unloader AssyTo Pressure Gauge5965945861To Heater93To HeaterTo Barb On Recovery Tank4590To Pump8574 8748To Pump5451784273283To "T" BarbFrom UnloaderTo Barb OnSolution Tank7771988690126692394088 33476175 614463997 1687012151 303499805279630541 8995533895To Barb On Pump5018PEX 500-C-TICK - 560426585612To Barb OnSolution Tank 87/2016
PARTS LISTPALLET SYSTEM 500-1 C-TICKKit ItemRef. 198USP10219USP11230USPK1 12K1 13K1 65K1 23K1 24K1 25K1 26K1 27K1 28K1 29K1 30K1 31K1 32K1 33K1 34K1 23942261121221111221211111111DescriptionWasher Flat 3/16 Zinc PlatScrew-Php-SS-4x3/8-SmsWasher Brass Half Hard 1 XQuick Disconnect Plug MaleWasher 1 OD X 9/16 Id XElbow 45deg.Angle 1/4 Male X 1Hose Clamp-Size 28-1-9/16- 2 1/2Clamp, HoseHose Clamp 48 3-1/2dia 9Quick Connect Brass 1/4 FPTRetainer Power Cord Water -Ph-Combo-Tapping-8x5/8 ABMount Heat ExchangerStrap-Velcro-1.0 X ap-Buckle/Cord-W/Spur GrommetSwitch Rocker Dpst On/Off 20Wheel 12”X1” Black On Gray 1/2” AxleGage-PressureScr-Pan Phil 8-32 X .75Wsh, Flt Sae 5/16Scr, Soc Hd 1/4-20 X 1.00Scr, Hex 1/4-20 X 4.25Nut, Hex Nyl Loc 8-32Scr, Pan Phil Loc 1/4-20 X .62Scr, Pan Phil SS 8-32 X .50Scr, Hex Hd Loc 1/4-20x.50Scr, Soc Hd 5/16-18 X 1.25 Zinc PlatedScr-Soc Shd SS Loc .31 X .625 X 1/4-20Scr-Flt Phil Sm #8 X .50Scr-Pan Phil Sm #6 X .75Scr-Pan Phil 8-32 X .31Equipment PalletCover-Intake-PalletCover-Exhaust ChamberRoller Ball-PalletRoller Ball Bushing-PalletWand ClipHose Hanger SsCover Plate Pressure 500PSIRocker Switch-3 PositionVac Motor Intake-3 StageGasket Vac IntakeWand BracketVac Motor 230V-3 StageVac Motor Brush Kit-240VHarness-MainHeat Exch Complete-240v 2000wKit-Heater Repair PEXVac Hose Rubber 7.75 X 2.0 IDSolution HoseHose 3/8 IDGasket-PalletKit ItemRef. 98#56004000199#560040011Service KitsK1561131071DescriptionSwitchplate Assy 230v240v-500psi Pump AssyKit-Pump Head 500 PSI Complete(Pump w/fittings & Bearing & Cam Assy)Kit-Pump Motor 240V(Motor w/Bearing & Cam Assembly)Hose-1/4” Id 1/8mnpt 1/4 FnptHose-3/8 Id 1/4qd 3/8mnptHose-1/4 Id 1/8mnpt 1/4 FnptHose-1/4id 3/8 Fnpt 90-1/4mnptHose-AssyUnion Tee-Barb 3/8id HoseHose-3/8 IdHose-3/8 IdPower CordHose Hanger BushingPressure Relief AssemblyUnloader AssemblyRectifier, 35 AmpTerminal BlockClamp-PNut-Hex Flange SS M4-0.7Plug, CapVacuum HoseBushing 3/4 X 9/16Gasket 1 Side Adhesive 5 1/2Heat Sink Plate Bridge RectifierAxel Cap Black Pal NutElectrical Plug Australian & NVac Hose 2” ID X 13.5 Black RubberAxel Rod Zinc Plate 1/2 ODLouver 3 Black PlasticNipple-SS-1/4 Pipe-Length .90Manifold for Cobra BlackManifold Black w/1063 S-WGrommetHose Clamp 3/4 X 1 3/4 SSFilterFilterChoke AssyGasket SwitchplateShrink Tubing 1/2 Red PolyElectrical Connec .250 X .032Rec .250 16-14 AwgClamp-Hose SAE #6Tie 4 Black Weather ResisBracket-Hose ClipWsh-Flt Ss .765x1.312x.090Wsh-Disc Spring Ss .8x1.1x.021Kit-Hardware Pallet Sys 500[ ] Not Shown* Optional, Not Included# Revised or new since last update56042658 - PEX 500-C-TICK19
PARTS LISTPALLET SYSTEM 500-2 C-TICK2210 724322925 2044682179118167165535413614664212827330138111931 2447113337122120281PEX 500-C-TICK - 56042658787/2016
PARTS LISTPALLET SYSTEM 500-2 C-TICKKit ItemRef. 198USP10219USP11230USPK1 12K1 13K1 65K1 23K1 24K1 25K1 26K1 27K1 28K1 29K1 30K1 31K1 32K1 33K1 34K1 23942261121221111221211111111DescriptionWasher Flat 3/16 Zinc PlatScrew-Php-SS-4x3/8-SmsWasher Brass Half Hard 1 XQuick Disconnect Plug MaleWasher 1 OD X 9/16 Id XElbow 45deg.Angle 1/4 Male X 1Hose Clamp-Size 28-1-9/16- 2 1/2Clamp, HoseHose Clamp 48 3-1/2dia 9Quick Connect Brass 1/4 FPTRetainer Power Cord Water -Ph-Combo-Tapping-8x5/8 ABMount Heat ExchangerStrap-Velcro-1.0 X ap-Buckle/Cord-W/Spur GrommetSwitch Rocker Dpst On/Off 20Wheel 12”X1” Black On Gray 1/2” AxleGage-PressureScr-Pan Phil 8-32 X .75Wsh, Flt Sae 5/16Scr, Soc Hd 1/4-20 X 1.00Scr, Hex 1/4-20 X 4.25Nut, Hex Nyl Loc 8-32Scr, Pan Phil Loc 1/4-20 X .62Scr, Pan Phil SS 8-32 X .50Scr, Hex Hd Loc 1/4-20x.50Scr, Soc Hd 5/16-18 X 1.25 Zinc PlatedScr-Soc Shd SS Loc .31 X .625 X 1/4-20Scr-Flt Phil Sm #8 X .50Scr-Pan Phil Sm #6 X .75Scr-Pan Phil 8-32 X .31Equipment PalletCover-Intake-PalletCover-Exhaust ChamberRoller Ball-PalletRoller Ball Bushing-PalletWand ClipHose Hanger SsCover Plate Pressure 500PSIRocker Switch-3 PositionVac Motor Intake-3 StageGasket Vac IntakeWand BracketVac Motor 230V-3 StageVac Motor Brush Kit-240VHarness-MainHeat Exch Complete-240v 2000wKit-Heater Repair PEXVac Hose Rubber 7.75 X 2.0 IDSolution HoseHose 3/8 IDGasket-PalletKit ItemRef. 98#56004000199#560040011Service KitsK1561131071DescriptionSwitchplate Assy 230v240v-500psi Pump AssyKit-Pump Head 500 PSI Complete(Pump w/fittings & Bearing & Cam Assy)Kit-Pump Motor 240V(Motor w/Bearing & Cam Assembly)Hose-1/4” Id 1/8mnpt 1/4 FnptHose-3/8 Id 1/4qd 3/8mnptHose-1/4 Id 1/8mnpt 1/4 FnptHose-1/4id 3/8 Fnpt 90-1/4mnptHose-AssyUnion Tee-Barb 3/8id HoseHose-3/8 IdHose-3/8 IdPower CordHose Hanger BushingPressure Relief AssemblyUnloader AssemblyRectifier, 35 AmpTerminal BlockClamp-PNut-Hex Flange SS M4-0.7Plug, CapVacuum HoseBushing 3/4 X 9/16Gasket 1 Side Adhesive 5 1/2Heat Sink Plate Bridge RectifierAxel Cap Black Pal NutElectrical Plug Australian & NVac Hose 2” ID X 13.5 Black RubberAxel Rod Zinc Plate 1/2 ODLouver 3 Black PlasticNipple-SS-1/4 Pipe-Length .90Manifold for Cobra BlackManifold Black w/1063 S-WGrommetHose Clamp 3/4 X 1 3/4 SSFilterFilterChoke AssyGasket SwitchplateShrink Tubing 1/2 Red PolyElectrical Connec .250 X .032Rec .250 16-14 AwgClamp-Hose SAE #6Tie 4 Black Weather ResisBracket-Hose ClipWsh-Flt Ss .765x1.312x.090Wsh-Disc Spring Ss .8x1.1x.021Kit-Hardware Pallet Sys 500[ ] Not Shown* Optional, Not Included# Revised or new since last update56042658 - PEX 500-C-TICK21
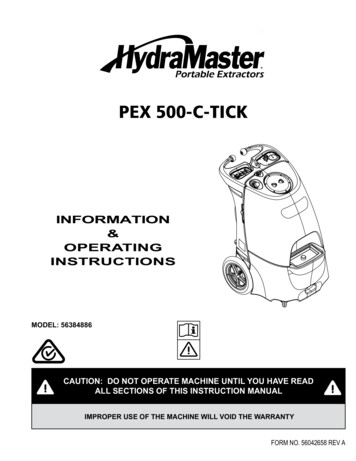
PARTS LIST10513614432VAC HOSEFROM PALLET SYSTEM189117RECOVERY SYSTEMKit ItemRef. 11303911#5610526556105266K1 13K1 1456383436Qty61116111111111DescriptionNut-Nylon Lock-SS-8-32Chain-CoverScrew 6x3/8 S/S Trusshead PGasket-Lid-XLPE-6.5IDx3/16 ThickScrew-Php-SS-8-32x1-1/8Barb 1-1/2 X FIPT ABSHose Clamp 3/4 X 1 3/4 SSRecovery TankRecovery Tank GasketBall Float AssyDrain HoseCap-Drain Hose (for 56105265)Lid and Ring 6 Lid W/ClearO-Ring# Revised or new since last updateService Kits22K1561131001Kit-Recovery Tank LidPEX 500-C-TICK - 560426587/2016
PARTS LIST39213177615BYPASS / RETURN HOSEFROM PALLET SYSTEM81411PUMP SUPPLY HOSEFROM PALLET SYSTEM16108151412SOLUTION SYSTEMKit ItemK1K1K1K1K1K1K1K1Ref. 13901A1492BUSP15108316111317Service 111Washer Flat 3/16 Zinc PlatScrew-BHS-Brass-10
A-8 / ENGLISH A-8 - FORM NO. 56042658 - PEX 500-C-TICK KNOW YOUR SWITCH PLATE A Solution Pump Switch - This switch turns the solution pump ON and OFF. B Vacuum Switch - This switch turns the first of the two vacuum motors ON and OFF. C Vacuum Switch - This switch turns the second of the two vacuum motors ON and OFF. D Heat Switch - This three position switch controls the water temperature.