Transcription
Essbase on OCI:Backup and RestoreThis paper covers disaster recovery and version upgrade planningfor Essbase instances deployed on OCI .June 2020 Version 1.2Copyright 2020, Oracle and/or its affiliatesConfidential - Public
DISCLAIMERThis document in any form, software or printed matter, contains proprietary information that is the exclusive property ofOracle. Your access to and use of this confidential material is subject to the terms and conditions of your Oracle softwarelicense and service agreement, which has been executed and with which you agree to comply. This document andinformation contained herein may not be disclosed, copied, reproduced or distributed to anyone outside Oracle withoutprior written consent of Oracle. This document is not part of your license agreement nor can it be incorporated into anycontractual agreement with Oracle or its subsidiaries or affiliates.This document is for informational purposes only and is intended solely to assist you in planning for the implementationand upgrade of the product features described. It is not a commitment to deliver any material, code, or functionality, andshould not be relied upon in making purchasing decisions. The development, release, and timing of any features orfunctionality described in this document remains at the sole discretion of Oracle.Due to the nature of the product architecture, it may not be possible to safely include all features described in this documentwithout risking significant destabilization of the code.1WHITE PAPER Essbase on OCI: Backup and Restore Version 1.2Copyright 2020, Oracle and/or its affiliates Confidential - Public/Oracle Internal/Oracle Restricted/Oracle Highly Restricted
TABLE OF CONTENTSDisclaimer1Purpose Statement3Backup and restore terminology and Use cases3Defining Restore Use CasesUnderstanding Essbase BackupsUse case: Disaster RecoveryDefault Essbase Deployment: Recover ComputeNon-Default Essbase Deployment: Recover ComputeEssbase Backups: Step-by-stepBackup Entire ATP and Block Volumes: Step-by-Step55101414Backing up Essbase using Oracle-Provided Scripts14Backing up Essbase using DB client and OCI console14Backup ATP Schema and Block Volumes: Step-by-Step16Before You Begin: Install and Configure Oracle Instant Client and Tools16Backing up Essbase schema using Data Pump and OCI console18Various other notes23420Managing Volume Groups20Resolving Network Components20WHITE PAPER Essbase on OCI: Backup and Restore Version 1.2Copyright 2020, Oracle and/or its affiliates Confidential - Public/Oracle Internal/Oracle Restricted/Oracle Highly Restricted
PURPOSE STATEMENTThis document provides recommendations for the life cycle management of Essbase deployments on Oracle CloudInfrastructure (OCI). We’ll review use cases and steps for full Essbase instance backup in support of disaster recovery andversion upgrades. Essbase deployments require regular backup and healthy redundancy planning. For deployments onOCI, block volumes and relational database schemas must be thoughtfully managed.Application-level backups within an Essbase service also have a very important place in the overall Essbase life cyclemanagement, but they are not the focus of this paper. Here, we are focused on recovering/upgrading the entire Essbaseinstance (all applications) as of some point-in-time.Task-level steps described in this whitepaper are as of Essbase version 19.3.0.2.3. Should a step not work exactly asdescribed, please consult the Essbase documentation.BACKUP AND RESTORE TERMINOLOGY AND USE CASESWhen you use the Oracle Marketplace to deploy Essbase on OCI, you don’t install it in the traditional sense, as you would toan on-premise server machine. Instead, you deploy Essbase as part of an image on a cloud compute node (or a ‘compute’for short). This compute, together with the other necessary OCI components (VCN, relational database, block and objectstorage, etc.), is called an Essbase stack.Certain components from every stack you create contain information that makes your Essbase deployment unique to yourend user community. You will need to back up these unique stack components at appropriate intervals to meet yourrecovery objectives. In the event of an OCI compute or Availability Domain (AD) failure, you can recover your Essbaseinstance by building a new stack and restoring into it your Essbase backup. Similarly, you can perform necessary Essbaseversion updates using backups.Restore, in this paper, will be a generic term used to describe the action of deploying a new Essbase stack and attaching to itthe appropriate block volume and relational database backups.If your restored Essbase stack should be the latest release, you will use Oracle Marketplace to create it.If you wish to recover the same version of Essbase you ran prior to restoring, then you can take an older deployment scriptfrom GITHUB.Important: Think of the pre-restore Essbase stack as a source (of block volumes, block volume backups, RDB schemas,RDB backups) and the post-restore Essbase stack as a target. Your restored target instance should reflect the sourceinstance as of some point in time.Defining Restore Use CasesThe restore requirements for your Essbase deployment will define the required backup tasks. There are two commonrestore scenarios:Disaster Recovery: should you experience a hardware failure with the compute node in which Essbase is running, you caneasily recover your instance in any AD in the same region.Version Upgrade: between major versions, Oracle will require out-of-place Essbase binary/configuration uptake, esp. whenFusion Middleware changes or Essbase schema changes are being introduced.Although not every restore use cases is driven by disaster recovery, restoring Essbase always requires the deployment of anew target stack [for the sake of recovering or updating the compute image]. When defining the target stack, you can reuse some source stack components, along with your source backups.Although not highlighted in this paper, service level agreements (SLAs) with the Essbase user community are an importantconsideration for restore planning. What is the acceptable downtime window during any recovery or update? There arethings you can do to manage the overall time it takes to restore an instance, such as cloning block volumes and buildingtarget stacks in advance so that the target OCI environment is in passive standby.Note: Detailed steps for the version upgrade restore use case will be published with the first major release after 19.3.x.x.The remainder of this paper will focus on disaster recovery.3WHITE PAPER Essbase on OCI: Backup and Restore Version 1.2Copyright 2020, Oracle and/or its affiliates Confidential - Public/Oracle Internal/Oracle Restricted/Oracle Highly Restricted
Understanding Essbase BackupsSuitable and reliable backups are the backbone of your restore use case. Any backup of Essbase on OCI will depend onsome details of your Essbase stack. A complete backup must protect all information that makes your Essbase deploymentunique. These items are: Relational database schemas for every Essbase stack, which store some application, user and configurationinformation.i) A single database schema for Essbase, called instance prefix Essbaseii) Eight database schemas for WebLogic, with the same instance prefix schemaname Essbase application and database information stored on a block volume mounted as /u01/data.WebLogic domain and configuration information stored on a block volume mounted as /u01/confg. [Essbase is amanaged service within a WebLogic domain.]Your backup strategy must ensure that the information above is captured at appropriate intervals to align with your restoreuse case. Also, the timing of relational database backups and Essbase block volume backups must be synchronized toensure that the target instance will have the required consistency for Essbase to run properly.Consider this Although it is possible to restore source block volumes directly to a target stack, you may not know thestatus of any write operations that were in process in the case of compute disaster recovery. Stopping Essbase before youtake a backup allows you to know the exact state of your Essbase data when you use it to restore an Essbase instance.Block Volume Backup Planning for Your Restore Use CaseWhen you restore Essbase in a target stack, you will always restore and attach a source data block volume backup (and insome cases, a config block volume backup). To consistently restore a target Essbase instance, backups of your sourceEssbase data block volume should be from the same point-in-time as your source ATP database backup.should be taken at a time when the Essbase services were stopped.Optionally, you can work directly with the source block volumes if you are sure about the Essbase data they contain.Note: Block volumes are restored from backup into an AD of your choosing. Clones can be introduced into your backupprocesses to minimize Essbase downtime. Block volumes (or clones) cannot be moved between ADs. Clones can be used toquickly replicate a source block volume, then can be backed up and likewise restored into an AD of your choosing. Whenclones are being used, Essbase must only be stopped during the cloning process.Database Backup Planning For Your Restore Use CaseWhen you deploy an Essbase stack, the default behavior is to deploy a new ATP database as part of the stack. If you deploya second Essbase stack in the same region, you can optionally choose to deploy without a second ATP database by selectingthe “use existing database” option. This results in license cost savings, as a single ATP database is scalable enough tosupport schemas for multiple Essbase instances. Schemas associated with each instance of Essbase have a common andunique prefix. The number of Essbase instances deployed in your ATP database, combined with your recovery use case,defines whether you can back up the entire database or if you need to perform schema-level backups.Relational Database Backups for Default Essbase DeploymentsDefault Essbase deployments consist of a single Essbase stack with RCU schemas deployed into a single relational database.For Essbase default deployments, the relational database can be backed up without exporting schemas for individualEssbase instances. This is possible because restoring the database only impacts one Essbase instance.Relational Database Backups for Non-Default Essbase DeploymentsNon-default Essbase deployments consist of multiple Essbase stacks, each with unique RCU schemas, deployed into a singlerelational database. Essbase non-default deployments require you to refine your relational database backup strategy.Restoration of a relational database backup is “all or nothing”, meaning that the relational database schemas for all Essbaseinstances would be reset to the same timestamp should a restore action be required on the database.Best practice for Essbase backups is to synchronize the relational database backup with the block volume backups. But it isnot a best practice to require all Essbase instances to be on the same backup and restore schedule. For non-defaultdeployments, isolation of the data and metadata for a single Essbase instance is accomplished by using database schemabackups.4WHITE PAPER Essbase on OCI: Backup and Restore Version 1.2Copyright 2020, Oracle and/or its affiliates Confidential - Public/Oracle Internal/Oracle Restricted/Oracle Highly Restricted
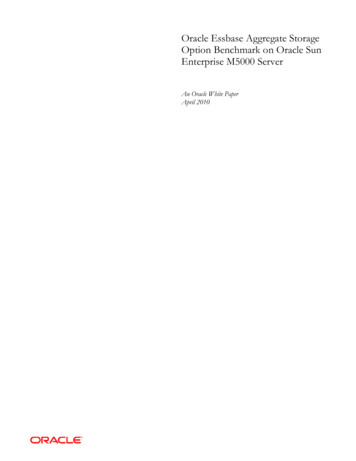
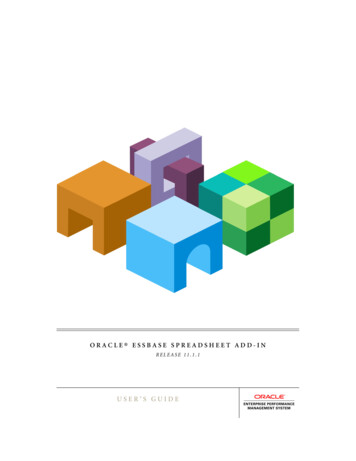
Restore Use CaseEssbase Deployment TypeRDB Backup TypeBlock Volume(s) to RecoverDisaster RecoveryDefaultDatabaseData and ConfigDisaster RecoveryNon-DefaultSchemaDataNext, we will look at disaster recovery and the backup steps required to support it. Some assumptions have been made tolimit the size and scope of this paper. All examples in this paper assume the following: ATP is the relational database into which Essbase schemas are deployedOracle Identity Cloud Service (IDCS) is the security provider for the Essbase deploymentThe ESSBASE SYSTEM ADMIN USER NAME (stored in WebLogic – only non-IDCS user in the system) is the samebetween the source and the target Essbase stackThe source instance backup has [at the time of restore] at least one valid IDCS user with an Essbase systemadministrator role.USE CASE: DISASTER RECOVERYIf the compute node on which your Essbase services are deployed fails, you can recover it in any AD in the same region.When you build the target stack and recover the compute, you can re-use many parts of the source stack by using “useexisting database” and “use existing network” options. If you have a load balancer in the source deployment, you canchange its backend networking and use it with the target stack. You can also attach the block volumes (or theirbackup/clone) that were previously attached to the source compute.When restoring your Essbase environment, do not be confused by the term “use existing database”. Although you are freeto use a pre-existing relational database, every new Essbase stack will deploy a unique set of Essbase schemas. Deployinginto an existing database will not “hook” your target Essbase services to your source Essbase schemas – rather, it will createnew target schemas. Mapping source schema data and metadata into the new target database is accomplished when yourestore your source database backup into the target.Remember that a failed compute node will cause failure of your Essbase services. The backups referenced as part of thisbackup and restore discussion must be taken at regular intervals in advance of any compute failure.Default Essbase Deployment: Recover ComputeDefault deployments can be restored from backup using the OCI console.Backups should be taken prior to compute failure following one of the methods here: Backup Entire ATP and BlockVolumes: Step-by-Step. It doesn’t matter whether you choose to backup using Oracle-provided scripts or using a databaseclient and the OCI console.1)Deploy a target Essbase stack using Oracle Marketplace Use the source IDCS confidential applicationUse the source ATP database and passwordUse the source VCN and application subnetIf your source stack has a load balancer, do not deploy a target Load Balancer– you can change the Backend Setafter deploying the target stackIf your source stack has a bastion host, deploy a bastion host with the target stack [source bastion host can bedeleted after successful recovery]Use the same Essbase system admin user name and password in the target as you used in the sourceUse the same IDCS Essbase admin user in the target stack as you used in the source stack. If this is not possible,make sure the source Essbase instance has at least one valid IDCS user with the Essbase system administrator role.After you restore, you must login to the target instance as a valid IDCS user who had Essbase system administratorrole on the source instance.The Essbase services in the target stack will be started automatically by the Oracle Resource Manager (ORM) apply job.Note: After deploying this stack, two sets of Essbase schemas will be present in your ATP (source and target).Remember that your ATP backup, taken prior to this stack deployment contains only one set of Essbase schemas(source).5WHITE PAPER Essbase on OCI: Backup and Restore Version 1.2Copyright 2020, Oracle and/or its affiliates Confidential - Public/Oracle Internal/Oracle Restricted/Oracle Highly Restricted
2)Stop the target Essbase services. [Do not stop the Essbase compute in OCI.]Hint: It goes without saying that the Essbase services on the source compute are stopped, because this use caseinvolves source compute hardware failure. If you are simulating these steps, make sure you also stop the sourcecompute’s Essbase services. ssh to the target Essbase compute as opc userexecute the following command: sudo systemctl stop okup?ctx en/database/other-databases/essbase/19.3&id GUID-E442392E-04F3-4E0D-AA98868B57EFB9073)Restore the source ATP from Backup.Be sure to select a source ATP backup that was taken during a time when your source Essbase services were stopped;also, be sure that you have source Essbase ‘data’ and ‘config’ block volumes from the same time. Using the OCI console main menu, choose Autonomous Transaction ProcessingSelect the source ATP (note: source and target schemas are in the source ATP)Under Resources, select BackupsFind the timestamp of the Backup you want to restore, and select Restore using the menu on the right side of thepageImportant: Before restoring your ATP for the first time, use the following link and carefully review steps 4 and 5.After you complete a restoration of your ATP, you may render other backups invalid, depending on okup?ctx en/cloud/paas/atp-cloud&id GUID-78C28C41-AA87-4AD7-BEB6-693235C73F3C After the restore finishes, audit your data using a database client like SQL Developer and then be sure to Stop andStart the source ATP, which will be in a read only state after a successful restore. You can look at theESSBASE APPLICATION table within the targetprefix ESSBASE schema to verify the restored applications.4) Detach ‘data’ and ‘config’ block volumes from the target Essbase compute. As opc user, ssh to your target compute and unmount the /u01/data volumesudo umount /u01/data Using the OCI console main menu, choose Compute- InstancesSelect the target Compute in which your Essbase instance is deployedIn Compute Details- Resources, select Attached Block VolumesUsing the actions menu to the right of the ‘data’ volume, select Detachssh to the target Compute as opc user and issue the detach ISCSI commands as indicated.Select Continue Detachment in OCI after issuing ISCSI detach commands.Repeat for the target ‘config’ block tent/Block/Tasks/detachingavolume.htm5)Create ‘data’ and ‘config’ block volumes from source block volume backup.Block volume backups are stored in object storage; they are not able to be attached to compute instances without firstcreating a new volume in block storage. Clones, on the other hand, are standalone block volumes and can be directlyattached to a compute instance. Skip this step if you cloned your block volumes. You may have backed up the blockvolume group; if so, you can create the volume group. Using the OCI console main menu, choose Block Storage- Block Volume BackupsFind the desired ‘data’ volume backup; using the actions menu on the right, select Create Block VolumeProvide a name for the Block Volume and select the correct AD and compartment of your target Essbase compute.Select Create Block VolumeRepeat for the source ‘config’ block volume tent/Block/Tasks/creatingavolume.htm6WHITE PAPER Essbase on OCI: Backup and Restore Version 1.2Copyright 2020, Oracle and/or its affiliates Confidential - Public/Oracle Internal/Oracle Restricted/Oracle Highly Restricted
6)Attach block volumes created in step 5) to the target Compute Using the OCI console main menu, choose Compute- InstancesSelect the target Compute (the instance you are recovering)Under Resources, select Attached Block Volumes; there should be no attached volumesSelect Attach Block VolumeUse the default selections for ISCSI, READ/WRITE. Select the correct compartment and then select the source ‘data’block volume you just created from backup and select Attach.Repeat for the source ‘config’ block volume you just created from tent/Block/Tasks/attachingavolume.htm7)Connect to newly attached target block volumes and mount them After the restored ‘data’ and ‘config’ volumes are attached to the target compute, use the actions menu for eachattached volume to retrieve the ISCSI attach commands.As opc user, connect to the target Compute and execute ISCSI attach commands.As opc user, lsblk to show attached volumes and their disk labels. As opc user, mount the newly attached voumes as /u01/data and /u01/config sudo systemctl daemon-reloadsudo mount /dev/sdc1 /u01/configsudo mount /dev/sdb1 Content/Block/Tasks/connectingtoavolume.htm8)7As opc user, update the target compute /etc/fstab file with the UUID of the newly attached ‘data’ and ‘config’volumes. sudo blkid to show the UUID for the newly attached ‘data’ and ‘config’ block volumes sudo vi /etc/fstab to update the ‘data’ and ‘config’ lines and replace the UUID, if changed.WHITE PAPER Essbase on OCI: Backup and Restore Version 1.2Copyright 2020, Oracle and/or its affiliates Confidential - Public/Oracle Internal/Oracle Restricted/Oracle Highly Restricted
9)As opc user, update the target compute /etc/hosts file to map the source domain information to the target Determine the domain name of your source computeUsing the OCI console main menu, choose Resource Manager- StacksSelect your source stack to edit its detailsUnder Resources- Jobs, select the successful apply jobUnder Job Details- Resources, scroll to the bottom of the log to review the job outputs Record the essbase node domain nameEdit the /etc/hosts file on the target compute and add the source domain informationsudo vi /etc/hosts10) As opc user, update the target compute /etc/oci-hostname.conf file Set the PRESERVE HOSTINFO setting to 3sudo vi /etc/oci-hostname.conf11) Update source load balancer networking for use with the target compute [skip if no source load balancer]8 Using the OCI console main menu, choose Networking- Load BalancersSelect the source load balancerSelect Resources- Backend SetsSelect the Backend Set essbaseSelect Resources- BackendsSelect Add Backends and select the target compute.Remove the Backend corresponding to the source compute There is no need to update the IDCS confidential application URLs, as the same load balancer IP is now routing tothe target Essbase instance.WHITE PAPER Essbase on OCI: Backup and Restore Version 1.2Copyright 2020, Oracle and/or its affiliates Confidential - Public/Oracle Internal/Oracle Restricted/Oracle Highly Restricted
12) If your source stack did not have a load balancer, update your IDCS Confidential Application login/logout URLswith the target IP address Login to IDCS and edit the source confidential application to ensure that the target IP address is substituted for thesource IP address that was previously used.13) Start the Essbase services. ssh to the target Essbase compute as opc userexecute the following command: sudo systemctl start essbase.service14) Resolve startup issues, if any. If it takes longer than you expect for Essbase to start, open another bash window to connect and check the status.If you see that the services didn’t find the JDK, then link the source JDK being used by the mounted config volumeto the JDK on the target system.[opc@essbase26jzoa4p-1 ] sudo systemctl start essbase.service[opc@essbase26jzoa4p-1 ] sudo systemctl status essbase.service [in 2nd bash window] essbase.service - Oracle Essbase serviceLoaded: loaded (/etc/systemd/system/essbase.service; enabled; vendor preset: disabled)Active: activating (start) since Fri 2020-03-06 22:48:24 GMT; 23s agoMain PID: 4782 (code exited, status 0/SUCCESS);: 16336 (start.sh)CGroup: /system.slice/essbase.service 16336 /bin/sh /u01/config/domains/essbase domain/esstools/bin/start.sh 16337 /bin/bash scripts/start essbase.sh 16347 /bin/bash scripts/start essbase.sh 16349 /bin/sh /u01/oracle/oracle common/common/bin/wlst.sh scripts/start servers.pyessbasemdbvmvrl-1 /u01/config/domains/essbase domain 16352 /bin/sh /u01/oracle/oracle common/common/bin/fmwconfig common.sh wlst ase.sysman/scripts/start servers.py essbasemdbvmvrl-1 /u01/config/domains/essbase domain 16353 /bin/sh /u01/oracle/oracle common/common/bin/wlst internal.sh scripts/start servers.pyessbasemdbvmvrl-1 /u01/config/domains/essbase domain 16409 /usr/java/jdk1.8.0 241/bin/java -DORACLE HOME /u01/oracle/oracle common -Xms32m -Xmx1024m sbase.sysman/scripts/start servers.py essbasemdbvmvrl-1 /u01/config/doma.Mar 06 22:48:35 essbasemdbvmvrl-1 startup.sh[16336]: Mar 6, 2020 10:48:35 PM GMT Info Security BEA-090905 Disabling the CryptoJ JCE Provider selfintegrity check for better startup performance. To enable thi.ification true. Mar 06 22:48:35 essbasemdbvmvrl-1 startup.sh[16336]: Mar 6, 2020 10:48:35 PM GMT Info Security BEA-090906 Changing the default Random NumberGenerator in RSA CryptoJ from ECDRBG128 to HMACDRBG. To disable th.faultPRNG true. Mar 06 22:48:35 essbasemdbvmvrl-1 startup.sh[16336]: Mar 6, 2020 10:48:35 PM GMT Info Security BEA-090909 Using the configured custom SSL HostnameVerifier implementation: . Mar 06 22:48:35 essbasemdbvmvrl-1 startup.sh[16336]: Node manager not running. Starting it.Mar 06 22:48:36 essbasemdbvmvrl-1 startup.sh[16336]: NMProcess: NODEMGR HOME is already set to /u01/config/domains/essbase domain/nodemanagerMar 06 22:48:36 essbasemdbvmvrl-1 startup.sh[16336]: NMProcess: The JDK wasn't found in directory /usr/java/jdk1.8.0 221.Mar 06 22:48:36 essbasemdbvmvrl-1 startup.sh[16336]: NMProcess: Please edit the startNodeManager.sh script so that the JAVA HOMEMar 06 22:48:36 essbasemdbvmvrl-1 startup.sh[16336]: NMProcess: variable points to the location of your JDK. Link the source JDK to the JDK the target is expecting[opc@essbase26jzoa4p-1 ] sudo ln -s /usr/java/jdk1.8.0 241 /usr/java/jdk1.8.0 221[opc@essbase26jzoa4p-1 ] sudo systemctl start essbase.service[opc@essbase26jzoa4p-1 ] sudo systemctl status essbase.service essbase.service - Oracle Essbase serviceLoaded: loaded (/etc/systemd/system/essbase.service; enabled; vendor preset: disabled)Active: active (running) since Fri 2020-03-06 23:05:07 GMT; 22s agoProcess: 17749 ExecStart /u01/vmtools/startup.sh (code exited, status 0/SUCCESS)Main PID: 17914 (java)CGroup: /system.slice/essbase.service 17863 /bin/sh /u01/config/domains/essbase domain/bin/startNodeManager.sh 17864 /bin/sh h 17914 /usr/java/jdk1.8.0 221/bin/java -server -Xms32m -Xmx200m -Djdk.tls.ephemeralDHKeySize 2048 Dcoherence.home /u01/oracle/wlserver/./coherence -Dbea.home /u01/oracle/wlserver/. -DNodeManagerHome /u01/config/domain. 18014 /bin/sh /u01/config/domains/essbase domain/bin/startWebLogic.sh 18064 /usr/java/jdk1.8.0 221/bin/java -server -Xms256m -Xmx1024m -cp jar Dlaunch.use.env.classpath true -DWebLogic.Name AdminServer -Djava.security.policy /u01/oracle/w. 18253 /bin/sh /u01/config/domains/essbase domain/bin/startWebLogic.sh 18303 /usr/java/jdk1.8.0 221/bin/java -server -Xms512m -Xmx12059m -cp jar Dlaunch.use.env.classpath true -DWebLogic.Name ess server1 -Djava.security.policy /u01/oracle/.Mar 06 23:05:06 essbasemdbvmvrl-1 startup.sh[17749]: Started ess server1Mar 06 23:05:06 essbasemdbvmvrl-1 startup.sh[17749]: Finished starting serversMar 06 23:05:06 essbasemdbvmvrl-1 startup.sh[17749]: Status of Domain: /u01/config/domains/essbase domainMar 06 23:05:06 essbasemdbvmvrl-1 startup.sh[17749]: NodeManager (essbasemdbvmvrl-1:9556): RUNNINGMar 06 23:05:06 essbasemdbvmvrl-1 startup.sh[17749]: NameTypeMachineStatusMar 06 23:05:06 essbasemdbvmvrl-1 startup.sh[17749]: ------------------9WHITE PAPER Essbase on OCI: Backup and Restore Version 1.2Copyright 2020, Oracle and/or its affiliates Confidential - Public/Oracle Internal/Oracle Restricted/Oracle Highly Restricted
Mar 06 23:05:06 essbasemdbvmvrl-1 startup.sh[17749]: ess server1 com RUNNINGMar 06 23:05:06 essbasemdbvmvrl-1 startup.sh[17749]: AdminServer com RUNNINGMar 06 23:05:07 essbasemdbvmvrl-1 systemd[1]: essbase.service: Supervising process 17914 which is not our child. We'll most likely not notice whenit exits.Mar 06 23:05:07 essbasemdbvmvrl-1 systemd[1]: Started Oracle Essbase service.15) After successfully recovering into the target Essbase stack, you can delete the failed source compute node anddo further cleanup to un-needed block volumes and backups.Non-Default Essbase Deployment: Recover ComputeRemember that non-default deployments have schemas for multiple Essbase instances in a single ATP. Still, if a computefailure takes place for one of the Essbase instances, you will deploy the new target Essbase schemas in the same ATP. Youwill then use relational database schema backups to import the source Essbase schema into the target. Source continues torefer to the schema belonging to the failed Essbase compute node, and target refers to a newly deployed stack built with“use existing database” and “use existing VCN” options.Before beginning this recovery, backups should be taken following this method: Backup ATP Schema and Block Volumes:Step-by-Step. To perform schema backups using data pump, you will need to first install and configure the Oracle InstantClient.1)Deploy a target Essbase stack using Oracle Marketplace Use source IDCS confidential applicationUse source ATP database and passwordUse source VCN and application subnetIf your source stack has a load balancer, do not deploy a target Load Balancer– you can change the Backend Setafter deploying the target stackIf your source stack has a bastion host, deploy a bastion host with the target stack [source bastion host can bedeleted aft
Essbase non-default deployments require you to refine your relational database backup strategy. Restoration of a relational database backup is *all or nothing , meaning that the relational database schemas for all Essbase instances would be reset to the same timestamp should a restore action be required on the database.