Transcription
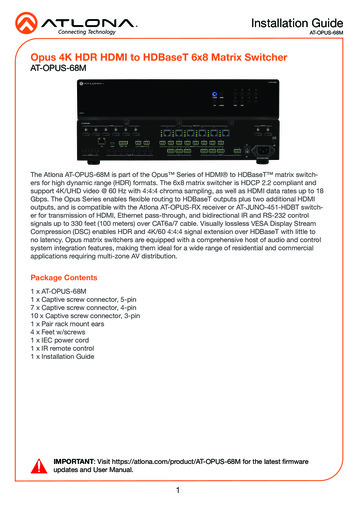
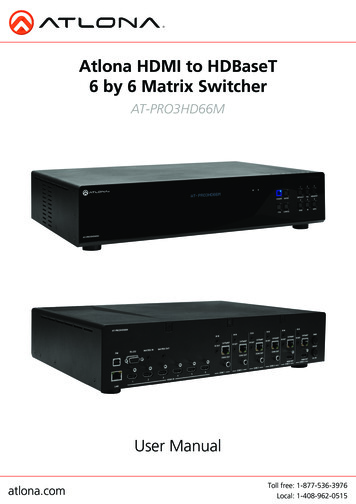
Atlona HDMI to HDBaseT6 by 6 Matrix SwitcherAT-PRO3HD66MUser Manualatlona.comToll free: 1-877-536-3976Local: 1-408-962-0515
Table of Contents1. Introduction. 32. Package Contents. 33. Features . 34. Before You Start. 35. Panel Descriptions Front Panel. 4 IR. 4 Back Panel. 56. Connection and Installation 3rd Party Control. 6 IR Remote Control. 7 Matrix I/O Control. 8 I/O Route Memory. 9 EDID. 9-11 Matrix Status. 127. RS-232 Connection. 13 Set Up. 138. TCP/IP RS-232 TCP/IP Set Up. 14 LAN TCP/IP Set Up.14-15 WebGUI.15-229. TCP/IP and RS-232 Control Commands. 23 TCP/IP Commands.23-24 Baud Rate.24-2510. Remote Control. 2511. Resetting and Updating. 2612. Specifications. 2713. Safety Information. 2814. Warranty. 2915. Atlona Product Registration. 30atlona.com2Toll free: 1-877-536-3976Local: 1-408-962-0515
IntroductionWith the latest and more affordable HDBaseT technology extend HDMI sources up to 230ft overcategory cable. The Atlona HDMI 6 by 6 Matrix Switcher allows for effortless control of up to 12devices through IR, RS-232, TCP/IP and the front panel. With built in S/PDIF ports send audio to anAVR or distribution amp. To ensure all audio passes through, the 6 by 6 Matrix Switcher supportsall Lossy and Lossless formats of Dolby and DTS over HDMI.Package Contents 1 x AT-PRO3HD66M 1 x 24V/6.25A DC adaptor 1 x Power cord 1 x IR Extender 7 x IR Emitter 1 x Remote control 1 x Pair of dual purpose wall/rack mounts 1 x User ManualFeatures HDBaseT allows IR, RS-232, audio and visual signals to pass over a single category cable. Latest feature of Power over Category cable (PoCc ) enables the matrix to power all compatiblereceivers. IR ports for zone dedicated control through IR remote control and 3rd party control boxes. Programmable I/O memories, save I/O routes for faster switching to the most commonly usedconfigurations. EDID learning function for up to 6 video display EDIDs. Built in internal EDID mode provides 12 individual EDIDs to ensure compatibility when using DVIprojectors or trying to route digital multi-channel audio through an S/PDIF port Multiple control options such as RS-232, IR, TCP/IP, and the front panel. Dolby TrueHD and DTS-HD Master Audio pass through HDMI output interface. Compatible with DVI/D (with DVI/D to HDMI adapter such as AT14050), allowing DVI/D to bepassed to displays. Mirrored HDMI outputs on zones 5 and 6 for in room displays or AVRs Built in S/PDIF audio de-embedding for AVR or audio distribution amplifiers.Compatible with PCM 2Channel, Dolby 2.0, Dolby Digital 5.1, and DTS 5.1. Optional redundant power supply (AT-PW24V6.25A) in case the main power supply fails. HDCP compliantBefore You Start Make sure when connecting a category cable a 568B termination method is used. Make sure the matrix is connected to a component surge suppressor with line conditioning.Note: Atlona’s warranty does not cover damage due to electrical disturbances. A component surgesuppressor with line conditioning is highly suggested, especially in areas with electricalstorms. Be sure you’re using a mono to mono (2 conductor) 3.5mm IR cable when using IR outputcontrol from 3rd party control boxes, stereo (3 conductor) 3.5mm cables are not compatible.atlona.com3Toll free: 1-877-536-3976Local: 1-408-962-0515
Panel DescriptionFront ERFCNCANCELEDID45d6AT-PRO3HD66M3AT-PRO3HD66MIR INIR INIR INIR INIR INIR IN1. Power Button - Cycles the power between On (blue backlight) or Standby (red backlight) mode.2. Enter Button - Use to view current status for inputs and outputs or to confirm a command.3. IR Receiver Window - Receives the signal from the included IR Remote Control or a 3rd partycontrol box.4. Function Button - Select for command options. (blue backlight when selected)a. Default: Mirrors all inputs to corresponding outputs. (i.e. 1 to 1, 2 to 2, 3 to 3, etc.)b. All: Save a single input to all the outputs with this functionc. Memory: Save/load the current input and output route to memoryd. EDID: Save/Load EDIDs to individual inputse. IR: Turn IR receiving on/off (see below)f. INFO: Displays the firmware version on the front display5. Cancel Button - Within the functions menu use to go back one screen or to the home screen.Note: You cannot power off or change functions unless you return to the home screen.6. Number buttons - Use these buttons to select input and output paths or use with the functionbutton to change matrix settings.FWRS-232MAINMATRIX IN MATRIX OUTCAT5e/6/7CAT5e/6/7CAT5e/6/7IR OUTCAT5e/6/7IR OUTIR OUTIR OUTCAT5e/6/7CAT5e/6/7IR OUTIR OUTBACKUPCOAX OUT123LAN45COAX OUTCOAX OUTCOAX OUT6ZONE 1HDMI INZONE 2ZONE 3ZONE 4HDMI OUTZONE 5HDMI OUTZONE 6DC 24VIRThe IR receiver window can sometimes pick up stray reflected IR commands causing loss offunctionality. To disable the front panel, see directions below:home screenAT-PRO3HD66MSelect Input NumberSelect IR 1:On 2: OffCurrent: On/Offatlona.com--- Select Function Option--- --- --- Select IR 1: On 2: OffCurrent On--- Feedback ”IR On Selected”--- --- Select IR 1: On 2: OffCurrent off--- Feedback ”IR Off Selected”----------------------- --- 4Toll free: 1-877-536-3976Local: 1-408-962-0515
M123DEFAULTALLMEMORY456EDIDIRINFOBPOWERENTERBack IR INIR INIR INIR INFWIR INIR INMAINMATRIX IN MATRIX OUTIR OUTCAT5e/6/7CAT5e/6/7CAT5e/6/7IR OUTIR OUTIR OUTCAT5e/6/7CAT5e/6/7CAT5e/6/7IR OUTIR OUTBACKUPCOAX OUTCOAX OUT1234LANHDMI IN785COAX OUTCOAX OUT6ZONE 1ZONE 2abZONE 3cZONE 4dHDMI OUTZONE 5eHDMI OUTZONE 6DC 24V91. Firmware Update - Type B USB Port used for updating matrix firmware2. RS-232 - Connect to this port for control from a computer or 3rd party control box.3. Matrix IR In - Used to control matrix I/O switching from a 3rd party IR control box.4. Matrix IR Out - Global output, combines IR for all incoming zones.5. Zone dedicated portsa. IR 3.5mm mono In ports: Used in conjunction with 3rd party IR control box to extend IRcontrol commands to video displays over category cable.Note: Be sure you’re using a mono to mono 3.5mm IR cable for 3rd party control boxes,3.5mm stereo cables are not compatible.b. IR Out ports: Sends IR signal to sources through a 3.5mm IR emitterc. Coax Out (S/PDIF): Audio de-embedding for distribution amplifiers and AVRs.Compatible with PCM 2Channel, Dolby 2.0, Dolby Digital 5.1, and DTS 5.1.d. CAT5e/6/7 Out (RJ45): Extends video and bidirectional RS-232, IR, and audio signalsthrough a single category cable.e. HDMI Out: Mirrored HDMI output6. Main Power Port - Use included locking DC adaptor to power the matrix switcher7. LAN Port - For TCP/IP matrix control8. HDMI Input Ports - Connect HDMI sources into these ports, such as DVD players, Blu-ray players,computers, etc.9. Back Up Power Port - Redundant power supply (AT-PW24V6.25A available at atlona.com)atlona.com5Toll free: 1-877-536-3976Local: 1-408-962-0515
Connection and Installation3rd Party Control box Set UpWith the feature of the IR input zone ports the AT-PRO3HD66M has the ability to receive IRcommands from a 3rd party controller and send it out through the CAT5e/6/7 port to control thedisplays in any zone.3rd Party Controller112V DC FACTORYRESTOREID135246COMPONENTHDMIWIFI 1DIGITALCOAX ZIGBEELSERIAL 1RELAYSWIFI 2RVIDEO OUTSERIAL 2AUDIO OUTAUDIO INGNDSIG 12VGNDSIG 12VGNDSIG 12VGNDSIG 12VIR OUTCONTACTSMatrix IR ControlZone IR ControlBlu-ray PlayerIR CELRS-232IR INIR INIR INIR INFWBIR INIR INMAINMATRIX IN MATRIX OUTIR OUTCAT5e/6/7CAT5e/6/7CAT5e/6/7IR OUTIR OUTIR OUTCAT5e/6/7CAT5e/6/7CAT5e/6/7IR OUTIR OUTBACKUPCOAX OUTCOAX OUT1LAN2345COAX OUT6ZONE 2ZONE 1HDMI INFront PanelIR ReceiverCOAX OUTZONE 3ZONE 4HDMI OUTZONE 5HDMI OUTZONE 6DC 24VAT-PRO3HDRECLINKCAT5/6INHDMI OUTRS232 OUT IR INIR OUTIR EmitterVideo Displayatlona.com6Toll free: 1-877-536-3976Local: 1-408-962-0515
IR Remote Control Set UpNote: IR signal is routed through the HDBaseT zone. Only the IR out of the corresponding zone will pass control signalwhen using a 3rd party IR controllerBlu-ray PlayerM123DEFAULTALLMEMORY456EDIDIRINFOBPOWERIR 2IR INIR INIR INIR INFWIR INIR INMAINMATRIX IN MATRIX OUTIR OUTCAT5e/6/7CAT5e/6/7CAT5e/6/7IR OUTIR OUTIR OUTCAT5e/6/7CAT5e/6/7CAT5e/6/7IR OUTIR OUTBACKUPCOAX OUT12LAN345COAX OUTCOAX OUTCOAX OUT6ZONE 2ZONE 1HDMI INZONE 3ZONE 4HDMI OUTZONE 5HDMI OUTZONE 6DC 24VAT-PRO3HDRECLINKCAT5/6INHDMI OUTRS232 OUT IR INIR OUTIR ReceiverModuleVideo DisplayIRRemoteatlona.com7Toll free: 1-877-536-3976Local: 1-408-962-0515
Matrix Front Panel FunctionsThe AT-PRO3HD66M’s front panel has 3 functions: I/O control, EDID, and matrix settings. Thefollowing sections go over step by step setup & control.I/O ControlTo set an input to an output(I.E. Input 1 to output 2)input selectionhome screenAT-PRO3HD66MSelect Input Number--- --- through--- Select output numberPress enter to confirm--- output selectionthrough--- --- Feedback ”Input # saved toOutput #”To mirror all inputs and outputs(I.E. Input 1 to output 1, input 2 to output 2, etc.)home screenAT-PRO3HD66MSelect Input Number--- --- --- --- Select Function Option--- --- --- --- Mirror In to OutPress enter to confirmFeedback ”Mirroring In and Out”To route one input to all outputs(I.E. Input 1 to output 1, 2, 3, 4, 5 and 6)home screenAT-PRO3HD66MSelect Input Number--- --- Select Function OptionSelect input numberto save to all outputsinput selection--- atlona.comthrough--- Input # to all outputsPress enter to confirm8--- --- Feedback ”Input # saved to all”Toll free: 1-877-536-3976Local: 1-408-962-0515
I/O Route MemoryOnce inputs and outputs have been set they can be saved to memory and recalled later. Up to 6individual input/output routes can be saved. The route will remain in memory until a new route hasbeen saved to that memory number or the matrix has been factory reset. example routeO: 1 2 3 4 5 6I: 4 6 1 3 2 6To save an I/O route to memoryhome screenAT-PRO3HD66MSelect Input Number--- --- Select Function Option--- 1 Save in/out route--- 2 Select memory route--- memory selection--- Save to memory (1-6) #--- Press enter--- throughFeedback ”Memory # saved”--- To load a saved I/O routeOnce an input/output route has been saved, it can be loaded at any time.home screenAT-PRO3HD66MSelect Input NumberSelect Function Option--- --- --- 1 Save in/out route--- 2 Select memory route--- memory selection--- Select Memory route 1-6--- Press enter to loadFeedback ”Memory # loaded”--- --- throughEDID Set UpWhen the matrix is completely connected and turned on it will load the default EDID, which is thehighest common native resolution of the devices. (i.e. In the diagram below the default would be720p with 2ch audio. Multi-channel audio and 3D are not enabled on internal mode, unlessall devices have these features.)1080p (3D)-2ch1080p-Dolby TrueHD (3D)Input 1Output NCEL720p-2chOutput 2AT-PRO3HD66MAT-PRO3HD66MRS-2321IR INIR INMAINMATRIX IN MATRIX OUTCAT5e/6/7CAT5e/6/7CAT5e/6/7IR OUTInput 2LANIR INIR INIR INIR INFW720p-2chCAT5e/6/7IR OUTIR OUTIR OUTCAT5e/6/7CAT5e/6/7IR OUTIR OUT1080p-Dolby TrueHD (3D)BACKUPCOAX OUT234HDMI IN5COAX OUTCOAX OUTCOAX OUT6ZONE 1ZONE 2ZONE 3ZONE 4HDMI OUTZONE 5HDMI OUTZONE 6Output 3DC 24VOn default, all devices in the diagram will work at 720p. If a device is not syncing or a differentresolution is required, internal EDID or EDID copy and load should resolve these issues. ThePRO3HD66M can copy up to 6 EDIDs to memory.atlona.com9Toll free: 1-877-536-3976Local: 1-408-962-0515
Step 1: copy an EDIDBefore an EDID can be loaded to an input, it must first be copied to the matrix’s memory. Eachdisplay’s EDID can be saved individually to one of the matrix’s six preset EDID memories.home screenAT-PRO3HD66MSelect Input Number--- --- Select Function Option--- 1 To copy up to 6 EDIDs--- 2 To choose input EDID--- output selectionCopy from output #--- Save to Memory (1-6) #throughmemory selection--- --- through--- --- Copy from output #--- Save to Memory (1-6) #Feedback ”Saved port # EDID toMemory # [Failed/Passed]”Step 2: load a copied EDID onto an inputOnce EDIDs have been copied to memory they can be loaded to a specific input.Note: (refer to the diagram on page 9) Using the EDID of output 3 with input 1 will enable 1080p,3D, and Dolby TrueHD to pass. Output 2 will receive no audio or video and output 1 will receive noaudio with these settings.home screenAT-PRO3HD66MSelect Input Number--- --- Select Function Option--- --- 1 To copy up to 6 EDIDs2 To choose input EDID--- input selection--- Input #Select an input port--- through--- Input # Press EnterCurrent: Default--- memory selection--- Input: # Mode:1.Default 2.Saved 3.Int--- Use EDID memory # enter--- --- --- Input: # Select savedEDID memory 1-6 (#)--- through--- Feedback ”Save memory # EDIDto input #”EX. Atlona EDID - ATLPioneer EDID - PIOToshiba EDID - TSBatlona.com10Toll free: 1-877-536-3976Local: 1-408-962-0515
Step 3: Load an internal EDID on an inputIf the first two steps don’t produce the correct resolution or audio configuration, the twelveinternal EDIDs should resolve the issue.Internal EDID optionsEDID 1: 1080P 2CH audioEDID 2: 1080P HD multi-channel audio 7.1*EDID 3: 1080P Dolby Digital 5.1**EDID 4: 1080P 3D 2CH audioEDID 5: 1080P 3D HD multi-channel audio 7.1*EDID 6: 1080P 3D Dolby Digital 5.1**EDID 7: 720P 2CH audioEDID 8: 720P Dolby Digital 5.1**EDID 9: 1280x800 RGB 2CH audioEDID 10: 1366x768 RGB 2CH audioEDID 11: 1080P DVI***EDID 12: 1280x800 DVI***Front panel display readoutATL 1080P 2CHATL 1080P Multi CHATL 1080P DDATL 1080P 3D 2CHATL 1080P 3D Multi CHATL 1080P 3D DDATL 720P 2CHATL 720P DDATL 1280x800 RGB 2CHATL 1366x768 RGB 2CHATL 1080P DVIATL 1280x800 RGB DVI* Recommended EDID for use of an AVR** Recommended EDID for use of the S/PDIF audio de-embedding*** Recommended EDID for use of DVI projectorshome screenAT-PRO3HD66MSelect Input Number--- --- Select Function Option--- --- 1 To copy up to 6 EDIDs2 To choose input EDID--- input selection--- --- Input #Select an input portInput: # Mode:1.Default 2.Saved 3.Int--- --- --- --- through--- --- EDID Internal # enterATLInput # Press EnterCurrent: Default--- Internal EDID selection1 - Cycles throughEDIDs in ascending--- order2 - Cycles throughEDIDs in descendingorderFeedback ”Saved Internal #To input #”RS-232 commands:To access the different EDIDs through RS-232 the following commands must be used.CommandFeedbackDescriptionEDIDMSetX default EDIDMSetX default Sets the EDID of an input to the default EDIDEx. EDIDMset2 default - sets input 2 to defaultEDIDMSetX saveYEDIDMSetX saveYSets the EDID of an input to the previously saved EDID memoryEx. EDIDMset1 save3 - sets input 1 to the EDID memory 3EDIDMSetX intZEDIDMSetX intZSets the EDID of an input to one of the internal EDIDsEx. EDIDMset3 int6 - sets input 3 to the internal EDID - 1080p 3D DolbyDigital 5.1atlona.com11Toll free: 1-877-536-3976Local: 1-408-962-0515
Matrix StatusWhen installing or troubleshooting it’s important to verify settings, or be able to come back to aproject and see how it was set up. The AT-PRO3HD66M matrix settings are viewable through thefront panel display. View current I/O settings, firmware version, FPGA version, IP, and the baudrates of not just the matrix but extenders as well.View current I/O settingshome screenAT-PRO3HD66MSelect Input Number--- --- O 1 2 3 4 5 6I x x x x x xView Firmware/Baud Rate/FPGA settingshome screen--- AT-PRO3HD66MFW Ver: 0.X.XX--- ---------AT-PRO3HD66MSelect Input Number--- --- --- --- --- Select Function Option--- AT-PRO3HD66MFPGA 1 Ver: 0.0.XXFPGA VersionAT-PRO3HD66M--- IP Addr: XXX.XXX.XXX.XXX--- IP Address--- AT-PRO3HD66MConsole: X X X XMatrix Baud Rate--- AT-PRO3HD66MPort 1: X X X XOutput Baud Rateatlona.com--- 12Press 2 to cycle throughIP, Netmask, Gateway,IP port, and MACaddressEX. 115200 8 None 1OR9600 8 ODD 0--- Press 4 to cycle throughthe baud rates of eachoutput port.Toll free: 1-877-536-3976Local: 1-408-962-0515
RS-232ConnectionRS-232 is connected through a 9-pin female DB connector. Only pins 2, 3, and 5 are terminated.5 4 3 2 19 8 7 Not usedTransmitReceiveNot usedGroundNot usedNot usedNot usedNot usedSet UpTo set up the RS-232 hyperterminal (if not using 3rd party software) use the following steps:1. Connect the matrix to a PC using a 9pin to 9pin cable2. Go to the Device manager folder (see picture A)3. Find the Matrix COM port and right click with a mouse and select properties (see picture B)NOTE: If unsure which COM port is the matrix, unplug the 9pin cable and plug it back in. Itwill disappear and reappear on the COM port list.4. Under the properties menu select the port settings tab and update the menu to the matrixdefault settings of: Bits Per Second: 115200, Data Bits: 8, Parity: None, Stop Bits: 1 and FlowControl: None. (see picture C)Set up is done and any hyperterminal program may be used to control the matrix now.ABCatlona.com13Toll free: 1-877-536-3976Local: 1-408-962-0515
TCP/IPWarning!: Do not connect the matrix LAN port until the first steps have been followed.BEFORE YOU PLUG IN ANYTHING: Verify no other devices on the network have the IP of192.168.1.10 (the matrix default is 192.168.1.10). (See page 12 to view the IP through the front panel)There are two ways to set TCP/IP control when any of the products on the network have the sameIP address as the matrix: RS-232 or through LAN on a non networked computer.RS-232 TCP/IP Set up (Preferred)Step 1: Follow RS-232 set up instructions on page 13Step 2: Open Hyperterminal programStep 3: Verify DHCP is offSend command “IPDHCPsta” followed by a carriage returnFeedback should be “DHCPoff”If DHCP is on use command “IPDHCPoff” to turn DHCP offRouter IP addressStep 4: Change the current IP using the command “IPStatic 192.168.0.200 255.255.255.0 192.168.0.1”IP can be anything that system devices aren’t currently using. (200 is just an example)Step 5: (optional) Change the port using the command “IPPort 4400” followed by a carriage return4400 is just an example. The port can be changed to what is needed/wantedThe matrix is now ready to be used for TCP/IP control. The LAN cable may be connected now.LAN TCP/IP Set up (If RS-232 is not available)Step 1: Connect LAN to a computerStep 2: Right click the network icon at the bottom right side of screen andopen network and sharing center on PC (see picture A)Step 3: Select internet type connection/local area connection (see picture B)Step 4: Select properties (see picture C)Step 4: Select IP V.4 and press properties (see picture D)BAatlona.comCD14Toll free: 1-877-536-3976Local: 1-408-962-0515
Step 5: Change IP to 192.168.1.2 and Subnet: 255.255.255.0 (see picture E)Step 6: Press applyStep 7: Close internet type connection and launch WebGUIType the default IP (192.168.1.10) a web browserLog in:Username: rootPassword: AtlonaStep 8: If desired, change the network address informationStep 9: Go back to your network settings and returnthe IP V.4 to the original settings (see below)Step 10: Continue with WebGUIETCP/IP WebGUIAtlona has created an easy to use WebGUI for changing settings and controlling the matrix.To begin, type the IP address of the matrix into a web browser (as seen below)Important: If experiencing any stability issues, disable any anti-virus or firewall that may beinterfering with network communication to the Matrix.atlona.com15Toll free: 1-877-536-3976Local: 1-408-962-0515
A login screen will appear. For the first log in (and future admin changes) the username is “root”and password is “Atlona”.Note: The username cannot change, but the password can be changed (see page 19)The home screen will display the general software and firmware information. If the matrix ispowered off the FPGA will not display (see above). Once the power is on it will display (see below).Note: When the matrix is turned off many fields within the WebGUI will not display information.Be sure the matrix is powered on for complete control.atlona.com16Toll free: 1-877-536-3976Local: 1-408-962-0515
The network set up page will allow the IP information to be changed. When a change is made thescreen will grey and the ability to save or cancel will display at the bottom (see below).Note: If DHCP is on, the IP cannot be configured.Note: Be sure to save all changes before moving to the next pageatlona.com17Toll free: 1-877-536-3976Local: 1-408-962-0515
The config page under status/setting will allow the zone output and matrix baud rates to bechanged, as well as turning power and the IR receiving window on / off.A grey the screen will display the save and cancel options when making changes. Remember tosave all settings before moving on to the next page.Note: All like fields can be changed during one edit.atlona.com18Toll free: 1-877-536-3976Local: 1-408-962-0515
Adding, deleting, and updating users can also be done from the config page. User name changescan only be done by the admin. Admin user name is always “root” and default password is“Atlona”.Note: Only the admin password can be changed. The username will always remain “root”Note: Always remember to save settings before moving to the next pageatlona.com19Toll free: 1-877-536-3976Local: 1-408-962-0515
The I/O page allows input and output routes to be changed easily by drop down menu. Output Allwill route one selected input to all the outputs.Note: All routes can be changed while in the grey edit screen. Remember to save after all changeshave been made.atlona.com20Toll free: 1-877-536-3976Local: 1-408-962-0515
For compatibility, EDID configuration has been added. Each input has a drop down selection forinternal, default, and saved EDIDs.Note: When saving an EDID to memory through the WebGUI, the output will save to thecorresponding memory. Ex. Output 2 will only save to Memory 2Internal EDIDs (see page 11) provide 12 options for video and audio to ensure compatibility andreliability.Auto default mode will choose the highest common video resolution and audio format.Each saved EDID will save to memory and be noted as MM and the number of its output.**Clicking on the Display’s EDID link will provide a breakdown of the selected output’s EDIDNote: MM#s in the picture above are examples of saved EDIDsNote: Remember to save after all changes to ensure complete compatibility.atlona.com21Toll free: 1-877-536-3976Local: 1-408-962-0515
The HDCP page will display the output’s ability to pass HDCP or not.Several messages will appear under different circumstances:Supported - HDCP is supported by the displayNot Supported - The display is unable to support HDCPNon-HDCP Source - A source that does not support HDCPNo connection - If no source is selected, HDCP status cannot be determinedatlona.com22Toll free: 1-877-536-3976Local: 1-408-962-0515
RS-232 & TCP/IP CommandsThe command codes are case sensitive, do not change capitalization, spacing, or lettering.CommandFeedbackDescriptionPWONPWONPower onPWOFFPWOFFPower offPWSTAPWxWill display the power status of the matrix (ex. Power is on PWON)Version(Firmware #)Brings up the current firmware versionLockLockLocks the front panel of the matrix so no buttons are activeUnlockUnlockUnlocks the front panel of the matrix, enabling the buttons againAll#x1AVx1,x2AVx2,.Resets all inputs to corresponding outputs (in3 to out3)x1 x1 Turns off output channel (to turn off output 3 x3 )x1AVx2x1AVx2Switch input to output (input 3 to output 2 x3AVx2)x1AVx2,x3,x4x1AVx2,x3,x4Switch input to multiple outputs (input 3 x3AVx1,x2)IRONIRONTurns on the IR receiverIROFFIROFFTurns off the IR ows what input is connected to selected outputStatusx1AVx1,x2AVx2,x3AVx4, .Displays which inputs are currently connected to which outputsSaveY (ex. Save2)SaveY (ex. Save2)Saves settings for future use, preset options 0 to 4RecallY (ex. Recall2)RecallY (ex. Recall2)Recalls saved settings for the number you selectedClearY (ex. Clear2)ClearY (ex. Clear2)Erases the save for the number you selectedMresetMresetSets matrix back to the default settingsRS232zoneX[command] RS232zoneX[command] Send commands to devices connected to the receiver RS-232 ports.Commands are the same as the ones stated in this table.X zone numberex: RS232zone1[PWON] ex: RS232zone1[PWON] example: Turning the power on for the device connected in zone 1Each command or feedback is terminated with a carriage return.Note: If the command fails or is incorrect the feedback should be “Command FAILED”TCP/IP CommandsCommandFeedbackDescriptionIPCFGIP Addr : x.x.x.xNetmask : x.x.x.xGateway : x.x.x.xIP Port: x.x.xDisplays IP address configurationIPTimeout XXIPTimeout XX(Ex. IPTimout120)Determines amount of seconds of inactivity before TCP/IPdisconnectsIPQuitIPQuitLogs out of TCP/IPIPAddUserTCP/IP username & password list: Will display a list of users- user password- user password- user passwordIPAddUser [X] [Y]TCP/IP user was addedatlona.comAdd a user for TCP/IP control. X User Y PasswordEx. IPAddUser Atlona 1234 (User Atlona 1234 Password)23Toll free: 1-877-536-3976Local: 1-408-962-0515
TCP/IP Commands Cont.IPDelUser [X]TCP/IP user was deletedDelete a user from TCP/IP X User (Ex. IPDelUser Atlona)IPDHCP staIPDHCP staEx. IPDHCP onDisplays the status of DHCPIPDHCP onIPDHCP onTurns DHCP onIPDHCP offIPDHCP offTurns DHCP offIPStatic [X] [Y] [Z]IPStatic address netmask gateway Sets a static IP addressEx. IPStatic 192.168.1.1 255.255.255.0 192.168.1.200IPPortIPPort YSet the TCP/IP port (ex. IPPort 230)IPLogin staIPLogin staEx. IPLogin onDisplays IPLogin statusIPLogin onIPLogin onEnables IPLoginIPLogin offIPLogin offDisables IPLoginBroadcast staBroadcast staDisplays broadcast mode statusBroadcast onBroadcast onEnables broadcast modeBroadcast offBroadcast offDisables broadcast modeBaud RateDefault baud rates of the matrix and receivers have been set for the best compatiblity with otherdevices (i.e. projectors). Baud rates should not be changed unless an incompatibility occurs.To change the baud rate of the matrix or the receiver (AT-PRO3HDREC) an RS-232 hyperterminalwill be needed. Once the RS-232 hyperterminal is set up changing the baud rate will be done witha command line. The baud rate for the matrix is for matrix control and the output baudrate is for control of the RS-232 device in the zone being controlled.Note: Baud rate options 2400, 4800, 9600, 19200, 38400, 57600, or 115200Command for Matrix baud rateCSpara[baudrate,data-length,parity,stop-bit] (data, parity, and stop for matrix must be 8,0,1)For example if you wish to change the baud rate to 38400 the command would look like this:CSpara[38400,8,0,1]Note: Default for the matrix is: Baud-115200bps, Data length-8bit, Parity-None, Stop Bit-1RS-232 Command for the Output baud rate statusRS232paraThe RS-232 status command will provide feedback for the current parameters for each output.Example: (See example of feedback below)RS232paraCurrent RS232 parameter:- Port 1 :BaudRate 2400bps, DataBits 0, Parity None, StopBits 1.- Port 2 :BaudRate 9600bps, DataBits 0, Parity ODD, StopBits 1.- Port 3 :BaudRate 9600bps, DataBits 0, Parity None, StopBits 1.- Port 4 :BaudRate 9600bps, DataBits 0, Parity None, StopBits 1.Note: Default for the outputs is: Baud-9600bps, Data length-8bit, Parity-None, Stop Bit-1The ability to c
User Manual Atlona HDMI to HDBaseT 6 by 6 Matrix Switcher AT-PRO3HD66M atlona.com Toll free: 1-877-536-3976 Local: 1-408-962-0515