Transcription
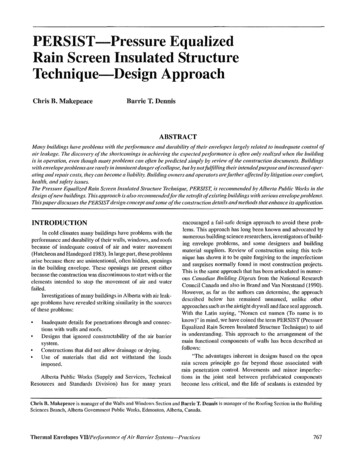
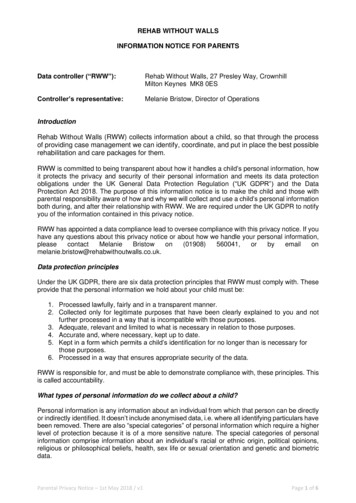
Rain-Screen Walls: a Better Wayto Install SidingSpacing the siding away from the housewrap promotes ventHation anddrainage for long-lasting siding and paintBY MARK AVERILLSNYDERDsensed trouble as soon as I saw thehouse. I was there to bid on painting the eight-year-old, multimillion-dollar home. What first struck me wasthe sheets of paint dangling from the cedarsiding (photo below left). Even more alarming, the paint peeling from the walls wasfrom the house's third paint job.When I learned that the previous paint jobwas done only two years before, I knew thatthe problem ran deeper than the paint. Jittery about hiring yet another painter, thehomeowners agreed when I suggested calling in a consultant, Joseph Lstiburek.When Joe saw the house about a week later, he said, "I'll tell you in two minutes what'swrong if we can pull one clapboard." Pullingoff one clapboard revealed tea-colored Tyvekhousewrap, soaked like blotter paper (photobelow right). Both the clapboards and the plywood sheathing were saturated. I was stunned.Joe and I checked for possible moisturesources, from the attic to the basement.There was no evidence of any interior mois-. ".(.--.11THE PAINT ON THIS HOUSE NEVERSTOOD A CHANCETannins leaching from the back of the cedar siding, which had not been back-primed, ruined the housewrap's waterrepellency. Any rain that got past the siding soaked the sheathing, creating a reservoir that kept the siding wet and the paintpeeling. See sidebar, p. 89, for more information about housewrap failure.86FINE HOMEBUILDING.
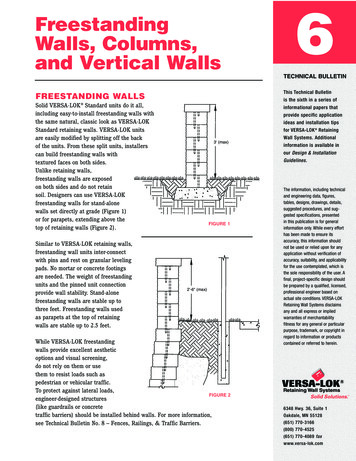
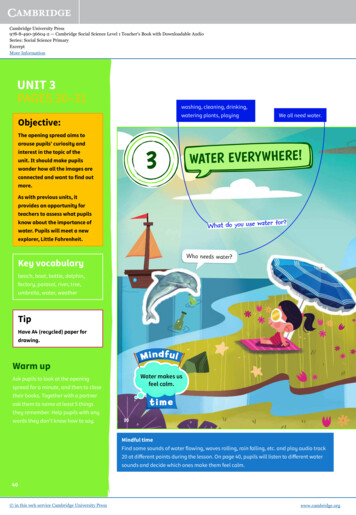
DETAILING A RAIN-SCREEN WALLFurringstrips space the clapboards away from the wall, creatinga vent space that helps to dry the back of the siding. Layeredtar paper and flashings behind the furring strips create what iscalled a drainage plane, which alone would protect the housefrom water, even if there were no siding. This belt-andsuspenders approach can contribute to the longevity of boththe house and its paint.ClapboardsTar-paper spliriesprotect joints.A lx2 rippedto an anglecaps the water,table.Window screenrepels insects.Cor-A-VentDrawings: Rick DaskamFEBRUARY/MARCH200187
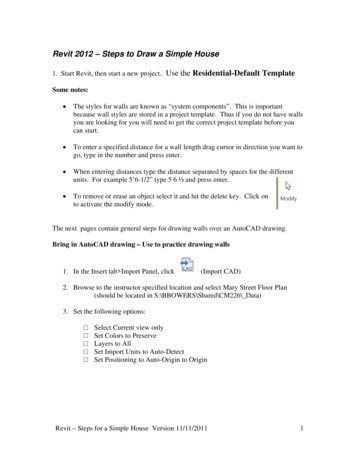
ture source that could account for the damage and peeling paint. Furthermore, wefound no flashing deficiencies that couldlead rainwater behind the housewrap. Thepattern of wetting, coupled with the lack ofany interior moisture source, indicated thesource of moisture to be rain that found itsrIway past the siding and the housewrap.None of this surprised Joe, who explainedto me the science behind the failure and thereason why the one sure way to correct it was tobuild a rain-screen wall (sidebar facing page).The key is to isolate the housewrapor tar paper from the sidingFirst,flash vulnerable spots such as rough sills to drain water. Note how the tar paper to the rightof the opening laps over the top of the Ice &WaterShieldflashing. Inturn,the Ice&WaterShieldlapsthe tarpaperbelow.r .-- Counterflashing covers step flashing, Ice &Water Shield and tar paper.The counterflashing is layeredover the lower clapboardto drain,while the upper clapboardstopsabove it to defeat capillaryaction.88FINE HOMEBUILDINGRain-screen walls have an airspace betweenthe siding and the building paper or housewrap. (Installed behind a rain screen, plastichousewraps can work. I prefer #15 tar paperbecause of its century-old track record. Either one makes up what is called thedrainage plane). This airspace is created byapplying vertical furring strips over thedrainage-plane material. The siding, typically clapboards, is nailed to these strips.The airspace does several duties. First, itspaces the siding away from the drainageplane, minimizing any chance of extractivebleed (sidebar facing page). Back-primingthe siding would do the same thing, and it isa good practice. But it does nothing to address capillary action. As demonstrated bythe grade-school experiment of putting astalk of celery into a glass of colored water,capillary action can draw water upwardalong a continuous surface. Water can movelong distances in this way, so a raindropclimbing the back of one clapboard to thetop of another, then to the wall sheathing, isnot an imaginary event.The airspace in a rain-screen wall providesa capillary break, stopping water driven behind the siding by capillary action from everreaching the drainage plane. Vented top andbottom, the siding has a way to dry from thewater that gets behind it. Finally, this ventedairspace helps to equalize the air pressure oneach side of the siding, reducing the chanceof wind-driven rain being forced or drawnbehind the siding.You might argue that rain should never getpast a properly detailed, standard siding job.I once would have argued the same. However, when my crew stripped this house's wallsof their trim and clapboards, we stood backand marveled (photo right, p. 86). The worstdamage was around door and window openings and under clapboard joints, exactlywhere water had leaked under the unprimedsiding. The funny thing is that even thoughwe looked carefully at the siding's installa-
tion, it was hard to see how water had leakedin. The workmanship was perfectly acceptable.Layers of membranes, flashing andtar paper protect the sheathingThe existing clapboards, trim and housewrap of this house had to be removed, anddamaged sheathing and framing repaired.Once these tasks were done, the only difference between this job and a new house wasthat I was locked into existing window anddoor trim, and soffit details.Had this been new construction, I wouldhave furred out the door and window units,thereby keeping all the trim on one plane.The 84 windows and 18 doors were alreadyinstalled with their 5/4x4 casings appliedagainst the original housewrap. The homeowners drew the line here; they did not wantthese units removed. The best that my crewcould do was to pry the casings away fromthe house enough to slip double-thick #15tar-paper splines under the casings."Be the raindrop," an old-timer once told me.Although this phrase might sound like a hazybit of Eastern philosophy, imagining the pathof a raindrop is key to understanding waterproofing details. Basic to this idea is startingat the bottom, and layering upper flashingsand drainage planes over those below.On a new home, the first layer would be apan of self-adhering bituminous membraneat the rough sills of doors and windows. I useGrace Ice & Water Shield (Grace Construction Products; 800-444-6459; www.graceconstruction.com). There were only a fewdoors on this house that had to be taken outto repair the surrounding framing, so wecould use this detail only in these places (topphoto, facing page).We also adhered a 3-ft. wide course ofIce& Water Shield to the sheathing at the bottom of the walls, all the way around thehouse, to guard against dripping watersplashing back to the house.Other spots that we covered with Ice &Water Shield were walls that rose above anintersecting roof On a new house, we wouldhave extended half the width of the Ice &Water Shield onto the roof deck and half upthe wall. This option was closed to us on thishouse because we weren't tearing off theroof. The best that we could do was to benddown the existing step flashing to expose thewall sheathing, which we then covered withIce & Water Shield.The next layer in the rain screen is the capflashings above windows, doors and otherwall penetrations such as dryer vents andlight-mounting blocks (photos p. 90). Theseflashings are installed with vertical flangesHow housewraps and building papers failby Joseph LstiburekThe primary function of a housewrap(Tyvekand Typar are two commonexamples) or building paper (#15or #30tar paper) is to drain rain that penetrates the siding through leaky jointsor capillary action. Marketing claims tothe contrary notwithstanding, housewraps do very little to reduce anyair infiltration.The problem with housewraps, andbuilding papers to a lesser extent, is lossof water repellency. Contaminants referred to as surfactants (tolearn how ts.htm) degrade the water repellency of buildingpapers and housewrap, allowing the wetting of thehousewrap or building-paper surface by water. Water-soluble extractives inwood, such as tannins andwood sugars in Douglas fir,redwood and cedar, as wellas detergents and soaps, are surfactants.Once the surface is wet, pores in thehousewrap or building paper fill, allowing liquid-phase water to pass through.Once water penetrates the housewrapinto a wall, peeling paint and rotten siding often follow.Back-primingwood clapboards andtrim helps to isolate surfactants in thewood from the housewrap or buildingpaper surface. Similarly,providing anairspace between wood trim and sidingand the housewrap or building paperusing furring strips (Cedar Breather is acommercial product for this application; BenjaminObdyke Inc.;800-3467655;www.obdyke.com)reduces thepotential of surfactant movement. Irecommend both practices.Stucco should never be installed indirect contact with any plastic-basedhousewrap. Stucco can adhere or bondto the housewrap surface, allowinghousewrap pores to become wettedand subsequently establish capillaryflow. Also, many stuccos add surfactants to improve workability and freeze-thaw resistance. Adrainage spacebetween stucco andhousewrap is essential tocontrol water.Stucco does not typicallybond with building papers.However,most stucco applications over buildingpaper result in insufficientdrainage. I recommend using at least two layers ofbuilding paper under stucco to allow some drainage between thetwo layers.Plain dirt can also cause housewrapto leak, just as Scotchgard-coated fabric that becomes dirty must be cleanedand re-treated to re-establish water repellency. Don't let your housewrap become muddy or dirty.-Joseph Lstiburekis a principalin"Marketingclaims to thecontrary,housewrapsdo little toreduce airinfiltration."over the tar-paper splines that we slid behindthe casings directly against the wall sheathing.I used copper and lead flashings. Wherethe flashing would show, I used copper.Where it wasn't particularly visible or whereI needed a flexible flashing, I used lead.Tar paper has worked for a century;why change?The final step before nailing up the furringstrips was to wrap the house in #15 tar paper.Building Science Corporation (www.buildingscience.com)in Westford,Massachusetts,and the author ofBuilder'sGuideto Cold Climates(TheTaunton Press,2000).Recently, I've switched to Shingle Mate byGAF (800-234-4285;www.gaf.com). afiberglass-reinforced tar paper that stays flatand doesn't pucker up when it becomes wetas regular tar paper does. We started at thebottom, covering the layer of Ice & WaterShield. We applied the tar paper horizontally, lapping each succeeding course a minimum of 4 in. over the lower course. This layer of tar paper also laps both the stepflashings at roof intersections and the capFEBRUARY/MARCH200189
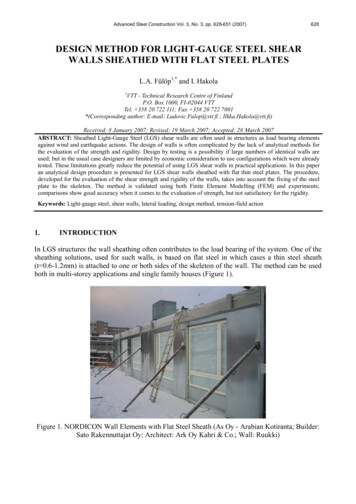
,.Capflashing protects door and window casings. Note how tar papercovers the furringstrip by the side casing,and how the cap flashing and tar paperare all layered todraindown.If siding leaks at joints, let it drain. The tar-papersplines underthis light-mountingblock both cover the furringstrips and extend over the next lower clapboardto drainwater awayfrom the house.90FINE HOMEBUILDINGflashings over doors, windows and the like(photo left).We made the furring strips from 3fs-in.ACfir plywood. We ripped most of the strips 2 in.wide, plus a few 61/2in. wide for under cornerboards. (The corner boards were to be 3/. in.by 5 in., so that left 11/2in. of furring strip tosupport the abutting siding.) On new construction, we would have furred out the windows and doors, but as I said before, theowners didn't want us pulling and reinstalling all those units.As luck had it, the door and window casings were of 5/4 stock. This good fortune allowed us to add the 3fs-in.spacer parallel to theside casing and still have the clapboards beflush with the casings. For added protection,we covered the furring strips next to the window casings, a spot we knew from the tearoffto be vulnerable, with tar paper (top photo).To provide the greatest possible chance forwater behind the siding to dry out, the topsand bottoms of the channels between thefurring strips were left open to the air. Wescreened these channels' bottoms and tops toprevent bugs from entering. This step was asimple matter of stapling 12-in. wide stripsof screen along the bottom edge of thebuilding so that 6 in. of it hung below thebottom of the sheathing (drawing p. 87). Wethen nailed the furring strips, with their bottoms flush to the bottom of the sheathing,over the screen. The furring strips werenailed to the house directly over studs withstainless-steel 7d ring-shank nails.I wanted to back up the water table so thatit didn't flex if someone leaned on it, yet stillallow ventilation. To accomplish this, wefilled the spaces between the furring strips'bottoms with Cor-A-Vent (800-837-8368;www.cor-a-vent.com),a plastic roof ventthat resembles corrugated cardboard. Weripped the Cor-A-Vent to 3 in. wide andpeeled its layers apart so that they matchedthe furring strips' thickness.We repeated this detail at the tops of thewalls, finally folding the screen over the furring strips and Cor-A-Vent, top and bottom.The Cor-A-Vent fills the void between furring strips; it's rigid and waterproof, and itsupports the screen so that bugs can't crawl in.Above the windows and the doors, we ran ahorizontal furring strip over the flange of thecap flashing. To vent these spaces, the vertical furring strips stop 1/2in. shy of the horizontal strip.The final step on this job before beginningto nail on trim and clapboards was to installcounterflashing where roofs met sidewalls.We used 8-in. wide lead, nailed to the furring strips and bent 90 , to go 3 in. over the
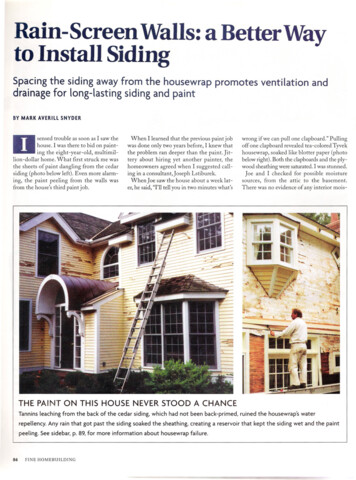
VENTINGTHE TOP OF A RAIN-SCREEN WALL UNOBTRUSIVELYThe air from below (drawing p. 87) needs to exit somewhere. Rabbeting the trim board that caps the siding completesthe path.Soffit'"Rabbeted lx4Cor-A-VentJ/.-in. by 2-in.plywood furringstrips.cedar roof shingles. This flashing wascrimped down over the butts of the shinglesto minimize the intrusion of wind-drivenrain (bottom photo, p. 88).Even on a rain screen, back-primingis good practiceAfter we built the rain screen,skimping onthe trim and the clapboardsmade no sense.Ihave found that of the commonly availablewoods, only two are suitable for harsh climates such as New England's: cedar and redwood. With a minimum amount of maintenance, these two woods will last a lifetime.We chose cedar.I sanded and dusted all six sides of everytrim board that I used. This task may seemto be overkill-it's certainly tedious-butIaccomplish several ends at once. The processallows me to read the boards for cups andcracks, dings and dents; it removes dirt andwax film from the board; it levels planermarks; and it scuffs up the surface for superior paint adhesion.After sanding, I primed all surfaces ofevery board with an alkyd primer, Pratt andLambertSuprime8 (800-289-7728;www.prattandlambert.com).Alkyd primertakes at least 48 hours to dry on cedar, so Ialways needed to be two to three days aheadof the installation crew.Because I could buy clear, preprimed cedarclapboards, I avoided the tedium of sandingthem. To be sure, though, we primed everycut end before installation.Siding goes on conventionallyThe first trim boards up were corner boards.Before nailing up the corners, we coveredtheir furring strips with #15 tar paper.Next came the water table, a lx8 cappedwith a lx2 that we ripped to pitch 150 todrain water outward (drawing p. 87). Thewater table is installed level with the bottomof the plywood sheathing. We avoided jointsin the water table as far as was possible.Where they were unavoidable, we scarfjoined the boards and protected the furringstrip behind the joint with a tar-paper spline.The clapboards were installed conventionally (see FHB #47, pp. 48-52, and #112,pp. 62-67), but on top of the furring strips.They were face-nailed with small-head 6dstainless-steel ring-shank nails. Every jointwas backed up by a 3-in. by 5-in. tar-paperspline that laps the clapboard below (draw-ing p. 87). All the joints were tight, a razorknife blade thickness or less,but not so tightthat they would bow the corner boards orwindow casings.We lapped the lower tar-paper splines at interruptions such as windows or light-mounting blocks over the top of the clapboards (bottom photo, facing page). The final trim pieceis a lx4 installed in place of a final clapboard,tight to the soffit. This board's lower edge israbbeted 1/4in., creating a weatherproof, almost-invisible vent (photo, drawing above).Even on a rain-screen wall, good paint isworth the cost. I ordered clapboards preprimed with Cabot's Problem Solver (800877-8246; www.cabotstain.com).I spotprimed cut ends with Pratt and LambertSuprime 8; then the entire house got threecoats of Pratt and Lambert's best acrylic exterior paint, Accolade, in an eggshell finish.We'd made the joints tight enough that nocaulk was needed. Caulk doesn't last, and itdoesn't make up for poor carpentry.I've been back recently to look over thishouse. After three years, the paint still looksnew-on a house that previously wouldn't0hold paint for half that time.Builder and writer Mark Averill Snydersplits histime setts.Photosby the author.FEBRUARY/MARCH200191
to leak, just as Scotchgard-coated fab-ric that becomes dirty must be cleaned and re-treated to re-establish water re-pellency. Don't let your housewrap be-come muddy or dirty.-Joseph Lstiburek isa principal in Building Science Corporation (www. buildingscience.com) in Westford, Massachusetts, and the author of Builder's Guide to Cold Climates (The