Transcription
LASERJET ENTERPRISE M806User GuideM806dnM806x
HP LaserJet Enterprise M806User Guide
Copyright and LicenseTrademark Credits 2013 Copyright Hewlett-PackardDevelopment Company, L.P.Adobe , Adobe Photoshop , Acrobat , andPostScript are trademarks of Adobe SystemsIncorporated.Reproduction, adaptation, or translationwithout prior written permission is prohibited,except as allowed under the copyright laws.The information contained herein is subject tochange without notice.The only warranties for HP products andservices are set forth in the express warrantystatements accompanying such products andservices. Nothing herein should be construedas constituting an additional warranty. HP shallnot be liable for technical or editorial errors oromissions contained herein.Part number: CZ244-90904Edition 1, 10/2013Apple and the Apple logo are trademarks ofApple Computer, Inc., registered in the U.S. andother countries. iPod is a trademark of AppleComputer, Inc. iPod is for legal or rightholderauthorized copying only. Don't steal music.Microsoft , Windows , Windows XP, andWindows Vista are U.S. registered trademarksof Microsoft Corporation.UNIX is a registered trademark of The OpenGroup.
Table of contents1 Product introduction . 1Product comparison . 2Product views . 4Product front view . 4Product back view . 5Interface ports . 6Control-panel view . 7Finishing accessory views . 9Stapler/stacker . 9Stapler/stacker with hole punch . 10Booklet maker . 11Product hardware setup and software installation . 122 Paper trays . 13Configure trays for paper type and size . 14Configure a tray when loading paper . 14Configure a tray to match print job settings . 14Configure a tray by using the control panel . 14Load Tray 1 . 15Load Tray 2 and Tray 3 . 19Load Tray 4 and Tray 5 . 23Configure the default staple location . 25Configure the default hole punch location . 253 Parts, supplies, and accessories . 27Order parts, accessories, and supplies . 28Ordering . 28Parts and supplies . 28Accessories . 30Replace the toner cartridge . 31ENWWiii
4 Print . 35Print tasks (Windows) . 36How to print (Windows) . 36Automatically print on both sides (Windows) . 37Manually print on both sides (Windows) . 39Print multiple pages per sheet (Windows) . 41Select the paper type (Windows) . 43Print tasks (Mac OS X) . 46How to print (Mac OS X) . 46Automatically print on both sides (Mac OS X) . 46Manually print on both sides (Mac OS X) . 46Print multiple pages per sheet (Mac OS X) . 46Select the paper type (Mac OS X) . 47Store print jobs on the product . 48Create a stored job (Windows) . 48Create a stored job (Mac OS X) . 50Print a stored job . 51Delete a stored job . 51Mobile printing . 52HP ePrint . 52HP ePrint software . 52AirPrint . 53Print from the USB port . 54Enable the USB port for printing . 54Print USB documents . 545 Manage the product . 55HP Embedded Web Server . 56How to access the HP Embedded Web Server (EWS) . 56HP Utility for Mac OS X . 57Open HP Utility . 57HP Utility features . 57Use HP Web Jetadmin software . 59Economy settings . 60Print with EconoMode . 60Set Sleep mode . 60Set the Sleep Schedule . 61Product security features . 62Security statements . 62IP Security . 62Sign in to the product . 62ivENWW
Assign a system password . 62Encryption support: HP High Performance Secure Hard Disks . 63Software and firmware updates . 646 Solve problems . 65Restore factory-set defaults . 66Control panel help system . 67A “Cartridge is low” or “Cartridge is very low” message displays on the product control panel . 68Change the “Very Low” settings . 68For products with fax capability . 68Order supplies . 69Product does not pick up paper or misfeeds . 70The product does not pick up paper . 70The product picks up multiple sheets of paper . 70The document feeder jams, skews, or picks up multiple sheets of paper . 70Clear jams . 72Auto-navigation for clearing jams . 72Experiencing frequent or recurring paper jams? . 72Clear jams in the front door . 73Clear jams in Tray 1 . 76Clear jams in the right door . 79Clear jams in Tray 2 and Tray 3 . 82Clear jams in Tray 4 and Tray 5 . 83Clear jams in the duplexer . 87Clear jams in the left door (fuser area) . 92Clear jams in the output bin area . 95Clear jams in the stapler/stacker accessory . 97Clear jams in the stapler/stacker . 97Clear connection jams . 98Clear Staple 1 jams . 99Clear jams in the stapler/stacker with hole punch accessory . 103Clear top left door jams in the stapler/stacker with hole punch accessory . 103Clear a connection jam in the stapler/stacker with hole punch accessory . 106Clear Staple 1 jams . 110Clear jams in the booklet maker accessory . 114Clear jams in the front left door of the booklet maker . 114Clear connection jams . 117Clear Staple 1 jams . 118Clear staple jams in the booklet maker . 120Improve print quality . 125Print from a different software program . 125ENWWv
Check the paper-type setting for the print job . 125Check the paper type setting (Windows) . 125Check the paper type setting (Mac OS X) . 126Check toner-cartridge status . 126Print a cleaning page . 127Visually inspect the toner-cartridge . 127Check paper and the printing environment . 127Use paper that meets HP specifications . 127Check the environment . 128Check the EconoMode settings . 128Try a different print driver . 129Set the individual tray alignment . 129Solve wired network problems . 131Poor physical connection . 131The computer is using the incorrect IP address for the product . 131The computer is unable to communicate with the product . 131The product is using incorrect link and duplex settings for the network . 132New software programs might be causing compatibility problems . 132The computer or workstation might be set up incorrectly . 132The product is disabled, or other network settings are incorrect . 132Index . 133viENWW
1Product introduction Product comparison Product views Finishing accessory views Product hardware setup and software installationFor more information:In the US, go to www.hp.com/support/ljM806.Outside the US, go to www.hp.com/support. Select your country/region. Click Product Support &Troubleshooting. Enter the product name, and then select Search.HP's all-inclusive help for your product includes the following information:ENWW Install and configure Learn and use Solve problems Download software updates Join support forums Find warranty and regulatory information1
Product comparisonPaper handlingM806dnM806x CZ244ACZ245ATray 1 (100-sheet capacity)Tray 2 and Tray 3 (500-sheet capacity each)Tray 4 and Tray 5 (combined 3,500-sheet capacity)Automatic duplex printing500-sheet output binConnectivity10/100/1000 Ethernet LAN connection with IPv4and IPv6Easy-access USB port for printing without acomputer and upgrading the firmwareWireless direct accessory for “touch” printing frommobile devices (optional on some printers)StorageHP High-Performance Secure Hard DiskControl-panel display and inputTouchscreen control panelPrintPrints 55 pages per minute (ppm) on A4 and Lettersize paperEasy-access USB printing (no computer required)Wireless direct accessory for “touch” printing frommobile devices (optional on some printers)Mobile printing using the following:Supported operating systems23 HP ePrint HP ePrint software1 HP ePrint Enterprise HP ePrint Home & Biz HP Printer Control Google Cloud Print AirPrintWindows XP SP2 or later, 32-bit and 64-bitNOTE: The software installer does not support the64-bit version, but the print driver supports it.NOTE: Microsoft retired mainstream support forWindows XP in April 2009. HP will continue toprovide best-effort support for the discontinued XPoperating system.Windows Vista, 32-bit and 64-bitNOTE: Windows Vista Starter is not supported bythe software installer or the print driver.2Chapter 1 Product introductionENWW
M806dnM806x CZ244ACZ245AWindows 7, 32-bit and 64-bitWindows 8, 32-bit and 64-bitNOTE:UPD PCL 5 is not supported for Windows 8.Windows 2003 Server SP1 or later, 32-bit and 64-bitNOTE: The software installer does not support the64-bit version, but the print driver supports it.NOTE: Microsoft retired mainstream support forWindows Server 2003 in July 2010. HP will continueto provide best-effort support for the discontinuedServer 2003 operating system.Windows Server 2008, 32-bit and 64-bitWindows Server 2008 R2, 64-bitWindows Server 2012, 64-bitNOTE: UPD PCL 5 is not supported for WindowsServer 2012.Mac OS X 10.6, 10.7 Lion, and 10.8 Mountain Lion123ENWWThe HP ePrint Software supports the following operating systems: Windows XP SP2 or greater (32-bit) up to ePrint Softwareversion 3; Windows Vista (32-bit and 64-bit); Windows 7 (32-bit and 64-bit); Windows 8 (32-bit and 64-bit); and Mac OS X versions10.6, 10.7 Lion, and 10.8 Mountain Lion.The list of supported operating systems applies to the Windows PCL 6, UPD PCL 6, UPD PCL 5, UPD PS, and Mac print drivers and tothe in-box software installation CD. For a current list of supported operating systems, go to www.hp.com/support/ljM806 for HP'sall-inclusive help for your product. If you are located outside the US, go to www.hp.com/support, select a country/region, clickProduct Support & Troubleshooting, enter the product name, and then select Search.The HP Software Installer CD for Windows and Mac installs the HP PCL 6 discrete driver and .NET 3.5 SP1 for Windows operatingsystems, the .NET 4.0 for Windows 8 and Windows Server 2012, and the Mac driver and Mac Utility for the Mac operating systems.Other optional software is also included on the installation CD.Product comparison3
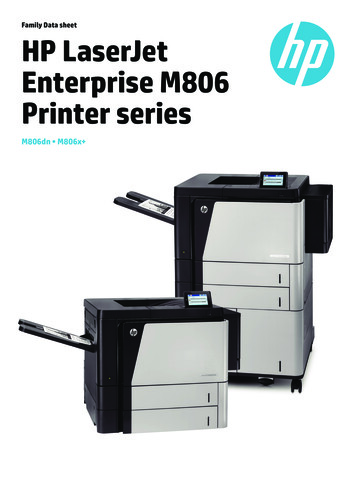
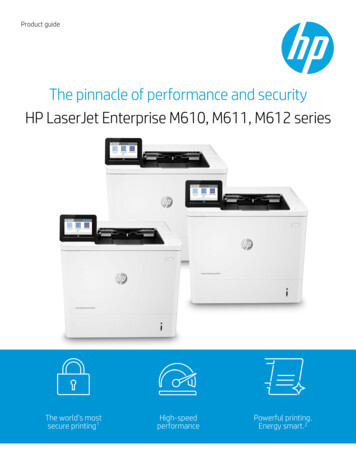
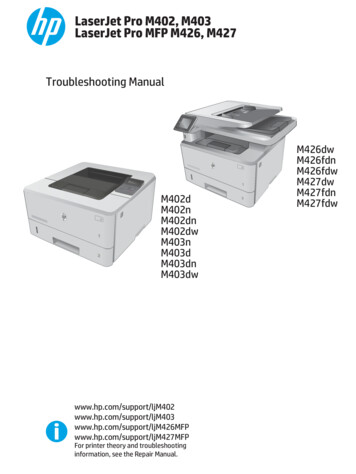
Product views Product front view Product back view Interface ports Control-panel viewProduct front view12341451361211109781Hardware integration pocket (for connecting accessory and third-party devices)2Control panel with color touchscreen display (tilts up for easier viewing)3Top output bin4Easy-access USB port (for printing without a computer)NOTE:4An administrator must enable this port before use. See Print from the USB port on page 54.5Tray 16Right-side door (access for clearing jams)7Lower-right door (access for clearing jams)8Tray 49Tray 510Tray 311Tray 212On/off button13Front door (access to the toner cartridge)14Straight-through output binChapter 1 Product introductionENWW
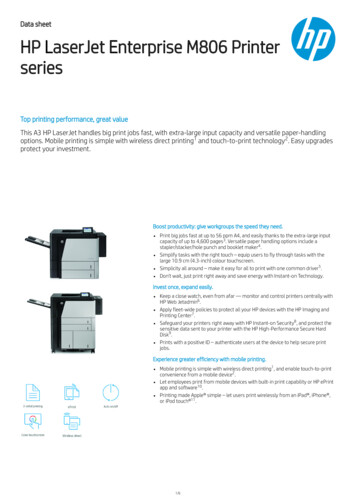
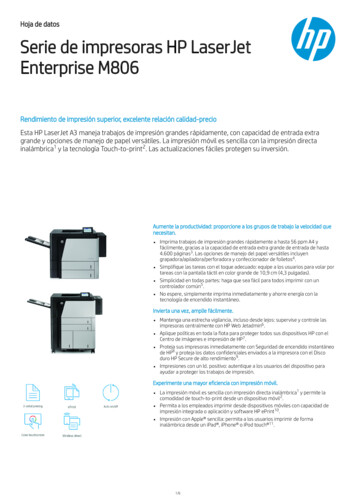
Product back view51432ENWW1Left door (access to the fuser and the duplexer)2Power connection3Connection for an optional finishing accessory4Model and serial number label5Formatter (contains the interface ports)Product views5
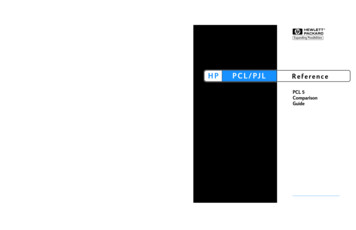
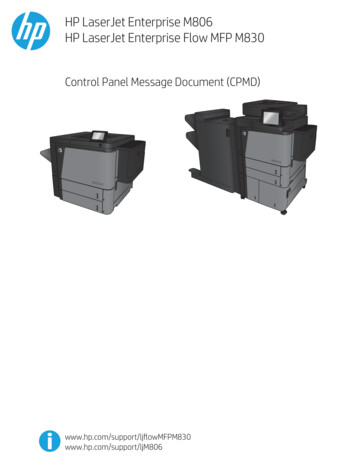
Interface ports12341USB port for connecting external USB devices (this port might be covered)2Hi-Speed USB 2.0 printing portNOTE:6For Easy-access USB printing, use the USB port near the control panel.3Local area network (LAN) Ethernet (RJ-45) network port4Foreign interface harness (for connecting third-party devices)Chapter 1 Product introductionENWW
Control-panel viewThe Home screen provides access to the product features and indicates the current status of the product.You can return to the Home screen at any time by touching the Home button on the left side of the productcontrol panel. You can also touch the Home button in the upper-left corner of most screens.NOTE: HP regularly updates features that are available in the product firmware. To take advantage of themost current features, update the product firmware. To download the most recent firmware update file, goto www.hp.com/support/ljM806 for HP's all-inclusive help for your product. If you are located outside the US,go to www.hp.com/support, select a country/region, click Product Support & Troubleshooting, enter theproduct name, and then select Search.NOTE:The features that appear on the Home screen can vary, depending on the product configuration.1234 5 6 7 812119101HP logo or Home buttonOn any screen other than the Home screen, the HP logo changes to a HomeHomeENWWbutton. Touch thebutton to return to the Home screen.2Stop buttonTouch the Stop button to pause the current job. The Job Status screen opens, and then you cancancel or continue the job.3Sign In or Sign OutbuttonTouch the Sign In button to access secured features.Touch the Sign Out button to sign out of the product if you have signed in for access to securedfeatures. After you sign out, the product restores all options to the default settings.4Product statusThe status line provides information about the overall product status.5Language SelectionbuttonTouch the Language Selection button to select the language for the control-panel display.6Sleep buttonTouch the Sleep button to put the product into Sleep mode.7Network buttonTouch the Network button to find information about the network connection.8Help buttonTouch the Help button to open the embedded help system.9Scroll barTouch the up or down arrows on the scroll bar to see the complete list of available features.Product views7
108FeaturesDepending on the product configuration, the features that appear in this area can include any of thefollowing items: Quick Sets Retrieve from USB Retrieve from Device Memory Job Status Supplies Trays Administration Device Maintenance11Home button and lightTouch to return to the product Home screen at any time.12Refresh buttonTouch the Refresh button to clear changes and restore the default settings.Chapter 1 Product introductionENWW
Finishing accessory views Stapler/stacker Stapler/stacker with hole punch Booklet makerStapler/stacker2345167ENWW1Stapler/stacker output bins2Stapler/stacker output slot3Front door4Top cover5Upper release latch6Stapler 17Lower release latchFinishing accessory views9
Stapler/stacker with hole punch234516789101Stapler/stacker output bins2Stapler/stacker output slot3Front door4Top cover5Upper release latch6Hole punch7Chad collector8Stapler 19Lower release latchChapter 1 Product introductionENWW
Booklet maker45673891011212113ENWW1Booklet output bin2Booklet output slot3Stapler/stacker output bins4Stapler/stacker output slot5Front door6Top cover7Upper release latch8Stapler 19Upper paper delivery guide10Lower paper delivery guide11Saddle-stitch carriage, access to stapler 2 and stapler 312Paper-advancement knobs for clearing jams13Lower release latchFinishing accessory views11
Product hardware setup and software installationFor basic setup instructions, see the Hardware Installation Guide that came with the product. For additionalinstructions, go to HP support on the Web.In the US, go to www.hp.com/support/ljM806 for HP's all-inclusive help for your product.Outside the US, follow these steps:1.Go to www.hp.com/support.2.Select your country/region.3.Click Product Support & Troubleshooting.4.Enter the product name, and then select Search.Select your product to find the following support:12 Install and configure Learn and use Solve problems Download software updates Join support forums Find warranty and regulatory informationChapter 1 Product introductionENWW
2Paper trays Configure trays for paper type and size Load Tray 1 Load Tray 2 and Tray 3 Load Tray 4 and Tray 5 Configure the default staple location Configure the default hole punch locationFor more information:In the US, go to www.hp.com/support/ljM806.Outside the US, go to www.hp.com/support. Select your country/region. Click Product Support &Troubleshooting. Enter the product name, and then select Search.HP's all-inclusive help for your product includes the following information:ENWW Install and configure Learn and use Solve problems Download software updates Join support forums Find warranty and regulatory information13
Configure trays for paper type and sizeThe product automatically prompts you to configure a tray for type and size in the following situations: When you load paper into the tray When you specify a particular tray or paper type for a print job through the print driver or a softwareprogram and the tray is not configured to match the print-job’s settingsNOTE: The prompt does not display if you are printing from Tray 1, and Tray 1 is configured for the Any Sizepaper size and the Any Type paper type settings. In this situation, if the print job does not specify a tray, theproduct prints from Tray 1, even if the paper type and size settings in the print job do not match the paperloaded in Tray 1.Configure a tray when loading paper1.Load paper in the tray.2.The tray configuration message displays on the product control panel.3.Touch t
3 The HP Software Installer CD for Windows and Mac installs the HP PCL 6 discrete driver and .NET 3.5 SP1 for Windows operating systems, the .NET 4.0 for Windows 8 and Windows Server 2012, and the Mac driver and Mac Utility for the Mac operating systems. Other optional software is also included on the installation CD. ENWW Product comparison 3