Transcription
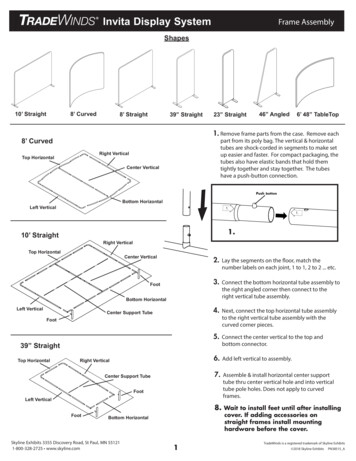
Invita Display SystemFrame AssemblyShapes8’ Curved10’ Straight8’ Straight39” Straight23” Straight46” Angled6’ 48” TableTop1. Remove frame parts from the case. Remove each8’ Curvedpart from its poly bag. The vertical & horizontaltubes are shock-corded in segments to make setup easier and faster. For compact packaging, thetubes also have elastic bands that hold themtightly together and stay together. The tubeshave a push-button connection.Right VerticalTop HorizontalCenter VerticalbuttonBottom HorizontalLeft Vertical1.1.1.10’ StraightRight VerticalTop HorizontalCenter Vertical2. Lay the segments on the floor, match thenumber labels on each joint, 1 to 1, 2 to 2 . etc.3. Connect the bottom horizontal tube assembly toFootthe right angled corner then connect to theright vertical tube assembly.Bottom HorizontalLeft Vertical4. Next, connect the top horizontal tube assemblyCenter Support Tubeto the right vertical tube assembly with thecurved corner pieces.Foot5. Connect the center vertical to the top andbottom connector.39” StraightTop Horizontal6. Add left vertical to assembly.Right Vertical7. Assemble & install horizontal center supportCenter Support Tubetube thru center vertical hole and into verticaltube pole holes. Does not apply to curvedframes.FootLeft Vertical8. Wait to install feet until after installingFootcover. If adding accessories onstraight frames install mountinghardware before the cover.Bottom HorizontalSkyline Exhibits 3355 Discovery Road, St Paul, MN 551211-800-328-2725 www.skyline.com1TradeWinds is a registered trademark of Skyline Exhibits 2018 Skyline ExhibitsPN38515 A
Invita Display SystemCover InstallationLayout Protector Sheet8’ Curved Frame cover (shown as example).Follow same cover installation for other shapes.Note: If your frame has a monitor or center shelves,the internal bracket must be installed on toframe before the cover.Install accessory brackets if applicable.(Skip to accessory page 4 for details.)1. A plastic sheet is provided to keep the coverclean during installation.Spread the sheet on the floor and set the frameupright on the sheet.Use the provided white fabric gloves to helpkeep the cover clean during handling.Installing Covers & Lights Cords2. Lay the frame either flat or concave side up,depending on shape, on the sheet.Concave3. Remove the cover from the thick polystorage bag, unzip the cover and spread it outon the sheet. Retain plastic bags for repacking.Identify front (concave) side of cover (curvedframes).4. Slide pillowcase-like cover over the frameabout half way.5. If installing light(s) on a double-sided cover:Transformerthread the cord(s) through button holes ofcover in the top, leaving about 12” of cordprotruding on outside of cover.See Step 13 to finish light installation.Button holein coverLight clipFit Cover onto Frame6. Tip the frame up and slide the cover down overthe frame.7. Fit the top corners of the cover tightly on theframe. Stretch cover to the bottom of the frame.8. For ease of zipping on straight frames,DO NOT install feet until cover has beencompletely zipped or remove feet from framebefore zipping.Skyline Exhibits 3355 Discovery Road, St Paul, MN 551211-800-328-2725 www.skyline.com2TradeWinds is a registered trademark of Skyline Exhibits 2018 Skyline ExhibitsPN38515 A
Invita Display SystemZip Cover ClosedCurved frames:9. Fit the bottom cover corners on the frame. Startzipping one side around its corner as far as thefirst tube joint. Move to the second corner andzip it to the first joint as well. If you have troublegetting the second zipper started, pull the fabricdown from the top of the frame along that edge.Cover InstallationStraight frames:Have just one zipper pull,zipping from one side tothe other.10. Continue zipping the rest of the cover. One personcan do this. It is easier to have one person pullthe cover together, while the other person does thezipping. Pull fabric about 6” ahead of the zipper pull.Position Zipper & CoverCurved frames:11. Move both zipper pulls around to one side so theydo not interfere when the structure is standing.Straight frames:Install feet as shown w/ offset in feet facing center ofthe frame.Adjust cover to align cuts to accessory brackets:Straight frameAfter installing the cover, it may need to be adjustedslightly to align the cover cuts w/ the accessory slotsin the internal bracket.This can be done 2 ways:1) Twist the cover side to side until slots align2) Adjust the internal bracket by unclipping itthrough the cover & sliding side to side (small frames)or sliding it vertically on the center pole (large frames).Connect Lights12. For a double-sided cover (cord hidden insideDouble-sidedcovergraphic) (see step 5): Snap clear light clip ontothe top bar near a button hole in graphic. Plug thecord end into the cord at the base of the unit, thenplug light cord into power source.Single-sidedcoverCord InsideCord BehindIf using lights on a single-sided cover, snap the clearlight clip on the top bar and drape cord behind theframe/graphic.Skyline Exhibits 3355 Discovery Road, St Paul, MN 551211-800-328-2725 www.skyline.com3TradeWinds is a registered trademark of Skyline Exhibits 2018 Skyline ExhibitsPN38515 A
Invita Display SystemAccessoriesLiterature HolderInstall monitor mounts and accessorypoles before the cover.Mounting hardware is centered on theframe.Monitor MountCenter ShelfMonitor MountCenter ShelfLarge Frames10’ Straight, 8’ StraightOverlay Side ShelfSmall Frames23” Straight, 39” Straight,46” Angled16” Round Side ShelfCenter Shelf (small frames)Monitor Mount (small frames)FrameImportant: Center thebracket in middle offrame or align crosshairs on bracket withpole to pole connector.FrameShelf1.1.3.2. ”4.3.InternalBracketNest bracketstogether as shownMonitorBracketAccessoryPolesDouble sidedaccessories(small frame)Back viewMonitorCenter Shelf (large frames)Monitor Mount (large frames)Side Shelves/Lit HolderInstall shelf over coverthrough cut out holes.Fit monitor over cover.Install clip on accessoryto frame pole over coverat desired height.ShelfFrame(Center vertical)MonitorFrame(Center vertical)LiteratureHolder2.Back viewInternalBracket w/ clip1.MonitorBracket2.3.InternalBracket w/ clipBlack lineImportant: To mount at correct height, aligncross hairs with black line on pole. Doublesided accessories at same height are notpossible on center pole.Skyline Exhibits 3355 Discovery Road, St Paul, MN 551211-800-328-2725 www.skyline.com1.Black lineOverlay SideShelf16” RoundSide ShelfFrameBack view4TradeWinds is a registered trademark of Skyline Exhibits 2018 Skyline ExhibitsPN38515 A
Invita Display SystemFrame to Frame ConnectorsFrame Connection PartsEdge to EdgeSingle roundfootDouble roundfootOverlayingUse withOverlayingfeetFrame to frame connectorConfiguration examples shown belowTriple roundfootORUse withOverlay connector(Swivels for multiple configurations)Configuration examples shown belowQuad roundfootOverlay connectorFrame to frame connectorCircle footOverlayfootConnector Configurationflat headscrew60-120 orTStraight,slight overlayOverlay connectorthreadedstudflatwasherlock washerStraight (inline)flat headscrewthreaded nutOverlayfootflat washerSkyline Exhibits 3355 Discovery Road, St Paul, MN 551211-800-328-2725 www.skyline.com5TradeWinds is a registered trademark of Skyline Exhibits 2018 Skyline ExhibitsPN38515 A
Invita Display SystemDisassembly/RepackingDisassembly1. Disassemble accessories, cover and frame in the reverse order of assembly.2. Remove any accessories prior to laying down frame for disassembly.3. To greatly prolong the life of the TradeWinds Invita Display System, repack cover in its poly bagand frame components into their corresponding poly bags. Install the elastic bands on each framecomponent for compact packing.Repacking4. It is important to repack the soft sided bag in this order:a. Feetb. Frame tubes - repacked in the poly bags with elastic band around each tube assembly.c. Frame corners - pack at ends of bag.d. Any accessoriese. Cover, fabric gloves, and drop cloth.Skyline Exhibits 3355 Discovery Road, St Paul, MN 551211-800-328-2725 www.skyline.com6TradeWinds is a registered trademark of Skyline Exhibits 2018 Skyline ExhibitsPN38515 A
Invita Display System Skyline Exhibits 3355 Discovery Road, St Paul, MN 55121 10' Straight 8' Curved 8' Straight 39" Straight 23" Straight 46" Angled 6' 48" TableTop 1. Remove frame parts from the case. Remove each part from its poly bag. The vertical & horizontal tubes are shock-corded in segments to make set