Transcription
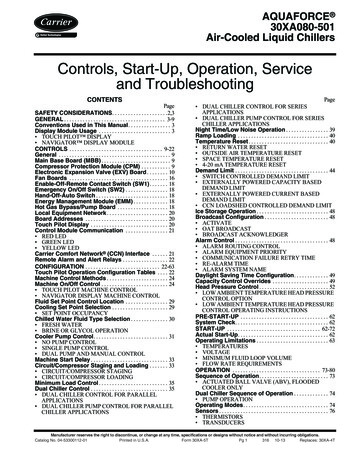
AQUAFORCE 30XA080-501Air-Cooled Liquid ChillersControls, Start-Up, Operation, Serviceand TroubleshootingCONTENTSPageSAFETY CONSIDERATIONS. . . . . . . . . . . . . . . . . . . . .2,3GENERAL . . . . . . . . . . . . . . . . . . . . . . . . . . . . . . . . . . . . . . 3-9Conventions Used in This Manual. . . . . . . . . . . . . . . . 3Display Module Usage . . . . . . . . . . . . . . . . . . . . . . . . . . . 3 TOUCH PILOT DISPLAY NAVIGATOR DISPLAY MODULECONTROLS . . . . . . . . . . . . . . . . . . . . . . . . . . . . . . . . . . . 9-22General . . . . . . . . . . . . . . . . . . . . . . . . . . . . . . . . . . . . . . . . . . 9Main Base Board (MBB) . . . . . . . . . . . . . . . . . . . . . . . . . . 9Compressor Protection Module (CPM) . . . . . . . . . . . 9Electronic Expansion Valve (EXV) Board . . . . . . . . 10Fan Boards . . . . . . . . . . . . . . . . . . . . . . . . . . . . . . . . . . . . . 16Enable-Off-Remote Contact Switch (SW1). . . . . . . 18Emergency On/Off Switch (SW2) . . . . . . . . . . . . . . . . 18Hand-Off-Auto Switch . . . . . . . . . . . . . . . . . . . . . . . . . . . 18Energy Management Module (EMM) . . . . . . . . . . . . . 18Hot Gas Bypass/Pump Board . . . . . . . . . . . . . . . . . . . 18Local Equipment Network . . . . . . . . . . . . . . . . . . . . . . . 20Board Addresses . . . . . . . . . . . . . . . . . . . . . . . . . . . . . . . 20Touch Pilot Display . . . . . . . . . . . . . . . . . . . . . . . . . . . . . 20Control Module Communication . . . . . . . . . . . . . . . . 21 RED LED GREEN LED YELLOW LEDCarrier Comfort Network (CCN) Interface . . . . . . 21Remote Alarm and Alert Relays . . . . . . . . . . . . . . . . . 22CONFIGURATION . . . . . . . . . . . . . . . . . . . . . . . . . . . . 22-63Touch Pilot Operation Configuration Tables . . . . 22Machine Control Methods . . . . . . . . . . . . . . . . . . . . . . . 24Machine On/Off Control . . . . . . . . . . . . . . . . . . . . . . . . . 24 TOUCH PILOT MACHINE CONTROL NAVIGATOR DISPLAY MACHINE CONTROLFluid Set Point Control Location . . . . . . . . . . . . . . . . 29Cooling Set Point Selection . . . . . . . . . . . . . . . . . . . . . 29 SET POINT OCCUPANCYChilled Water Fluid Type Selection . . . . . . . . . . . . . . 30 FRESH WATER BRINE OR GLYCOL OPERATIONCooler Pump Control. . . . . . . . . . . . . . . . . . . . . . . . . . . . 31 NO PUMP CONTROL SINGLE PUMP CONTROL DUAL PUMP AND MANUAL CONTROLMachine Start Delay . . . . . . . . . . . . . . . . . . . . . . . . . . . . . 33Circuit/Compressor Staging and Loading . . . . . . . 33 CIRCUIT/COMPRESSOR STAGING CIRCUIT/COMPRESSOR LOADINGMinimum Load Control . . . . . . . . . . . . . . . . . . . . . . . . . . 35Dual Chiller Control . . . . . . . . . . . . . . . . . . . . . . . . . . . . . 35 DUAL CHILLER CONTROL FOR PARALLELAPPLICATIONS DUAL CHILLER PUMP CONTROL FOR PARALLELCHILLER APPLICATIONSPage DUAL CHILLER CONTROL FOR SERIESAPPLICATIONS DUAL CHILLER PUMP CONTROL FOR SERIESCHILLER APPLICATIONSNight Time/Low Noise Operation . . . . . . . . . . . . . . . . 39Ramp Loading . . . . . . . . . . . . . . . . . . . . . . . . . . . . . . . . . . 40Temperature Reset . . . . . . . . . . . . . . . . . . . . . . . . . . . . . . 40 RETURN WATER RESET OUTSIDE AIR TEMPERATURE RESET SPACE TEMPERATURE RESET 4-20 mA TEMPERATURE RESETDemand Limit . . . . . . . . . . . . . . . . . . . . . . . . . . . . . . . . . . . 44 SWITCH CONTROLLED DEMAND LIMIT EXTERNALLY POWERED CAPACITY BASEDDEMAND LIMIT EXTERNALLY POWERED CURRENT BASEDDEMAND LIMIT CCN LOADSHED CONTROLLED DEMAND LIMITIce Storage Operation . . . . . . . . . . . . . . . . . . . . . . . . . . . 48Broadcast Configuration . . . . . . . . . . . . . . . . . . . . . . . . 48 ACTIVATE OAT BROADCAST BROADCAST ACKNOWLEDGERAlarm Control . . . . . . . . . . . . . . . . . . . . . . . . . . . . . . . . . . . 48 ALARM ROUTING CONTROL ALARM EQUIPMENT PRIORITY COMMUNICATION FAILURE RETRY TIME RE-ALARM TIME ALARM SYSTEM NAMEDaylight Saving Time Configuration. . . . . . . . . . . . . 49Capacity Control Overrides . . . . . . . . . . . . . . . . . . . . . 49Head Pressure Control . . . . . . . . . . . . . . . . . . . . . . . . . . 52 LOW AMBIENT TEMPERATURE HEAD PRESSURECONTROL OPTION LOW AMBIENT TEMPERATURE HEAD PRESSURECONTROL OPERATING INSTRUCTIONSPRE-START-UP . . . . . . . . . . . . . . . . . . . . . . . . . . . . . . . . . 62System Check. . . . . . . . . . . . . . . . . . . . . . . . . . . . . . . . . . . 62START-UP . . . . . . . . . . . . . . . . . . . . . . . . . . . . . . . . . . . 62-72Actual Start-Up. . . . . . . . . . . . . . . . . . . . . . . . . . . . . . . . . . 62Operating Limitations . . . . . . . . . . . . . . . . . . . . . . . . . . . 63 TEMPERATURES VOLTAGE MINIMUM FLUID LOOP VOLUME FLOW RATE REQUIREMENTSOPERATION . . . . . . . . . . . . . . . . . . . . . . . . . . . . . . . . . 73-80Sequence of Operation. . . . . . . . . . . . . . . . . . . . . . . . . . 73 ACTUATED BALL VALVE (ABV), FLOODEDCOOLER ONLYDual Chiller Sequence of Operation . . . . . . . . . . . . . 74 PUMP OPERATIONOperating Modes. . . . . . . . . . . . . . . . . . . . . . . . . . . . . . . . 74Sensors . . . . . . . . . . . . . . . . . . . . . . . . . . . . . . . . . . . . . . . . . 76 THERMISTORS TRANSDUCERSManufacturer reserves the right to discontinue, or change at any time, specifications or designs without notice and without incurring obligations.Catalog No. 04-53300112-01Printed in U.S.A.Form 30XA-5TPg 1316 10-13Replaces: 30XA-4T
PageCONTENTS (cont)APPENDIX F — MAINTENANCE SUMMARYAND LOG SHEETS . . . . . . . . . . . . . . . . . . . . . . . . . 182-184APPENDIX G — BACNET COMMUNICATONOPTION . . . . . . . . . . . . . . . . . . . . . . . . . . . . . . . . . . . . . 185-195APPENDIX H — COOLER HEATER SENSORSET POINT . . . . . . . . . . . . . . . . . . . . . . . . . . . . . . . . . . . . 196PageSERVICE . . . . . . . . . . . . . . . . . . . . . . . . . . . . . . . . . . . . . 80-95Economizer Assembly . . . . . . . . . . . . . . . . . . . . . . . . . . 80Electronic Expansion Valve (EXV) . . . . . . . . . . . . . . . 80 FLOODED COOLER MAIN EXV CONTROL DX COOLER MAIN EXV CONTROL ECONOMIZER EXV CONTROL EXV TROUBLESHOOTING PROCEDURECompressor Assembly . . . . . . . . . . . . . . . . . . . . . . . . . . 84 COMPRESSOR OIL SYSTEMCooler Service . . . . . . . . . . . . . . . . . . . . . . . . . . . . . . . . . . 85Flooded Cooler Units. . . . . . . . . . . . . . . . . . . . . . . . . . . . 85 FLOODED COOLER SUCTION SERVICE VALVE FLOODED COOLER FREEZE PROTECTION FLOODED COOLER LOW FLUID TEMPERATURE FLOODED COOLER LOSS OF FLUID FLOWPROTECTION FLOODED COOLER TUBE PLUGGING FLOODED COOLER RETUBING FLOODED COOLER TIGHTENING COOLER HEADBOLTS FLOODED COOLER INSPECTING/CLEANINGHEAT EXHANGERS FLOODED COOLER WATER TREATMENTDX Cooler Units . . . . . . . . . . . . . . . . . . . . . . . . . . . . . . . . . 89 DX COOLER SUCTION SERVICE VALVE DX COOLER FREEZE PROTECTION DX COOLER LIQUID FLUID TEMPERATURE DX COOLER LOSS OF FLUID FLOW PROTECTION DX COOLER TUBE PLUGGING DX COOLER RETUBING DX COOLER TIGHTENING COOLER HEAD BOLTS DX COOLER CHILLED WATER FLOW SWITCHDX Cooler and Flooded Cooler Units . . . . . . . . . . . . 92 PREPARATION FOR WINTER SHUTDOWNMicrochannel Heat Exchanger (MCHX) CondenserCoil Maintenance and CleaningRecommendations . . . . . . . . . . . . . . . . . . . . . . . . . . . . 93RTPF Condenser Coil Maintenance and CleaningRecommendations . . . . . . . . . . . . . . . . . . . . . . . . . . . . 93 REMOVE SURFACE LOADED FIBERS PERIODIC CLEAN WATER RINSE ROUTINE CLEANING OF RTPF COIL SURFACESCondenser Fans. . . . . . . . . . . . . . . . . . . . . . . . . . . . . . . . . 94Refrigerant Circuit. . . . . . . . . . . . . . . . . . . . . . . . . . . . . . . 94 LEAK TESTING REFRIGERANT CHARGESafety Devices . . . . . . . . . . . . . . . . . . . . . . . . . . . . . . . . . . 94 COMPRESSOR PROTECTION OIL SEPARATOR HEATERS COOLER PROTECTIONRelief Devices . . . . . . . . . . . . . . . . . . . . . . . . . . . . . . . . . . . 95 PRESSURE RELIEF VALVESMAINTENANCE. . . . . . . . . . . . . . . . . . . . . . . . . . . . . . . . . . 95Recommended Maintenance Schedule . . . . . . . . . . 95TROUBLESHOOTING. . . . . . . . . . . . . . . . . . . . . . . . 95-119Alarms and Alerts . . . . . . . . . . . . . . . . . . . . . . . . . . . . . . . 95 DIAGNOSTIC ALARM CODES AND POSSIBLECAUSESService Test . . . . . . . . . . . . . . . . . . . . . . . . . . . . . . . . . . . . 111APPENDIX A — TOUCH PILOT DISPLAY TABLES . . . . . . . . . . . . . . . . . . . . . . . . . 120-139APPENDIX B — NAVIGATOR DISPLAY TABLES . . . . . . . . . . . . . . . . . . . . . . . . . 140-154APPENDIX C — CCN TABLES . . . . . . . . . . . . . . 155-169APPENDIX D — 30XA080-500 CPMDIP SWITCH ADDRESSES. . . . . . . . . . . . . . . . 170-175APPENDIX E — PIPING ANDINSTRUMENTATION . . . . . . . . . . . . . . . . . . . . . 176-181INDEX . . . . . . . . . . . . . . . . . . . . . . . . . . . . . . . . . . . . . . . . . . 197START-UP CHECKLISTFOR 30XA LIQUID CHILLERS . . . . . . . . CL-1 to CL-8SAFETY CONSIDERATIONSInstalling, starting up, and servicing this equipment can behazardous due to system pressures, electrical components, andequipment location (roof, elevated structures, etc.). Onlytrained, qualified installers and service technicians shouldinstall, start up, and service this equipment. When working onthis equipment, observe precautions in the literature, on tags,stickers, and labels attached to the equipment, and any othersafety precautions that apply. Follow all safety codes. Wearsafety glasses and work gloves. Use care in handling, rigging,and setting this equipment, and in handling all electricalcomponents.WARNINGElectrical shock can cause personal injury and death. Shutoff all power to this equipment during installation and service. There may be more than one disconnect switch. Tagall disconnect locations to alert others not to restore poweruntil work is completed.WARNINGDO NOT VENT refrigerant relief valves within a building.Outlet from relief valves must be vented in accordancewith the latest edition of ANSI/ASHRAE (AmericanNational Standards Institute/American Society of Heating,Refrigerating and Air Conditioning Engineers) 15 (SafetyCode for Mechanical Refrigeration). The accumulation ofrefrigerant in an enclosed space can displace oxygen andcause asphyxiation. Provide adequate ventilation inenclosed or low overhead areas. Inhalation of high concentrations of vapor is harmful and may cause heart irregularities, unconsciousness or death. Misuse can be fatal. Vaporis heavier than air and reduces the amount of oxygen available for breathing. Product causes eye and skin irritation.Decomposition products are hazardous.2
GENERALWARNINGThis publication contains Controls, Operation, Start-Up,Service and Troubleshooting information for the 30XA080501 air-cooled liquid chillers with electronic controls. The30XA chillers are equipped with ComfortLink controls andelectronic expansion valves. The AquaForce 30XA chillersoffer two different user interface devices, the Touch Pilot display and the Navigator display.DO NOT USE TORCH to remove any component. Systemcontains oil and refrigerant under pressure.To remove a component, wear protective gloves and goggles and proceed as follows:a. Shut off electrical power to unit.b. Recover refrigerant to relieve all pressure from system using both high-pressure and low pressure ports.c. Traces of vapor should be displaced with nitrogenand the work area should be well ventilated. Refrigerant in contact with an open flame produces toxicgases.d. Cut component connection tubing with tubing cutterand remove component from unit. Use a pan to catchany oil that may come out of the lines and as a gagefor how much oil to add to the system.e. Carefully unsweat remaining tubing stubs when necessary. Oil can ignite when exposed to torch flame.Failure to follow these procedures may result in personalinjury or death.Conventions Used in This Manual — The follow-ing conventions for discussing configuration points for theNavigator module and Touch Pilot display will be used in thismanual.Point names for the Touch Pilot display will be shown inbold. See Appendix A for a complete list of point names. Itemnames for the Navigator module will be shown in bold italics.See Appendix B for the complete path name preceeding theitem name. The point and item names in Appendices A and Bwill be listed in alphabetical order and the path name for eachwill be written with the mode name first, then any sub-modes,each separated by an arrow symbol ( .This path name will show the user how to navigate through theNavigator module or the Touch Pilot display to reach the desiredconfiguration. The user would scroll through the modes andsub-modes using theandkeys on the Navigator display.For the Touch Pilot display, the user would simply touch the menuitem on the screen. The arrow symbol in the path name representspressing ENTER to move into the next level of the menu structure for the Navigator module, or touching the menu item on thescreen for the Touch Pilot display.CAUTIONThis unit uses a microprocessor-based electronic controlsystem. Do not use jumpers or other tools to short out components, or to bypass or otherwise depart from recommended procedures. Any short-to-ground of the controlboard or accompanying wiring may destroy the electronicmodules or electrical components.When a value is included as part of the point name, it will beshown after the point name after an equals sign. If the valuerepresents a configuration setting, an explanation will beshown in parentheses after the value. The Touch Pilot namewill be shown first with the Navigator name following. As anexample,(Circuit Loading Sequence 1 (A Lead), LLCS Cir Aleads).Press the ESCAPE and ENTER keys simultaneously onthe Navigator module to display an expanded text description ofthe point name or value. The expanded description is shown in theNavigator display tables (Appendix B) but will not be shown withthe path names in text. The Touch Pilot display will show anexpanded description of the point name. To view the expandedpoint name for the Touch Pilot display go to Appendix A.CAUTIONTo prevent potential damage to heat exchanger tubes,always run fluid through heat exchanger when adding orremoving refrigerant charge. Use appropriate antifreezesolutions in cooler fluid loop to prevent the freezing of heatexchanger or interconnecting piping when the equipment isexposed to temperatures below 32 F (0 C). Proof of flowswitch is factory installed on all models. Do NOT removepower from this chiller during winter shut down periodswithout taking precaution to remove all water from heatexchanger. Failure to properly protect the system fromfreezing may constitute abuse and may void warranty.The Touch Pilot display configures the unit via the CCN(Carrier Comfort Network ) Tables, which are located in Appendix C of this manual.CAUTIONCompressors require specific rotation. Test condenserfan(s) first to ensure proper phasing. Swap any two incoming power leads to correct condenser fan rotation beforestarting compressors. Operating the unit without testing thecondenser fan(s) for proper phasing could result in equipment damage.Display Module UsageTOUCH PILOT DISPLAY — The Touch Pilot display is thestandard user interface for the AquaForce 30XA chillers withthe ComfortLink control system. The display includes a largeLCD (liquid crystal display) touch screen for display and userconfiguration, a Start/Stop button, and an Alarm Indicator LED(light-emitting diode). See Fig. 1.CAUTIONDO NOT re-use compressor oil or any oil that has beenexposed to the atmosphere. Dispose of oil per local codesand regulations. DO NOT leave refrigerant system open toair any longer than the actual time required to service theequipment. Seal circuits being serviced and charge withdry nitrogen to prevent oil contamination when timelyrepairs cannot be completed. Failure to follow these procedures may result in damage to equipment.3
“PAGE DOWN” If the current table or list has moredata than will fit on the screen, pressing this buttonwill replace the items currently on the screen with the nextgroup of items.“PAGE UP” If the current table or list has more datathan will fit on the screen, pressing this button willreplace the items currently on the screen with the previousgroup of items.“FORCE” Begins the process of forcing or overridingthe value of a point.“AUTO” Begins the process of removing a force froma point.“MODIFY” Begins the process of modifying a configuration value.“ALARM INDICATOR LIGHT” An LED alarmindicator light is activated when a new alarm condition occurs. The alarm indicator light, located on theright side of the display, remains activated until it is manuallyreset using the Reset button on the Main menu.“START/STOP BUTTON” The Touch Pilot display includes an equipment Start/Stop Button thatenables the user to start or stop the chiller from thedisplay. See Enable-Off-Remote Contact Switch (SW1) onpage 18 for additional information.Several items are password protected. When required, aPassword dialog box will be displayed for field input of thepassword. The default password is 3333. The password can bechanged if desired.COMMAND REJECTED will be displayed if the unit is inan ON state and a configuration change is attempted. Place theunit in the OFF state before making a configuration change.Power-Up Display — When the Touch Pilot display is powered up, it displays an initialization progress bar and attaches(initiates communication) to the Main Base Board. The TouchPilot display then shows that controller’s default Group Display screen. See Fig. 2. This is a user-configured display screenwith up to 9 points on 8 separate screens. For more informationon adding or removing points from the Group Display screen,see the Group Display Screens section on page 5.Touch any of the screen point buttons and Point Data Dialogbox will be displayed with expanded information. In the example shown below, the CTRL PNT button in the bottom leftcorner was selected. See Fig. 2 and 3.To exit the box, press.Main Menu Display — The default screen for the Touch Pilotcontroller is the Group Display screen. To access the MainMenu, press thebutton. The screen shown in Fig. 4 will bedisplayed. Selecting a button will display the screens associated with that category. The user can also access the login screenfrom the Main Menu if needed.LCD TOUCH ig. 1 — Touch Pilot DisplayThe Touch Pilot display can be used to access variousCarrier Comfort Network devices. For operation under thesecircumstances, contact your Carrier representative.Operation of the Touch Pilot display is driven from thedisplays on the touch screen. The Touch Pilot display uses thefollowing screen “buttons” to allow the user to operate the display and navigate within and between screens.“BACK” Returns to the next higher screen in thehierarchy.“HOME” Displays the Default Group Display screenfor Touch Pilot display. The Default Screen is a userconfigured display of up to 9 points on each of 8 screens. Thisallows for quick access to various, frequently viewed points,without navigating through the Main Menu structure. This button is available at all menu levels and returns the user to thefirst Default Group Display screen.“MAIN MENU” Displays the Main Menu screen.This allows access for viewing and configuration,where possible, of all points supported by the controller. Thisincludes points such as set point and operational configuration.This button is available at all menu levels and returns the userto the Main Menu screen.“PREVIOUS” In a group of sequential screens of thesame type, pressing this button moves the user to thenext earlier screen in the group.“NEXT” In a group of sequential screens of the sametype, pressing this button advances the user to the nextscreen in the group.“OK” Agrees with, or says “yes” to a prompt and performs the appropriate processing.“NO” Rejects, or says “no” to a prompt and performsthe appropriate processing.“CANCEL” Terminates an ongoing action and returnsto the current screen without any other processing.“CLEAR DATA” Clears the data value in a data entrydialog box. This button is used to clear incorrect data.“RESET DATA” Zeros the data value in a data entrydialog box.“ADD” Adds the active point to a Group Displayscreen.“REMOVE” Deletes a point from a Group Displayscreen.“INCREASE” Modifies the value of a field within itsdefined limits or “SCROLL UP” and shifts the screenview up by one item.“DECREASE” Modifies the value of a field within itsdefined limits or “SCROLL DOWN” and shifts thescreen view down by one item.Touch Pilot Menu Structure — The user can navigatethrough the Touch Pilot display screens by selecting the buttons that appear on the screen. When a button is selected, eithera sub-menu or a list of point names and values will be shown.Submenus will display a list of associated point names. SeeFig. 5 for the Touch Pilot menu structure.If the list of point names and values are shown, the top lineof the display is the table name. The line and total line counteris displayed in the upper right corner of the display. Selectingan item will cause a Point Data dialog box to appear.Setup Menu Screen — The Setup Menu screen, shown inFig. 6, is accessed by pressing the Setup button from the MainMenu. This configuration allows the user to configure the basicoperation and look of the display. Table 1 summarizes the Setup Menu functions.4
To change the Time and Date, press thebutton. SelectMain MenuTime. On the display, a day and date boxwith a time box will be shown. To change the day and date,press the day and date box. A calendar will be displayed. If thecorrect month is displayed, touch the correct date. If the wrongmonth is displayed, use theorto change to the correctmonth and select the correct date. The date will highlighted.Pressto accept the change. The previous screen will bedisplayed with the corrected day and date shown. To correctthe time, use thetheoron the left to change the hour. Useon the left to change the minutes. Continuouslytouching theFig. 2 — Group Display Screenororwill sequence the numbers. The time isshown in a 24-hour format. To accept the changes, press thea30-4470orbuttons. A “Save” dialog box is displayed with thewords, “Do you wish to save changes?” Pressto acceptthe changes.Fig. 3 — Point Data Dialog BoxFig. 4 — Main Menu DisplayGroup Display Screens — The Touch Pilot display supports up to eight Group Display screens. Group Displayscreens show status information along the top of the screensand nine buttons that display nine point names and point valuesthat are chosen by the user. All Group Display screen points areuser configurable. The bottom line of the screen contains navigation buttons that can be used to move between the GroupDisplay screens.Pressing a point button will show that point’s Point Datadialog box. See Fig. 2 and 3. This box contains buttons thatremove the point from the group display and apply or remove aforce (point override). When touching any button in the displayscreen, the button will be outlined to acknowledge input. Theremay be a delay in response to input, but if the button is outlined, do NOT press any other button until the previous inputhas been processed.If there is a communication failure with the MBB (MainBase Board), all point buttons will be displayed in inverse video and the message Communication Failure will be displayedin the top left line of the screen.Default Group Designation — The default group is the first ofthe 8 Group Display screens. This is the default screen of thedisplay. Information on this screen as well as the other 7screens can be user-modified to meet the needs of the site.To Add a Point To a Group Display — From the Main Menu,press the desired menu button (Status, Setpoint, Service,Maint, or Config) and, if necessary, the sub-menu button toaccess the point to be added. Press the point button to show thesource point’s Point Data dialog box. See Fig. 3. From thePoint Data dialog box, press the ADD button. The display willshow the last Group Display accessed. Use the navigationbuttons to access the destination Group Display. Press an existing point button or a blank button to update the highlightedbutton with the source point’s name. Press to add the highlighted point to the group and return to the table display.a30-4471a30-4472Setting the Time and Date — The ComfortLink control has atime and date function. This can be useful for diagnostics to determine when alarms occur. The control is factory configuredfor the proper date and is set for the Eastern Time Zone. Thedate and time zone must be checked and corrected if necessary,to allow the machine to function on an internal time scheduleand to display a proper time and date stamp for alarms. Thetime and date is displayed on the Group Display Screen.5
User interfaceGroup display x PO1SFACTORYLOADFACTCtrl-IDALARHISTRegionalCIRCA IRCA DSERVICE1M MSTSLVUSERALAM CURContrastCIRCB ANCP UNABLDEFROSTMMST SLVBacklightCIRCB DUPDTHOURLAST PORCFG TAB1CalibrateCIRCC DUPDHRFANPR LIMIT PasswordCIRCC ANMAINTCFGBOARD PN DisplaySTATEGENSERMAINTCFG TAB8CCNRECLAIMEXV CTRLBRODEFSMODESCUR ntMain 473QCK TST1QCK TST2SERV TSTFig. 5 — Touch Pilot Display Menu Structure6
Table 1 — Setup MenuSETUP MENU SSWORDSFUNCTIONThis button specifies the time and date format and the base unit of measure. Time display can be configured as 12hour AM/PM setting or as a 24-hour setting. The date can be formatted in one of 3 settings, MM-DD-YYYY (MonthDay-Year), DD-MM-YYYY (Day-Month-Year), or YYYY-MM-DD (Year-Month-Day). Units of measure can be either US(English) or Metric (SI).This button selects the active language and font of the display. Available languages are English and Spanish (Espanol).If a preferred language is not available, additional software for the Main Base Board (MBB) and the Touch Pilot display are required. Contact your Carrier representative for instructions and software.This button adjusts the LCD contrast. Press and hold the [MOON] button to increase/darken the contrast or the [STAR]button to decrease/lighten the current contrast.NOTE: Touching the screen anywhere for 5 seconds while powering-up will prompt the user to restore contrast andcalibration settings to factory defaults.This button specifies whether backlighting should be kept on at all times or turned off during inactive periods.This button is used to adjust the LCD touch screen calibration. Touch the screen in the circular targets located first inthe upper left and then in the lower right corner of the screen to adjust.This button is used to configure the limited and full logged-in access system passwords. In order to change passwords,the user must be logged in with full access to view and change the passwords. All passwords must consist of 4-digits,which can be entered using the numeric keypad. Access levels and associated privileges are as follows:Limited Logged-in Access - Provides the user with read/write access to all available tables (except service configuration tables, where the user will not be permitted to modify point data, and Group Display tables, where the user will notbe permitted to add points.) This access level also provides read/write access to all Touch Pilot display setup propertiesexcept Display, CCN, and Password.Full Logged-in Access - Provides user with read/write access to all available tables for the attached device and allTouch Pilot display properties.DISPLAYCCNIf the user does not log in, read-only access to all tables is allowed. The user will be prompted to log in when attemptingto access password-required functions.This button is used to view the description data and part number from the Ctlr-ID Table and to specify the OperatingMode. The Operating mode can be configured for Equipment mode or Network mode. For Touch Pilot displays that arestandard with the unit, Operating mode should not be changed from Equipment mode. Equipment mode providesaccess only to the chiller’s MBB via the Local Equipment Network (LEN) Bus. For remote access, a remote Touch Pilotdisplay can be set to Network mode. Network mode provides access to all devices on the CCN (Carrier Comfort Network ) bus.NOTE: When changing the operating mode, a power cycle is required in order for the new operating mode to takeeffect. The user should view and correct the following CCN data: address and baud rate, alarm acknowledger, andbroadcast acknowledger designation.This button is used to configure the bus and element numbers and the baud rate of the control on the network.NAVIGATOR DISPLAY MODULE — The Navigatordisplay module provides a mobile user interface to theComfortLink control system. The display has up and down arrow keys, an ENTER key, and an ESCAPE key. These keysare used to navigate through the different levels of the displaystructure. Press the ESCAPE key until ‘Select a Menu Item’ isdisplayed. Use the up and down arrow keys to move throughthe top 11 mode levels indicated by LEDs on the left side of thedisplay. See Fig. 7. See Table 2 and Appendix B for more details about the display menu structure.Once within a mode or sub-mode, a “ ” indicates thecurrently selected item on the display screen. Pressing theENTER and ESCAPE keys simultaneously will put theNavigator module into expanded text mode where the fullmeaning of all sub-modes, items, and their values can be displayed. Pressing the ENTER and ESCAPE keys when thedisplay says ‘Select Menu Item’ (Mode LED level) will returnthe Navigator module to its default m
(Carrier Comfort Network ) Tables, which are located in Ap-pendix C of this manual. Display Module Usage TOUCH PILOT DISPLAY — The Touch Pilot display is the standard user interface for the AquaForce 30XA chillers with the ComfortLink control system. The display includes a large LCD (liquid crystal display) touch screen for display and user