Transcription
Installation Instructionsfor Sure Lock Lap Sidingwith Concealed Nailing SystemIncludes: 8 in. Sure Lock and Sure Lock Six Cottage Lap Important:Read and understand all pages ofthe installation instructions beforestarting the siding application.For TruWood care and maintenance information,warranty information, and installation videos,visit our web site at: TruWoodSiding.com
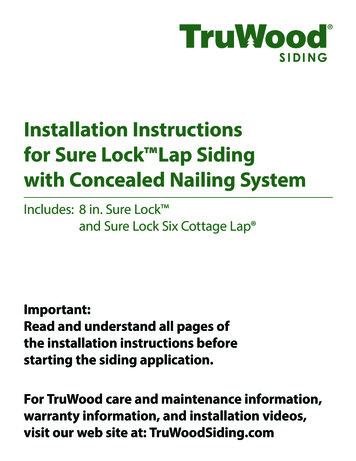
FRAMING Apply these lap siding products horizontally onwalls and gables that meet racking requirements. Follow product specific nailing pattern(see Fig. 4). Framing must not exceed 16 in. on center (o.c.). Although not recommended, where 24 in. o.c.vertical framing is used, nail to framing 24 in. o.c.with intermediate nailing 12 in. o.c. to sheathingwith a 6d galvanized ring shank nail. Thiseffectively creates a 12 in. o.c. nailing schedule.SHEATHING Sheathing is required for all siding products.Recommended sheathing is a minimum of 7/16in. OSB or 1/2 in. exterior grade plywood. Foam sheathing or other composite sheathingmay be substituted. Collins Products LLC will notbe responsible for problems related to crushingof the foam during or after siding applications, ormoisture accumulation in the wall cavity.VAPOR BARRIERS, VENTILATIONAND MOISTURE CONTROL Crawl spaces, attics and living spaces must beventilated at least to the minimum specified inHUD standards.FLASHING In areas where the bottom drip edge of the sidingis adjacent to flashing, provide a minimum 3/8 in.gap between bottom drip edge of the siding andthe flashing (see Fig. 7). Install flashing in a manner that creates properout-sloping (see Fig. 7). Kick out flashing is required in areas where theroof and gutters are adjacent to the siding.Provide a 1 in. clearance between the gutter endand the siding (see Fig. 8).INSTALLING Start by ripping 2 or more inches off the top edgeof the Sure Lock siding to provide an interlockingstarter strip. Align starter strip with the bottomedge of the sill plate. The bottom portions of theripped siding may be used for the top courses. Make sure to prime and paint all exposed cutedges. Roofs, gutters, roof to wall transitions, windows,doors, decks and attachments shall be designed,flashed and installed to prevent moisture entryinto the siding or wall cavity or accumulationof water against the siding other than ambientmoisture. Sure Lock requires one nail per lap piece on allstuds 16 in. o.c. Make sure each nail is placedprecisely on the scored nailing guideline. Thisensures that the nail head is properly concealedand does not penetrate the interlocking grooves.The top of the nail must be flush to ensure easeof interlock during application (see Fig. 4). Siding must have 2 in. clearance from masonry,concrete, brick, stone, stucco or mortar, or beproperly flashed (see Fig. 7). Periodic checks are necessary to ensure thehorizontal lap remains level. Make adjustments asnecessary. A continuous vapor barrier rated 1 perm or less isrequired across the interior side of all walls to besided. Vertical butt joints must be located only on studs. A vapor barrier rated 1 perm or less must beinstalled between the wood sill, wood framingand the foundation wall. When butting siding to inside or outside corners,use a minimum 1 in. thick dry wood material (seeFig. 3). A vapor barrier ground cover must be used incrawl spaces.2
FASTENINGCLEARANCES Use corrosion resistant boxhead nails with aminimum head diameter of 1/4 in. (10% varianceallowed). Siding must have a minimum 2 in. separationfrom concrete or be appropriately flashed. Fastening must not exceed 16 in. o.c. (see Framingsection for 24 in. o.c. stud spacing). All lap products require that the butt joints belocated on the studs and nailed at the joints (seeFig. 2). Nails must penetrate wood framing 1-1/2 in. Avoid countersinking nails or rupturing the surfaceof the siding. If countersinking occurs, seal nailprior to painting (see Fig. 1). Fasten from end to end or center to end to avoidinternal stress. Nailing schedule for soffit application of sidingproducts must not exceed 16 in. o.c. For siding used as soffit material, the siding mustbe nailed 12 in. or 16 in. o.c. into the framing.GAPS AND CORNERS Leave 3/16 in. gap around all doors, windowframes and corners. Seal all gaps (see Fig. 2and 3). Siding must be 6 in. from soil or landscapingmaterial. Where the siding meets the roof, it must bespaced a minimum of 2 in. from the plane of theroof and be properly flashed. The cut edge mustbe primed and painted. Vegetation must not be in direct contact with thesiding.SEALING Use the best quality flexible, paintable, mildewresistant exterior grade sealant material thatmeets ASTM C920, Class 25 or higher. Seal around all openings such as window anddoor frames and at butt joints. Seal all overdriven nails (see Fig. 1). Seal or flash all horizontal trim material in amanner that creates proper out-sloping.PAINTINGBUTT JOINTS Touch up damaged areas with premium acryliclatex primer or premium alkyd oil-based primer. All butt joints must be located over studs. Siding must be finish-painted within 90 daysafter installation. If siding is exposed for a longerperiod, reprime the siding. Leave 3/16 in. gap at all butt joints (see Fig. 2).Stacked Butt Joints (see Fig. 5)Vertically aligning butt joints at a commonlocation on the wall is strongly recommended.Joints should be gapped at least 3/16 in, sealed,then vertical trim is applied over the joints.This method minimizes long term homeownermaintenance.Staggered Butt Joints (see Fig. 6)If butt joints are staggered, vertical butt jointcovers are required to protect the butt joints.Sealing butt joints in lieu of joint covers ispermitted but not recommended as it requires ahigher degree of homeowner maintenance. Siding must be clean and dry when paint isapplied. Use only premium acrylic latex paint or premiumalkyd oil-based paint containing an appropriateamount of mildewcide for local moistureconditions. For best performance, use 100% acrylic latexpaints or 100% acrylic latex solid body (opaque)stain. Follow paint manufacturer’s recommendationsfor engineered wood siding.3
A minimum of 4 dry mils, which includes 1mil factory primer, is required. This is bestachieved with two coats of finished paint. Drip edges and grooves must be well coated.INSTALLATION ERRORS THATVOID THE WARRANTY Do not apply siding to a rain soaked structure. All surfaces and exposed cut edges must bepainted in place. Do not apply siding that is wet. Wet siding canshrink after application and shrinkage is notcovered by the TruWood warranty.PROPER STORAGE Wet blown insulation is not allowed. Store siding flat and support it on stringers toavoid sagging and contact with the ground. Do not apply stucco or composite stuccoproducts over the siding. Siding must be covered and protected fromthe elements. Do not apply the siding to floating structuresor buildings over water. Allow siding to acclimatize to local conditionsprior to installation. Staples are not an acceptable fastening device.CONSTRUCTION ESSENTIALS The structure must be constructed to meetlocal applicable building requirements,HUD minimum property standards or HUDmanufactured housing construction andsafety standards. Lap siding does not provideshear strength.WARRANTY REQUIREMENTS The terms of the Limited Warranty requirestrict compliance with the installationinstructions. These instructions aresupplemental to applicable local buildingcodes and standard building practices.Compliance with the most stringent of theseis required. Architectural designs, plansand specifications must comply with theseinstructions. All deviations from the installation instructionsmust be pre-approved in writing by the CollinsProducts LLC Product Performance Manager. Do not apply to wall systems withoutconventional framing. Do not bevel cut the siding edges at buttjoints. Do not paint in wet or cold conditions. Do not use shake and shingle paints, lowquality flat oil or alkyd paints, vinyl acetate(PVA), vinyl acrylic or vinyl acetate-acrylicco-polymer paints. These coatings do notadequately protect the siding.Note: This list is not intended to be inclusive ofall errors that would void the warranty. Theseare just some examples.KEY HOMEOWNERMAINTENANCE RESPONSIBILITIES Inspect and renew all sealant and immediatelyrepair any water penetration issues every year. Maintain gutters and downspouts to avoidwater cascading down walls. Ensure sprinkler patterns are directed awayfrom structures. Follow paint manufacturer’s recommendationsfor repainting and paint maintenance.4
CONDITIONCORRECTIONFigure 2Figure 18 IN. SURE LOCK NAILINGSURE LOCK SIXCOTTAGE LAP NAILINGFigure 3STUDSURE LOCK SIX COTTAGE LAP SIDINGVERTICALLY ALIGNED JOINTSSTUDSIDINGSIDINGNAIL ONSCRIBEDLINEAIR INFILTRATIONBARRIERSIDINGAIR ure 4SHEATHINGSTARTERSTRIPSURE LOCK LAP SIXING STAGGERED JOINTSFigure 5FLASHINGGap 3/8 in.ensure completepaint coverageof the drip edge1"1 in. clearance betweengutter end and sidingFigure 6Figure 7Figure 85
Apply siding over approved structural sheathing. Maximum nail spacing is 16 in. on center. Nails must penetrate wood framing 1-1/2 in. Do not use staples. Use only the nails specified in theseinstructions. Install a minimum 3/16 in. gap at butt joints and ends.Use only approved methods to protect joint areas. Siding must not be in direct contact with stucco, mortar,stone, brick, concrete or masonry. Apply siding in a method that will prevent moisture entry intothe siding or wall cavity. Seal all exposed cut ends using a method that will preventmoisture intrusion. Maintain the proper clearance from the siding bottom dripedge to the finished grade, walkways and adjacent to the rooflines.CODES AND STANDARDSTruWood Siding meets the requirements of thefollowing codes and standards: 2018, 2015, 2012, 2009 InternationalBuilding Code 2018, 2015, 2012, 2009 InternationalResidential Code*CALIFORNIA WUIAPPLICATION REQUIREMENTS Framing must not exceed 16 in. on center. Minimum 5/8 in. Type-X gypsum exteriorsheathing is required.(8140-2025:0006SFM 12-7A-1) ICC ESR-2588 Federal Manufactured Housing Standards American National StandardANSI-CPA 135.6 – 2012 California Wildland-Urban Interface (WUI)*Sales: 800.417.3674 Warranty: 800.329.1219 TruWoodSiding.comRev. 11/186
Installation Instructions for Sure Lock . after installation. If siding is exposed for a longer period, reprime the siding. . for engineered wood siding. 3 A minimum of 4 dry mils, which includes 1 mil factory primer, is required. This is best achieved with two coats of finished paint.