Transcription
smartLivingKeyfree ConnectedSmart Lock ManualPlease read the intructions before fitting and using theKeyfree Connected lock.The functions and design of this product can be changedwithout prior notice for performance and quality improvements.The smarter way to protect your home
Keyfree manual 2014-2.qxd 08/12/2015 10:17 am Page 2INTRODUCTIONKeyfree Helpine:01902 co.uk2
Keyfree manual 2014-2.qxd 08/12/2015 10:17 am Page 3CONTENTSIntroductionGetting StartedSmart HomeExtra FeaturesSafety Precautions4Product Features5Lock Overview7Set/Change Master Code8Set/Delete User Code9Opening and locking11Set One Day Codes12Register/Delete Key Fobs14Change Relock Time16Silent Mode On/Off18Connecting to a Home Automation System20Child Safety Mode22Passage Mode22Handle Alarm22Intrusion Alarm23Incorrect PIN Lockout24Emergency Power25Resetting the lock26User Code Log29Key Fob log303
Keyfree manual 2014-2.qxd 08/12/2015 10:17 am Page 4Safety PrecautionsPlease read this carefullyLocking from the outsideWhen you leave your home be sure tolift up the handle in the given time sothe door is fully secure.Be careful not to let any unauthorizedusers discover your PIN code.Please keep your PIN code safe.To maintain the high quality finish,clean regularly with a softdamp cloth taking care not toscratch the finish.Do not use any chemicals whencleaning as this may affectyour warranty.Locking from the insidePress button & lift inner handle until.Red LED will show.If the inner handle is not lifted to securelylock your door, the door is held on the latchonly.Caution4Please ensure the button is fullydepressed when opening or lockingyour door from the inside.For total peace of mind, please storeyour back up key in a safe &convenient place.If the button does not pop up when yourelease the lever, please slightly lift upthe inside lever to make the button popup for the best security.Make sure to follow the above instructions to avoid any injuries or damage to the product .
Keyfree manual 2014-2.qxd 08/12/2015 10:17 am Page 51.IntroductionProduct FeaturesElectronic PIN Code SystemYou can open the door conveniently with up 20 configurable PIN codes, allowing Keyfree access.2.Smart Home Connectivity (Optional)By adding the corresponding module, your Keyfree lock can be integrated with your home automation system.3.Key Fob Entry (Optional)A Yale key fob can be assigned to allow the lock to be unlocked remotely.4.Emergency BackupIn the event of power failure in the lock, a 9 volt battery (PP3) can be connected to the front of the lockto provide backup power5.Alarmed Door LockThe Keyfree lock has a built in damage alarm, if the keypad area is damaged an 80dB alarm will sound6.Basic Security LockingThe outside handle will automatically disengage once you have entered your home to prevent anyone fromfollowing in behind you.7.Emergency Escape FeatureIn the event of an emergency the inside handle will always be engaged, allowing escape without first having to unlockthe door.5
Keyfree manual 2014-2.qxd 08/12/2015 10:18 am Page 6Lock OverviewBasic ContentsThe contents of this product may be subject to change without notice for performance or quality improvement. Basic Contentssmar tLivingLivingKeyfree ConnectednnecteSmart LockInstallation ManualManuaPlease read the intructions before fitting and using theKeyfree Connected lock.The functions and design of this product can be changedwithout prior notice for performance and quality improvements.smarter way to protectprotectct yourur home The smarterFront (Front Body)Back (Main Body) Optional AccessoriesKey Fob(Optional)6Home AutomationModule (Optional)CylinderUser Guide
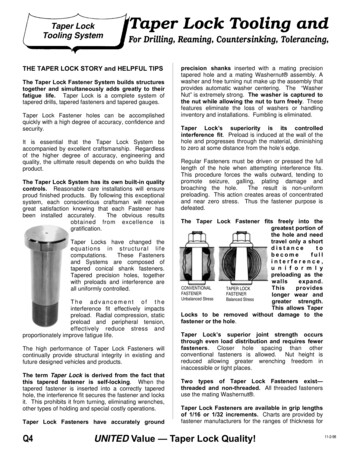
Keyfree manual 2014-2.qxd 08/12/2015 10:18 am Page 7Lock OverviewFrontBody,install onofthetheoutsideof the door)(Front Body, installed(Fronton theoutsidedoor)Pull down Emergency Cover?5?1?6(Sold separately)?7?82?4Keypad (10-Key)2Enter button3Lever Handle4button5Emergency Power SupplyTerminal6Reset button7Keyhole8Emergency CoverGetting Started9V Emergencybattery13?Back?1(Back Body, installed on the inside of the door)1Battery Cover?62LED Indicator?73Lever Handle?84Speaker Hole?95Screw Hole6Slot for Remote controlmodule (Optional)10?211?37I button8Passage Mode/Button9Push Button12?1.5V AA Alkaline Batteries10 Lock case11 Latch Bolt12 Dead Bolt to securely lock4?5?7
Keyfree manual 2014-2.qxd 08/12/2015 10:18 am Page 8Changing Master CodeRegistrationThe master code is the main password to the lock. As well as allowing entry through the door, it is also used toconfigure the lock including adding and removing users.StepIconExpected FeedbackPress any buttonPress any button on thekeypad to beginEnter the master code,followed by # key2 tone beepIf you are setting the codefor the first time the default is123456.Select the [1] buttonfollowed by # key2 tone beepYou are now in the lock’s menu,choose option number 1 tochange the master code.Enter a new master codePress the # button8DescriptionThe master code must be6 digitsVoice saying “completed”This completes the mastercode setup.
Keyfree manual 2014-2.qxd 08/12/2015 10:18 am Page 9Setting a User CodeThe lock can hold up to 20 unique user codes, each one has a slot in the locks memory from 1 to 20. If a new code iswritten to a slot that already holds a code it will overwrite it. Because of this it is important to record which codes are storedin each slot. Please use the section in the back of the book to record this.IconExpected FeedbackPress any buttonGetting StartedStepDescriptionPress any button on the keypad to beginEnter the master code,followed by # key2 tone beepIf you have forgotten the master code pleasesee the resetting the lock section of themanual.Select the [2] button followedby # key2 tone beepYou are now in the lock’s menu, choose optionnumber 2 to select the user code setup.Press the [1] button and then #2 tone beepOption number 1 adds or modifies a usercodeEnter the slot number for theuser code followed by # keyThis is the number of the slot in memorywhere the code will be saved (1-20)Enter the new user codefollowed by # key3 tone ascending beepThe user code can be between 4-10 digitsPress the # button to finish.Voice saying “completed”The user code will now be added to the lock.To add multiple codes please complete the above instructions, record that the memory slot has been filled in the usercode log at the back of this guide, then repeat this process.9
Keyfree manual 2014-2.qxd 08/12/2015 10:18 am Page 10Deleting a User CodeTo stop a user having access their code will need to be deleted. Before doing this you will first need to know which slot inthe locks memory their code is in. Please see the user code log at the back of the guide.StepIconExpected FeedbackPress any buttonPress any button on the keypad to beginEnter the master code,followed by # key2 tone beepIf you have forgotten the master code pleasesee the resetting the lock section of themanual.Select the [2] button followedby # key2 tone beepYou are now in the lock’s menu, choose optionnumber 2 to select the user code setup.Press the [2] button and then #2 tone beepOption number 2 deletes a user code3 Tone Ascending beepThis is the number of the slot in memorywhere the code will be saved (1-20)Enter the slot number for theuser code followed by # keyPress the # button to finish.10DescriptionVoice saying “completed”The user code will now be deleted from thelock.
Keyfree manual 2014-2.qxd 08/12/2015 10:18 am Page 11Opening & LockingSecurely Locking Your DoorInside:Press push button & lift the handle.This can be done anytime and will always fully secure your door.Outside:Close the door and lift up the handle within the set connection timeOnce the outside handle disengages you must enter your PIN or press any button on the keyfob and lift up the handle within the connection time to securely lock your door.LockedFront handle engageIf the time expires you need tore-engage the handle to securely lockyour door. You can re-engage bypressing the remote, pressing theinner lever down or entering your pin.Front handle not engaged afterthe outside handle relocksException : In the Passage mode,Getting StartedUnlockedthe handle is operable all the time.The automatic relock time can be varied by usersetting. Refer to section “settings”.(Optional)IMPORTANT Your door is only securely locked when the inside handle is lifted up & red LED shows.Opening Your DoorPIN CodeEnter registeredPIN codePress any buttonPress(Enter) buttonPress the outerhandle downRemote Control (Optional)Simply press any buttonon the key fobPress the outerhandle down11
Keyfree manual 2014-2.qxd 08/12/2015 10:18 am Page 12Setting a One Day CodeThe one day code is a code that will automatically expire after 24 hours. This allows short term access to be granted tosomeone.StepIconExpected FeedbackPress any buttonPress any button on the keypad to beginEnter the master code,followed by # key2 tone beepIf you have forgotten the master code pleasesee the resetting the lock section of themanual.Select the [5] button followedby # key2 tone beepYou are now in the lock’s menu, choose optionnumber 5 to enter the one day code settings.Enter the new user code2 tone beepThe user code must be 4 digitsPress the # button to finish.12DescriptionVoice saying “completed”The code will now be active for 24 hours
Keyfree manual 2014-2.qxd 08/12/2015 10:18 am Page 13Deleting a One Day CodeA one day code can be deleted if it is no longer wanted. If not it will expire at the end of the 24 hour period.StepIconExpected FeedbackPress any button on the keypad to beginEnter the master code,followed by # key2 tone beepIf you have forgotten the master code pleasesee the resetting the lock section of themanual.Select the [5] button followedby # key2 tone beepYou are now in the lock’s menu, choose optionnumber 5 to enter the one day code settings.Press the # button to finish.Voice saying “completed”Getting StartedPress any buttonDescriptionPress the # to confirm code deletion.13
Keyfree manual 2014-2.qxd 08/12/2015 10:18 am Page 14Register Key FobYale key fobs allow you to open the lock at a distance of up to 15 metres. This requires both the Yale key fob and thecorresponding lock module to work. Up to 5 key fobs can be registered on 1 lock, and like the user codes they each havetheir unique slot in the lock memory. Adding a new fob into a slot that already contains a fob will override it.StepIconExpected FeedbackPress any buttonPress any button on the keypad to beginEnter the master code,followed by # key2 tone beepIf you have forgotten the master code pleasesee the resetting the lock section of themanual.Select the [3] button followedby # key2 tone beepYou are now in the lock’s menu, option 3contains the key fob settings.Select the [1] button followedby # key2 tone beepThis puts the lock into fob add modeEnter the slot number for the fobfollowed by #2 tone beepSelect the number of the slot in memorywhere the fob will be saved (1-5)Push both unlock buttons onkey fobSingle beepPress both buttons as shown in diagrambelow.Press the # button to confirm.Press the # button to finish.14Description3 tone ascending beepVoice saying “completed”The fob will now unlock the lock.This adds the fob to the lock memory
Keyfree manual 2014-2.qxd 08/12/2015 10:18 am Page 15Delete Previously Paired Key FobIf a key fob is lost or stolen it can be removed from the lock so that it can no longer be used to open it.StepIconExpected FeedbackPress any button on the keypad to beginEnter the master code,followed by # key2 tone beepIf you have forgotten the master code pleasesee the resetting the lock section of themanual.Select the [3] button followedby # key2 tone beepYou are now in the lock’s menu, option 3contains the key fob settingsPress the [2] button followedby # key2 tone beepThis puts the lock into fob delete mode.Enter the slot number for the fobfollowed by #2 tone beep, then 3 toneascending beepSelect the number of the slot in memorywhere the fob is saved (1-5)Press the # button to finish.Voice saying “completed”Getting StartedPress any buttonDescriptionThe fob will now not unlock the lock.15
Keyfree manual 2014-2.qxd 08/12/2015 10:18 am Page 16Change PIN Relock TimeThe relock time is the amount of time it takes for the external handle to disengage after the lock has been unlocked with acorrect PIN. The default is 7 seconds.StepIconExpected FeedbackPress any buttonPress any button on the keypad to beginEnter the master code,followed by # key2 tone beepIf you have forgotten the master code pleasesee the resetting the lock section of themanual.Select the [6] button followedby # key2 tone beepYou are now in the lock’s menu, option 6contains the pin relock settings.The relock time can be between 7 and 60seconds.Input the relock time (7-60)Press the # button to finish.16DescriptionVoice saying “completed”The relock time will now be set.
Keyfree manual 2014-2.qxd 08/12/2015 10:18 am Page 17Change Remote Relock TimeThe lock can be set to unlock for longer periods of time unlocked remotely by a key fob or a home automation system.StepIconExpected FeedbackPress any button on the keypad to beginEnter the master code,followed by # key2 tone beepIf you have forgotten the master code pleasesee the resetting the lock section of themanual.Select the [7] button followedby # key2 tone beepYou are now in the lock’s menu, option 7contains the key fob relock settingsThe relock time can be between 10 and 90seconds i.e. 50 50 seconds.Input the relock time (10-90)Press the # button to finish.Getting StartedPress any buttonDescriptionVoice saying “completed”The relock time will now be set.17
Keyfree manual 2014-2.qxd 08/12/2015 10:18 am Page 18Silent Mode On/OffThe lock can be toggled between two modes. Sound assisted mode will provide a variety of sounds to provide feedbackfrom the lock, where as in the default silent mode the only sounds will be an alarm, a low battery warning and feedbackwhile changing settings in the lock’s menu.StepIconExpected FeedbackPress any buttonPress any button on the keypad to beginEnter the master code,followed by # key2 tone beepIf you have forgotten the master code pleasesee the resetting the lock section of themanual.Select the [8] button followedby # key2 tone beepYou are now in the lock’s menu, option 8contains the silent mode settings.Press [1] to for silent mode or[2] for sound assisted mode.Press the # button to finish.18DescriptionSelect between the two modesFanfare sound and voicesaying “silent mode on/off”
Keyfree manual 2014-2.qxd 08/12/2015 10:18 am Page 19Smart HomeLock ModuleThe Yale Keyfree lock can have a removable wireless communication module within the lock. This module isused for all wireless communications to both home automation systems and key fobs. In order to connect toa home automation system a new module may be required for the lock, however changing the module hasthe potential to disrupt the current wireless communications. For instance while a new module may allowthe lock to connect to a home automation system, it could cause the key fob to stop working. An up to datelist of compatible home automation systems and the corresponding lock modules is available at the followingaddress on the Yale website:www.yale.co.uk/YaleEcosystemTo find out which module is currently in your lock please follow the ‘removing a module’ instructions.StepIconRemove inside coverDescriptionSmart HomeRemoving the module.Slide up the black plastic cover of the lock on the inside of the door.Remove a battery from thelockRemove any of the batteries to cut power to the lock.Remove the moduleThe module is situated in the top left corner above the [P] button. It can beunplugged by pulling it out.Record module model numberThe model number will be on a sticker on the module, and will enable you tofind the current wireless compatibility of the lock.Inserting a ModuleStepRemove inside coverIconDescriptionSlide up the black plastic cover of the lock on the inside of the door.Remove a battery from thelockRemove any of the batteries to cut power to the lock.Insert the moduleThe module has 8 pins that are plugged into the small black connector above the[P] button on the top left of the lock.19
Keyfree manual 2014-2.qxd 08/12/2015 10:18 am Page 20Smart HomeConnecting to a Home Automation SystemConnecting to a home automation system is a two way process and may require the home automation system to beconfigured to look for a new device, please consult the manual that came with the system for more information.StepIconExpected FeedbackPress any buttonDescriptionPress any button on the keypad to beginEnter the master code,followed by # key2 tone beepIf you have forgotten the master code pleasesee the resetting the lock section of themanual.Press the [4] button followed by# key2 tone beepYou are now in the lock’s menu, option 4contains the home automation settings2 tone beepThis will make the lock look for a compatiblesystem. If the lock makes a short set of errorbeeps it will need disconnecting from anexisting system. Follow steps on page 21.Press the [1] button followed bythe hash keyPlease wait up to 60 secondsVoice saying “completed”The lock will now be linked to the homeautomation system.Please Note: You cannot use a keyfob and use the keyfree connected Smart Lock with a Home Automation System.20
Keyfree manual 2014-2.qxd 08/12/2015 10:18 am Page 21Smart HomeDisconnecting from a Home Automation SystemFor security reasons a lock will not connect to a new home automation system if it is linked to another. If you havechanged your home automation system please run through the disconnecting settings before adding the new one.StepIconExpected FeedbackPress any button on the keypad tobeginEnter the master code,followed by # key2 tone beepIf you have forgotten the master codeplease see the resetting the locksection of the manual.Press the [4] button followed by# key2 tone beepYou are now in the lock’s menu, option 4contains the home automation settingsPress the [2] button followed bythe hash key2 tone beep. Completed.This will disconnect the lock from theprevious systemSmart HomePress any buttonDescription21
Keyfree manual 2014-2.qxd 08/12/2015 10:18 am Page 22Extra FeaturesChild Safety ModeWith child safety mode activated, depressing inside handle will sound the alarm for 10 seconds to notify the door is open to any persons inside. Inputtingyour pin or pressing the key fob will cancel the alarm. If required the mode will then need to be activated.StepIconPress and hold the passagemode button (above batteries)for 5 seconds.DescriptionHOLDOpen the battery cover then press and hold the passage modebutton for 5 seconds to activate the child safety mode.Replace the battery cover.Passage ModeWhen passage mode is active, the outside handle will not relock allowing you to enter without entering the code.StepIconDescriptionOpen the battery cover and press the P button. You will hear the lock unlock.NOTE: The lock will remain insecure until passage mode has been stopped.To stop passage mode press the passage mode button or lift the handle.Press the passage mode buttonHandle AlarmWhenNotethe handle alarm is set, any operation of the handle from inside will sound the alarm for 3 minutes.Inputting in your PIN or by pressing your key fob will disable the handle alarm setting.StepDescriptionPress any buttonPress any button.Enter PIN codeEnter the registered PIN code in the keypad.Press and hold thefor 5 Sec.22IconHOLDPress the [#] button for 5 seconds.(The beeping sound sets off for 3 times.)
Keyfree manual 2014-2.qxd 08/12/2015 10:18 am Page 23Extra FeaturesIntrusion AlarmThe alarm sound continues for 30 minutes or until it is disarmed.Damage Alarm :If the circuit board of outer handle is damaged the 80db alarm will sound.DirectionsOr if the front handle is seperated from the door.23
Keyfree manual 2014-2.qxd 08/12/2015 10:18 am Page 24Extra FeaturesIncorrect PIN LockoutFor security if the wrong PIN is entered 5 consecutive times the lock will lockout for 3 minutes.This is indicated by the lights on the keypad flashing.To Release LockoutMethodMethodMethod24123Press any button inside of battery cover.Depress inside lever handle.Press any key fob button.
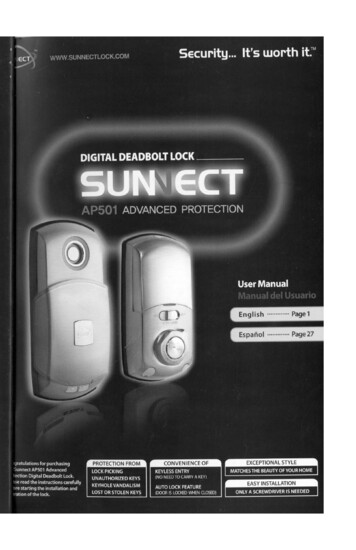
Keyfree manual 2014-2.qxd 08/12/2015 10:18 am Page 25Emergency PowerEmergency Power Supply for Discharged BatteriesIf the batteries in the lock have completely failed emergency power can be provided by a 9V battery on the front body.To Supply Emergency PowerStepIconDescriptionContact the 9V batteryOpen the emergency cover. Keep contacting the 9V battery onto theemergency power supply terminal.Press any buttonPress any buttonEnter PIN codeEnter the registered PIN code in the keypad.Press Enter buttonPressbutton to activate the outer handle.Expiry PeriodThe product uses four 1.5V(LR6) alkaline AA batteries. The batteries will last approximately 1 year based on the lock being used 10times a day. (Users are advised to use authentic alkaline batteries.)Low Battery AlarmLow Battery Lamp (red)You must replace all 4 batteries for the following cases:* The Low Battery LED on the back body flickers red.* The voice guide sounds (“Low Battery”)RISK OF EXPLOSION IF BATTERY IS REPLACED BY ANINCORRECT TYPE. DISPOSE OF USED BATTERIES ACCORDINGTO THE WASTE BATTERIES REGULATIONS.“LowBattery”back bodyThe battery life varies according to ambient temperature, humidity, frequency of use and the quality of the battery.Do not use rechareable batteries. Only alkaline batteries are recommended.25
Keyfree manual 2014-2.qxd 08/12/2015 10:18 am Page 26Resetting the LockIn the event of losing the master code to the lock, the lock will need to be reset back to factory default settings. This willresult in the master code being set to the factory default which is ‘123456’.StepIconDescriptionRemove inside coverSlide up the black plastic cover of the lock on the inside of the door.Remove a battery from insidethe lock. Then remove themodule.Take out any battery to remove the power from the lock.Unscrew the two screws onthe back to remove the rearcover.The top screw is located below the [I] and [P] buttons while thebottom screw is behind the rubber plug under the speaker hole.Disconnect the cable that runsto the exterior half of the lock.Disconnect the cable that runs through the door to the exterior unit.Press and hold the [I] button and[P] button. Continue holding thebuttons and insert battery.Continue holding these buttons until the ready sound is heard in step 6.Wait for 10 seconds, a two tonesound will be heard.Release the [I] and [P] buttonsWithin 5 seconds of the twotone sound reconnect the cablerunning to the exteriorescutcheon.The lock will play a three toneascending tone and say“welcome to the Yale digitalworld” the master code is nowset to 123456.26Do not release until a two tone is heard.
Keyfree manual 2014-2.qxd 08/12/2015 10:18 am Page 27SpecificationsSpecificationsOperating Temperature-15 C - 55 C (5-131 F)Lasts appoximately 1 year(when lock is used 10 times a day)Contact DetailsKeyfree Helpine:01902 co.uk27
Keyfree manual 2014-2.qxd 08/12/2015 10:18 am Page 28Warranty2 Year GuaranteeStatementThis product is guaranteed for consumers against faulty workmanship,materials and function for a period of 2 years from the date of purchaseproviding the full installation and maintenance instructions are followed.Please keep your proof of purchase safe, this must be submitted whenmaking a claim under this guarantee.Please note that it is a condition of this guarantee that your Yaleproduct:š DV EHHQ FRUUHFWO\ LQVWDOOHG DQG PDLQWDLQHG LQ DFFRUGDQFH ZLWK WKH Yale installation and maintenance instructions provided to you atthe time of purchase.š DV QRW EHHQ PRGLıHG RU GDPDJHG LQ DQ\ ZD\ š DV QRW EHHQ VXEMHFWHG WR XQDXWKRUL]HG UHSDLUV Yale are responsible under this guarantee for repairing the product orreplacing the product as we deem necessary. If there is fault with theproduct, please contact Customer Services on 01902 364647, whoZLOO JLYH \RX WKH QDPH RI DQ H[SHUW DQG FRQıUP ZKDW \RX QHHG WR GR to make a claim under this guarantee.Please do not carry out any repairs without our authority or by using anunauthorised expert. Any repairs or other works carried out without ourDXWKRUL]DWLRQ RU E\ XVLQJ DQ XQDXWKRUL]HG H[SHUW ZLOO QRW EH FRYHUHG under this guarantee.This guarantee is non transferrable and applies to products purchasedin the United Kingdom only. This guarantee does not apply to normalwear and tear. This does not affect your statutory rights. A full copy ofthis guarantee is available upon request by writing to Yale UK, SchoolStreet, Willenhall, West Midlands. WV13 3PW or by visiting our websitewww.yale.co.uk.28
Keyfree manual 2014-2.qxd 08/12/2015 10:18 am Page 29User Code LogPin CodesSlot NumberNamePin Code (Optional)12356789101112131415161718192029
Keyfree manual 2014-2.qxd 08/12/2015 10:18 am Page 30Key Fob LogKey FobSlot Number1234530Name
Keyfree manual 2014-2.qxd 08/12/2015 10:18 am Page 31
smartLivingThe smarter way to protect your home
A Yale key fob can be assigned to allow the lock to be unlocked remotely. Emergency Backup In the event of power failure in the lock, a 9 volt battery (PP3) can be connected to the front of the lock to provide backup power Alarmed Door Lock The Keyfree lock has a built in damage alarm, if the keypad area is damaged an 80dB alarm will sound