Transcription
SPMQUICK TIPSVOLUME IITen short articles on using features of the photo editingprogram StereoPhoto Maker created by Masuji Suto.Inside This Booklet:Setting the Stereo Window - p 2Auto Alignment - p 3How to Save EXIF Information - and Why - p 4Creating an Image Gallery - p 6First Steps - p 8Opening Files - p 10Multi-Conversion - p 12Create a Slide Show - p 14Add a Component Image - p 163D Mirror Effect - p 18These articles originally published in The Stereo Windownewsletter of the Detroit Stereographic Society SPM Quick Tips 2016A Publication of the Detroit Stereographic Societywww.Detroit3D.orgSPM Quick Tips2016
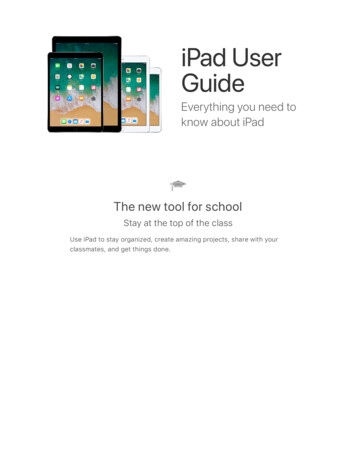
SPM Quick Tip - Setting theStereo Windowby Dennis GreenWhen you look at a stereo image, the edge of the image makesan apparent “window” through which you see the image’s depth.Setting the window means to move the apparent location of theimage forward or back by moving the left and right images closertogether or farther apart. This is done in StereoPhoto Maker byusing the left and right arrow keys on your keyboard. Using theright arrow key appears to move the image farther back.The most importantreason to set thewindow is to makesure that everythingthat should be behindthe window appearsthat way. If somethingthat should be behind it appears to be located in front of thewindow (farther forward than the window’s edge), that will cause a“window violation” which spoils the 3D effect.If you are not good at seeing windowviolations, just remember that the Leftimage sees Less on the Left (the 3-LRule). This means that you should beseeing less of any object on the leftside of the left image than what you cansee in the right image.For example, note that the window frame in the right image is notvisible in the left image because it sees less of the left side. Justmake sure when you set the stereo window that anything touchingthe edge of the image is farther back (farther left in the left image)than the edge itself. Use the arrow keys to move the image back(right arrow) or forward (left arrow).[ ][ ]2 SPM Quick Tips 2016SPM Quick Tip: Auto-Alignmentby Dennis GreenOne of the most valuable functions of StereoPhoto Maker, and theone that established it as the most-used stereo image editor, isthe auto-alignment tool. Prior to SPM, there were no stereodigital cameras, so digital 3D was created by scanning film chips(usually individually), using images from twin digital cameras(which were often not aligned themselves) or by taking cha-chaimages from a single digital camera. Using twin cameras oftenresulted in images that were different sizes, due to zoom lensesnot being at the exact same focal length. SPM was created byMasuji Suto to correct issues with digital stereo images.SPM’s auto-alignment first analyzes both images of a pair to findsimilar points in each image, then calculates whether one imagemust be resized to match the other, as well as correcting verticalmisalignment from one camera being tipped up or down, and anyrotational or keystone error. Even stereo digital cameras like theFuji W3 or Panasonic 3D1 can have minor misalignments.To use the auto-alignmentfeature, just open an imageand select Adjust - AutoAlignment (or the shortcutAlt A). SPM will take a fewseconds to do the alignmentand then give you a report ofwhat changes were made.You can align a whole folderof images by using the Multiconversion feature. In fact itis a good idea to do that before viewing a session’s images tosave yourself any eyestrain from viewing many misaligned images. The images can be saved in .tiff or lossless .jpg format in aseparate folder to keep the originals untouched.[ ][ ]SPM Quick Tips2016 3
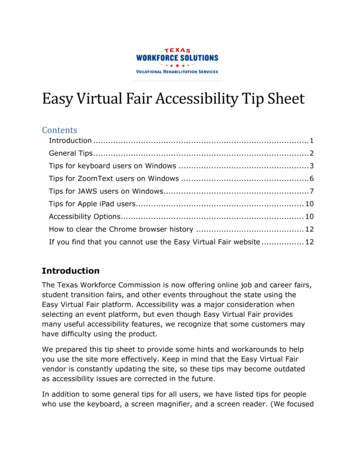
SPM Quick Tip - How To SaveEXIF Information - and Whyby Dennis GreenExif data is the information in a digital photo about how theimage was taken. Right click on any image file, go to the bottomand select “properties”. You will find a long list of details, whichincludes the date taken, the camera used, all of the settings, anda lot of other details. These screenshots show just part of the listfor an image out of the camera, and for one manipulated andsaved under another title. The information can be lost.Original image fileResaved image fileLinda Nygren shared information on how to keep this informationin modified files so you can get all the details about the finalimage in the future.“When you first run the SPM program, there are a few things inthe ‘preference settings’ that are important. First, you want tomake sure that SPM keeps your original image metadata, suchas time and date of capture and camera ID and settings. To dothis, go to *Edit * *Preferences*, and near the bottom check thebox for ‘When add thumbnail image to Save file, copy originalexif to Save file’.4 SPM Quick Tips 2016“Then after you open an image, click on ‘file’ one of the ‘Save’options, then in the dialog box that opens up, check the box in frontof ‘Add thumbnail image to Save file’. You only have to do thisonce, and SPM will continue to keep your original imagemetadata.“If you do NOT do this, then each new edited file will be treated asif it were created on the day of editing and the details of theoriginal capture (EXIF data) will be lost. While you are in that‘Save’ dialog, you can also choose the ’jpg quality’ which will beremembered until you change it. The default is 70 or 80, but mostusers prefer to set this at maximum while editing, which is ‘99’ forSPM. It is mostly a concern if you might be saving your imagesmore than once, and wish to avoid the adverse effects of repeatedjpg compression.”[ ][ ]SPM Quick Tips2016 5
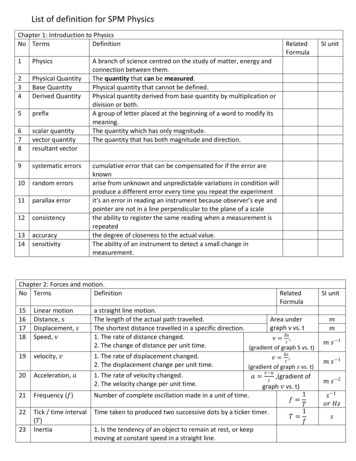
SPM Quick Tips - Creating anImage Galleryby Dennis GreenCreating an image gallery with SPM will allow you to share agroup of images with friends, relatives or the world in a way thatwill allow them to view the images in whatever way they wouldlike. The user has the choice of several 3D modes includingparallel and cross-view for free viewing or using a screen viewer,three anaglyph modes for viewing with red/cyan glasses, interlaced mode for use with a 3D monitor or 3D laptop, and asqueezed mode (SBS50) for viewing on a 3D TV.It even has the choice of viewing in 2D for someone who doesnot have any 3D viewing options or who prefers 2D images. Ithas a slideshow option, as well as allowing you to step throughthe images manually using the Left and Right arrow keys.Once created, the gallery can be uploaded to a website, or it canalso be copied to a CD or sent over the internet using a programlike “WeSendIt”. The nice thing about the gallery is that the userdoes not need to install any program on their computer (not evenSPM) - it runs in whatever browser they already have!Here’s how to create the gallery in a few minutes:1. Put all of the images you want included in a single folder.2. Open StereoPhoto Maker.3. In the “web” menu,select “Make HTML5Stereo Viewer.”6 SPM Quick Tips 20164. Navigate to the folder ofimages you created. If youwant an index page withthumbnail images, checkthe thumbnail box at thebottom. Change the namein the Page Title box to theone you want. For thisexample we’ve used“DSS Sample Images”5. Select the images you want displayed and click “Start SelectedFiles”, or if you want all of them, click “Start All Files”.6. That’s it! Your folder will now haveseveral additional files in it.Double click on “index.htm m” to view theindex page, or on “index.htm” to godirectly to the gallery.Here is what theindex page willlook like, withyour page nameat the top.And here is the viewerin full screen modeshowing one of theimages (in parallelmode) with the smallmenu choices at thetop. It’s really easy.Give it a try!SPM Quick Tips2016 7
SPM Quick Tip: First StepsWhen you have a stereo image open, the menu options will expand,giving you more tools. We will concentrate on the viewing options.by Dennis GreenI remember when I first tried to use StereoPhoto Maker. I went tothe website and downloaded the program and started it - then hadno idea what to do. I was confronted by this black blank screen,unlike other programs that would open with a blank document or awork area. So to get a beginner going, this article will start from thevery beginning and go through just the first two steps; downloadingthe program and viewing some images.Step 1: Download the program.Go to the website that has a variety of Masuji Suto’s programs. Youcan use a web search on “StereoPhoto Maker” , or use this link:http://stereo.jpn.org/eng/stphmkr/A few lines down the page you will see the download links:Download one of the versions and open it (you may get a messagesaying “unknown publisher” - run the program anyway).Once the program opens, you will see a black screen with a fewicons at the top, plus some menus. Click on the first icon to open astereo image, like an mpo file from a stereo camera or a side-byside image from another source.Click on the second icon to openLeft and Right images, like thosefrom a pair of cameras or twoimages taken with a single camera(cha-cha). These options are alsoavailable from the File menu.Step 2: View an image. Now that you know how to open animage, let’s look at the options for viewing one in 3D.8 SPM Quick Tips 2016The first icon allows you to view the image in interlaced mode,which would be used if you have a passive 3D display, such as a3D laptop, 3D TV or passive monitor. The settings for this mode(or for any of the viewing icons) can be found under the Stereomenu. Once set, SPM will remember your setting.If you don’t have a 3D display, you can use one of the next two iconsto view the image in anaglyph mode using glasses with the coloredlenses. You have a choice of Gray Anaglyph, which will remove thecolor from the image (useful when the image has a lot of red or cyancolors in it), or color anaglyph.The dropdown next to the Gray Anaglyph icon allows you to changethe anaglyph color to match your glasses. The default is red/cyan,which is the most common anaglyph colors, but if you have glasseswith red/green, red/blue, or yellow/blue lenses, you can use them.The dropdown next to the Color Anaglyph givesyou choices among several ways to view images to reduce the problems with red or cyancolors in your images. The best thing to do is tostart with color at the top, and try out the differentreduced color options to see which gives thebest view for you.The next viewing options is side-by-side, the default viewing mode,which can be used for free-viewing or with one of several mirrorviewing devices. This icon is followed by the Above/Below modeused with viewers like the View Magic. This is good for viewingpanoramic images. The final two modes are for Sharp glasses-freedisplays and for using shutter glasses, if you have that hardware.Now that you have taken the first steps with SPM, look over theother SPM Quick Tips (in newsletters or on the club website) and tryone of the other tips. Before you know it, you will be using SPM formost of your stereo viewing and editing.[ ][ ]SPM Quick Tips2016 9
SPM Quick Tip: Opening Filesby Dennis GreenHere are four tips on opening stereo files for viewing or editingusing StereoPhoto Maker:1. To quickly open a 3D.jpg file from WindowsExplorer, just right-clickon the filename andhover over the “Openwith” option in the dialogbox. Another dropdownwill appear with options.If SPM is not in theoptions, just click on“Choose default program.” and it will allowyou to navigate to theSPM program. Onceyou select SPM, it willbe added to thedropdown for future use.2. Youcan have an .mpo fileautomatically open with SPMinstead of some 2D photoviewer when you double-clickon the file. Just click on the“Start” button and then on“Default Programs”. Then clickon “Associate a file type.” andwait for the list of file types toappear. Select “.mpo” and thenclick on the “Change Program”button at the top. Some suggested programs will appear, or youcan navigate to SPM to make it the default. From then on, it will bemuch faster than opening SPM and then finding a file.10 SPM Quick Tips 20163. To have Windows Explorer show thumbnails of .mpo files insteadof just an icon, you can change your registry file so that Windowswill treat .mpo files just like .jpg files, allowing you to view theirthumbnails in Windows Explorer or any other program that canopen a .jpg image. Full directions for making this change are onDon Munsil’s website: http://www.munsil.com/MPO registry.html.4. SPM has a tool for viewing imagefiles in folders. It is the fourth iconfrom the left - the “Open Image FileList” command. Clicking on this iconwill give you a window similar toWindows Explorer with two usefulfunctions for those who are using twin cameras (which is becomingpopular again) with pairs of Left and Right image folders.The first function is that if youhave images from a camerathat is upside down in a twinrig, you can reorient all of thepictures for that folder byselecting the Exif menu andselecting “Set the orientationtag 3 ‘180 rotated’ ”. You willthen be able to see all ofthose images right side up.If you open another instance of the Image File List (by selecting the“Instance” menu), you can view the contents of the other folder. Bynow using the “D” (down) and “U” (up) keys, you can scroll bothfolders at the same time, which will allow you to find any orphanimages before opening the files and making stereo pairs.Once you have all the images in matched pairs, you can open themby selecting one image from the left folder and one from the right,then using the menu item “Open L/R Image” (or press the “O” key).After one image is open, you can step through the other images byjust using the space bar.[ ][ ]SPM Quick Tips 2016 11
SPM Tip - Multi-Conversionby Dennis GreenLast month we showed several ways to open files in StereoPhotoMaker. This month we will show how to use Multi-Conversion to dothe most common tasks for a folder full of images. The three maincategories are:1. Change the file format:Input:The input format will normally be either side-by-side (.mpo or .jpg ifyou are using a 3D camera like the Fuji W3 or Lumix 3D1) orindependent L/R images (if you are using a twin camera rig orshooting cha-cha style). There are a few other choices in case youare starting with files that are in another format, like anaglyph.Output:The output format has two main choices. The first is file type (sideby-side most often, but other choices are independent L/R, anaglyph, interlaced, half-width SBS for viewing on a 3D TV, etc.) . Theother is file extension (usually .jpg, but other choices include .tif, .jps,and most important, .mpo for use with devices that automaticallyrecognize that .mpo implies a 3D image). You could also use thisarea to separate stereo images into L/R files so you could send orupload 2D images when a 3D viewing device is not an option.2. Adjust the images:SPM’s greatest tool is probably still the ability to automatically aligna folder full of 3D images with just a few mouse clicks. The button“Auto alignment Setting” allows you to determine how the alignmentshould be done. The most common choices are to mount the nearpoint to the window, or to set the far points to an infinity setting ornumber of pixels. The default is to mount the near point at the12 SPM Quick Tips 2016window if the deviation is less than 1/25 of the image, which willwork for most images. You can always adjust the window after thealignment is done, sothis is more of a generalsetting. You can alsochoose to not have thewindow automaticallyset.Other options includeadding a little sharpening(a little helps a lot) and doing an auto color adjustment if you havetwo cameras that give different results - that will allow all of theimages to be matched to the better camera. Save your adjustedimages to a different folder, and you can change settings and redothe adjustments.3. Edit the images:The third category is the edit area. You would most often use this todo resizing of your images(see the Quick Tips collectionin the “How To” section of theclub website for details).Beyond that, there are severaladded edits that will save a lotof time over doing them oneach image.One is to add a decorative border that you set up in “Border Options” under the View menu (or hit Alt-B). Another is to swap all ofthe L/R images, which is handy if you want to print out images forfree-viewing using the cross-view method.You can also add a logo image (which could be a copyright notice)or add generic text (like the author’s name or a generic caption like“Scenes from Yellowstone - 2017”.Try a few conversions in each category on a folder of images,saving them to another location. You may save hours of work andmake your picture processing faster and more fun![ ][ ]SPM Quick Tips 2016 13
SPM Tip - Create a Slide Showby Dennis GreenStereoPhoto Maker has a quick way to create a slideshow fromimages in a folder. The hard way would be to create copies of all ofthe images you wanted in the show, put them in a folder and namethem so that they play in the correct order as you step through themwith SPM. Instead, using the option of creating a slide show list,you can pick and choose image from one or more folders, andshow them in any order without renaming or copying them.The first step is to look through the images and decide which onesyou want in the show, and what order you want them to appear.Then, while viewing them in SPM, when you get to the first imagefor the show, just press the “M” key and a dialog box will open that(1) shows the folder you are in, (2) asks you to name the list (give ita name you will remember in case you end up with more than oneslideshow), and (3) specify how long you want each image to bedisplayed in tenths of a second (so a duration of 50 will be fiveseconds). After that, go through the folder , pressing “M” when yousee the next image you want in the show, and each will be added,in the order they are picked. You can even go to other folders andpick images to add to the show, and SPM will remember whereeach picture is located. To create a different show, press Ctrl M.To run the slideshow when you are done, press Ctrl Shift O (orgo to File- Slide Show List- Open Slide Show List). You will see allthe lists in that folder, or you can change to another folder. After youpick the list, SPM will open the first image. To start the show, justpress “A”. Press “A” any time during the show to pause.To remove an image from the show list while viewing the slideshow, press Ctrl D. You can fill the screen by pressing Enter orReturn, and toggle back out of full screen by pressing them again.You can edit the slideshow easily by pressing Ctrl Shift H (or goto File- Slide Show List- Edit Slide Show List). SPM will open thetext file that runs the show. You can change any of the parametersto get the result you want.In the text file above, the first parameter is the image input format.11 is side-by-side. A few other common formats are:13.Interlaced14.Anaglyph21.Independent L/R images.The second parameter is the length of time that image will bedisplayed in tenths of a second (so 30 3 seconds). You can haveeach slide displayed for a different amount of time if you want someto be on screen longer than others.The third parameter allows you to swap the L/R images to viewthem with the cross-view method by changing the 0 to 1.These have been tips for a simple slide show. You can create amore complex show that includes a music file or comments displayed on the screen. That may be a future Quick Tips article.14 SPM Quick Tips 2016SPM Quick Tips2016 15
SPM Tip: Add A Component ImageSome very creative images can be made by using the “Add LogoImage” command under the Edit menu to add image componentsinto a stereo image. Photoshop has ways of removing a background from an image component, but placing it in a stereo imageis not always easy (and you have to have Photoshop). With SPMyou can bring in multiple images and extract their black or singlecolored backgrounds (i.e. the “green screen” process).First, you open an image and then add another image to it. You canthen use the “Extract” button and the eyedropper to select the background of the imported image to make it transparent.If your imported image is 3D using separate L and R images, SPMautomatically detects this and adds the image to the original in 3D.You can then changethe size of the imported image andmove it in all threedimensions to get itjust where you want itusing the “imageposition section. Forthe X and Y positions,you can move the image around with your cursor, then use the upand down arrows on the “Depth” box to move it forward and back.You can use the “Repeat” button to bring in multiple copies of theimage, resizing and placing each copy independently. You canadjust the placement, including the depth, of several added imagecomponents to make a new image with all of the elements in 3D.Grab a pair of anaglyph glasses to view this image in stereo. Notethat extracting the black background allows the background items inthe new image to show through the wings of each fairy, greatlyincreasing the realism of the new image.Full instructions for using this feature can be found t 13.htm16 SPM Quick Tips 2016SPM Quick Tips2016 17
SPM Quick Tip: 3D Mirror EffectBy Dennis GreenHere is a way to use the 3D Mirror Effect tool to create someinteresting variations on images you may already have.First open an image in SPM andpress [Ctrl] W to get the horizontal mirror tool. Place the verticalline at the point you would like tobe in the middle of the mirroredimage, then drag in the directionof the part of the image you wantto keep. In this example, the lineis on the right and I am draggingto the left.This page intentionally left blankYou will then get a horizontally mirrored image:Repeat that action using[Alt] W (the verticalmirror tool) and placingthe line near the bottom,then dragging up. You will then get an image with some interesting added features. It works best when the intersection lines areat the window (as opposed to being in the background). Here ismy resulting image (in 3D):It’s hard to believe this came from that first image!18 SPM Quick Tips 2016[ ][ ]SPM Quick Tips2016 19
4 SPM Quick Tips 2016 SPM Quick Tips 2016 SPM Quick Tip - How To Save EXIF Information - and Why by Dennis Green Exif data is the information in a digital photo about how the image was taken. Right click on any image file, go to the bottom and select "properties". You will find a long list of det ails, which