Transcription
ES-50/ES-60W/ES-55R/ES-65WRUser's Guide
ContentsES-50/ES-60W/ES-55R/ES-65WR User's Guide. 7Scanner Basics. 8Scanner Parts Locations . 8Scanner Parts. 8Scanner Buttons and Lights. 9User Replaceable Epson Scanner Accessories . 10Changing the Power Save Settings. 10Charging the Battery (ES-60W/ES-65WR). 12Loading Originals.Loading Originals in the Input Slot.Original Document Specifications .Receipt Specifications.Special Original Specifications .Plastic Card Specifications.131320212222Wi-Fi Networking .Network Security Recommendations .Connecting to an Existing Wi-Fi Network .Manually Connecting to a Wi-Fi Network.Wi-Fi Protected Setup (WPS) .Using WPS to Connect to a Network.Using WPS PIN Mode to Connect to a Network.Direct Wi-Fi Mode Setup .Enabling a Direct Wi-Fi Connection .Disabling Wi-Fi .Restoring Default Network Settings.Epson DocumentScan App for iOS/Android.232324252525262728282829Scanning .Scanning a Document in Epson ScanSmart.Saving a Scan .Attaching a Scan to E-mail .303033343
Sending a Scan to a Cloud Service .Printing a Scan .Saving a Scan as a Microsoft Office Format File .Selecting Epson ScanSmart Settings.Changing the Scanner.Changing the Scan Settings .Changing the File Name Settings .Changing the Save Settings .Save Settings .Customizing Action Icons .Scanning Using Receipt Manager .Starting a Free Trial (ES-50/ES-60W) .Hiding the Receipt Manager Trial Icons .Activating Receipt Manager (ES-50/ES-60W) .Scanning Receipts and Using Receipt Manager .Exporting Receipts to QuickBooks Online .Exporting Receipts to QuickBooks Desktop.Saving or Exporting Receipts to Quicken.Saving Receipt Data as a TurboTax File.Saving Receipt Data as a CSV File.Scanning Receipts as an Image File.Selecting Receipt Manager Settings .Exporting or Importing the Receipt Database .Changing Column Settings.Changing Currency and Language Settings .Importing Categories from QuickBooks Desktop or Quicken.Scan Resolution Guidelines 87072Cleaning and Transporting Your Scanner.Cleaning Your Scanner .Cleaning Inside Your Scanner.Calibrating Your Scanner .Transporting Your Scanner .74747476774
Solving Problems . 78Scanner Light Status . 78Solving Scanning Problems . 81Scanner Does Not Turn On or Off or Turns Off Unexpectedly . 82Scanner Button Does Not Start Scanning. 83Scanning Software Does Not Operate Correctly . 83Original Feeds Incorrectly in Scanner. 84Original Jams in Scanner. 85Scanning is Slow . 86Cannot Send Scans to a Cloud Service. 86Solving Network Scanning Problems . 86Cannot Scan Over a Network . 87Scanner Cannot Connect to a Wireless Router . 87Solving Scanned Image Quality Problems . 89Back of Original Image Appears in Scanned Image . 89Scanned Characters are Blurry . 89Characters are not Recognized During Conversion to Editable Text (OCR) . 90Ripple Patterns Appear in an Image . 91Spots or Lines Appear in All Scanned Images. 91Straight Lines in an Image Appear Crooked . 91Scanned Image is Cropped . 91Resetting the Epson Scan 2 Settings . 92Solving Receipt Manager Problems . 92Cannot Access an Accounting Service . 93Cannot Import Receipt Database . 93License Key is Disabled. 93Uninstall Your Scanner Software. 93Uninstalling Scanner Software - Windows . 94Uninstalling Scanner Software - Mac. 94Where to Get Help. 95Technical Specifications . 97Windows System Requirements . 97Mac System Requirements . 975
General Specifications . 98Dimension Specifications . 99Electrical Specifications . 100Environmental Specifications . 101Network Interface Specifications (ES-60W/ES-65WR) . 101Safety and Approvals Specifications . 102Notices . 104Important Safety Instructions. 104Battery Safety Instructions (ES-60W/ES-65WR). 106Restrictions on Copying . 106Default Delay Times for Power Management for Epson Products. 107Binding Arbitration and Class Waiver . 107Trademarks . 110Copyright Notice. 111libTIFF Software Acknowledgment. 111A Note Concerning Responsible Use of Copyrighted Materials. 112Copyright Attribution . 1126
ES-50/ES-60W/ES-55R/ES-65WR User's GuideWelcome to the ES-50/ES-60W/ES-55R/ES-65WR User's Guide.For a printable PDF copy of this guide, click here.7
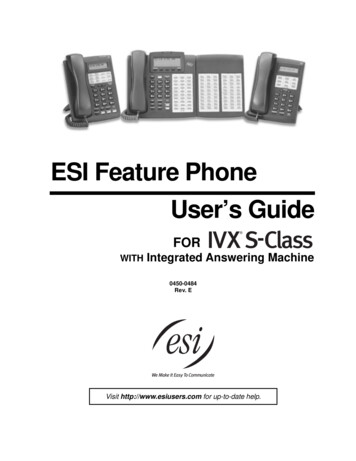
Scanner BasicsSee these sections to learn about the basic features of your scanner.Scanner Parts LocationsChanging the Power Save SettingsCharging the Battery (ES-60W/ES-65WR)Scanner Parts LocationsSee these sections to identify the parts on your scanner.Scanner PartsScanner Buttons and LightsUser Replaceable Epson Scanner AccessoriesParent topic: Scanner BasicsScanner PartsNote: The illustrations show the ES-50/ES-55R, but the parts are the same for the ES-60W/ES-65WR.1Input slot2Loophole3USB port8
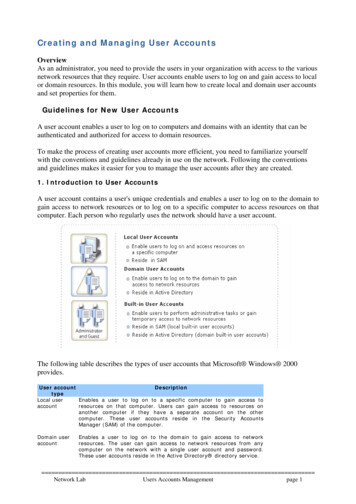
Parent topic: Scanner Parts LocationsScanner Buttons and LightsES-50/ES-55R1start button2automatic feeding mode light3Ready lightES-60W/ES-65WR9
1start button2automatic feeding mode light3Ready light4Wi-Fi light5Wi-Fi AP light6battery light7Error status light8Wi-Fi switch9Wi-Fi connect button10power switchParent topic: Scanner Parts LocationsUser Replaceable Epson Scanner AccessoriesYou can purchase genuine Epson accessories at epson.com (U.S. sales), epson.ca (Canadian sales), orepson.com.jm (Caribbean sales). You can also purchase accessories from an Epson authorized reseller.To find the nearest one, call 800-GO-EPSON (800-463-7766) in the U.S. or 800-807-7766 in Canada.PartPart numberCarrier sheet for portable scannersB12B819451Maintenance sheet kit 2B12B819481Parent topic: Scanner Parts LocationsChanging the Power Save SettingsYou can use the Epson Scan 2 Utility to change the time period before the scanner enters sleep modeand turns off automatically.1. Do one of the following to access the Epson Scan 2 Utility: Windows 10: Clickand select EPSON Epson Scan 2 Utility. Windows 8.x: Navigate to the Apps screen and select Epson Scan 2 Utility.10
Windows (other versions): ClickEPSON Epson Scan 2 Utility.or Start, and select All Programs or Programs. Select Mac: Open the Applications folder, open the Epson Software folder, and select Epson Scan 2Utility.2. Click the Power Save tab.3. Select the length of time after which you want the scanner to go to sleep as the Sleep Timer setting.4. Select a power off timer setting for the Battery or USB power setting (ES-60W/ES-65WR).5. Click Set.6. Close the Epson Scan 2 Utility.Parent topic: Scanner Basics11
Charging the Battery (ES-60W/ES-65WR)The scanner runs on battery power when it is not connected to the computer with a USB cable, or if it isconnected via Wi-Fi. You can charge the battery from a computer with a USB connection to the scanner.1. Make sure that the computer is turned on and not in sleep mode.2. Connect the scanner to the computer using the micro USB cable that came with the scanner.3. Slide thepower switch to turn on the scanner.The battery light flashes and shows the battery level while the battery is charging. When chargingis complete, the battery level is shown as full. If the scanner is off when charging completes, thebattery light turns off.Note: The battery takes about 3.5 hours to fully charge. Charging times increase if the scanner is onduring the charging process.Parent topic: Scanner Basics12
Loading OriginalsFollow the instructions here to load your originals into the scanner.Loading Originals in the Input SlotOriginal Document SpecificationsReceipt SpecificationsSpecial Original SpecificationsPlastic Card SpecificationsLoading Originals in the Input SlotYou can load an original that meets the document specifications in the input slot.Caution: Do not load photos, or valuable original documents or artwork, directly into the scanner. Thismay wrinkle or damage the original.Note: The illustrations show the ES-50/ES-55R model, but the steps are the same for the ES-60W/ES65WR.13
For standard size originals, slide your original into the input slot against the left side as shown until itmeets resistance. Make sure the printed side is faceup and top edge first.14
For longer originals, slide your original into the input slot against the left side as shown until it meetsresistance. Make sure the printed side is faceup and top edge first. Set the paper size in the scanningprogram and support the original as it enters into and ejects from the scanner.15
For receipts, support the original by hand and load it into the input slot against the left side as shownuntil it meets resistance. Make sure the printed side is faceup and top edge first.16
For envelopes, slide the original into the input slot against the left side as shown until it meetsresistance. Make sure the printed side is faceup and the flap is facing as shown. For envelopes withthe flap on the shorter side, load the envelope with the flap side last.Caution: Do not load envelopes with adhesives on them.17
For plastic cards, load the card horizontally into the input slot against the left side as shown until itmeets resistance. Make sure the printed side is faceup.Caution: Do not load plastic cards vertically or at an angle. For irregularly shaped originals, use an optional carrier sheet (part number B12B819451). Make surethe illustration on the front edge of the carrier sheet is faceup with the original faceup against the left18
side. Slide the carrier sheet top edge first into the input slot against the left side as shown until it meetsresistance.Note: Only use the carrier sheet designed for your scanner. If the carrier sheet is scratched or hasbeen scanned more than 3,000 times, stop using it and obtain a new one.Parent topic: Loading Originals19
Related referencesOriginal Document SpecificationsReceipt SpecificationsSpecial Original SpecificationsPlastic Card SpecificationsUser Replaceable Epson Scanner AccessoriesOriginal Document SpecificationsYou can load original documents that meet these specifications in your scanner.Note: To scan delicate originals or originals that are easily wrinkled, use an optional carrier sheet (partnumber B12B819451).Paper typePaper sizePaper weightPlain paperLetter (8.5 11 inches [216 279 mm])9 to 72 lb (35 to 270 g/m²)Fine paperLegal (8.5 14 inches [216 356 mm])Recycled paperA4 (8.3 11.7 inches [210 297 mm])A5 (5.8 8.2 inches [148 210 mm])B5 (7.2 10.1 inches [182 257 mm])B6 (5 7.2 inches [128 182 mm])A6 (4.1 5.8 inches [105 148 mm])A7 (2.9 4.1 inches [74 105 mm])12 to 72 lb(46 to 270 g/m²)A8 (2.1 2.9 inches [52 74 mm])Long paperWidth: 2.0 to 8.5 inches (50.8 to 216 mm)9 to 72 lb (35 to 270 g/m²)Height: 2.0 to 72 inches (50.8 to 1828.8mm)Postcards3.9 5.8 inches (100 148 mm)9 to 72 lb (35 to 270 g/m²)Paper business cards2.1 3.4 inches (55 89 mm)12 to 72 lb(46 to 270 g/m²)20
Caution: Do not load the following types of originals in the scanner, or they may be damaged or maydamage the scanner: Originals with an uneven surface such as letterhead paper Originals with crinkles or fold lines Curled originals Coated paper Originals with punch holes Originals with folded corners Photos or photo paper* Originals with labels or stickers* Originals with staples or paper clips Originals with sticky notes attached* Ripped originals* Originals with carbon paper backing* Perforated originals* Booklets Non-paper originals such as clear files, fabric, and metal foil Originals with glue attached Heavily wrinkled or curled originals Transparent originals such as overhead projector film Originals with wet ink*You can only scan these originals by using the carrier sheet.Parent topic: Loading OriginalsReceipt SpecificationsYou can load 1 receipt at a time that meets these specifications in your scanner.21
Paper typePaper sizePaper thicknessReceipts (plain paper, finepaper, or recycled paper)3 3 inches (76.2 76.2 mm) to 3 14inches (76.2 355.6 mm)12 to 72 lb (46 to 270 g/m²)Note: Scan receipts one at a time using automatic feeding mode. Support a long original receipt by handas it enters and exits the scanner.Parent topic: Loading OriginalsSpecial Original SpecificationsYou can load 1 envelope or irregularly shaped original that meets these specifications in your scanner.Paper typePaper sizePaper thicknessEnvelopes4.72 9.25 inches (120 235 mm)0.015 inch (0.38 mm) or less3.62 6.50 inches (92 165 mm)Irregularly shaped original (in Up to A4 (8.3 11.7 inchescarrier sheet)[210 297 mm])0.012 inch (0.3 mm) or less(excluding the thickness ofthe carrier sheet)Parent topic: Loading OriginalsPlastic Card SpecificationsYou can load 1 plastic card that meets these specifications in your scanner.Card typeCard sizeCard thicknessWith embossingISO7810 ID-1 compliant: 2.1 3.3inches (54 85.6 mm)0.05 inch (1.24 mm) or lessWithout embossing0.04 inch (1.0 mm) or lessNote: ISO7810 ID-1 size laminated cards (thickness of 0.02 inch [0.6 mm] or less) may not be scannedsuccessfully.Parent topic: Loading Originals22
Wi-Fi NetworkingSee these sections to use your scanner over a Wi-Fi network (ES-60W/ES-65WR).Network Security RecommendationsConnecting to an Existing Wi-Fi NetworkDirect Wi-Fi Mode SetupEpson DocumentScan App for iOS/AndroidNetwork Security RecommendationsTo help deter unauthorized access to your product over a network, you should protect your networkenvironment using appropriate security measures.Security measures such as these can help deter threats such as loss of user data, use of telephone andfax lines, and other intrusions: Enable security on your wireless LANEnable the appropriate security on the wireless LAN you plan to use with your product. Networksecurity such as a network password can deter interception of traffic over the wireless LAN. Yourrouter may already have a default password enabled by your Internet service provider (ISP). See yourISP and router documentation for instructions on how to change the default password and bettersecure your network. Connect your product only to a network protected by a firewallConnecting your product directly to the Internet may leave it vulnerable to security threats. Instead,connect it to a router or other network connection protected by a firewall. Your router may alreadyhave a firewall set up by your Internet service provider; check with your ISP for confirmation. For bestresults, set up and use a private IP address for your network connection. Change the default administrator password on your productIf your product has an option to set an administrator password, change the default administratorpassword to deter access by unauthorized users to personal data stored on your product, such as IDs,passwords, and contact lists.Parent topic: Wi-Fi Networking23
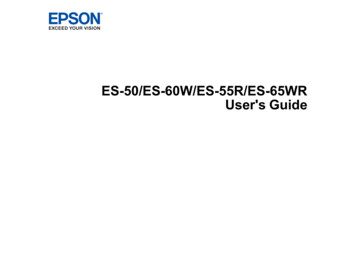
Connecting to an Existing Wi-Fi NetworkYou can set up your scanner to communicate with your computer using a wireless router. The wirelessrouter can be connected to your computer over a wireless or wired network.1Epson scanner2Wireless router3Computer with a wireless interface4Computer5Internet6Ethernet cable (used only for wired connection from the computer to the wireless router)Manually Connecting to a Wi-Fi NetworkWi-Fi Protected Setup (WPS)24
Parent topic: Wi-Fi NetworkingManually Connecting to a Wi-Fi NetworkYou can use your product's software installer to connect the scanner to a Wi-Fi network.Note: You must have a computer with a wireless adapter to set up the connection.1. See the Start Here sheet for instructions on downloading and installing your scanner's software.Note: The scanner powers off after 1 minute of inactivity. If the scanner turns off during theprocedure, you may need to repeat some of the steps.2. Select the wireless connection method for the scanner when prompted.The scanner is added to the network and connected to the computer for network scanning.Parent topic: Connecting to an Existing Wi-Fi NetworkWi-Fi Protected Setup (WPS)If your network uses a WPS-enabled wireless router, you can quickly connect your scanner to thenetwork using Wi-Fi Protected Setup (WPS).Note: To check if your router is WPS-enabled, look for a button labeled WPS on your router. If there isno hardware button, there may be a WPS setting in the software for the device. Check your networkproduct documentation for details.Using WPS to Connect to a NetworkUsing WPS PIN Mode to Connect to a NetworkParent topic: Connecting to an Existing Wi-Fi NetworkUsing WPS to Connect to a NetworkIf you have a WPS-enabled wireless router, you can use Wi-Fi Protected Setup (WPS) to connect yourscanner to the network.1. Follow the instructions on the Start Here sheet to install the scanner software on your computer.2. Make sure the scanner is turned on.3. Set theWi-Fi switch to theWi-Fi position.25
4. Enable WPS on your router by pressing the WPS button or enabling the WPS setting in your routerfirmware.The router enters WPS discovery mode for 2 minutes.5. Press and hold theWi-Fi connect button on the scanner until the ready,AP lights flash alternately.Wi-Fi, andWi-FiNote: If you do not complete this step within 2 minutes, repeat these steps to try again.When the ready,Wi-Fi, andconnected to the network.Wi-Fi AP lights on the scanner stay on, the scanner isNote: If the ready light stays on, but theWi-Fi andWi-Fi AP lights flash simultaneously,connection has failed. Restart the scanner and router, move them closer together, and repeat thesesteps to try again.Parent topic: Wi-Fi Protected Setup (WPS)Using WPS PIN Mode to Connect to a NetworkIf you have a WPS-enabled wireless router that supports PIN mode, you can use Wi-Fi Protected Setup(WPS) PIN mode to connect your scanner to the network.1. Follow the instructions on the Start Here sheet to install the scanner software on your computer.2. Find the WPS PIN number setting in your router's firmware.3. Make sure the scanner is turned off and set theWi-Fi switch to theWi-Fi position.4. Press and hold theWi-Fi connect button and slide and hold the power switch for about tenseconds until the ready,Wi-Fi andWi-Fi AP lights flash alternately.26
The scanner enters WPS discovery mode for two minutes.5. Use your computer to enter the PIN code 01234565 into the WPS PIN number setting in the routerfirmware within two minutes.Note: If you do not enter the code within 2 minutes, repeat the steps to try again.Connection setup starts when the ready light flashes, and theWi-Fi andWi-Fi AP lights flashalternately. When the ready,Wi-Fi, andWi-Fi AP lights on the scanner stay on, the scanneris connected to the network.Parent topic: Wi-Fi Protected Setup (WPS)Direct Wi-Fi Mode SetupYou can set up your scanner to communicate directly with your computer or another device withoutrequiring a wireless router. If your product is not already connected to a wireless network, it entersaccess point mode and the scanner itself acts as the network access point.1Epson scanner2Computer with a wireless interface3Other wireless deviceEnabling a Direct Wi-Fi Connec
11 Windows (other versions): Click or Start, and select All Programs or Programs.Select EPSON Epson Scan 2 Utility. Mac: Open the Applications folder, open the Epson Software folder, and select Epson Scan 2 Utility. 2. Click the Power Save tab. 3. Select the length of time after which you want the scanner to go to sleep as the Sleep Timer setting. 4. Select a power off timer setting .