Transcription
Configure a "One Button Login" for IP PhoneAgentsDocument ID: Components roblem 1Problem 2Related InformationIntroductionThis document explains the procedure that allows IP Phone Agents to login without a prompt for a username,password, and extension in a Cisco Unified Contact Center (UCC) Express or Enterprise environment.PrerequisitesRequirementsCisco recommends that you have knowledge of these topics: Cisco Customer Response Solutions (CRS) ICD or Cisco Unified Intelligent Contact Management(ICM) Enterprise CallManager administrationComponents UsedThe information in this document is based on these software and hardware versions: Cisco CallManager 4.1, 4.2, 4.3, 5.0 and 6.0Note: One button login is not supported with any version of Cisco CallManager Express (CME). Cisco CRS 4.0(5), 4.5(2) and 5.0(1) or Cisco ICM 7.2(1)The information in this document was created from the devices in a specific lab environment. All of thedevices used in this document started with a cleared (default) configuration. If your network is live, make surethat you understand the potential impact of any command.ConventionsRefer to Cisco Technical Tips Conventions for more information on document conventions.
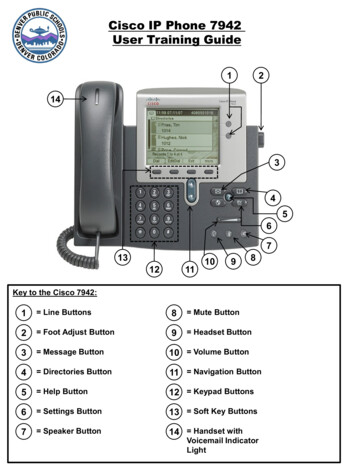
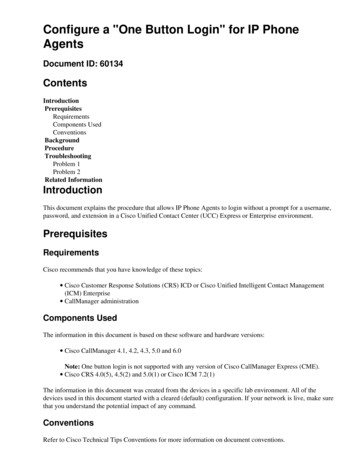
BackgroundWhen IP Phone Agents log in to their respective phone, the username, password, and extension must bemanually keyed. This allows CallManager administrators to map the parameters to a particular IP phone sothe agent is never required to enter the parameters. One button login can be used in conjunction withextension mobility.There are some caveats the administrator should consider prior to implementing this solution: SecurityAnyone with physical access to the IP phone can log in as the agent in question. This mightor might not be a concern for the individual administrator. Moves/ChangesAny time the agent changes the password, or if the agent moves to a differentphone, the CallManager administrator must update the parameters to reflect the change. Therefore,any move and change in the agents should be coordinated with the CallManager administrator.ProcedureWhen you configure the IP Phone Service to allow IP Phone Agents to log in, use this URL, as noted in theCisco Desktop Product Suite Installation Guide. See the Installing Desktop Applications Configuring CiscoCallManager IP Phones to Work with IP Phone Agents section of this honexml/IPAgentInitial.jspThe xxx.xxx.xxx.xxx represents the IP address of the machine where the Cisco Desktop Service is loaded andyyyy is 6293 for UCC Express and 8088 for UCC Enterprise.When an IP Phone agent chooses this service, CallManager provides a prompt for the agent ID, password, andextension. Add an additional IP Phone Service just for one button login with a slightly different exml/IPAgentLogin.jsp) and add parameters for the ID,password, and extension in order to implement this procedure. You want two IP Phone Services set up so if anagent has a problem using the one button login service (i.e. because the password was changed), the agent stillhas the regular IP Phone Agent service to use. Note that one button login service should only be used forinitial login. Once the agent is on non IP Phone Agent screen, the regular IP Phone Agent service should beused to get back to the Skill Statistics screen and other IP Phone Agent screens. When the IP Phone Service isadded to each agent phone, specify the values of these parameters. The procedure in this section assumes thatyou are creating the additional one button login IP Phone Agent IP Phone Service from the start. If the onebutton login IP Phone Agent Service is already created, skip to step 12.1. For CallManager earlier than 5.0, in CallManager Administration, choose Feature Cisco IP PhoneServices, as shown in Figure 1A.Figure 1A: Cisco CallManager 4.1 Administration
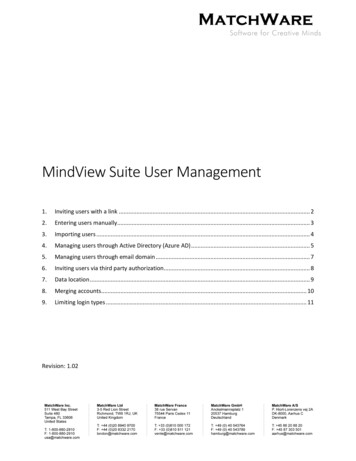
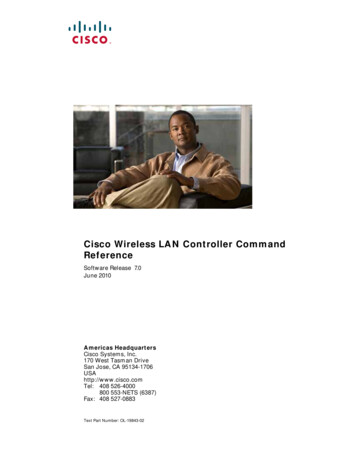
For CallManager 5.0 and later, in CallManager Administration, choose Device Device Settings Phone Services, as shown in Figure 1B.Figure 1B: Cisco CallManager 5.0 AdministrationThe Find and List IP Phone Service window appears.Note: The screen shots in the next steps might appear differently between versions of CallManager.See your Product Documentation.2. Click Add a New IP Phone Service, as shown in Figure 2.Figure 2: Find and List IP Phone Services
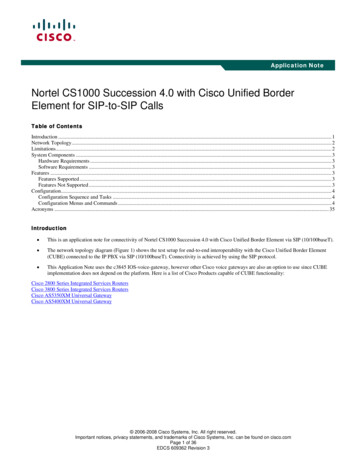
The Cisco IP Phone Services Configuration window appears.3. In the Service Name field, enter a name appropriate for the site, as shown in Figure 3.4. Enter a Service Description, as shown in Figure 3.5. In the Service URL field, nexml/IPAgentLogin.jsp, where xxx.xxx.xxx.xxx isthe IP address of your Cisco Agent Desktop server and yyyy is 6293 for UCC Express and 8088 forUCC Enterprise.This is almost the exact same URL described in the Cisco Desktop Product Suite Installation Guide.The difference is the last portion of the URL. For this procedure, point to IPAgentLogin.jsp insteadof IPAgentInitial.jsp.Figure 3: Cisco IP Phone Services Configuration6. Click Insert.The Cisco IP Phone Services Configuration page refreshes with the new information.7. Create parameters for Ext, Pwd, and ID, which represent the extension of the agent, password, andlogin ID, respectively.
8. Click New, as shown in Figure 4.Figure 4: Cisco IP Phone Services Configuration9. Enter this information in the fields provided:a. Enter Ext in the Parameter Name field.b. Enter Ext in the Parameter Display Name field.c. Enter a logical description, such as Agent Extension, for the Parameter Description field.d. Leave the Default Value field blank.e. Check the Parameter is Required check box.Note: For the Pwd parameter, if a password is not required for all agents, do not check thischeck box.f. Click Insert and Close, as shown in Figure 5.Figure 5: Configure Cisco IP Phone Service Parameter
10. Repeat steps 8 and 9 to enter these two parameters that remain:a. Use this value for the Pwd parameter:Parameter Name: PwdParameter Display Name: PwdDefault Value: (Leave blank unless you have the same password for allyour agents, in which case you can enter that password here)Parameter Description: (Enter a logical description, such as "Agentpassword")b. Use this value for the ID parameter:Parameter Name: IDParameter Display Name: IDDefault Value: (Leave blank)Parameter Description: (Enter a logical description, such as "Agent ID")Note: These values are displayed over multiple lines due to space limitations.When finished, the Service Information and the Service Parameter Information sections looksimilar to Figure 6.Figure 6: Cisco IP Phone Services Configuration
11. Click Update in order to apply this service to the IP phones of the agent.12. In CallManager Administration, choose Device Phones and use the search criteria, for example:Directory Number, in order to locate the agent phones.13. Select the phone to get to the Phone Configuration page, as shown in Figure 7.Figure 7: Phone Configuration14. Click Subscribe/Unsubscribe Services in the upper right corner, as shown in Figure 7.The Service Subscription window appears, as shown in Figure 8.Figure 8: Service Subscription
15. Choose the One Button Login service from the drop down list in the Select a Service field.16. Click Continue.The Service Subscription Subscribe window appears, as shown in Figure 9.Figure 9: Service Subscription Subscribe17. Enter the extension in the Ext field, the agent ID in the ID field, and the password in the Pwd field.18. Click Subscribe.Subscribe to regular IP Phone Agent service as documented in the Cisco Desktop Product SuiteInstallation Guide. See the Installing Desktop Applications Configuring Cisco CallManager IPPhones to Work with IP Phone Agents Assigning the IP Phone Service to IP Agent Phones sectionof this guide.19. Click Services on the IP phone.
The One Button Login service option and regular IP Phone Agent service options should be available.If not, reset the phone.20. Choose the One Button Login and regular IP Phone Agent services and test the login to make sureeverything works properly.21. Once the procedure is verified with the first agent, repeat steps 12 and 20 for each of the contactcenter agents in order to grant access to the One Button Login and regular IP Phone Service.If a new agent needs to work at this station at a later time, the agent can either use the standardmethod (enter the UserID, Password, and Extension each time the agent logs in) in order to log in tothe IP Phone Agent, or the CallManager administrator can change the ID and Pwd parameters for theOne Button Login for the phone to match the new agent.For extension mobility agents, the steps are the same as for regular agents except that it is theextension mobility phones that subscribe to the services instead of the hard phones. The one buttonlogin and regular IP Phone Agent services are only available after the agent has logged into extensionmobility.TroubleshootingThis section describes common problems encountered when you use a one button login, and providesinformation on how to troubleshoot the problems.Problem 1The agent is unable to login and receives an error message when the one button login service is used.Complete these steps in order to troubleshoot:1. Cross check by using a regular IP Phone Agent service in order to login. If it fails, the issue is notwith how one button login is configured. Refer to Cisco Desktop Product Suite Service Information.See the Troubleshooting IP Phone Agent Problems section of this guide.2. Make sure the URL is valid. Check that the IP address and port are correct, and use IPAgentLogin.jsp.3. Make sure all three parameters (ID, Ext, and Pwd) are specified.Note: All are case sensitive.4. Check the device used by the agent to make sure the correct ID, password and extension are enteredinto the appropriate parameter fields. Re enter them again to be sure.5. Check the IPPA service log/debug files which can provide information on why the login failed.Problem 2The agent receives an error screen when the one button login service is selected when already logged in.One button login service can only be used for agents that are not already logged in and not on a call. If theagent is already logged in, the agent should use the regular IP Phone Agent service to get to the IP PhoneAgent screens, such as the Skill Statistics screen.Related Information Cisco Desktop Product Suite Installation Guide Technical Support & Documentation Cisco Systems
Contacts & Feedback Help Site Map 2013 2014 Cisco Systems, Inc. All rights reserved. Terms & Conditions Privacy Statement Cookie Policy Trademarks ofCisco Systems, Inc.Updated: Feb 28, 2007Document ID: 60134
CallManager administration Components Used The information in this document is based on these software and hardware versions: Cisco CallManager 4.1, 4.2, 4.3, 5.0 and 6.0 Note: One button login is not supported with any version of Cisco CallManager Express (CME). Cisco CRS 4.0(5), 4.5(2) and 5.0(1) or Cisco ICM 7.2(1)