Transcription
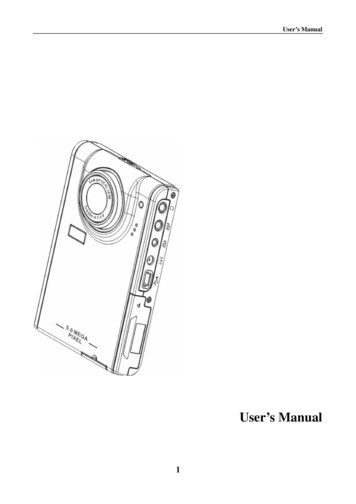
User’s ManualUser’s Manual1
User’s ManualContentsIntroductionFeaturesPackage contentsGetting StartedAttach the hand strapInsert the batteriesInsert an SD cardPlay Multimedia-Photo/Video/Audio Clip Browsing-MPEG4 Player-Audio Clip BrowsingMP3 Player-Play-Lyric DisplayVoice PenAlarm ClockCalendarWorld timeCalculatorCurrency ExchangeFile BrowserGamesPc-CameraCamera Mode-Take Pictures-Digital Zoom-Use the Flash-Use the Self-Timer-Continuous Shots-Couple Shots-Picture Frame-Change the Focus-Record Videos-Adjust the Camera SettingsInstall the softwareRecord TV programKaraokeAppendix 1: SpecificationsAppendix 2: Error MessagesAppendix 3: Exchange Rate TableAppendix 4: Introduction of Blaze MP3 WorkshopAppendix 5: Introduction of Blaze Video 2P43P43
User’s ManualChapter 1 IntroductionHello.Thank you for purchasing this digital camera, which will bring you a wonderful new life style, andenable you to enjoy a modern stylish life.It integrates entertainment and shooting, which enables you to enjoy high definition shooting of upto 5 megapixels, and experience the unique entertainment of this player and the exciting world ofmultimedia. You can use this digital camera to enjoy mp3 format music, play videos, shoot videoclips, record audio, play audio, store data, calculate, make a calendar, adjust your world time,exchange currencies, and play various interesting games.Features:zzzzzzzzzzzzzCompact, stylish design8 digital zoom5 megapixels high-resolution CMOS (2592 *1944 pixels)Maximum resolution of 12 megapixels (extrapolated resolution)Video capture resolution of 320*240@30 fps, 640*480@30fpsSupports MP3/WAV music formatSupports Divx/Mov/ASF multimedia playing formatUltra-large 2.5” LCDBuilt-in 128 MB memorySupports SD card mediaUSB2.0 portTV output and inputBuilt-in microphone and speakerPackage contents:Make sure that your package contains the following components. If anything is missing or damaged,contact your dealer immediately. Retain the packaging in case you need to ship the digital camera inthe future.z Digital cameraz Hand strapz Quick start guidez Driver and software CDz User’s manual (on CD)z Lithium batteryz USB cablez TV-IN cablez TV-OUT cablez Earphonez Chargerz Traveling Bag3
User’s ManualDigital camera overview:Familiarize yourself with the controls of the digital camera with the illustrations below.Front viewLEDLensMicrophoneFlash4
User’s ManualRear ViewSpeakerMode buttonMP3 buttonCamera Mode button4-way buttonMenu buttonOK buttonPower buttonLock buttonZoom buttonShutter buttonSide Views: Left5
User’s ManualRightEarphone jackTV-in jackTV-out jackDC in jackUSB portBattery/SD cardcompartmentTop ViewFocus button6
User’s ManualBottom ViewDocking connectorHand strap eyelet7
User’s ManualChapter 2 Getting StartedAttaching the hand strap1.Thread the short loop of the hand strap through the hand strap eyelet at the bottom of the player.2.Thread the long loop of the hand strap through the short loop.3.Pull the long loop tight.Inserting the batteries:1.Slide the battery/memory card cover on the side of the player in the direction of the arrow.2.Open the cover.8
User’s Manual3.Insert the batteries into the compartment observing the correct polarity.4.Close the cover and snap it into place in the direction of the arrow.Turning the player on and offPress the Power button on the left side of the player to turn it on.Illustration:Power buttonPress the Power button again to turn the player off.9
User’s ManualInserting an SD card1.Slide the battery/memory card cover on the side of the player in the direction of the arrow.2.Open the cover.10
User’s Manual3.Insert the SD card into the slot, with the label facing the front of the player, until it clicks intoplace.Note: SD cards can only be inserted by one direction. If the card does not enter the slot easily, donot force it. Make sure the card is facing the correction direction.4.Close the cover, and snap it into place in the direction of the arrow.11
User’s ManualChapter 3 Playing MultimediaMedia playerPhoto/Video/Audio Clip Browsing:Enter the photo browsing mode in the main menu of digital camera, and the LCD screen willdisplay the photos/video clip thumbnails according to the time. You can press the left or the rightkey of the 4-way button to move to the previous or the next file.Play:To browse photos and video or audio clips, please follow the procedure:1.Turn on the player, and enter the multimedia main menu.2.Use the left or the right key of the 4-way button to select photos,video or audio to be browsed, and press OK to confirm.3.Enter the submenu, and use the right or the left key of the 4-waybutton to move to the next or the previous file.4.If the file is a video clip, press OK to begin playing the video clip.Press OK to stop playing.The screen displays the playing status and playing icon.5.If the file is an audio clip, press OK to begin playing the audio clip.Press OK to stop playing. The screen displays the playing status andplaying icon.12
User’s ManualDelete:In the Play Mode, you can easily delete any unsatisfactory photo or videoclip, and not transfer them into the PC.To delete unneeded files, please follow the procedure:1.In the Play Mode, use the 4-way button to move to the photo/video clipto be deleted.2.Press the MENU button, and use the left or the right key of the 4-waybutton to display the Delete menu.3.Use the 4-way button to select one of following options:----This file: to delete the currently selected file.----All files: to delete all files.4.Press OK to confirm. The selected file(s) will be deleted.Protect/Unprotect filesTo lock photos or audio/video clips to prevent them from being deletedaccidentally, please follow the procedure:1.In the Play Mode, use the 4-way button to move to the photo oraudio/video clip to be locked.2.Press the MENU button, and use the left or the right key of the 4-waybutton to display the Lock menu.3.Use the Up or the Down key of the 5-way button to select one offollowing options:----This file----All files4.Press OK to confirm.5.If the selected file has already been locked, you can use a similarprocedure to unlock it.13
User’s ManualEdit PhotosYou can use various options in the playback menu to edit photos, such as resizing, cropping, orrotating photos.z Resize PhotosTo resize a photo, please follow the procedure:1.In the Play Mode, use the 4-way button to move to the photo thatyou want to resize.2.Press the MENU button, and use the left or the right key ofthe 4-way button to move to the Edit menu.3.Press the Up or the Down key of the 4-way button and the OKbutton to open the Resize submenu.4.Press the Up or the Down key of the 4-way button to select one ofthe following resize options:----VGA----1.3M----3.1M----5.0M5.Press OK when finished.z Rotate PhotosTo rotate a photo, please follow the procedure:1.In the Play Mode, use the 4-way button to move to the photo thatyou want to rotate.2.Press the MENU button, and use the left or the right key of the4-way button to move to the Edit menu.14
User’s Manual3.Press the Up or the Down key of the 4-way button and the OKbutton to open the Rotate submenu.4.Press the Up or the Down key of the 4-way button to select one ofthe following rotate en you select Rotate, the photo will rotate 90 degrees automatically. You can view the effect onthe screen. If you want to continue rotating, please keep on pressing the Rotate button until it meetsyour requirement.6.Press OK when finished.z Crop FilesThe cropping feature enables you to cut off the unwanted parts of aphoto. To crop a photo, please follow the procedure:1.In the Play Mode, use the 4-way button to move to the photo thatyou want to crop.2.Press the MENU button, and use the left or the right key of the4-way button to move to the Edit menu.3.Press the Up or the Down key of the 4-way button and the OKbutton to open the Crop submenu.4.Press the Up or the Down key of the 4-way button to select one ofthe following resize options:----4: 3----3: 25.Press OK when finished.Use the slideshow featureThe slideshow feature of the player enables you to view all the photos onthe LCD screen automatically. You can set the slideshow interval,direction, etc. and customize the slideshow as required.Refer to the following sections on how to set up a slideshow.z Set the starting pointTo specify the starting point of a slideshow, please follow the procedure:1.In the photo mode, enter the photo browsing state.2.Press the MENU button, and use the left or the right key of the4-way button to move to the Slide menu.3.Press the Up or the Down key of the 4-way button and the OKbutton to open the Show submenu.4.Press the Up or the Down key of the 4-way button to select one ofthe following options:----From current----From first----From last5.Press OK when finished.15
User’s Manualz Set the slideshow intervalTo set the interval between consecutive photos during the slide show,please follow the procedure:1. In the photo mode, enter the photo browsing state.2. Press the MENU button, and use the left or the right key of the4-way button to move to the Slide menu.3. Press the Up or the Down key of the 4-way button and the OKbutton to open the Interval submenu.4. Press the Up or the Down key of the 4-way button to select one ofthe following interval options:----1 sec----3 sec----5 sec5. Press OK when finished.z Set the directionTo specify the order in which the photos are displayed in the slide show,please follow the procedure:1.In the photo mode, enter the photo browsing state.2.Press the MENU button, and use the left or the right key of the4-way button to move to the Slide menu.3.Press the Up or the Down key of the 4-way button and the OKbutton to open the Direction submenu.16
User’s Manual4.Press the Up or the Down key of the 4-way button to select one ofthe following direction options:----Forward----Backward5.Press OK when finished.z Repeat the slideshowTo show the slides repeatedly, please follow the procedure:1.In the photo mode, enter the photo browsing state.2.Press the MENU button, and use the left or the right key of the4-way button to move to the Slide menu.3.Press the Up or the Down key of the 4-way button and the OKbutton to open the Repeat submenu.4.Press the Up or the Down key of the 4-way button to select Yes torepeat the slideshow, or select No to show the slides only once.5.Press OK when finished.z Start the slideshowAfter setting up the slideshow, you are now ready to start the slideshow.To start the slideshow, please follow the procedure:1.In the photo mode, enter the photo browsing state.17
User’s Manual2.Press the MENU button, and use the left or the right key of the4-way button to move to the Slide menu.3.Press the Up or the Down key of the 4-way button to display thePlay This File submenu.4.Press OK.The slideshow starts. Press the OK button at any time to stop theslideshow.Video Browse:Please refer to the section 13 of photo browsing procedure in theprevious section.MP3 Player:This media player supports the MP3 music playback of .mp3 and .wmvformats, and displays the lyrics simultaneously. (This feature requiresthe users to download or edit lyrics by themselves).z Play:1.Turn on the player, and enter the multimedia main menu.2.Use the right key of the 4-way button to move to the MP3 submenu.3.Use the Up or the Down key of the 4-way button to select the songthat you want to listen to.4.Press OK to begin playing. If you want to listen to the next song, youcan use the right key of the 4-way button to move to it.18
User’s ManualYou can use the Volume Control Button on the side of the player to control the volume by yourself.When listening to the music, you are recommended to move up the lock button on the side of theplayer to avoid accidental operations. To continue operating, unlock the button first.Note 1: If the media player is in the locking state, the LCD doesn’t respond when you press thebuttons.Note 2: To make it convenient for you to use the MP3 feature, we have set shortcutkeys specially, so you can use the left shortcut key to enter the MP3 menu directly.z EQ Mode:You can select various EQ modes according to the type of music. Please follow the procedure:1.Open the MP3 menu, and use the Up or the Down key of the 4-way button to select the musicthat you want to listen to.2.Press the MENU button, and use the left or the right key of the 4-way button to move to the EQsubmenu. You can select from the following ---Custom3.Select an option, and press OK to confirm.z Loop Mode:1.Open the MP3 menu, and press the MENU button to enter the menu selection.2.Use the Up or the Down key of the 4-way button to select the Play Modes. You can select fromthe following options:----Single ect an option, and press OK to confirm.z Set the LCD to turn off automatically:You can set the LCD to turn off automatically when MP3 feature is enabled in order to save power.1.Turn on the player, and enter the MP3 menu.2.Press OK to enter, and use the Up or the Down key of the 4-way button to select the song to beplayed.3.Press OK to begin playing the song. Press the MENU button to display the LCD AutomaticTurnoff menu. Press the Up or the Down key of the 4-way button to select one of the followingoptions:----1 minute----2 minutes----5 minutes----Never4.Press OK when finished.19
User’s Manualz Lyric Display:This feature only supports the lyrics of .lrc format. You can download or use the proper software toedit the lyrics. To use this feature, you just need to copy the lyrics to the DCIM directory of theplayer when uploading the songs from the PC. This feature supports 13 languages: English, German,French, Italian, Spanish, Dutch, Czech, Polish, Russian, Traditional Chinese, Simplified Chinese,Korean, Japanese, Bulgarian, Portuguese.You may search the needed lyrics on the search websites, such as www.google.com,www.baidu.dom.Audio Browse:Please refer to the section 13 of Photo Browse for the correspondingprocedure.Accessories:z Voice Pen:You can use this feature to record voice memo. To use this feature,please follow the procedure:1.Turn on the player, and enter the multimedia main menu.2.Use the right key of the 4-way button and then the OK button toenter the Accessory submenu.3.Press OK to enter the Voice Pen submenu.20
User’s Manual4.Use the right key of the 4-way button to move to the Start icon, andpress the OK button.The recording begins, and the player starts to record the recording timesimultaneously.5.If you want to stop or pause recording, use the left or the right key ofthe 4-way button to move to the Stop/Pause icon, and press OK toconfirm.6.When recording is finished, move to the Exit icon, and press OK toconfirm.z Alarm Clock:This digital camera features an alarm clock. To set the time, pleasefollow the procedure:1. Turn on the player, and enter the multimedia main menu.2. Use the 4-way button and then the OK button to enter the Accessorysubmenu.3. Use the 4-way button and then the OK button to enter the AlarmClock submenu.21
User’s Manual4. You can use the Up or Down key of the 4-way button to selectitems.You can use the Left or the Right key of the 4-way button to set the timeand alarm.5. Press OK to confirm.z Calendar:This feature makes it convenient for you to view the date. To create acalendar, please follow the procedure:1. Turn on the player, and enter the multimedia menu.2. Use the 4-way button and then the OK button to enter the Accessorysubmenu.3. Use the Left or the Right key of the 4-way button to enter theCalendar submenu.4. After you enter the Calendar menu, use the Left or the Right key ofthe 4-way button to adjust the current date.5. Press OK to confirm.z World time:This feature helps you check the current time of different areas. To checkthe time, please follow the procedure:1.Turn on the player, and enter the multimedia menu.22
User’s Manual2.Use the 4-way button and then the OK button to enter the Accessorysubmenu.3.Use the Left or the Right key of the 4-way button to enter the Worldtime menu.4.After you enter the World time menu, use the Right key of the 4-waybutton to enter the menu selection.5.Select the required area, and press OK to confirm. The displayed timeis the current time of this area.Reminder: When you use this feature, please confirm the system time ofthe player first.z Calculator:1.Turn on the player, and enter the multimedia menu.2.Use the 4-way button and then the OK button to enter the Accessorysubmenu.3.Use the Left or the Right key of the 4-way button to enter theCalculator menu.23
User’s Manual4.Use the Left, Right, Up, and Down key of the 4-way button to enternumbers or symbols.5.To finish calculation, move to the sign, and you can get the result.z Currency Exchange:This player uses a set of basic exchange rates to make currencyconversion.(See Appendix 3 for the exchange rate table)1.Turn on the player, and enter the multimedia menu.2.Use the 4-way button and then the OK button to enter the Accessorysubmenu.3.Use the Left or the Right key of the 4-way button to enter theCurrency submenu.4.First, use the Left or the Right key of the 4-way button to set yourbasic currency (usually the local currency).5.Then, use the Down or the Right key of the 4-way button to enter the amount that you need toconvert, and when you finish, press the Left key of the 4-way button to return.6.Now you can use the Down key and the Left or Right key of the4-way button to select the target currency.7.Use the Down key of the 4-way button to get the conversion result.Note: If you enter a value in the second amount field, you can make areverse conversion, and the conversion result is displayed in the first amount field.24
User’s ManualFile Browser:It can display all the files in the folders of this player, which makes itconvenient for you to copy or delete these files.To use this feature, please follow the procedure:Delete:1.Turn on the player, and enter the multimedia menu.2.Use the 4-way button and then the OK button to enter the FileBrowser.3.Use the 4-way button to select the file that you want to delete.4.Press MENU to display the File Management menu.5.Use the Up or the Down key of the 4-way button to select Delete option, and the current file willbe deleted.Copy:1.Turn on the player, and enter the multimedia menu.2.Use the 4-way button and then the OK button to enter the File Browser.3.Use the 4-way button to select the file that you want to copy.4.Press MENU to display the File Management menu.5.Use the Up or the Down key of the 4-way button to select Copy option, and the current file willbe copied.6.Use the Left or the Right key of the 4-way button to select the folder that you want to paste, andpress OK to confirm.7.The previous file will be copied into this folder.Games:This player provides various interesting games, which entertain can youin your leisure time.To select a game, please follow the procedure:1.Turn on the player, and enter the multimedia menu.2.Use the Left or the Right key of the 4-way button and then the OKbutton to enter the Game menu.3.Use the Left or the Right key of the 4-way button to select your game.z Tetris:z OTHELLO:z Moving box:z Puzzle:z Magic beads:z Lottery:4.Press OK to confirm and begin to play the game.(Press the Shutter button at any time to stop the game and return to theprevious menu.)25
User’s ManualSetupz Enable sound effect:Follow the procedure to enable the sound effects:1.Turn on the player, enter the main menu, and press the right key of the4-way button to switch to the Setup menu.2.Press OK to enter, and use the Left or the Right key of the 4-waybutton to switch to the Sound Effects menu.3.Use the Up or the Down key of the 4-way button to select On to enablethe sound effects, or select Off to disable the sound effects.4.Press OK when finished.z Set the USB options (PC- camera):You can use this player as a storage device to transfer photos to PCs, or to download MP3 orMPEG4 video clips from PCs. In addition, you can also use it as a Web camera to attend videoconferences. To set the USB options, please follow the procedure:1.Turn on the player, enter the main menu, and press the right key ofthe 4-way button to switch to the Setup menu.2.Press OK to enter, and use the Left or the Right key of the 4-waybutton to switch to the USB menu.3.Use the Up or the Down key of the 4-way button to select one of thefollowing options:----MSDC----PC-Camera4.Press OK when finished.26
User’s Manualz Set the welcome picture:Follow the procedure to specify the welcome picture shown when theplayer is turned on.1.Turn on the player, and press the left or the right key of the 4-waybutton to switch to the Setup menu.2.Press OK to enter.3.Press the left or the right key of the 4-way button to switch to theWelcome menu.4.Use the Up or the Down key of the 4-way button to select one of thefollowing options:----Auto----Custom picture----Off5.Press OK when finished.z Set the frequency:Use the Frequency menu to set the frequency of the player. This valueshould be the same as the frequency of the power supply at the locationwhere you are using the player. This prevents lights flickering whentaking pictures or video.1.Turn on the player, enter the main menu, and press the right key ofthe 4-way button to switch to the Setup menu.2.Press OK to enter, and use the Left or the Right key of the 4-waybutton to switch to the Frequency menu.3.Use the Up or the Down key of the 4-way button to select one of thefollowing options:----50Hz----60Hz4.Press OK when finished.27
User’s Manualz Set the TV out:You can connect the digital camera to a TV, and use the TV screen toview photos and play video clips.Set the output mode:Before connecting the player to a TV, you need to set the TV outputmode and make sure that it matches your TV. To set the TV output mode,follow the procedure:1.Turn on the player, enter the main menu, and press the right key ofthe 4-way button to switch to the Setup menu.2.Press OK to enter, and use the Left or the Right key of the 4-waybutton to switch to the TV Out menu.3.Use the Up or the Down key of the 4-way button to select the NTSC orPAL option:4.Press OK when finished.zTo view photos and videos on the TV, please follow the procedure:1.Turn on the player, and press the button 3 times to enter the Playback menu.2.Select a photo or video, and press OK to enter.3.Connect the TV out jack on your player to the audio / video input ports on your TV using theAV cable provided. The LCD screen turns off.4.Follow the procedures described in “Reviewing photos or movie clips” on page 13 to play thefiles in your machine.28
User’s Manualz Set the auto power off function:The auto power off function turns off power automatically after aspecified period in order to conserve power. Follow the procedure to setthe auto power off interval.1.Turn on the player, enter the main menu, and press the right key ofthe 4-way button to switch to the Setup menu.2.Press OK to enter, and use the Left or the Right key of the 4-waybutton to switch to the Auto Power Off menu.3.Use the Up or the Down key of the 4-way button to select one of thefollowing options:----1 minute----2 minutes----5 minutes----Never4.Press OK when finished.z Set the date and time:Setting an accurate system time helps you record the shooting duration,and convert the world time correctly.To set the date and time, please follow the procedure:1.Turn on the player, enter the main menu, and press the right key ofthe 4-way button to switch to the Setup menu.2.Press OK to enter, and use the Left or the Right key of the 4-waybutton to switch to the Date and Time submenu.3.Use the Up or the Down key of the 4-way button to select from Dateor Time.4.Press OK to enter.5.Use the 4-way button to adjust the values of date or time.6.When adjustment is finished, press the Left key of the 4-way buttonto return to the submenu.29
User’s Manualz Set the language:To set the menu language, please follow the procedure:1.Turn on the player, enter the main menu, and press the right key ofthe 4-way button to switch to the Setup menu.2.Press OK to enter, and use the Left or the Right key of the 4-waybutton to switch to the Language menu.3.Use the Up or the Down key of the 4-way button to select one of thefollowing ----Traditional Chinese----Simplified uguese4.Press OK when finished.z Restore defaults:Use the Setup menu to restore the player settings to their default valuesas follows:1.Turn on the player, enter the main menu, and press the right key ofthe 4-way button to switch to the Setup menu.2.Press OK to enter, and use the Left or the Right key of the 4-waybutton to switch to the Default menu.3.Press the Up or the Down key of the 4-way button to select Confirmto reset the player, or select Cancel to cancel the operation.4.Press OK when finished.30
User’s Manualz Format the memory:Follow the procedure to format the camera’s memory:1.Turn on the player, enter the main menu, and press the right key ofthe 4-way button to switch to the Setup menu.2.Press OK to enter, and use the Left or the Right key of the 4-waybutton to switch to the Format menu.3.Press the Up or the Down key of the 4-way button to select Confirmto format the player, or select Cancel to cancel the operation.4.Press OK when finished.The camera’s memory is formatted and all the files including theprotected files are deleted.Warning: Formatting memory will cause all files stored in memory to beerased. Make sure you have backed up any files you want to keep.31
User’s ManualChapter 4 Camera ModeWith the 5-megapixel setting of this digital camera, you can easily capture the exciting segments ofyour life. First, you can use the right shortcut key of the player to enter the camera mode directly,which makes it convenient for you to take photos or record videos.Before that, you should understand the LCD icons in the camera mode:Each mode uses different icons to represent settings:Picture Mode:Flash IconResolution Picture QualityPicture Mode IconScene Setting IconThe quantity of remainingpictures in the current memoryZoomCouple shotBattery Status IconCurrent TimeEV Adjustment SettingFocus FrameVideo Mode:DPOF IconCurrent File’s Serial Number /Total Number of FilesResolutionProtect IconVideo ResolutionVideo Mode IconVideo DurationRecording IconZoomBattery Status IconCurrent TimeFocus Frame32
User’s ManualSelect the camera mode:This player has two capture modes: Picture and Video. Use Picture mode to capture still images.Use Video mode to capture video and audio.Use the third mode (Play Mode) to view pictures and videos, and listen to audio.Use the left shortcut key to change modes:CameraModeButtonzPress once to enter the Picture Mode.zPress twice to enter the Video Mode.zPress thrice to enter the Play Mode.z Take pictures1.Turn on the digital camera. Make sure the player is in the Picture mode.2.Frame the picture using the LCD.3.Press the Shutter button.Use the multimedia playback button to adjust the camera’s settingsYou can adjust the player’s settings to take better pictures.z Use the digital zoomThe player has a 8 digital zoom, allowing you to enlarge the subject without moving closer.1.Turn on the player. Make sure the player is in the Picture or Video mode.2.Frame the picture using the LCD.3.Push the Volume button upwards to increase the zoom factor and take a close up picture of thesubject with more detail. Push the Volume button downwards to decrease the zoom factor andtake a wider picture with less detail.4.Press the Shutter button to take the picture.33
User’s Manualz Use the flashThe flash has three settings for different lighting conditions. Press MENU button to enter the menu,and display different flash settings.IconDescriptionFlash automatically as necessaryEnable flashDisable flashz Use the self-timerThe self-timer allows you to take hands-free pictures and videos such asself portraits or group photos.1.Turn on the player. Make sure the player is in the Picture mode.2.Put the camera on a stable surface such as a tripod or table, and thenframe the picture.3.When framing the picture, adjust zoom or flash settings as necessary.4.The self-timer has two delay settings.Press the MENU button to enter the Picture menu. Press the left orthe right key to adjust, and enter the Self-timer menu.Select the required delay-time option, press OK to confirm, andpress the MENU button to return to the Picture Mode.5.Press OK or the Shutter button. The counter begins counting downon the LCD. The LED on the front of the player flashes once asecond to countdown.z Continuous shotsYou can take pictures very quickly one after the other using the Continuous Shots setting. You canuse it to shoot a series of actions for 3 times.1.Turn on the player. Make sure the player is in the Picture mode.2.When framing the picture, adjust zoom or flash settings as necessary.34
User’s Manual3. Use the Down key of the 4-way button to select the Continuous Shots option, and press MENUto return.4.This feature has been set. Press OK to begin continuous shots.zCouple ShotsThis feature enables you to shoot different objects on a single screen.See the following procedure for detail:1. Turn on the player. Make sure the player is in the Picture mode.2. Press MENU, and use the Left or the Right key of the 4-way buttonto enter the Capture Mode menu.3. Use the Down key of the 4-way button to select the Couple Shotsfeature.4. Press MENU to return, and begin shooting.The Couple Shots icon is displayed on
Flash LED Microphone. User's Manual 5 Rear View Side Views: Left Speaker Mode button MP3 button 4-way button Camera Mode button Menu button OK button . Note: SD cards can only be inserted by one direction. If the card does not enter the slot easily, do not force it. Make sure the card is facing the correction direction.