Transcription
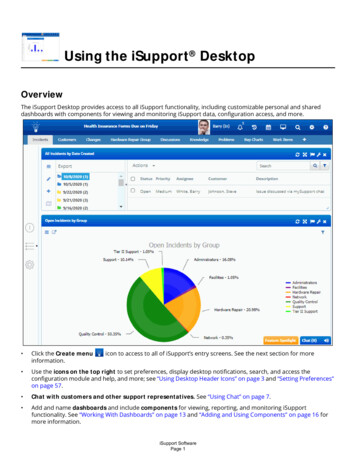
Using the iSupport DesktopOverviewThe iSupport Desktop provides access to all iSupport functionality, including customizable personal and shareddashboards with components for viewing and monitoring iSupport data, configuration access, and more. Click the Create menuinformation.icon to access to all of iSupport’s entry screens. See the next section for more Use the icons on the top right to set preferences, display desktop notifications, search, and access theconfiguration module and help, and more; see “Using Desktop Header Icons” on page 3 and “Setting Preferences”on page 57. Chat with customers and other support representatives. See “Using Chat” on page 7. Add and name dashboards and include components for viewing, reporting, and monitoring iSupportfunctionality. See “Working With Dashboards” on page 13 and “Adding and Using Components” on page 16 formore information.iSupport SoftwarePage 1
Add quick access icons for commonly used actions. See “Configuring the Desktop Quick Access Section” onpage 60. Access Preferences on the Profile menu for setting options for your calendar, notifications, quick access icons,views, signature block, personal rules and correspondence, and more. See “Setting Preferences” on page 57. Administrators can configure the following desktop settings: dashboard element colors, header text, availableDesktop components, and the record types/features involved in global searches performed by all supportrepresentatives. See “Configuring iSupport Desktop Settings” on page 66.Note: Functionality may not appear for support representatives if permissions are enabled in the Configurationmodule.Authentication (Logging In and Out)Methods for authenticating to the iSupport Desktop include: iSupport’s application login. Your user name and password are set up in your Support Representative Profilerecord, and you can change your password via the Preferences option. A Forgot Password link, passwordexpiration after a specified number of days, a previous password check with a specified number of previouspasswords, and minimum password requirements can be configured via the Rep Security screen in theConfiguration module. You can also force a password reset for all support representatives and enter text toappear at the bottom of the login dialog.In the Login dialog, use the Reset button to clear the User Name andPassword fields.Note: The Password field in the Login dialog is case sensitive. Selecting Out will exclude (for routing purposes) asupport representative from all of the groups in which the support representative is assigned. However, it will notprevent assignment if a support representative is the default owner of incidents submitted via a mySupportportal, an incident or change (if enabled) template, or email-submitted incidents. Microsoft Windows-based authentication which enables support representatives to bypass the Loginprompt for accessing the Desktop. It will apply to all support representatives. See “Setting Up MicrosoftWindows-Based Authentication for the Desktop” on page 68 for more information. Single sign on integration. Administrators can use the Options and Tools Integrate Single Sign OnIntegrations screen to enable a third party application (such as Shibboleth and Otka) to pass user credentials sothat a user can sign in to mySupport or the iSupport Desktop with the same credentials that they use to log intoother applications. See “Setting Up Single Sign On Authentication for the Desktop” on page 69 for moreinformation.If you are not using Microsoft Windows-based authentication with iSupport, administrators can use the Optionsand Tools Administer Rep Security configuration screen to enable password security options, enter text for thelogin screen, and configure locks to prevent a support representative who has exceeded a specified number of failedlogin attempts from logging in. See the online help for more information.Using the Create MenuUse the Create menuicon to create work items, start an asset scan or scan comparison, and send a broadcastmessage. Note that if you don’t have permissions to access functionality, its icon will not appear. The Problem,iSupport SoftwarePage 2
Purchase, Product, Change, Service Request, Service Contract, Configuration Item, and Opportunity options onlyappear if you have the Service Desk edition.See “Adding and Using Components” on page 16 for more information.Using Desktop Header IconsUse the icons to the right of the Desktop header to do the following: Click on the Profile icon (your avatar/name/availability) to display a menu containing links for changing youravailability (if enabled in your Support Representative Profile record), accessing preferences, and logging out.Click the Availability option to check in and out for routing of incidents (and problems and changes if enabled).Note that selecting Out will exclude (for routing purposes) you from all of the groups in which you are assigned.However, it will not prevent assignment of incidents if you are the default assignee of incidents/problems/changes submitted via the mySupport portal, an incident or change template, or email-submitted incidents andchanges.Select Preferences to set personal options for using iSupport; see “Setting Preferences” on page 57.iSupport SoftwarePage 3
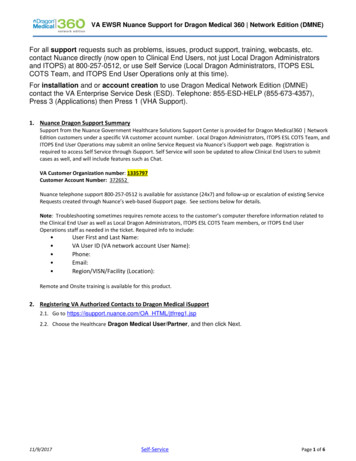
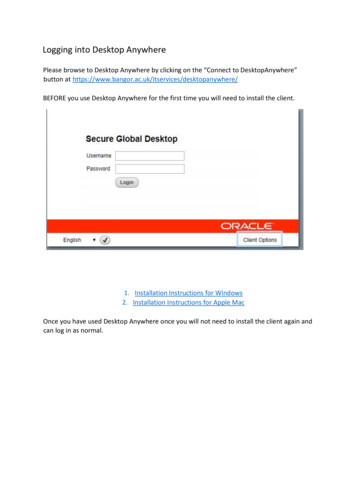
Use the Logout option on the Desktop menu to log off of the Desktop and display the iSupport Login screen. Use the Notification Centericon to display a list of notifications configured via the Rules, Alert Designer, andHeadline screens. Options on the Desktop Notification Center tab in Preferences (accessed by clicking the avatar/login) determine whether or not an entry will appear as a popup or list entry; see “Setting Preferences” on page57. An example of a desktop notification popup is shown below:An example of the dropdown is shown below.iSupport SoftwarePage 4
Use the Recent Itemsicon (next to the Notification Center icon) to access a drop-down list of the ten mostrecently accessed work items of a specified type; use the Showicon to select the type of work item to displayin the list. The Calendarsicon will appear if Microsoft Office Outlook Calendar and/or Google Calendar Integration isenabled; you can select calendars with meetings scheduled via iSupport entry screens for work items.iSupport SoftwarePage 5
Use the Desktop Contenticon to configure and manage views, charts, news feeds, and alerts. See the onlinehelp for more information on all of these options. Use the Searchicon to search iSupport data using keywords and, if searching knowledge, Boolean operators(And, Or, Not as well as parenthesis to group words and phrases). After entering the search text, select the typesof records to search and then click theicon to initiate the search. Google can be included if configured in theGoogle Integration screen.iSupport SoftwarePage 6
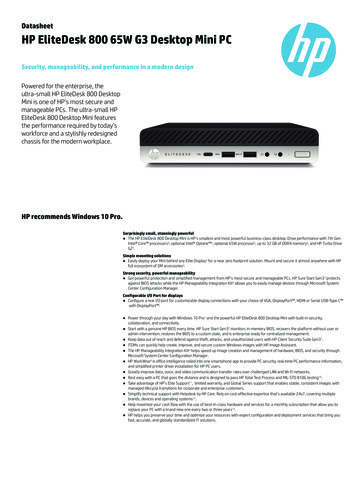
Search results will appear as in the example below. Use the Options link on each tab to select the fields to search,the type of search (Starts With, Contains, Ends With and Is), enable text highlighting, and select the type of view inwhich search results are displayed (list or classic). Use the Configurationicon to access the Configuration module as well as Search, Favorites, Recently Viewed,and Top Viewed configuration screens. Use the HelpDesktop menu to open a menu for accessing iSupport documentation, displaying the iSupportlicense agreement, and checking the version of your iSupport application, and more. the Online Help optionincludes overviews and context-sensitive help topics for iSupport; configuration overview pages contain links tocomprehensive PDFs that cover features by work item type. The help system is installed in the Help/CSHdirectory under the directory in which the Desktop is installed. You can click the Helpicon in entry screens todisplay a comprehensive help topic with information on the functionality in that screen.Using ChatThe Chat feature enables you to communicate with other support representatives and customers via messaging. Youcan use the Options and Settings Customize Chat Themes screen to configure the colors for the fonts andiSupport SoftwarePage 7
elements in the Chat dialogs; see “Customizing Chat Themes” on page 12 for more information. You can enablebrowser-based chat notifications; see “Using Browser-Based Chat Notifications” on page 12.Chatting With Other Support RepresentativesSupport representatives can use the Chat window to send messages to each other; this feature is enabled in theGlobal Settings screen.Support representatives can use the Emojiicon to display a menu of emoticons for use in responses, attach filesvia the Attach Fileicon, include other support representatives via the Add Rep to Chaticon, and search for/add a knowledge entry to the chat via the Add Knowledge Entry to Chaticon.iSupport SoftwarePage 8
You can automatically open a chat when an unavailable support representative becomes available by clicking on theirname; an Open Chat When Available dialog will appear for entering an amount of time in which to automaticallyopen a chat if they become available.Note that administrators can view chats between support representatives via the Options and Tools Administer Rep Chat History screen in the Configuration module. Administrators can exclude a support representative from thislist via setting in the Support Representative Profile screen.Chatting With Customers Using mySupportmySupport chat is enabled in the Feature Basics configuration screen and configured for a mySupport portal via themySupport Portal Options screen. mySupport chat can also be hosted on other web sites; see the online help formore information.A chat request from a mySupport customer will appear to support representatives that are scheduled to be availableto chat (via the Support Representative Group screen); the window will have an Accept Customer Chat Requestbutton and a green header bar. If enabled, a countdown will appear on the button.If the customer selected a support representative group or a support representative is only available in one group,the group name will appear at the top of the chat dialog.iSupport SoftwarePage 9
If multiple groups are selected in the Available Rep Chat Groups field on the Chat tab in the mySupport PortalOptions screen, the customer does not select a group, and the support representative is available in multiple groups,a list of those groups will appear for selection.If automatic incident creation is not configured, icons will be added for adding the chat transcript to an incident.Add chat transcript tohistory of a new incidentAdd chat transcript to historyof an existing incidentIf automatic incident creation is configured, a link will display a the top of the chat dialog, and the configuredinitial response will display to the customer. The Chat Responsesicon will appear for displaying include fieldsand configured responses. (Note that chat responses will overwrite any existing text in the entry area; include fieldswill append values to existing text.) The support representative can add other reps to the chat and view thecustomer’s profilerecord.Automatic incident creation configured viathe Chat tab in the Core Settings Groups Support Representative screenInitial response configured on the Chat tabin the Core Settings Groups SupportRepresentative screenInclude fields for adding the first and fullname from the customer’s profile or initialentry dialog (if not authenticated), as well asthe number and mySupport URL of theincident created when the chat is acceptedChat responses configured in the CoreSettings mySupport Chat ResponsesscreeniSupport SoftwarePage 10
Options for the mySupport Chat WindowAn example of a mySupport chat window is shown below; customers can use emojis and print the chat transcriptwhile a chat is in progress.The dialog that appears when a support representative ends a chat can include configurable text informing that thesupport representative ended the chat, a feedback question, a link to the incident (if applicable), and the option toprint the transcript.Configure this text via the Chat tab in theCore Settings Groups Rep Groups screen.Enable this prompt via the Chat tab in theCore Settings Groups Rep Groups screen.Customize this message via the Feedback tabin the Core Settings Feature Basics Incident Management screen.If a feedback question was included, another dialog will appear with a configured message and space for enteringany comments.Customize this message via theFeedback tab in the Core Settings Feature Basics IncidentManagement screen.iSupport SoftwarePage 11
Using Browser-Based Chat NotificationsYou can enable browser-based notifications for chat requests. When an incoming chat is received, the followingdialog will appear on the operating system desktop; click it to open the chat on the iSupport Desktop.This functionality is available when iSupport is accessed via Microsoft Edge, Mozilla Firefox, Apple Safari, and GoogleChrome (when web site is https); it is not available on Internet Explorer or via a mobile browser.These notifications must be enabled in browser settings, for each type of browser. The first time you enable theoption you will be prompted to allow notifications from the site; select the Allow option. With the feature enabledand notifications allowed, the browser will display a notification each time a new chat arrives. A bell will appear onthe iSupport Desktop chat tab as shown in the example below. Different browsers have slightly different options forhow the notifications are presented and whether or not the notifications time out, but iSupport will attempt to onlysend one popup and it will time out after 10 seconds.Browser-based notifications enabledIf you don't allow the notifications, the bell icon will appear empty on the Chat tab on the Desktop; the next time youclick the bell, you will be informed that you will need to access your browser's notification settings to change theentry for the rep site from Deny to Allow. Note that once you enable notifications for two different types of browsers(for example, Mozilla Firefox and Microsoft Edge), disabling notifications on one browser type will disablenotifications on all browsers.Customizing Chat ThemesUse the Options and Settings Customize Chat Themes screen to configure the colors for the fonts and elements inthe Chat dialogs between support representatives and support representatives and customers on the Desktop.iSupport SoftwarePage 12
Click on a dropdown to display a color picker for the applicable elements; the selected color will appear for theaffected elements in the example on the right. Hover over the field label (for example, Color) for a description of theaffected elements. Select the No Coloricon to reset a field to iSupport's default color; use the Reset Defaultsbutton at the bottom of the screen to set all fields back to iSupport's default colors.Working With DashboardsDashboards are tabbed spaces on the Desktop that you can label and add components to. Access to dashboards canbe personal or shared; a personal dashboard can be accessed by only the support representative who created it andothers with configured permissions, and an existing shared dashboard can be added by other supportrepresentatives. Configured permissions will determine whether you can create, edit, and delete a personal orshared dashboard. Restricted access can be configured; see “Setting Dashboard Access” on page 15.iSupport SoftwarePage 13
Use the Add Dashboardicon to add a personal or shared dashboard, or an existing dashboard, to the Desktop.In the Create Dashboard dialog, enter a name for the dashboard and, if applicable, select Yes in the ResponsiveComponents field to enable component widths to automatically adjust and display complete component frames.Horizontal scroll bars will be added to the content within each component frame when needed.A Dashboard Designer will appear; it includes options with predesigned dashboards and component layouts.Right-click on a dashboard tab to display a menu of dashboard options.If you have added or created a shared dashboard, it will be locked by default to prevent anyone from editing it.Select Unlock Editing on the Dashboard Options menu to make changes; the dashboard will reload for anyone elseusing it after an edit is made.iSupport SoftwarePage 14
The Lock Editing and Add Component options will appear in the menu after a dashboard is unlocked.Setting Dashboard AccessTheAccess option on the right-click Dashboard Options menu enables you to specify the individual supportrepresentative(s) or group(s) that can access the dashboard.To make the dashboard available for other support representatives to add to their Desktops via the Add Existingdashboard menu option, select Shared. Under Restrict: To make the dashboard available only to specified groups, place your cursor in the Add Rep Group field andselect the group(s). To make the dashboard available only to selected support representatives, place your cursor in the Add Rep fieldand select the support representative(s).Use the Desktop/Dashboards tab in the Rep Groups screen in Configuration to display the dashboards associatedwith a group.Other ways to control dashboard content: To add, delete, and rename dashboards, control dashboard access, and automatically include dashboards on theDesktop of support representatives, use settings on the Dashboards tab in the Alert and Dashboard Manager(accessed via the Desktop Content menu). To automatically add a dashboard to the Desktops of specifiedsupport representatives, click the Personal or Shared link in the Access column, select the supportrepresentatives, and click the Save and Push button. To push shared dashboards associated with a group specified as primary to the Desktop of a supportrepresentative, add the primary group via the Groups tab in the Support Representative Profile screen. You willhave the option to push the dashboards when you save the record. Use the Permissions screen to allow or disallow a support representative to create, edit, or delete a personal orshared dashboard, view, chart, and alert on the Desktop. Access this screen via the Desktop Content tab in theSupport Representatives Roles Permissions and Groups Support Representative Details AssociatedRoles screens.iSupport SoftwarePage 15
Note: The update and refresh of Awareness and Chat functionality, as well as Desktop components, can apply toonly four open pages at one time. The message “Awareness and chat not available” or “Auto refresh and chat notavailable” will appear if this is exceeded. These limitations do not apply if you are using Windows Server 2012 withWebSockets enabled and the current version of iSupport’s supported browsers.Adding and Using ComponentsComponents are small frames that are placed on a dashboard for viewing, reporting, and monitoring iSupportfunctionality. Display available components by selecting Unlock Editing and then Add Component on the right-clickDashboard Options menu. Drag the desired component onto the dashboard. When finished, click theicon at thebottom of the dialog.Use the Options and Tools Customize Dashboard Settings configuration screen to allow and disallow componentavailability, and the Core Settings Groups screen to specify available components for members of supportrepresentative groups. Note that the Mass Mailing Manager will not appear on the component menu until enabled inthe Mass Mailings configuration screen, and some component functionality is dependent on settings in a supportrepresentative's profile. For example, the Rep Manager component will not appear to a support representative thatdoes not have the Rep Manager permission enabled in their profile.Component Functions Resize components via the bottom and right-side borders; you can drag the lower right corner to move bothborders at once. Use the Maximizeicon to display only the component on the dashboard, covering it. The Minimizewill appear for you to redisplay the component in a smaller size along with all the other components. Use the Refreshicon to redisplay the most current data (iSupport data does not refresh automatically whenitems are created, changed, or deleted.) The Alerticon will appear for the Chart and View components for creating alerts that will appear in a dialogwhen a view field reaches a certain threshold.iSupport SoftwarePage 16icon
Use the Configureicon to display options for the component such as enabling and naming the header andenabling/disabling the border.The Auto option will refresh automatically when new data is available; the timed interval refresh option willrefresh at the rate entered in the Refresh Rate field.If you disable the header, use the Show Toolbarincluded for moving the component.icon to display component icons. The Moveicon will beAsset MonitorUse the Asset Monitor component to display results of monitoring configured in a scheduled scan and monitoringdefinition, including the state of devices and their CPU, memory, disk space, and services.When you add the Asset Monitorcomponent to a dashboard, an Add Monitored Devices link will appear for youto select the devices to appear in the component. Select the devices in the Host column and then click the AddSelected Devices link.The state of monitored items and devices will be indicated by green, red, yellow, and gray dots; you can displaydetails in a tooltip by hovering over the item or device name.iSupport SoftwarePage 17
A green dot will indicate that all monitoring settings in the Asset Inventory Scan and Monitoring Definition areconfigured correctly, the Asset Inventory Scan and Monitoring agent is working correctly, and the item or device isdetected by monitoring and meeting configured thresholds. A yellow dot will appear if, after everything has been working correctly as described above, the iSupport AssetInventory Scan and Monitoring agent or iSupport Agent Manager service has stopped or has been disabled.iSupport SoftwarePage 18
A gray dot will appear for a monitored item or device on which the WMI listeners cannot be started (for example,if an error occurred with permissions). A red dot will appear if, after everything has been working correctly, a problem occurs with the item or devicebeing monitored such as a service stoppage or a configured threshold that is not met (if any of the configuredreporting thresholds are met (a monitored device is off-line or has high memory or CPU utilization, a monitoreddrive has disk space lower than the specified percentage, or a monitored service has a stopped state). Click theShow Details link in the tooltip to display a chart of the occurrences at which a configured threshold wasexceeded and other details.iSupport SoftwarePage 19
The Show Details link will appear in the tooltip if a configured threshold was exceeded; click it to display a chart of theoccurrences at which a configured threshold was exceeded and other details:BadgesThe Badgescomponent displays a configurable icon with a count of a view field value. You can click on the iconto display the view. To configure the Badge component, start by dragging the Badge component icon to a dashboard.A larger New Badge icon will appear; click the gearicon to configure the icon and criteria for the count.CalendarThe Calendar component displays:A Google calendar or Microsoft Outlook calendar configured in the Calendar Integration screen. Note that youwill need to use the fields on the Details tab in the Preferences dialog (accessed via the Desktop menu) to enableiSupport SoftwarePage 20
access to your calendar(s) and set the work day hours during which you are available to be scheduled viaiSupport. An event calendar configured in the Event Calendar screen. Event calendars can be used for supportrepresentatives and customers to create and view meetings and submit an RSVP (if configured).iSupport SoftwarePage 21
Support representatives with edit access can double-click on a meeting to display and modify event details. Amaximum number of attendees can be set for a meeting; the RSVP button will appear if enabled and themaximum number of attendees has not been reached.Event details will appear as shown below to support representatives with no edit access:iSupport SoftwarePage 22
A scheduled change calendar (Service Desk Edition).ChartUse the Chart or Gaugecomponent to display all types of charts configured via the Chart Designer and WorkItem Chart Designer. Select charts via the component configurationdialog. Access can be restricted to specifiedsupport representatives, customers, and/or groups.Use the Export As Imageicon to export a chart as a .png file. The image size will be set based upon the size/resolution of the frame in which the icon was clicked.To remove an item in the chart, click on the item label in the chart legend (if configured).Click the Advanced Searchicon to set criteria for filtering data in a chart. Use the Match All/Any field to specifywhether you want every field comparison method value search condition to be met, or any configuredcondition to be met. Use the Add Conditionand Remove Conditionicons to display and remove a field comparison method value search condition. Click the Add Conditionicon if you wish to include anothercondition. You can use the Add Condition Groupicon to put a set of search conditions to be evaluated together iniSupport SoftwarePage 23
a group. Click the Save button to enter a name for the search and save it. The Saved Searcheshover over it to display saved searches.icon will display;If Opportunity functionality is enabled, you can display funnel-type charts by selecting Funnel in the Chart Type fieldin the component configuration dialog.CI Relationship ViewerThe CI Relationship Viewercomponent graphically displays the configuration items related to a specifiedconfiguration item. You can click on a configuration item name to open a record and reposition by dragging icons.Use the options in the Control Panel to display different depth levels, select the types of configuration items todisplay, and zoom.Cloud MonitorIf you use Amazon Web Services (AWS) to host your iSupport instance, you can view billing details in the CostAllocation Report via the Cloud Monitorcomponent. The component will display the current month's billingdetails for the resources that match a configured instance tag. All charges related to the instance (including EC2, EBS,iSupport SoftwarePage 24
Data I\O) will appear, including billing details for the past month. Use the Options and Tools Integrate CloudIntegration screen to configure the report.Embedded ContentUse the Embedded Contentcomponent to display HTML content such as a web site or YouTube video.To configure this component, paste the URL for the content into the Source URL field.FacebookThe Facebookcomponent displays a Facebook activity feed for a specified web site. To configure thiscomponent, enable Facebook Integration via the Facebook tab in the Social Media Integration Configuration screeniSupport SoftwarePage 25
and then use the component configuration dialog to enter the web site (example: www.apple.com) in the FacebookDomain field.Facebook MonitorThe Facebook Monitorcomponent monitors a Facebook page and displays posts and comments from it. Youcan create an incident from a listed post or reply.If the customer’s Facebook email address exists for a customer in Customer Profiles, the matching Customer Profilerecord will be used; otherwise, a new Customer Profile record will be created with the customer’s email address inthe format of Facebook username @facebook.com. A reply will be posted to Facebook with the incident number anda link to the incident; if the Facebook application doesn’t have permission to do this, an email will be sent to thecustomer’s Facebook email account.This component requires that a Facebook application is configured and made available to the Desktop via SocialMedia Integration Configuration screen. Enter the page username (which is included in the Facebook page URL) inthe Monitor Page field in the component configurationdialog. The following will appear; click to log in viaFacebook and grant access to your public profile and friend list. Access to your public profile is required. Click theicon to revoke access.iSupport SoftwarePage 26
Global SearchThe Global Searchcomponent displays a dialog for searching iSupport data using keywords and, if searchingknowledge, Boolean operators (And, Or, Not as well as parenthesis to group words and phrases). Select the recordtypes/features to search via the Entity Types field in the component configurationdialog; available record types/features are specified in the Dashboard Settings and Rep Groups screens in configuration. Use the Options link oneach tab to select the fields to search, the type of search (Starts With, Contains, Ends With and Is), enable texthighlighting, and select the type of view in which search results are displayed (list or classic).LeaderboardUse the Leaderboardcomponent to create contests with configurable award levels, action-based point values,and badges (icons) to display when an award level is reached. Points can be awarded manually or assignedautomatically based on completion of an iSupport action. Note that the dates in the From and To fields are for displayfiltering only; these fields do not affect point accumulation.The Create New Leaderboardicon will display next to the leaderboard dropdown for support representatives withRep Manager Administrator access. The Add or Subtract Pointsicon will display next to participant names for anyiSupport SoftwarePage 27
support representative designated as a Leaderboard Manager in the Leaderboard component configuration; thisenables the support repres
The iSupport Desktop provides access to all iSupport functionality, including customizable personal and shared dashboards with components for viewing and monitoring iSupport data, configuration access, and more. Click the . Create menu. icon to access to all of iSupport's entry screens. See the next section for more