Transcription
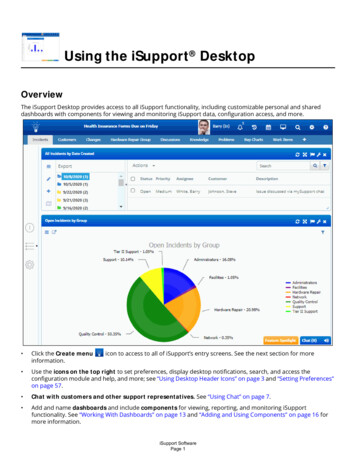
Configuring iSupport Email FunctionalityiSupport’s email functionality includes: Default outbound settings for defining the reply-to address, server, and account settings for all notificationsgenerated by iSupport when no applicable rule or email processing applies. See “Configuring Default OutboundSettings” on page 1. Email-submitted incident and change processing functionality that uses the Email Processing agent toretrieve entries from an email mailbox, create an incident or change for a new or existing customer, and updateexisting work items. You can configure incident, problem, change, customer, and opportunity rules that canperform additional actions such as sending notifications, changing field values, and more. See “Configuring EmailAccounts and Processing” on page 4. Default and custom notifications for iSupport events that are sent by: For iSupport’s Asset, CMDB, Alert, Discussion Digest, and View Subscription functionality, notifications are sentvia agents configured in the Options and Tools Administer Agents screen. For modules with rule-based functionality (Customer, Incident, Email, Knowledge, Discussion Post, Problem,Change, Opportunity, Purchasing), notifications are sent via rules that will perform actions when specifiedconditions are met.See “Customizing and Viewing Event Notification Content” on page 22 for more information. Design templates with elements (text and images) to appear around email body text. See “Configuring DesignTemplates” on page 24. Correspondence templates for reps to use in iSupport entry screens and on the Desktop. See “ConfiguringCorrespondence Templates” on page 18. View subscriptions that send an email with an attached file of exported view data to configured recipients on aschedule. See “Viewing and Creating View Subscriptions” on page 17. Require mass mailing approvals on correspondence sent from a customer view. See “Configuring Mass Mailing/Approvals” on page 25. Display a notification queue and delete any notifications that have not been sent. See “Displaying theNotification Queue” on page 26.Configuring Default Outbound SettingsYour default outbound email server settings may have been set through the Initial Setup Utility that appears afteriSupport is installed and accessed for the first time. Use the Core Settings Email Default Outbound Email Settingsscreen to define the reply-to address, server, and account settings for all notifications generated by iSupport whenno applicable rule or email processing applies.Email Notification Reply-to Address - Enter the address to be included in the Reply To field for notificationsgenerated by iSupport. Format the email address according to the following example: support@iSupport.comiSupport SoftwarePage 1
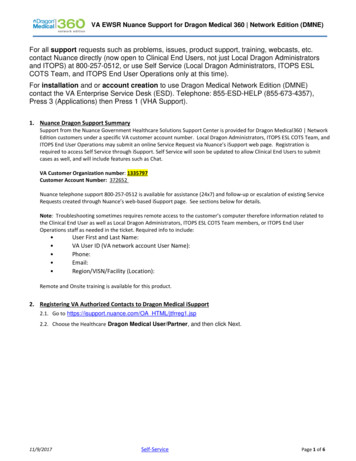
Use EWS - Select Yes to use Microsoft Exchange Web Server (EWS) for outbound email from iSupport.Exchange Server - enter the name or IP of the Microsoft Exchange server to be used for outbound notifications sentby iSupport.Exchange User Account Name/Password - Enter the user name and password for iSupport to use for connecting tothe Exchange server for sending outbound notifications.Use Local SMTP Server - Do the following:iSupport SoftwarePage 2
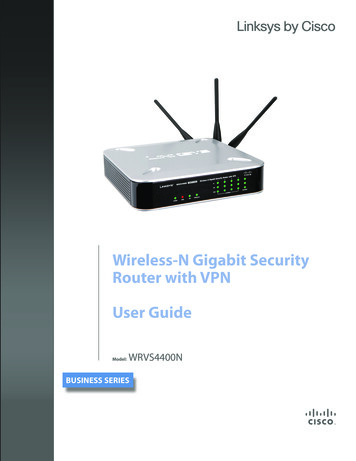
Select No if a server that is different from the local server on which iSupport is installed will be used foroutbound mail or if using Microsoft Exchange and a receive connector cannot be created. Select Yes to use the local SMTP server for outbound email notifications sent by iSupport.If you are using Microsoft Exchange, you will have to set up a Microsoft Exchange receive connector for theassociated port and IP address for the sending server. Receive connectors represent a logical gateway throughwhich all inbound messages are received. Receive connectors are configured on a per-server basis, and theycontrol how the Exchange server receives messages from the Internet, email clients, and other messagingservers. Contact your Microsoft Exchange administrator to add the receive connector.Do the following to enable SMTP in the local IIS installation:a On the server on which iSupport is installed, select Start Programs Administrative Tools Internet ServicesManager.bDouble-click the SMTP Email feature icon in the features view and add the Reply to address in the E-MailAddress field.cSelect the Deliver E-mail to SMTP: Server option and enter the SMTP server FQDN or IP in the SMTP Serverfield. In the Port field, enter the port number used in your network for SMTP. The default port for SMTP is 25.dSelect the appropriate authentication method for your SMTP server.eClick the Apply action in the Actions menu.Email Server - enter the name or IP of the server to be used for outbound mail sent by iSupport.Email Port Number - The default outbound mail port number is usually 25, but this number will changedepending on your selection in the Outbound Server Connection Encryption Type field. Verify that the number iscorrect and change it if necessary.iSupport SoftwarePage 3
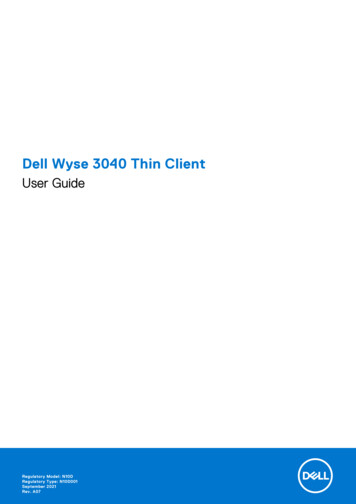
Use SMTP Authentication - If you’ll be using a server that is different from the local server on which iSupport isinstalled for outbound email, select Yes to pass a user name and password to the outbound mail server.User Name/Password - Enter the login to authenticate against the server for accessing the outbound emailaccount.Connection Encryption Type - Select the encryption type for the outbound server, if any: Transport LayerSecurity (TLS) or Secure Socket Layer (SSL). The default in the Outbound Mail Port Number field will changedepending on your selection; verify that the number is correct and change it if necessary.Default Design Template - Design templates include elements (text and images) to appear around the body of thecorrespondence template and support representative signature (if applicable). Select the design template to apply tooutbound email by default (if one associated with a correspondence template or custom notification isn’t in effect).Use the Create Newand View/Editicons to access the Design Template screen. See “Configuring DesignTemplates” on page 24 for more information.Configuring Email Accounts and ProcessingiSupport’s email-submitted incident and change processing functionality uses the Email Processing agent to retrieveentries from an email mailbox, create an incident or change for a new or existing customer, and update existing workitems. You can configure incident, problem, change, customer, and opportunity rules that can perform additionalactions such as sending notifications, changing field values, and more.When the Email Processing agent runs, the following occurs if the inbound email address matches the email accountuser name: If the email cannot be parsed, the action specified in the Unparseable Email Action field on the Email Processingtab will be performed. If updates are enabled, the subject and body of the incoming email is searched for an existing messageID, customer reference ID, or 10-character incident, problem, change, or purchase number. If an existingnumber exists, matching work items are updated by including a notation in the Audit History field with acorrespondence link to view the email and any attachments. Configured rules for the applicable work item typewill perform actions if conditions are met. Note that email rules do not apply to work items updated via emailprocessing. If no matching message ID, customer reference ID, or incident, problem, change, or purchase numberexists or updates are not enabled, an incident will be created. Email rules in the rule group associated withthe email account will evaluate and apply any actions that correspond to met conditions. Email rule actions canapply an incident or hierarchy template, create a change with a defined template, update the history in aCustomer Profile record, and delete or forward the incoming email. If an incident or hierarchy template is notapplied in a rule, settings on the Inbound Settings/Email Processing tab in the Email Accounts screen will applyand the subject line and body of the email are placed in the Description field. (However, the subject line text willbe included in the Short Description field if it is enabled in the Incident Basics screen. On a Change record, thesubject line text will be included in the Reason field.)If the sender does not have an email address that exists in a Customer Profile record, a new Customer Profilerecord will be created for the email address. Any configured incident and change rules will then evaluate andperform actions (such as sending notifications) if conditions are met.To configure iSupport’s email processing: Use the Accounts tab in the Core Settings Email screen to set up an incoming email account and define theincoming email server and protocol, primary email account, rule group, and associated defaults to be applied toiSupport SoftwarePage 4
incidents and/or changes created from email sent to that account. You can also enable updates and definesettings for outbound replies. See “Configuring Account Details” on page 6. Use the Options and Tools Automate Rules screen to configure email rules that will execute if updates arenot enabled or no matching work item number exists; in order for a rule to evaluate, it must be included in a rulegroup associated with an active email account. Use the Options and Tools Automate Rule Groups screen tocreate email rule groups. See “Configuring Email Rules and Rule Groups” on page 12.Email rule conditions operate on email fields; you can configure conditions that detect a specified word (such as"Undeliverable") or whether the email is sent from a customer. Email rule actions can create an incident orchange with a specified template, delete or forward the incoming email, or only update the history of a CustomerProfile record (instead of creating an incident or change) if specified conditions are met. If applicable, use the Incident, Problem, Change, Customer, and Opportunity Rules screens to configurerules that will perform actions such as sending notifications when a work item is created or updated. You canalso configure rules that will set the email account. Note that if conditions are met, rules will perform actions inthe order specified in the Rule Group screen.You can configure work item rules with the events work item type Created via Email and work item type Updated via Email for use with email processing. Use the Core Settings Email Default Outbound Email Settings screen to configure the reply-to addressand local SMTP server for notifications generated by iSupport when no applicable rule or email processingapplies. See “Configuring Default Outbound Settings” on page 1. Click the Email Processing Agent button in the Email Accounts list screen to schedule the Email Processingagent, which executes the search of incoming email and updates work items or creates incidents and changes asconfigured. You’ll select the number of minutes in the interval for the Email Processing agent to search the emailmailbox for new messages or select Disabled to disable email processing.Notes: Important: In order to avoid an email loop, be sure to consider the impact of automatic response notifications.The email account user name and aliases should not be the same as the email notification reply-to address in theDefault Outbound Email Settings screen, and the iSupport Application Account must have Modify permissions. For updates, only 10-character strings are considered as valid numbers; therefore, if an incident, problem,change, or purchase request number in an incoming email contains a special character (such as #,/:;!" or ?), thenumber will be ignored because it counts as 11 characters. This also includes HTML markup such as bold tags. Aspace must exist before and after the number. In an HTML-type incoming email, the incident, problem, change, or purchase request number must be in theSubject line. Try to ensure that each customer has a name set up in his/her email application. A name may not be included onan email-submitted incident or change if the customer does not have a profile record and does not have a nameset up in his/her email application. On an email-processed incident, problem, or change update, if there are names in the CC or TO field (other thanthe mail-in name) and Others to Notify is enabled, those names may be added to the Others to Notify list for theincident, problem, or change if there is a matching Customer Profile. See “Configuring Inbound Settings” on page8 for information on this configurable option.iSupport SoftwarePage 5
If an inbound email rule uses an auto-close incident template and a required custom field does not have adefault value, the required custom field will not have a value in the closed incident. If a template is applied because of a rule and the assignee cannot be determined from the template, the routingmethod specified on the Inbound Settings Email Processing tab in the Email Accounts screen will be used. Ifnone is specified, the assignee specified in Default Email Owner field in that screen will be used. For information on iSupport’s email processing validation functionality, see “iSupport Email Validation” on page17.Configuring Inbound SettingsUse the Inbound Settings tab in the Email Accounts screen to set up an incoming email account and define theincoming email server, protocol, rule group, and associated defaults to be applied to incidents and/or changescreated from email sent to that account.Configuring Account DetailsUse the Account Details tab to set up an incoming email account and define the incoming email server, protocol, andaccess information.Name - Enter a name for the inbound email account.Account is Set to Active - Select Yes to enable the account to process incoming email according to the schedule ofthe Email Processing agent.Email Server Access Protocol - Select the type of access protocol used by your mail server: POP3 (Post OfficeProtocol), IMAP4 (Internet Message Access Protocol), or Exchange WebServices (EWS).Use SSL Connection - This field appears if using POP3 or IMAP4. SSL is an encryption method that overlays theconnection between the iSupport server and the mail server. Select Yes if SSL encryption is enabled on the incomingmail server. The default port number in the Incoming Mail Server Port Number field will change because SSL uses adifferent default port; verify that the assigned port is correct and change if necessary.iSupport SoftwarePage 6
Incoming Email Server - Enter the host name of the server from which the email processing agent will retrievemessages. If using Exchange EWS, enter the path to the server (for example, https://example.com).Email Account User Name/Password - Enter the name and password to be used by the Email Processing agent tolog in to the server containing the email.Note: The inbound email account for processing email must be isolated and not viewed. Any email that has beenread or set back to unread will be skipped during the conversion process. If permitted by the email application, markthe inbound email account used for processing email as text only.Incoming Email Server Port Number - This field appears if using POP3 or IMAP4. Enter the port number used toaccess the server containing the email. (For POP3, this number is typically 110. For Secure POP3 (SSL-POP), thisnumber is typically port 995. For IMAP4, this number is typically 143.)Incoming Email Server Connection Timeout - This field appears if using POP3 or IMAP4. Enter the number ofminutes for iSupport to wait for a response from the incoming mail server when connecting, requesting or deletingemail, or disconnecting.(Optional) Test Email Settings/View Inbox - Click the View Inbox link to display email processing errors and anyemail that has not been processed.iSupport SoftwarePage 7
Configuring Inbound SettingsUse the Inbound Settings tab to configure the defaults to be applied to incidents and/or changes created from emailsent to the inbound account, and enable updates applied to incidents, changes, problems, and purchase requests.Default Assignee - Select the support representative to be assigned email-submitted incidents and/or changes. Anyassignee specified on an associated template (for a rule) will override this email owner. If a load balanced or roundrobin routing method is specified as well, incidents and/or changes will be assigned to this support representative ifnone are available for routing. You can click the Create Newor View/Editicons to access the Rep Profilescreen.Route Method - Routing options are enabled in the Feature Basics screen. Select one of the following: None Load Balanced to assign email-submitted incidents and/or changes based on current open statistics, includingweights based on priority. Round Robin to assign email-submitted incidents and/or changes based on current open statistics, includingweights based on priority. By Name to assign to the available support representative with the lightest workload. By Group to assign to the available support representative with the lightest workload within a group. By Location to assign to the available support representative with the lightest workload within a location.If there is no support representative available for a selected method, the incident and/or change will be assigned tothe support representative specified in the Default Email Owner field. Note that any route method specified on anassociated template (for a rule) will override this route method.iSupport SoftwarePage 8
Rule Group - Select the rule group containing the rules to evaluate when the Email Processing agent runs andprocesses incoming email. If you select default for a rule group, and none is selected for an email account, thedefault rule group will be used.Use HTML from Email Body in Description - Select Yes to enable HTML to be input and rendered by users in thebody of an incoming email; attached images will display directly in the Description field. If No is selected in this field,attached images on incoming email will be rendered as attachments on the associated correspondence entry. Checkyour corporate security practices regarding the ability of users to input and render HTML in web applications.Include "EMAIL SUBJECT" in Description - Select Yes to include the text "EMAIL SUBJECT" before the email subjecttext that will be included in the incident description. For example, if "Cannot connect to network" is the subject of theemail, the following will be included in the incident description: EMAIL SUBJECT: Cannot connect to networkThe subject line text will be included in the Short Description field if it is enabled in the Incident Basics screen. On aChange record, the subject line text will be included in the Reason field.Include "EMAIL BODY" in Description - Select Yes to include the text "EMAIL BODY" before the email body text thatwill be included in the incident and change description. For example, if "I have not been able to access the accountingapplication." is the body of the email, the following will be included in the description: EMAIL BODY: I have not beenable to access the accounting application.Default Status - Select the status to be assigned to email-submitted incidents and/or changes. Any status specifiedon an associated template (for a rule) will override this status. Only Open type statuses are available in this field. Youcan click the Create Newor View/Editicons to access the Options and Tools Customize Custom StatusLabels screen.Default Priority - This field appears if Impact Urgency Mapping is not enabled. Select the priority to be assigned toemail-submitted incidents and/or changes. Note that any priority specified on an associated template (for a rule) willoverride this priority.Default Mapping - This field appears if Impact Urgency Mapping is enabled in the Feature Basics screen. Click thislink to select the Impact, Urgency, and Priority to assign to the Impact, Urgency, and Priority fields on emailsubmitted incidents. Note that any mapping specified on an associated template (for a rule) will override this status.Attach Alternate Version to Correspondence - Select Yes to save any alternate version of the body of an email(created by the email application) as a document and placed on the Attachments tab of the correspondence.Enable mySupport Access for Auto-Created Customer Records From Email - A Customer Profile record is createdwhen a customer sends an email-submitted incident from an address that does not already exist in CustomerProfiles. Select this checkbox to enable the Approved to Access field by default when a Customer Profile record iscreated in this manner.Append Additional Email Addresses to Others to Notify - Select Yes to enable the addition of any names in the CCor TO field (other than the mail-in name) of an email-submitted incident or change to the Others to Notify list for theincident if there is a matching Customer Profile. Only the CC field will be evaluated on an update.Unparseable Email Action - Select the action to occur when an incoming email cannot be parsed: delete the email,forward the email to a specified address, or take no action. Note that if Take No Action is selected, an error willdisplay in the event log every time the agent runs for this email.iSupport SoftwarePage 9
Enabling UpdatesUpdate Incident/Change/Problem/Opportunity/Purchase Record if Existing Reference Included in EmailSelect Yes to enable a search for an existing message ID or 10-character work item number for the applicable workitem type when the Email Processing agent runs. If a match exists, the matching work item will be updated byincluding a notation in the Audit History field with a correspondence link to view the email and any attachments.Note that a space must be included before and after the work item number in order for the record to be updated.You can configure further actions to occur via the Rules screen in the applicable configuration module; you canconfigure work item rules that include conditions with the event work item Updated via Email for use with emailprocessing or email rules with the event Email Does Not Include iSupport Reference for use with email processing.Select No to perform defined email processing on the record. Email rules in the rule group associated with the emailaccount will evaluate and apply any actions that correspond to met conditions; email rule actions can delete orforward the incoming email, as well as create an incident or change with a defined template. If a template is notdefined, an incident will be created according to the settings on the Inbound Settings/Email Processing tab and thesubject line and body of the email will be placed in the Description field. If the Short Description field is enabled, thesubject line will be placed in the Short Description field. If the sender does not have an email address that exists in aCustomer Profile record, a new Customer Profile record will be created for the email address. Any configured workitem rules will also evaluate and perform actions such as sending notifications if conditions are met.Update Customer Record If Existing Reference Included in Email - A reference ID is included on correspondencesent from a Customer Profile record; select Yes to perform a search for a matching reference ID or message ID whenthe Email Processing agent runs. If a match exists, the History field in the Customer Profile record will be updatedwith a reference to the reply, and no new incident will be created. You can configure email rules with the event EmailDoes Not Include iSupport Reference and send a notification if applicable.Select No to create a new incident. Email rules in the rule group associated with the email account will evaluate andapply any actions that correspond to met conditions; email rule actions can delete or forward the incoming email, aswell as create an incident or change with a defined template. If a template is not defined, the incident will be createdaccording to the settings on the Inbound Settings/Email Processing tab and the subject line and body of the email areplaced in the Description field. If the Short Description field is enabled, the subject line will be placed in the ShortDescription field. If the sender does not have an email address that exists in a Customer Profile record, a newCustomer Profile record will be created for the email address. Any configured work item rules will also evaluate andperform actions such as sending notifications if conditions are met.iSupport SoftwarePage 10
Configuring Outbound Settings for an Email AccountUse the Outbound Settings tab to define the reply-to address, server, and account settings for iSupport eventnotifications for an email account.Email Notification Reply-to Address - Enter the address to be included in the Reply To field for all notificationsgenerated by iSupport for this inbound account. Format the email address according to the following example:support@example.localDefault Design Template - Design templates include elements (text and images) to appear around the body of thecorrespondence template and support representative signature (if applicable). Select the design template to apply tooutbound email by default (if one associated with a correspondence template or custom notification isn’t in effect).Use the Create Newand View/Editicons to access the Design Template screen. See “Configuring DesignTemplates” on page 24 for more information.Use Default Outbound Mail Settings - Select Yes to use the settings defined in the Core Settings Email DefaultOutbound Email Settings screen for outbound email from this account.Use Local SMTP Server/Outbound Email Server/Outbound Email Port Number - Select: Yes to use the local SMTP server for outbound email notifications sent by iSupport for this inbound account. No to use a server that is different from the local server on which iSupport is installed for outbound mail. Then, inthe Outbound Mail Server field, enter the name of the server to be used for outbound mail sent by iSupport forthis inbound account.Regardless of your selection in this field, you’ll need to set up your system to relay email. Use the following steps ifyou are using IIS:1. On the server on which the mail application is installed, select Start Programs Administrative Tools InternetServices Manager.2. Right-click on Default SMTP Virtual Server and select Properties. On the Access tab, click the Relay button in theRelay Restrictions section.3. Use the Relay Restrictions dialog to ensure that the server on which iSupport is installed is allowed to relay email.iSupport SoftwarePage 11
Use SMTP Authentication/Outbound Email Account User Name/Password/Outbound Server ConnectionEncryption Type - The Use SMTP Authentication field appears if No is selected in the Use Local SMTP Server field(you’ll be using a server that is different than the local server on which iSupport is installed for outbound email).Select Yes if you need to pass a user name and password to the outbound mail server.In the Outbound Email Account User Name and Password fields, enter the login to authenticate against the serverfor accessing the outbound email account.In the Outbound Server Connection Encryption Type field, if the server used for outbound email has anauthentication certificate for secure communication, select the type: Transport Layer Security (TLS) or Secure SocketLayer (SSL). The default in the Outbound Mail Port Number field will change depending on your selection; verify thatthe number is correct and change it if necessary.Configuring Email Rules and Rule GroupsUse the Email Rules screen to configure custom rules that will be applied to all incoming email (except those thatcontain an existing incident number in the subject or body of the email), and delete, forward, or create an incident orchange with an applied template if the rule conditions are met. You can also post Correspondence data to a webapplication using email rules.Conditions are applied on the To, CC, From, Subject, and Body fields in incoming email. Each rule can contain multipleconditions; these conditions can be individual in nature (using an AND logic operator) or grouped together (using theOR logic operator).In order for a rule to evaluate, it must be included in a rule group; rule groups are associated with email accounts. Adefault email rule group will be included in iSupport on installation or upgrade; upgrades to version will convertpreviously configured email rules and place them in the default email rule group. Use the Options and Tools Automate Rule Groups screen to create new rule groups; see “Creating Rule Groups” on page 16 for moreinformation.iSupport SoftwarePage 12
Configuring Rule ConditionsUse the first Match All/Any of the Following Conditions field to specify whether you want every configuredcondition in this rule to be met, or any configured condition in this rule to be met.In the first dropdown, select the email field (To, CC, From, Subject, and Body) or event (Email Does Not ContainiSupport Reference) on which the comparison method and value should be applied.The Email Does Not Contain iSupport Reference event condition refers to iSupport’s unique reference to the record,including an existing message ID, 10-character work item number, or customer guid; this reference is used in emailupdates.In the next dropdown, select the comparison method. Contains returns a true result if the value is included in the email field but other characters are included in thefield as well; the value can be embedded in a word. Is returns a true result if the value is the only set of characters included in the email field.Finally, enter the value to be used with the comparison method.Note: A literal (but not case-sensitive) search will be performed; quotation marks, asterisks, and special characters(such as the plus sign or tilde
Use EWS - Select Yes to use Microsoft Exchange Web Server (EWS) for outbound email from iSupport. Exchange Server - enter the name or IP of the Microsoft Exchange server to be used for outbound notifications sent by iSupport. Exchange User Account Name/Password - Enter the user name and password for iSupport to use for connecting to the Exchange server for sending outbound notifications.