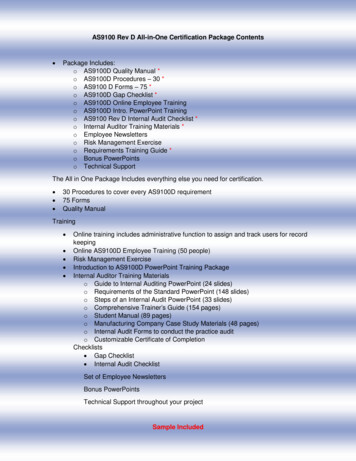
Transcription
The Unofficial Paint.NET User Guide is intended to provide access to several Paint.NET tutorials in asingle download. This will hopefully be useful for people without internet access, a pay as you gointernet connection, those who prefer tutorials in a printed format and those who simply want aguide to improving their Paint.NET skills having just read the help file without going tutorial hunting.This guide is the work of several members of the Paint.NET community (see the credits section for afull list) and would never have happened without their hard work and generosity. If you want tothank a specific author for their tutorial, click the url at the bottom of a tutorial.For more information email pdn@simonandrewbrown.co.uk.ContentsThe basics1. Cutting out imagesCreating images1. Hard Wood Floors2. The Pyro sig3. Power Reactor4. Some kind of hi‐tech wallpaper5. The Un‐Photoshop style sig tut6. Playing Cards & ChipsPhoto editing1. Cropping photographs – the rule of thirds2. How to shrink a city in 5 easy steps4. Real car ‐ Toy Car conversion3. Levels4. Antiquing5. How to Clone YourselfNotes1. Copyright
Cutting out ImagesBY SIMON BROWN1. Find your image ‐ I'll be using one of the Office 2007 clipart images.2. On a new layer with a relatively thin width, (depending on the size of your image) cover theperimeter of the part of the image you wish to cut out with the pen and line tools beingcareful to leave no gaps.3. Now select the magic wand tool (any tolerance below 60% should work fine) and click insidethe outline.
4. Now hold down Ctrl I to invert the selection, and then select the background layer.5. Now press the "delete" key and remove the layer you use to draw the outline.
6.Crop the image to the part you have cut‐out.7. Use the feather plugin to make the edges less sharp.
Copyright (C) Simon Brown 2009http://paintdotnet.forumer.com/viewtopic.php?f 34&t 28790
Hard Wood FloorsBY JERKFIGHTRequired Plug‐insJumblePanellingA. Open a Blank CanvasB. 1. Change Colours (Primary dark grey, secondary light gray)2. Gradien tool3. Linear Gradient Setting, and make the gradient.c. Add Noise at the settings below, don't be afraid to expirememnt.
D. Motion blur at the settings below.E. Using effects such as twist, try to make knots in the texture.1. If using twists follow derections below.1.1. Expirement with the amount1.2. Expirement with position*You may have to run this effect multiple times, but with diffrent settings
F. 1. New Layer2. Paint the new layer brown, you can use my hex if you want.3. Play with the layer proprities (F4)4. Merge Layer downG. 1.Depending on image size, you may want to play with these settings.2.Press the jumble button untill you get a nice balence of dark and light wood.3. Press OK when ready
H. Select every second line of wood like below.I. Using the panelling effect move the selection horizontal by an amount of your choice.
J. Rotate/Zoom (Play with the selections that are boxed)This is a common setting I use.There we go.
Made the floor of this with the same method above.Thanks for reading.Jerkfight
Copyright (C) Kyle Bridgemohansing 2008http://paintdotnet.forumer.com/viewtopic.php?f 44&t 27097
The #1 Most Copied Sig On The Forum(AKA the pyrosig)BY ZACH WALKER, A.K.A. PYROCHILDHere's what you're making:Yup, here it is. Finally. The long‐awaited pyro‐sig tutorial. I didn't even want to write atutorial on this, but was suckered into it by countless requests, both in the main forum aswell as private messages. A few emails even came my way. weird. To be perfectly honest, Idon't think this is actually worth a full‐blown tutorial, but hey, anything to keep y'all happy.These instructions are to create an exact duplicate of my signature. Obviously, you justmight want to change something or other, especially the name. unless you're the nitwitwho keeps stealing my username on other forums. And deviantART. Grr.Plugins and fonts needed:Gradient BarsOutline ObjectWater ReflectionEvanescent (TrueType Font)Optional:Curves Gradient MappingConditional Hue/SaturationThe procedure:Notes:‐All given sizes are in PIXELS.‐Until step 11, you should keep your Primary color set to BLACK and your Secondary colorset to WHITE. From that point on, colors don't matter, but if you change the colors beforethen, there's a good chance things won't work out.‐All given settings for plugins are APPROXIMATE, and you may have to experiment a tiny bitto get the look exactly right.THE BACKGROUND
1 ‐ Create a new image, 1000x200.File ‐ New.2 ‐ Select the top half of your imageTool: ‐ Rectangle Select‐Your selection should span the whole width of your image, and go from the very top toabout halfway down. You can use the text in the Status Bar to help you select the correctheight3 ‐ Run Gradient BarsEffects ‐ Render ‐ Gradient Bars.‐Set the alignment to Bottom, Scale to 150%, and play with the seed value until you like thelook4 ‐ Create a new layerLayers ‐ Add New Layer5 ‐ Draw a gradient across the imageTool: ‐ Gradient, Linear(Reflected)‐Start your gradient from the middle of the image and drag it across to either the right orleft edge6 ‐ Set the Blending Mode of the top layer to Color BurnLayers ‐ Layer Properties.‐Depending on your gradient, there may be a black bar in the bottom half of your image.Ignore it; it'll disappear in step 9.7 ‐ Merge the layersLayers ‐ Merge Layer Down8 ‐ Duplicate the layerLayers ‐ Duplicate Layer9 ‐ Set the Blending Mode of the top layer to NegationLayers ‐ Layer Properties.
10 ‐ Merge the layersLayers ‐ Merge Layer Down11 ‐ Color!‐Use whatever methods you feel comfortable with to recolor the image; at this point, thecolors you're working with no longer matter‐I used Curves in the original, but now I think I'd prefer Gradient Mapping. ConditionalHue/Saturation works also.‐If you don't know how to recolor it, well, there are lots of other tutorials that cover that, so. http://searchpaint.net/12 ‐ Run Water ReflectionEffects ‐ Distort ‐ Water Reflection.‐Set Duration to 200, all other values can be left at default.13 ‐ Create a new layer and name it ShadowLayers ‐ Add New Layer14 ‐ Draw your text on the Shadow layerTool: ‐ Text‐Font: Evanescent 72pt15 ‐ Duplicate the Shadow layer and name it TextLayers ‐ Duplicate Layer16 ‐ Put the shadow behind the textLayers ‐ Rotate / Zoom.‐Twist angle: 90.00‐Twist radius: 75.00‐Y pan: 0.30017 ‐ Add a new layer under the Shadow layer and name it GlowLayers ‐ Add New Layer18 ‐ Draw a filled ellipseTool: ‐ Ellipse, Draw Filled Shape19 ‐ Run Gaussian Blur
Effects ‐ Blurs ‐ Gaussian Blur.‐Radius: 2520 ‐ Recolor the shadowYou know how. if not, http://searchpaint.net/21 ‐ Run Outline Object on the Text layerEffects ‐ Outline Object.‐Width: 15‐Softness: 25422 ‐ Run Water Reflection on the Text layerEffects ‐ Distort ‐ Water Reflection.‐Distance: 70.00‐Waves period: 1.50‐Duration: 100.00Copyright (C) Zach Walker 2007http://paintdotnet.forumer.com/viewtopic.php?f 31&t 26990
Power ReactorBY MADJIKThis tutorial will guide you to do something like this:The result is in fact from the tutorial is this:This tutorial mainly needs the hexagrid plugin. You could find it hp?t 3607You will need also the fast zoom blur (deluxe) plugin. You could find it hp?t 3666
1.Create the background image : white 400x400 for this tutorial but bigger is better.2.Add a layer (nr2). Select a mid grey for primarycolor (hex:777777).Run the hexagrid:.Size:6.Draw Mode:horizontal centered.Brush width:1.Antialiased:Y3.Add a layer (nr3). Select Black for primarycolor.Run the hexagrid:.Size:50.Draw Mode:left.Brush width:2.Antialiased:Y
4.Repeat step 3, 4 times, increasing the size by 5, and the brush width by 1.1.Add a layer (nr4). Run the hexagrid: Size:55 ; Brush width:3.2.Add a layer (nr5). Run the hexagrid: Size:60 ; Brush width:4.3.Add a layer (nr6). Run the hexagrid: Size:65 ; Brush width:5.4.Add a layer (nr7). Run the hexagrid: Size:70 ; Brush width:6
5.Repeat now for each layers 3 to 7:.Zoom Blud Deluxe: All default values
6.Select layer nr2, and run the bulge effect.amount:1007.Flatten the image.
8.Duplicate the layer.Flip it horizontaly.Set the blend mode to Darken (test all the mode.)
9.Flatten the image.
10.Play with the curves.11.Duplicate the layer.Set the blend mode to Lighten (test all the mode.)
12.Zoom Blud Deluxe: Amount : 4 ? Rest : default values.Repeat 3‐4 times (Ctrl F)
Copyright (C) MadJik 2007http://paintdotnet.forumer.com/viewtopic.php?f 15&t 4872
Some kind of Hi tech wallpaperBY MADJIKPlaying around with several effects, looking for some nice art,I made this:I will try to redo it in this tutorial.1. Choose your image size (bigger better, you could reduce it later).For the tut, I've choose 600x450.2. Select the Lines/Curves Tool,.set the brush width to 30‐50 (I set it to 32),.set the style to Dashes, Dash‐dot or Dash‐dot‐dot.draw a horizontal line centered:
3. Fast Zoom blur it (:Plugin: Plugin Zoom Blur c.php?t 3666.Amount to the max,.Default for the rest.4. Invert the colors (Ctrl Shift I).
Next steps are partly based on the tutorial Make a â žWaveâ œ with ic.php?t 41585. Distort the image with the Twist effect:.Amount 20‐30.Quality 5
6. Duplicate the layer.7. Distort the top layer with the Twist effect:.Amount ‐ 30‐60 (max 2x the amount used step 5 in negative value).Quality 58. Open the Properties of the layer (press F4) and play with the blend mode to find the one you likemore.I set it to Overlay (Lighten or Darken work well too)
9. Now go to Adjustments/Curves RGB, and make it colored on one or both layers.I set these curves on the bottom layer, nothing on the top layer.10. Go to Adjustments/Curves Luminosity, and change the curve on one or both layers.I set this curve on the top layer, nothing on the bottom layer.
11. On each layer, apply the Relief Effect with angle 45Â .12. Save the PDN file for later modification. Flatten the image and save as a flat format (PNG or JPG)for use.
Final result isn't so far than the model. Need more light somehow!The size of the image and the brush width are important, the fast zoom blur will give different resultdepending on these factors.Copyright (C) MadJik 2007http://paintdotnet.forumer.com/viewtopic.php?f 15&t 4557
The Un Photoshop style sig tutBY LIAM DESIC (LJXD)How completely lame of me to do a sig tut on my sig, but dignity aside here's the way I domy type of sigs.These are some that i've released in this style.Basically what I aim for when I design these is, gloss, colour and shape. For my latest one Ifocused on red orange yellow, green and black. In my sigs I never use stocks or brushes.This is what you'll end up with, depending on what design you drawThese are the plugins you'll need[url http://paintdotnet.forumer.com/viewtopic.php?f 16&t 22881&st 0&sk t&sd a&hilit Drop shadow]Drop shadow, Average blur.[/url] , Align ObjectOkay so lets start
Part 1: Intro1.Open a new canvas with a size of 1000x300 (I like my canvas's twice the size then resizelater)2. Now ctrl‐a and hit delete.3. Draw a straight line from top to bottom anywhere on the canvas, then run align object tocentre the line. This will be the middle of our design.4.Now select the paint brush button, and change the setting to aliased. (If you'd preferdrawing the shape with the line/curve tool then by all means)5.Add a new layerPart 2: The Shape and Design6.Now this the most crucial part, the shape design. We only want to draw one half and we'llflip it later, first we want to make our centre piece, in earlier pieces i made an orb but in mylatest one i made a greeny shield thing.The centre Piece is also what will be the avatar, to make a nice matching piece.7.Keep erasing and painting until you've finished the basic out line. zoom into about 200‐300% too see the lines easier. Remember were only drawing one half. This is what I get8. Okay now we duplicate the layer and flip it horizontally, if the design looks bad in full, youshould delete that layer and make adjustments until you fine the centre piece looking good.Once you like it merge the centre piece layers.9. Add new layer
10. Now we want the Outside design, we need to decide whether its going to be attached tothe centre piece or look as though its coming from underneath, because of the intricacy ofmy centre piece i'm going to have the centre piece coming from underneath.11. Okay so get your paintbrushes out and start designing again, remember only one half.Here's what i got12.Now duplicate that layer and flip it, that's the whole shape of your sig, if your not happythen make changes. Merge the two layers, and make sure they're all closed up. This is howmine turned out.NOTE: Make Sure that all your outside design lines are connected, uncheck the view iconnext to the Centre Piece Layer to have a look. It doesn't really matter how they're connectedas you wont be able to see it.
Part 3: Colours13. Now its time for a bit of colour, we need one colour for the centre piece and one for theoutside. I Like contrasting colours to catch the eye. Now choose your colour for the centrepiece, i chose orange.14. Grab the magic wand tool and select the outside of the CP (centre piece). Then ctrl‐I andadd a new layer Then paintbucket your colour. If it covers the whole canvas ctrl‐z and tryand find where you didn't link up.15.Dont deselect, and add a new layer, get your paintbrush and and make the colour a bitdarker, then draw some lines all along the same "flow".16. Get a smaller brush and changer your colour to something lighter than the originalcolour and draw
2. On a new layer with a relatively thin width, (depending on the size of your image) cover the perimeter of the part of the image you wish to cut out with the pen and line tools being careful to leave no gaps. 3. Now select the magic wand tool (any tolerance below 60%