Transcription
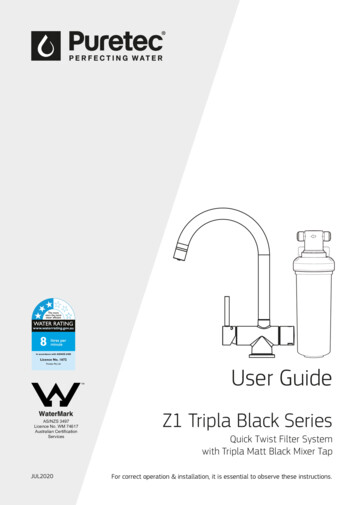
User GuideAS/NZS 3497Licence No. WM 74617Australian CertificationServicesJUL2020Z1 Tripla Black SeriesQuick Twist Filter Systemwith Tripla Matt Black Mixer TapFor correct operation & installation, it is essential to observe these instructions.
What's InsideWhat's InsidePuretec Customer Service . 3Operation. 3Cartridge Replacement. 3Servicing. 4Technical Information. 4Recommended Working Pressures. 4PART 1 Mixer Tap AssemblyInstallation Guide (BL1 & BL2 Models). 5Installation Guide (BL3 Model). 6Assembly (BL1 & BL2 Models). 7Assembly (BL3 Model). 8Water Connection Patterns. 9Replacement of Ceramic Disc Cartridge(s). 10PART 2 Filter InstallationFilter Cartridge Installation. 10Installation Requirements. 10Installation Procedure. 11Use Guidelines. 12Mixer Tap & System Assembly. 13Tripla BL1 & BL2 Parts Description . 15Tripla BL3 Parts Description . 16Performance Data. 17Warranty. 18Installation Note: A water filter system/tap, like any product, has a limited life and mayeventually fail. Also sometimes failure happens early due to unforeseen circumstances. Toavoid possible property damage, this product should be regularly examined for leakage and/or deterioration and replaced when necessary. A drain pan, plumbed to an appropriate drainor outfitted with a leak detector, should be used in those applications where any leakagecould cause property damage, and/or the water supply should be turned off if no one ishome/present.2Installation & Operation ManualCopyright Puretec Pty Ltd 2020
InstallationPuretec Customer ServiceThank you for purchasing Puretec Z1 Tripla water filter system. Your system is a provenperformer manufactured from only quality materials and components and will give years of‘spring fresh’ water free of impurities if maintained properly.The Puretec Z1 system cartridges need replacing regularly to maintain optimum performance.This is a simple procedure when following instructions. For cartridge replacements contactyour nearest Puretec stockist.The system is designed for metropolitan supply water but can be used in other situations.For other types of water supply please contact your local Puretec stockist or call our PuretecCustomer Service Helpline prior to installing the tap.Customer Service Helpline 1300 140 140 (Australia) 0800 130 140 (New Zealand).Caution: Do not use with water that is microbiologically unsafe or with water of unknownquality without adequate disinfection before or after the system. This product must beinstalled in accordance with local plumbing regulations by a licensed plumber.OperationThe Puretec Z1 Tripla system is designed to run economically for many years, dependent onthe initial installation and periodical maintenance.Flush systems for 10 minutes after any period of non-use more than 2 days. For a period ofnon-use of 2 weeks or more, it may be necessary to replace cartridge.Chrome Plated Surface - should only be cleaned with liquid detergent or soap and water.Under no circumstance should any abrasive or acid base cleaning agents be used.Cartridge ReplacementTo maintain the high quality of the purified water the cartridges need changing every 6months dependent on water quality and usage.When replacing cartridge, ensure you reset the LED reminder light by removing/replacing thebattery from the rubber seat. Please refer to page 8 for a detailed diagram.Order Z1-R for a replacement cartridge to suit your Z1 Tripla Black System.Quick Twist Water Filter System with Tripla Black Mixer Tap3
Installation GuideServicingPeriodically clean the aerator for any lodged sediment that may restrict flow. A Puretec waterfilter is highly recommended on all incoming lines for product longevity.Should it be necessary to have your mixer serviced while under warranty, please carry out thefollowing procedure:1.Firstly call the plumber, preferably the one that has installed it, (most problems arecaused by the supply lines not being cleaned out properly, prior to connecting themixers).2.Make sure that the plumber has installed your mixer according to the User Guide.3.If the plumber is satisfied that he cannot rectify the problem then contact yourplumbing supply store or your local Puretec stockist.Important: We do not recommend the dismantling of any internal part of the mixer asthis will breach your warranty.Technical InformationPuretec mixers can be used in conjunction with: Pressure storage hot water system. Any mains water pressure not exceeding 500 kPa. Maximum hot water temperature of 60 C. Instantaneous hot water system. Any filtered water supply.Recommended Working Pressures Minimum working pressure 50 kPa (7.5 psi). Maximum working pressure 500 kPa (72.5 psi).It should be noted that water mains pressure builds up during off peak periods, mainly atnight, sometimes doubling or trebling normal daytime pressures.Note: Not suitable for unequal pressure. On high pressure areas where the pressure exceedsthe recommended working pressure as indicated above pressure limiting valves must beinstalled or warranty is voided.4Installation & Operation ManualCopyright Puretec Pty Ltd 2020
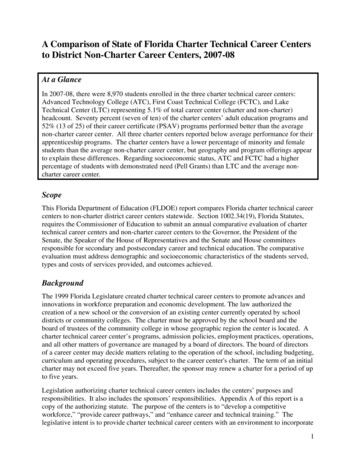
Mixer Tap InstallationPART 1Installation Guide (BL1 & BL2 Models)Fig. 1BaseFaucetHole (Ø33mm)Rubber WasherNutWater Filter Connection(green )HOT (red )COLD (blue )Note: It is important to flush out the supply pipes to the mixer before connecting the flexiblehoses with the initial installation, so no foreign matter can enter into the ceramic diskcartridges.A Puretec Water Filter is highly recommended for product longevity.Quick Twist Water Filter System with Tripla Black Mixer Tap5
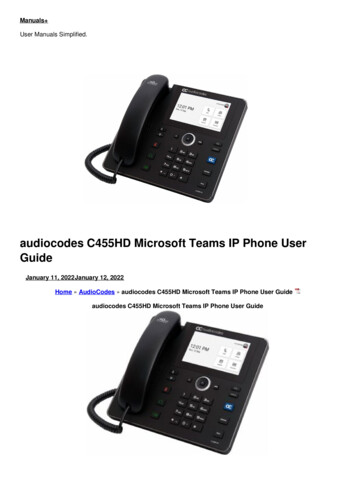
Mixer Tap InstallationInstallation Guide (BL3 Model)Fig. 2Retaining ScrewBaseGasketFaucetHole (Ø33mm)Plastic Fixed NutRubber WasherMetal WasherLocking Nut6Installation & Operation ManualCopyright Puretec Pty Ltd 2020
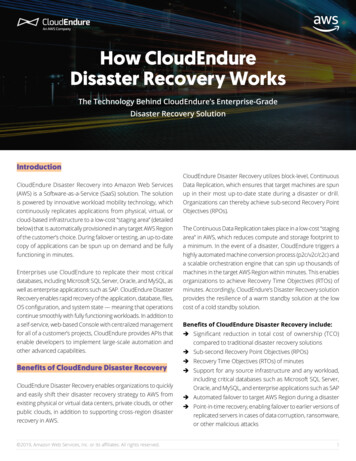
Mixer Tap InstallationAssembly (BL1 & BL2 Models)Fig. 3Step 1.Connect the hoses to the Faucet andtighten them.Only use hand to screw the flexible hose.Do not over tighten. Don't use any tools.2Tripla FaucetStep 2.Feed the hoses through the Basin orSink. Required through hole size isØ33mm.BaseBasin or SinkSink FaucetHole (Ø33mm)Fig. 41Base should be on top of the sink orbenchtop.Step 3.Place the Rubber Washer and screw theNut below the sink. Position the tap onyour desired angle then tighten the Nut.Rubber WasherNut3Quick Twist Water Filter System with Tripla Black Mixer Tap7
Mixer Tap InstallationAssembly (BL3 Model)Fig. 5Step 1.Connect the retaining screw and braided hoses tothe faucet and tighten them.Only use hand to screw the flexible hose. Do notover tighten. Don't use any tools.See connection pattern on Page 8.Step 2.Connect the straight adaptor to the filtered flexiblehose.Fig. 6Step 3.Feed the hoses through the basin orsink. Required through hole size isØ33mm.Base and washer should be on top ofthe sink.Step 4.Insert the plastic fixed nut, rubberwasher, metal washer and screw thenut by turning counterclockwise.Step 5.Position the tap on your desired angleand tighten the nut by using a wrench.8Installation & Operation ManualCopyright Puretec Pty Ltd 2020
Mixer Tap ConnectionsWater Connection PatternsFor TRIPLA BL1 & BL2Fig. 7Water FilterConnection( green )HOT WaterConnection( red )COLD WaterConnection( blue )For TRIPLA BL3Fig. 8Water FilterConnectionCOLD WaterConnectionRetaining ScrewHOT WaterConnectionQuick Twist Water Filter System with Tripla Black Mixer Tap9
Mixer Tap MaintenanceReplacement of Ceramic Disc Cartridge(s)Hot/Cold Outlet1. Remove hot and cold water indicator then release screw in lever and lift lever off, nowyou can unscrew dome cap and loosen the cartridge lock nut. Lift out old cartridge and clean inside making sure no old O-rings are still stuck insidecartridge housing. Insert new cartridge making sure O-rings on bottom of new cartridge have not fallenoff and lugs in bottom of cartridge line up with holes in cartridge housing. Now you can tighten lock nut with a torque wrench to 14 newton meters, then reinstalldome cap, lever screw and hot and cold water indicator.Filtered/Rain Ancillary Outlet2. Remove front button cover using fine-edged 1.2mm screwdriver. Unscrew handle then remove cartridge by unscrewing it anti-clockwise, using 5/8”socket. Install cartridge by following removal instructions as above, in reverse order. Ensure cartridge is firmly tightened, not over tightened.PART 2Filter InstallationThis system comes complete with an installation kit enabling it to be connected to 15 mm(½”) male thread.Installation Requirements1.15mm (½”) Cold water line - mains only.2.Supply pressure: 100 - 875 kPa (when pressure exceeds 500 kPa, a pressure limitingvalve must be installed).3.Supply temperature 0 - 38 C (protect from freezing).4.Suitable location for faucet.Alternative fittings may be required if being connected to anything other than anexisting 15mm (½”) copper pipe (copper pippe NOT included). No electrical or drainagerequirements needed.10 Installation & Operation ManualCopyright Puretec Pty Ltd 2020
Filter InstallationInstallation ProcedureI nstallation Note: A water filter system/tap, like any product, has a limited life and mayeventually fail. Also sometimes failure happens early due to unforeseen circumstances.To avoid possible property damage, this product should be regularly examined for leakageand/or deterioration and replaced when necessary. A drain pan, plumbed to an appropriatedrain or outfitted with a leak detector, should be used in those applications where anyleakage could cause property damage, and/or the water supply should be turned off if noone is home/present.INSTALLATION MUST BE COMPLETED BY A LICENCED PLUMBER. FAULTYOPERATION DUE TO UNQUALIFIED PERSONS WILL RESULT IN VOIDEDWARRANTY COVERAGE.1.Select suitable location that is close to the point of filtered water delivery (eg. sink).Remember to allow access room for changing filters and a suitable place where waterspillage will not cause damage. Location should not be in direct sunlight.2.Isolate water supply and cut existing copper pipe (coppe pipe NOT included) ready toinstall the SmartTee .3.Connect the SmartTee to the multivalve with a piece of white tubing (see Fig 9-10).4.Install filter cartridge by positioning it in the desired location, marking the position offixing hole and fixing with bracket screw. Z1 Series can be mounted horizontally orvertically. Allow room for the connecting tubes. Ensure flow arrow on cartridge is indirection of water flow.5.Fit the stem to tube reducers into either side of the filter by pushing the fittings intothe 3/8"quick-connect fittings already installed on the filter head (for quick-connectfittings see Fig. 10).6.Fit tubing into 1/4" connectors (stem to tube reducers). Allow slack in the tubing.Connect the tubing into the filtered water flexible hose securing with the nut found onthe flexible hose (plain).7.Connect cold water flexible hose (blue streak) to cold mains water supply and the hotwater flexible hose (red streak) to the hot water supply.8.Restore water supply & check for leaks, rectifying them, if any, before leaving the unit.9.Run the system for at least 5 minutes to remove carbon fines. Water may appearmilky, but this is normal and is only tiny air bubbles that will clear after a short period.Quick Twist Water Filter System with Tripla Black Mixer Tap 11
Filter Cartridge InstallationCartridge Installation/Changeout1.Rotate the old cartridge counterclockwise 1/4 turn, pull it out and dispose of it.2.Remove all packaging from the new cartridge, including any wraps or caps (ifapplicable).Replacement cartridge: Z1-R3. Insert the new cartridge into the filter head and rotate clockwise 1/4 turn.4. Turn on the water and check for leaks. If leaks occur, repeat step 3. If leaks persist,discontinue use and call your supporting dealer.5. Flush filter for 5 minutes before use or until water runs clear.Use Guidelines Minimum operating pressure 172 kPa. Maximum operating pressure 500 kPa. Do not allow exposure to temperatures below 0 C, protect from freezing. Maximum operating temperature 38 C. Maximum flow rate 5 Lpm. This system must be installed according to local plumbing codes on the cold waterline. Replacement Cartridges: See Installation/Changeout This system requires regular replacement of the filter cartridge to maintain properoperation. Varying chlorine, sediment, or organic substance levels may affectreplacement frequency. Be sure to change the filter cartridge at least every 23,000 litres or 6 months whichever occurs first; or whenever you detect a change in taste, odour, or decrease in flow.12 Installation & Operation ManualCopyright Puretec Pty Ltd 2020
AssemblyMixer Tap & System AssemblyFig. DESCRIPTION1SmartTee 2White Tubing3Pressure LimitingValve (Multivalve)4Z1-R Filter Cartridge5Mounting Bracket& Head6Nut7⅜" Stem to ½" TubeReducer8Filtered WaterFlexible Hose - Plain9Cold Water FlexibleHose - Blue Streak10Hot Water FlexibleHose - Red Streak11Lock Nut andWasher12Mixer TapCOLDWATERLINEFig. 10HOW TO USE QUICK CONNECT FITTINGS1.Cut the tube square and push in tothe tube stop. For metal tube removeburrs and chamfer tube end to preventO-Ring seal being damaged.3.Tube is secured in position.2.Fitting grips before it seals. Ensuretube is pushed in to tube stop.DISCONNECTION PROCEDURE4.Push collet against body and slide tube out of fitting.Quick Twist Water Filter System with Tripla Black Mixer Tap 13
AssemblyFigure 11 - SmartTee Quick Connect Fitting1.Turn the quick connect nut on the SmartTee anticlockwiseto release the collet.2.Cut the tube square and push into into the tube stop (insidethe collet). For metal tube; remove burrs and chamfer tubeend to prevent O-ring seal being damaged.3.The fitting grips before it seals. Ensure the tube ispushed all the way into the tube stop.4.Once the tube is secured in position, turn the quick connectnut clockwise to secure.Note: Hand tighten only. Do not overtighten.DISCONNECTION PROCEDURE5. Turn the quick connect nut on the SmartTee anticlockwise to release the collet.14 Installation & Operation Manual6. Push the collet against the quick connect nut and slide tubeout of fitting.Copyright Puretec Pty Ltd 2020
Parts DescriptionTripla BL1 & BL2 Parts DescriptionFig. 123. Gasket2. Aerator4. Spout1. Aerator Shell5. Gasket6. O-Ring9. Handle7. Plug8. Screw10. Screw17. Handle11. Handle12. Cartridge13. Body19. Body Base20. Screws18. Screw14. Cartridge15. Nut16. Cap21. Base22. Gasket23. Plastic Fixed Nut24. Threaded Tube25. Gasket30. Copper Tube26. Nut27. Wrench28. Flexible Hose29. Filter AdaptorQuick Twist Water Filter System with Tripla Black Mixer Tap 15
Parts DescriptionTripla BL3 Parts DescriptionFig. 134. Cap5. O-Ring6. Cap7. O-Ring8. Spout9. O-Ring3. Gasket2. Aerator1. Aerator Shell9. Spout12 Handle Cap11. O-Rings13 Screw10. Gasket21. Handle Cap14. Gaskets15. Handle22. Cap16. Cartridge23. Cartridge17. Handle18. Screw24. Screw19. Handle20. Body25. Base26. Gasket28. Flexible Hose27. Plastic Fixed Nut29. Fitting Group30. Filter Adaptor16 Installation & Operation ManualCopyright Puretec Pty Ltd 2020
Cartridge Performance DataPerformance l50%0.25 94%99.98% ND (1)99.99%Max EffluentMin PercentConcentrationRemoval0.3ND (1)NSF Standard 42 Drinking Water Treatment UnitsChlorine5 - Health(23,000 L)0.6 - Aesthetic2.1Standard 53 Cyst Live Cryptosporidium POU/POECyst 1100,000Test ParametersHardness, Total mg/L120TDS mg/L290Temp deg C21 CTurbidity NTU0.1pH7.57*Australian Drinking Water Guidelines - 1996ND Not DetectedThis appliance meets the domestic water treatment appliance Standards AS/NZS3497 for the followingwater treatment processes:ClassTreatment typeIMicrobiological StatusBacteriostaticIIFunctionPassWill stop bacteria increasing, but will notremove them unless II(a) is passed.N/AMicrobiological TreatmentII (a)Bacteria RemovalWill remove or inactivate bacteria.YESII (b)Virus RemovalWill remove or inactivate virus.YESII (c)Protozoa RemovalWill remove or inactivate Cryptosporidiumand Giardia, but will not remove orinactivate bacteria and virises unless II(a)and II(b) is passed.YESIIITurbidity & Particulate ReductionReduces cloudiness.YESIVTaste & Odour ReductionReduces taste & odours.YESVChemical TreatmentDecreases chlorine.YESQuick Twist Water Filter System with Tripla Black Mixer Tap 17
WarrantyNotesThe complete range of Puretec products are developed, refined and made to meet and exceedstringent specifications for the worldwide market.Important Note: Sales of products are subject to our Terms & Conditions which are availableupon request. All specifications, prices and photos are a guide only and are subject to changewithout notice. Please ring to confirm details. Do not use products with microbiological unsafewater without adequate disinfection. Under normal circumstances a pressure limiting valve isnot required. If incoming water pressure is excessive it may however be necessary to installan approved pressure limiting valve. Maximum flow depends on cartridge, vessel, pressure,impurities etc.WarrantyThis warranty commences from the date of purchase. To make a claim under the warranty,take the product and proof of purchase to place where you purchased the product, and theywill lodge a Warranty Request with Puretec. In addition to the guaranties provided under thelaw, Puretec offer warranties as follows: Tripla Tapware warranty is 1 year parts and labour,plus 5 years parts only. Puretec Z1 Filter System warranty is 1 year parts and labour, plus 9years parts only. Excludes cartridges.Puretec will pay your reasonable, direct expenses of claiming under this warranty. You maysubmit details and proof of your expense claim to place of purchase for consideration.The warranty only applies if the product was used and/or installed in accordance with theuser guide and/or installation instructions. This warranty is given in lieu of all other expressor implied warranties and manufacturer shall in no circumstance be held liable for damagesconsequential or otherwise or delays caused or faulty manufacturing except as excluded bylaw.Applicable to all above, is that the warranties need to be approved by Puretec to ensureproduct was not incorrectly used, installed or claimed. False and incorrect claims will bepursued at Puretec’s discretion, including chargeable inspection and labour costs incurred.All installation and service work should be completed by qualified tradespeople. Faultyoperation due to unqualified persons will result in voided warranty coverage.18 Installation & Operation ManualCopyright Puretec Pty Ltd 2020
WarrantyWarranty/AustraliaThis warranty is given by Puretec Pty Ltd, ABN 44 164 806 688, 37-43 Brodie Road LonsdaleSA 5160, telephone no. 1300 140 140 and email at sales@puretec.com.au.This warranty is provided in addition to other rights and remedies you have under law: Ourgoods come with guarantees which cannot be excluded under the Australian Consumer Law.You are entitled to replacement or refund for a major failure and to compensation for otherreasonably foreseeable loss or damage. You are also entitled to have the goods repaired orreplaced if the goods fail to be of acceptable quality and the failure does not amount to amajor failure.Warranty/New ZealandThis warranty is given by Puretec Ltd, Reg. No 4464398, PO Box 875 Cambridge 3450 NZ.telephone no. 0800 130 140 and email at sales@puretec.co.nz.This warranty is provided in addition to other rights and remedies you have under law: Ourgoods come with guarantees which cannot be excluded under the Consumer Guarantees Act.You are entitled to replacement or refund for a major failure and to compensation for otherreasonably foreseeable loss or damage. You are also entitled to have the goods repaired orreplaced if the goods fail to be of acceptable quality and the failure does not amount to amajor failure.Quick Twist Water Filter System with Tripla Black Mixer Tap 19
Connect the hoses to the Faucet and tighten them. Only use hand to screw the flexible hose. Do not over tighten. Don't use any tools. Step 2. Feed the hoses through the Basin or . Sink. Required through hole size is Ø33mm. Tripla Faucet Base Sink Faucet . Hole (Ø33mm) Basin or Sink Rubber Washer Nut. Fig. 3 Fig. 4