Transcription
REFERENCE MANUALSYSTEM 6000
SAFLOKTRAININGANDREFERENCE MANUALSAFLOK SYSTEM 6000WINDOWS VERSION 3
TMSystem 6000 Training and Reference ManualTABLE OF CONTENTSSECTION 1 ‐ INTRODUCTION TO SAFLOK SYSTEM 6000SECTION 2 ‐ LOADING THE SAFLOK PROGRAMSECTION 3 ‐ LOCK AND KEYCARD FEATURESSECTION 4 ‐ LOCK AND KEYCARD OPERATIONSSECTION 5 ‐ SAFLOK SYSTEM TRANSACTIONSSECTION 6 – DIAGNOSTIC ERROR CODES SAFLOKPage 1 of 206 11
Section 1Introduction to System 6000
TMSystem 6000 Training and Reference Manual1.1 Welcome to System 6000System 6000 is a battery‐operated guestroom door‐locking system designed to offer thehighest possible level of security to a property.There are two types of locks you can choose from;Magnetic reader lock – A magnetically encoded keycard is provided to each guest upon check‐in.RFID Lock – A guest is provided a RFID keycard or FOB to present to the locks upon check‐in.When this keycard is used at the lock, a circuit board within the lock reads the code andreleases the locking mechanism, allowing the guest to depress the handle and enter the room.When a new keycard is made for a subsequent guest, and this keycard is used at the lock, thepreviously issued keycard will no longer be valid. This feature has the effect of changing lockand combination with each new guest that occupies a room.From inside the room, the lock provides a dead bolt or privacy button, helping to ensure bothprivacy and security.1.2 System 6000 ComponentsThe basic system includes the System 6000, keycard encoder, and the SAFLOK electronic doorlocks and keycards. An Emergency Lock Power Supply (ELPS) and Lock Programmer andInterrogator (LPI) Interface Probe and a handheld LPI Device are also included. Multiple keycardencoders may be purchased for as many check‐in stations as required.The System 6000 is loaded onto the front‐desk computer(s). The program is used to generatekeycard‐coding information and to keep track of the room numbers and key assignments, useraccess codes, key combinations, and a history of all system transactions. The computer(s) areconnected directly to key encoding stations for performing the key‐making transactions.An LPI (Lock Programming/Interrogating) Device is also required. The LPI Device also has limitedmemory capacity, and is used solely for programming and interrogating locks. Lock codeinformation is provided to the LPI Device by the main computer.Keycard Encoding StationsThe Keycard Encoder receives the keycard encoding information from the main computer orterminal. When a keycard is inserted/swiped into the encoder, the information is digitallyencoded onto the magnetic strip or memory chip located on the keycard.For radio frequency identification (RFID locks), the RFID credential is placed on the encoder,and the information is encoded via radio waves. SAFLOKPage 1 of 406 11
TMSystem 6000 Training and Reference Manual1.2 System 6000 Components (Continued)SAFLOK LocksSeveral lock models are available to function with System 6000. Saflok has two types of lockswhich use different key media. The first type is a Magnetic reader lock that functions inconjunction with Magstripe keys. The second lock type is RFID locks that use Mifare RFID keysand FOB’s.The locks contain a circuit board, which is connected to a battery pack. When a properlyencoded keycard is used at the lock, the circuit board reads the code on the keycard and sendsan electronic signal to release the locking mechanism. The guest then has approximately 5‐6seconds to turn the lock handle and enter the room. If the lock handle is not turned within theallotted time, the locking mechanism will automatically return to the locked position. The guestwill then reinsert the magstripe keycard or present the RFID key to gain access to the room.Most SAFLOK locks feature a 1” steel dead bolt and a throw dead locking latchbolt with anti‐theft feature. When the handle is turned from inside the room, a panic feature retracts boththe latch and the dead bolt. With the automatic dead bolt ADB feature, the locks have anautomatic dead bolt feature that projects a 1” dead bolt each time the door is returned to theclosed position, providing continuous deadbolt latching security. A privacy button or switch canbe activated from inside the room, preventing property personnel from entering the room,except in emergencies.KeycardsThe keycard is the messenger to the lock, and provides the lock with the lock codinginformation. The keycard carries the code information provided by the computer and keycardencoder. When a properly encoded keycard is inserted or presented to the lock and removed,the lock circuit board updates the code information in its memory, rendering previously issuedkeycards invalid.Emergency Lock Power Supply (ELPS)The Emergency Lock Power Supply is used to restore battery power to a lock that hasinsufficient internal battery power. When inserted into the lock, and inserting a cut validkeycard, a lock with a dead battery can be activated. This capability eliminates the need toforcibly remove a lock from a door because it has lost power. Once the door has been opened,the batteries can be replaced.Lock Programmer and Interrogator (LPI) Interface Probe / ELPS power overrideThe Lock Programmer and Interrogator Interface Probe serves as an interface between the LPIDevice and the lock. The probe can be used to program locks or to interrogate a lock when it isnecessary to obtain a history of the keycards that were used to access the lock. The smartcardprobe also allows an emergency override option when a dead battery condition occurs on alock. Once the door has been opened, the batteries can be replaced. SAFLOKPage 2 of 406 11
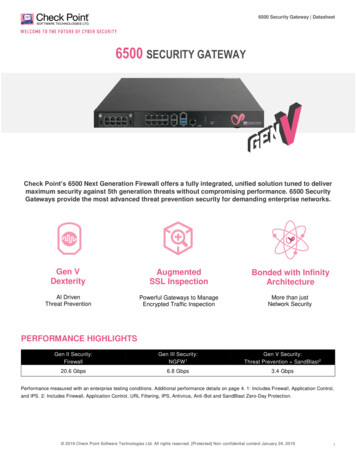
TMSystem 6000 Training and Reference Manual1.2 System 6000 Components (continued)1.3 Minimum Windows Equipment Requirements & RecommendationsRefer to the following page #4 SAFLOKPage 3 of 406 11
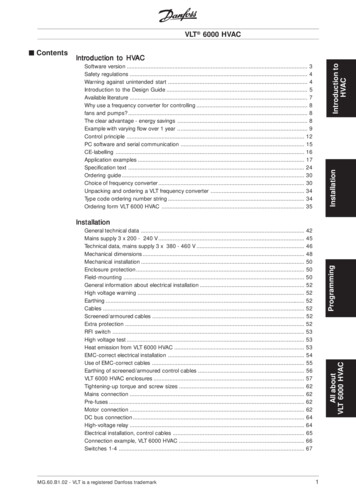
SAFLOK System 6000 Property Network DiagramMinimum Equipment Requirements & RecommendationsSAFLOK Server Operating system: Windows XP Professional or Windows Server2003 (Windows Server 2003 is required if over ten [10] workstations);appropriate server and client licensing is required Minimum hardware specifications: Multi-core, 2 GHz or greaterCPU / 4GB or greater RAM / 100GB available hard drive space Virtual Machine environments are supported with the followingminimum resource allocation: Multi-core, 2 GHz or greater CPUallocation / 4GB or greater RAM / 100GB available hard drive space If more than two (2) workstations are to be used withSaflok, an Ethernet network hub or switch is requiredSWITCH If connecting an encoder and/or handheld LPI devicedirectly to server, at least one (1) USB port must beavailable for encoder connection and at least one (1)dedicated Serial port for handheld LPI connection If including a Serial property management system(PMS) interface, at least one (1) dedicated Serialport must be available. TCP/IP interface supportis also available. Internet access is required to enable SAFLOKremote real-time support via the web Anti-virus software is highly recommended UPS and surge protection with equipmentwarranty are suggestedCAT 5 CABLEENCODERWITH TCP/IP CONNECTIONCAT 5 CABLEENCODERWITH TCP/IP CONNECTIONClient Workstation(s)KEY CONTROL Operating system: Windows XP, Vista, or Windows 7 Minimum hardware specifications: 1 GHz processor,1GB of RAM, and 10GB available hard drive space If connecting an encoder and/or handheld LPI devicedirectly to workstation, at least one (1) USB port mustbe available for encoder connection and/or at least one(1) Serial port for handheld LPI connection; encoders canalso utilize a TCP/IP (network) or Serial connection Anti-virus software is highly recommended UPS and surge protection with equipmentwarranty are suggestedCAT 5 CABLEUSBSAFLOKSERVERCAT 5CABLEENCODERWITH USBCONNECTIONNotes: All network installations and maintenance are the responsibilityof the individual customer and not SAFLOK. Due to the wide performance variability of different manufacturers’hardware, SAFLOK cannot guarantee software compatibility withall computers. If you require a list of computers that SAFLOK hastested and deemed software-compatible, please contact SAFLOKcustomer service at 1.800.999.6213. The customer is responsible for completing all software updates(e.g., Windows operating system & anti-virus protection). If using a Serial interface with a Virtual Machine, the VirtualMachine host computer must have an available dedicated Serialport that can be allocated to the Saflok Server Virtual Machine.RS232 ER(This diagram assumes that an Ethernet 10/100 multi-port hub is installed on the network.) 2010 SAFLOKPND6000 ac 12 10
SECTION 2System 6000 Installation and Configuration
TMSystem 6000 Reference Manual Section 22.1 Program Installation‐Saflok ServerYou can use the installation CD, or you may copy the installationCD to the Saflok server or any other computer on the network.1. If you are using the CD, simply insert it into the computeryou wish to install the software on and the installationprocess will begin automatically. *If installing over thenetwork, browse to the folder where the software islocated, and double‐click PgmStup3FB2 1.exe, and theinstallation process will begin.2. The setup program will inform you if there are anydatabase engines currently installed and running,and if so, it will stop them automatically.3. Click Next to continue. SAFLOKPage 2 of 2606 11
TMSystem 6000 Reference Manual Section 24. Select the destination directory. Click Nextto use the default.5. *If you will be installing Messenger at this property,click Yes. Otherwise click No.6. Select whether you would like to backup replaced files.This is only necessary if you are re‐installing or upgradingthe software and want to keep the old files. For a first –time installation, select No and click Next. SAFLOKPage 3 of 2606 11
TMSystem 6000 Reference Manual Section 27. Select the Server Stationinstallation type, and click Next.8. Select the Program Type. Thedefault installation type isServices. Select Next. SAFLOKPage 4 of 2606 11
TMSystem 6000 Reference Manual Section 29. By default, the setup program willinstall Saflok Client, Config, CRS,and Scheduler. You have theoption to install SecureShift serveras well. These settings shouldgenerally not be modified. SelectNext.o Saflok Client is the program you useto make keys.o Saflok Config is for modifying thedatabase, and is generally onlyused by Saflok technicians.o Saflok CRS program handlescommunications to LPIs andencoders.o Saflok Scheduler performs a backupof the database at Specified intervals.o Saflok SecureShift server is only needed at properties that have SecureShift, but do not have the PMSdisk.Note: if IRS is installed from the PMS disk, SecureShift server is not needed.10. The default database folder is:C:\ProgramFiles\SaflokV2\SaflokV2Data.If you would like to change the path, clickthe Browse button and select the folderto store the database files in. If you areinstalling Messenger, check the box for“Same data directory for 6000 andMessenger Server”. Click Next tocontinue. SAFLOKPage 5 of 2606 11
TMSystem 6000 Reference Manual Section 211. Verify that you have the correctInstallation Type, Program Type,and Target Directories. Click Nextto continue.12. Select the Logon Type for theScheduler service. In most cases, youwill select Local System. You will onlyselect Network Account if theScheduler will be backing up toanother computer on the network. Inthat case, select the account you willuse from the list and enter thepassword.13. After the install process is complete,click OK to reboot the computer. SAFLOKPage 6 of 2606 11
TMSystem 6000 Reference Manual Section 214. Upon rebooting, the CRSprogram will startautomatically. It willprompt you to set a link tothe database files. ClickOK.15. Browse to C:\ProgramFiles\SaflokV2\SaflokV2Data(or the directory you createdduring the install process).Click on SaflokDataV2.GDB,and click Open.Software installation is now complete. Follow the instructions below to configure the CRS, Schedulerand Service Launcher. SAFLOKPage 7 of 2606 11
TMSystem 6000 Reference Manual Section 22.2 CRS Configuration1. Open the CRS by double‐clicking the CRS iconfrom the system tray.2. Click File‐Logon. Enter username SETUPand password PASSWORD.3. Click the Settings tab, and then click theAdd button under the “Station IDassignments for this computer” box. SAFLOKPage 8 of 2606 11
TMSystem 6000 Reference Manual Section 24. Select Saflok Encoder for the encoder type,and click OK.5. Enter TIME for the Station ID and100 for the Port. Click OK to savethe station. Click File‐Minimize tominimize the CRS window. SAFLOKPage 9 of 2606 11
TMSystem 6000 Reference Manual Section 22.3 Scheduler ConfigurationNext, you will need to configure the Saflok Scheduler. This program creates a backup of the databaseat a specified time each day. By default, this time is 3:00AM. It also creates an archive of the transactionlog file to keep it manageable. This is performed at the same time as the backup.2.3.1 Scheduler Archive Configuration1. To begin, double‐click the Scheduler Icon from the system tray.2. Click File‐Logon and log on using the usernameand password, then click OK.3. Click Archive under theTasks section. On the TaskPerform tab, set “Performthis task:” to Daily. Set the“Archive” days of the weekto Sunday and Wednesday.Click Apply. SAFLOKPage 10 of 2606 11
TMSystem 6000 Reference Manual Section 24. Click the Task Data tab. Select either Saflok 6000 orSaflok Messenger. Set the Archive RecordThreshold and Archive Month Count for eachdatabase and click Apply.o Archive record threshold is one of the criteria Scheduler uses to determine if an Archive is necessary.The default setting is 20000. In this case, when Scheduler scans the Transaction Log file and it hasmore than 20000 transaction records, it will also check the Archive Month Count to see if it shouldcreate an archive. If there are less than 20000 records in the database, it will not perform an archive.o Archive Month Count is the number of months that you want to keep in the current log file; anythingolder than this setting will get archived. The default setting is 3 (only 1, 2, or 3 months selected). Inthis case, if there are over 20000 transaction records and they are older than 3 months, Scheduler willcreate an archive file.o If there are 20000 records, and they are all under 3 months old, an archive will not be created.Similarly, if the records are older than 3 months but there are fewer than 20000, an archive will notbe created.o The recommended settings for the Messenger database are 10000 records and 1 Month. As there aretypically many hundreds or thousands of records per day that are stored in the Messengertransaction log file (Saflokmsgrlogv2.gdb).o Once Scheduler has determined that an archive needs to be performed, it will archive the records fromthe Safloklogv2.gdb file, and put them into an ARC SAFLOKLOG####.gdb file.o Once an archive file has been created, and a transaction history report is run that spans into thearchived records, you will get 2 or more different reports, illustrated below. The top report would befrom the Current database, and the second report is from the archive. SAFLOKPage 11 of 2606 11
TMSystem 6000 Reference Manual Section 22.3.2 Scheduler Backup ConfigurationNext, we will configure theBackup settings.1. Click on the “Backup” entry under the“Tasks” field. Then, click “Daily”under “Perform this task:”o This setting will configure the backup task to run every day, at the time specified in the “Start time”field. By default, this is 3:00AM. A backup usually takes around 15‐20 minutes. Keys cannot be madeduring this time. Choose a time that will interfere with the property’s operations the least. Check all ofthe boxes for each day of the week, and also check the boxes for “Include/Sweep 6000”. The Sweepperforms extra maintenance and cleanup on the database.2. Next, click the “Task Data” tab. Inthe “Backup Directory” field,select where you want thedatabase backups to be stored.3. Click browse and select thefolder/drive you wish to storethe backups in.The best practice is to backup toan external location, such as anetwork drive or USB flash drive.If neither is available, then youmust create a folder on the localhard disk to store the backups.o By default, the Backup Count is set to 7. This determines the number of backups that are stored in theBackup Directory. It is recommended to leave this setting on the default. When the number of backupsreaches the Backup Count number, the newest backup will replace the oldest backup.4. When finished, click Apply to save the settings. The Scheduler is now configured properly. SAFLOKPage 12 of 2606 11
TMSystem 6000 Reference Manual Section 22.4 Saflok‐Client Installation Procedure1. If you are using the CD, simply insert it into thecomputer you wish to install the software on,and the installation process will beginautomatically. If installing over the network,browse to the folder where the softwareis located, and double‐clickPgmStup3FB2 1.exe, and the installationprocess will begin.2. Click Next to continue. SAFLOKPage 13 of 2606 11
TMSystem 6000 Reference Manual Section 23. Select the destinationdirectory. Click Next touse the default.4. Select whether you would like to backup replaced files. This isonly necessary if you are re‐installing the client software. Forthe first installation, you may select No and click Next. SAFLOKPage 14 of 2606 11
TMSystem 6000 Reference Manual Section 25. Select the installation type.Since this is a workstation,you will need to select“Workstation/ClientStation”. Click Next.6. Next, select the softwarecomponents you wish toinstall. Once complete,select Next.o Saflok Client is theprogram you use to makekeys.o Saflok Config is formodifying the database,and is generally notneeded on workstations.o Saflok CRS program allowsthe computer tocommunicate with anyUSB or Serial encoders,and is used to configureencoder / LPI stationnumbers. SAFLOKPage 15 of 2606 11
TMSystem 6000 Reference Manual Section 27. You are now ready toinstall. Click Next to startthe file copy process.8. After the installation is completed, click Finish.9. Next, launch the SaflokClient program. Thesoftware will ask you tofind the LAN basedtables (the database).Click OK, and a browsebox will be displayed. SAFLOKPage 16 of 2606 11
TMSystem 6000 Reference Manual Section 210. You may browse to the SaflokV2Data folder on the server (which should be shared on the network), or youcan use the UNC or IP path in the File name field (i.e. \\SAFLOKSERVER\SaflokV2Data or\\192.168.1.99\SaflokV2Data). As shown below, select the SAFLOKDATAV2.GDB file, and click Open. SAFLOKPage 17 of 2606 11
TMSystem 6000 Reference Manual Section 22.5 Configuring a USB Encoder1. Plug power and the USB cable into the encoder. Plug the USB cable into the computer.2. Windows will recognize the newhardware, and ask for a driver.The driver is located on theSaflok installation CD, in theDrivers\Insertion and MotorizedEncoder USB Drivers folder. Itwill install the driver for the USBHigh Speed Serial Converter.3. Windows will then prompt you toinstall the driver for the USB Serialport. Windows will need thedrivers for it as well. Browse tothe Drivers\Insertion andMotorized Encoder USB Driversfolder on the CD again. SAFLOKPage 18 of 2606 11
TMSystem 6000 Reference Manual Section 24. After the driver installation iscompleted, check the devicemanager to determine whichCOM port it is on. (Go to ControlPanel‐System‐Hardware Tab‐Device Manager.5. Expand the Ports section. Look for USBSerial Port (COM#). Take note of thenumber, you will need it when you addthe encoder station to the system.6. Double click on the CRS icon in the system tray.7. Click File, and then Log on.Enter your Username andpassword, and then clickthe settings tab.8. Click Add under the StationID assignments for thiscomputer section. SAFLOKPage 19 of 2606 11
TMSystem 6000 Reference Manual Section 29. Select Saflok Encoder, and click OK.10. Enter the Station IDnumber you wish to givethis encoder.11. Enter the COM Portnumber from the DeviceManager listing (i.e. if USBSerial Port COM3, enter3 in this field.)12. Check the USB Connection box. The Encoder baud rateshould be left on the default of 19200. Click Test For Encoder.13. If the encoder is communicatingproperly, you will see a successmessage. Click OK to continue, andclick OK again to save the encodersettings.The encoder is now ready to be used. SAFLOKPage 20 of 2606 11
TMSystem 6000 Reference Manual Section 22.6 Configuring a TCP/IP Encoder1. Double click on the CRS icon in the system tray.2. Click File, and then Log on.Enter your Username andpassword, and then click thesettings tab.3. Click the Add button underthe Station ID assignmentsfor the entire Saflok System.4. Enter the desired station ID forthe encoder.*Do not change the port number. SAFLOKPage 21 of 2606 11
TMSystem 6000 Reference Manual Section 25. Enter the desired IP address forthe encoder, and clickAdvanced.6. Click the Find All button. This willsearch the network for allavailable IP Encoders, and listthem by MAC Address. Eachencoder has a label on thebottom of the unit that showsits MAC address.7. Find the encoder you wish toconfigure in the list, and doubleclick on it. Click Configure.8. You will receive a message that the encoder accepted the command.Click OK to continue, and then click Close. Reset power to the encoderin order for the changes to take effect.9. After the encoder has finished powering up, click the Test For Encoder button.10. If the configuration is correct, you will see asuccess message. Click OK to continue, andthen click OK to save the encoder settings.The encoder is now ready to be used. SAFLOKPage 22 of 2606 11
TMSystem 6000 Reference Manual Section 22.7 Configuring an LPI1. Connect the LPI to an available serial port and ensure that it has power.2. Double click on the CRS icon in the system tray.3. Click File, and then Log on. Enteryour Username and password,and then click the settings tab.4. Click Add under the Station IDassignments for this computersection.5. Select Saflok Encoder, and click OK.6. Enter a station ID. Typically, LPI isused for LPI stations. If there aremultiple LPIs, use a number aswell (i.e. LPI1, LPI2, etc). Enter thePort number that the LPI isconnected to (i.e. if connected toCOM1, enter 1). Set the LPI Baudrate to match the baud ratesetting on the device – the defaultis 19200. The baud rate can be set on theLPI by going to the Setup Menu from themain menu on the LPI (option 3).RS232 Baud rate is option 1. SAFLOKPage 23 of 2606 11
TMSystem 6000 Reference Manual Section 27. Click the Test For LPI Button.8. If the configuration is correct, you will see asuccess message. Click OK to continue, andthen click OK again to save the station. SAFLOKPage 24 of 2606 11
TMSystem 6000 Reference Manual Section 22.8 Setting the Default Encoder and LPI Stations1. Double click the Saflok Client icon.2. Log on with your username and password,select OK.3. Click the System tab.4. Click the Terminal Settings button.5. Click the browse icon next to Encoder orLPI Station field. SAFLOKPage 25 of 2606 11
TMSystem 6000 Reference Manual Section 26. Select the station number that youcreated for the encoder or LPI to beused with this computer. Click OK toconfirm.7. Click OK to save the default station IDs.*The encoder and LPI are now configuredand ready to be used on the system. SAFLOKPage 26 of 2606 11
SECTION 3Lock and Keycard Features
TMSystem 6000 Reference Manual Section 33.1 IntroductionSAFLOK locks contain a small battery‐powered circuit board that includes a magnetic read head and three indicatorlights. These locks use standard credit card size keycards.When an encoded keycard is inserted into the lock and removed, the read head reads the magnetic code that hasbeen applied to the keycard by the encoder. This code is then analyzed by the circuit board. If the information iscorrect, voltage is applied to the locking mechanism to release the lock.A motor controls the locking mechanism on all SAFLOK MT and SL2500 locks. This motor is activated by a signalfrom the circuit board. The motor will reverse automatically after approximately six seconds.The locking mechanism on the Select is controlled by a solenoid. The signal from the circuit board activates thesolenoid, releasing the locking pin. The handle can then be turned to open the door. When the handle is turned,the solenoid is released and the locking pin is held in the locked position. The solenoid is also releasedautomatically after approximately six seconds.SAFLOK MT SAFLOKPage 2 of 2406/11
TMSystem 6000 Reference Manual Section 33.2 Keycard LevelsEach lock can be programmed to use multiple keycards, with each keycard operating independently from theothers. The lock code for a type of keycard will change only when a new keycard for that same type is created andinserted into the lock, regardless of what changes were made to other keycards.Room/UnitIndividual keys to each room that are issued upon arrival.SuiteTypically used for rooms with connecting doors. A Suite keycard will open two or more rooms.FailsafeIndividual keys for each room. These keys are made in advance and maintained in complete sets to be issued in theevent of a system or power failure when no other keys can be made. These keycards are backup keycard for guestrooms. They are usually made in advance and stored in a safe place. They can then be issued to guests in the eventof a power or system failure that temporarily prevents the making of new keycards.Limited UseThese keycards access only one lock and will open that lock only one to six times (as specified in the designconfiguration by the property).SectionOpens several rooms in a specified area.FloorOpens all of the rooms on a floor.InhibitOpens all of the locks and inhibits the keycard currently working the Room/Unit, Suite, and Fail‐safe level keycardsassigned to the lock. They will be used after a room is vacated. The inhibit keycard will not open the door and willinhibit the keys even if the dead bolt of the privacy switch is set.MasterThese keycards are used to divide the hotel into master areas to satisfy the needs of the various departments.Keycards used by housekeeping include Building Master keycards, Inhibit keycards, and Grand Master keycards.Grand MasterTypically operates all rooms on the property.Security/EmergencyOpens all rooms on the property and will override the dead bolt or privacy switch.Electronic LockoutThese keycards will double lock a lock from the outside, preventing all keycards, except the Emergency keycardfrom entering the room. SAFLOKPage 3 of 2406/11
TMSystem 6000 Reference Manual Section 33.2 Keycard Levels (continued)Special Lock LevelsSecondary Program Keycard (SPK)This keycard is used to reprogram the current Primary Program keycard (PPK) or remaster a different PPK into alock. This card should only be made at the direction of SAFLOK service personnel.Primary Program Keycard (PPK)This keycard is a non‐opening keycard that is used in conjunction with Program Information (PI) keycards andProgram Status (PS) keycards for programming locks and for performing special functions. It is also used toreprogram the current SPK or remaster a different SPK into a lock.Sub Functions within Keycard GroupsUnlatch/LatchAlternately leaves the lock unlatched or latched. When a lock is unlatched, no keys are necessary. This leveloperates a lock or a group of locks.PassThe room/unit, section, floor, and Grand Master levels can be programmed as pass levels to allow all the keys fromthe level to operate the lock.SelectableA keycard can be assigned to have access to special areas during the encoding process. An example might be givingthe keycard access to the parking garage or health club if the property charges for using these facilities. Up to sixdifferent selectable pass areas can be assigned in the system.Shift TimesMaster‐level keycards can be programmed to work only during certain hours of the day. When the keycard ismade, the user can select the start and end times of the shift. A keycard can only have one specified shift time. Ifthe keycard is used outside of the shift time, it will not work.Auto Unlatch/LatchA lock can be programmed to automatically unlatch and latch at specified times each day. Indicate theunlatch/latch times and the day of the week with the lock name (e.g., pool, Sunday through Thursday, unlatch at 9a.m. and latch at 10 p.m.; Friday and Saturday, 9 a.m. and latch at 12 a.m.).Memory Keycards / RFID Keycards or FOB’sStores information to track employees. When a memory keycard is used in a lock, it records the room number,date, and time of day. In addition, a memory card can be used to interrogate a lock. Locks must have softwareversion 12.15.03 or greater for interrogation with a memory card. SAFLOKPage 4 of 2406/11
TMSystem 6000 Reference Manual Section 33.3 Keycard SequenceEach type of keycard can be assigned a sequence range that indicates the number of times a new keycard can bemade, but not used in the lock, before the lock will be unable to recognize the next lock code and permit entry intothe room. This sequence range can be set from 1‐15 skips.When a new keycard is made it is encoded with the following information:1.Key Record Number – A number that indicates how the computer has filed the room number.2.Key Combination – A random code number generated by the computer when the key is made.3.Identification Number (ID#) – A number from 1‐255 that is assigned by the computer to differentiate onemaster keycard from another.4.New
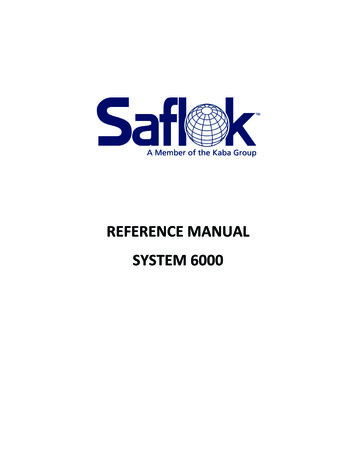
NETWORK PRINTER CAT 5 CABLE RS232 CABLE CLIENT USB CAT 5 CABLE CAT 5 CABLE ENCODER WITH TCP/IP CONNECTION ENCODER WITH SERIAL CONNECTION SAFLOK SERVER ENCODER WITH TCP/IP CONNECTION SWITCH (This diagram assumes that an Ethernet 10/100 multi-port hub is installed on the network.) SAFLOK Server Operating system: Windows XP Professional or .