Transcription
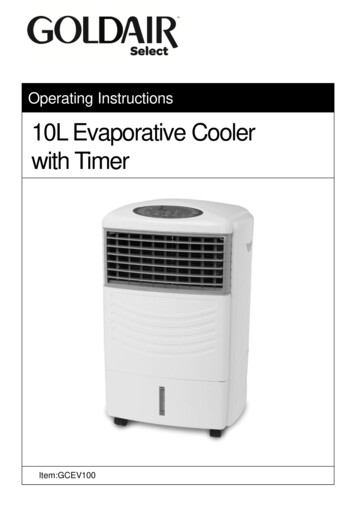
Portable Evaporative Air Coolerfor Outdoor, Indoor & Commercial UseEnfriador de aire portátil por evaporaciónIdeal para Uso Externo, Interno y ComercialOWNER’S MANUALOFF03ON21OFFONSWINGSPEEDCOOLRead and save these instructions before useMANUAL DEL USUARIOLea y guarde estas instrucciones antes de usarModel: CO60PMModelo: CO60PMPower rating: 220 WattsVoltage rating: 120 Volt AC, 60HzPotencia: 220 WattVoltage: 120 Volt AC, 60HzFor product inquiries or support, visit www.honeywellaircoolers.comPara consultas sobre productos o soporte técnico visite: www.honeywellaircoolers.comCustomer Support : 1-800-474-2147Centro de servicios al cliente: 1-800-474-2147Made in P.R.C.Fabricado en China
QUICK START GUIDE123Fill with water and plug into a standardpower outlet.Note: Please make sure the household power voltagematches the product specifications.Place near an open door or window.Note : Evaporative air cooler requires cross ventilation.Turn ON and enjoy the cooling breeze.Note: Start with LOW speed and gradually increaseto higher speed for optimum cooling performance.
INDEXRead all instructions carefully before setting up and operating the cooler, andplease keep this instruction manual for future reference. This manual is designed toprovide you with important information needed to setup, operate, maintain, andtroubleshoot your cooler. Failure to follow these instructions may damage and/orimpair its operation and void the warranty.SECTION1.2.3.4.5.PAGETHANK YOU .USER TIPS .SAFETY .PARTS DESCRIPTION .USE & OPERATION .Control Panel .Control Knobs .Filling with Water .6. CLEANING & MAINTENANCE .7. TROUBLESHOOTING GUIDE .8. TECHNICAL SPECIFICATIONS .9. ELECTRICAL WIRING DIAGRAM .10. SERVICE AND WARRANTY . .235899101113151617181
THANK YOUCongratulations on your purchase of this versatile Honeywell Evaporative Air Cooler. Foroptimum cooling from your cooler, fill the water tank to maximum level and load ice insidethe ice compartment before you turn on your air cooler.Cooler Location – Indoors (Important - Please Read!)Place the cooler in front of an open door or window. Ensure that there is adequate crossventilation in the room by leaving a door or window open opposite the cooler.Following these guidelines will ensure your cooler will work as effectively as possible.Not an Air Conditioner (Important - Please Read!)The evaporative air cooler is not an air conditioner as it does not use a compressor or refrigerantgas. It should not be expected to cool as efficiently as a refrigerated air conditioner.2
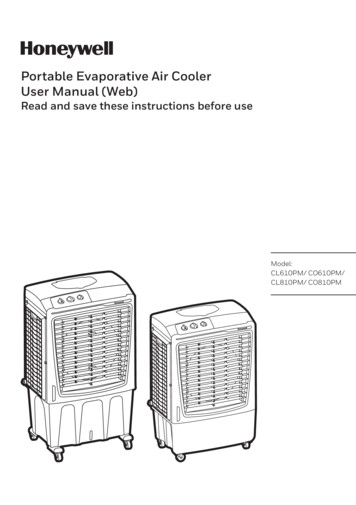
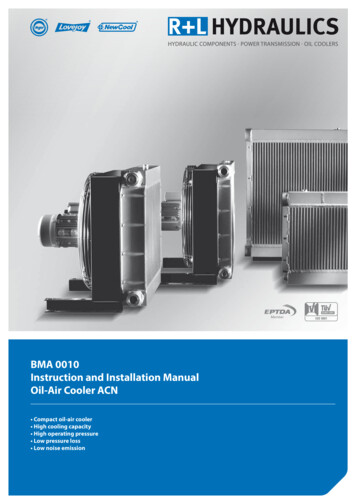
USER TIPSEnergy Efficient, No CompressorHoneywell Evaporative Air Coolers are built to maximize energy efficiency and keep costs low.Warm air is drawn into the cooler through a dust and odor-reducing carbon filter and enters theHoneycomb Cooling Media. Water pumped from the tank pours over the Honeycomb CoolingMedia. As the warm air passes through the Honeycomb Cooling Media, the water absorbs theheat, naturally cooling and humidifying the air. A fan propels the cooled air out into the room. Thisno-compressor system cools naturally, efficiently and inexpensively.Honeycomb Cooling MediaWarm anddry airCool andhumid airPumpWaterEvaporative Air Cooling Mechanism3
USER TIPSIndoor UseThe recommended maximum relative humidity level is 60% orless, which allows a noticeable temperature decrease. Thetemperature decrease will be greater in drier climates becausehigher evaporation occurs when the humidity is low.The evaporative air cooler should not be used in enclosedspaces. It must be kept level and there must be water in thewater tank. The room should have doors and windows openedto allow free air flow. The evaporative air cooler works bestwhen placed near an open window, so that outside air is drawninto the evaporative air cooler, circulates in the room, thenexits via the door. The maximum cooling effect is felt when aperson is in the flow of air coming out of the evaporative aircooler.The evaporative air cooler can also be used to humidify dryair during cool weather. To be used for humidification thewindows and doors should be closed to allow the humidifiedair to accumulate.Room with open windows & door(RECOMMENDED)Room with closed windows & door(NOT-RECOMMENDED)Outdoor UseUnit should be placed a minimum 10 inches away from any wall.NOTEWhen the product is used for the first time the Honeycomb Cooling Media will have an odorwhich will dissipate in a few hours or so of initial use.4
SAFETYRead and Save These Instructions:When using electrical appliances, basic safety precautions should always be followed: Your cooler runs on 120 Volt AC, 60 Hz current. Check thehousehold voltage to ensure it matches the appliance's rate120V - 60 Hzspecification. Before operating the product remove it from its packagingand check that it is in good condition.SHOCK HAZARD DO NOT operate any product with a damaged cord or plug.We recommend not using an extension cord with this appliance. DO NOT run power cord under carpeting, or cover it withrugs or runners. Keep the cord away from areas where it maybe tripped over. Always unplug the product before refilling the water tank. Always unplug the appliance from the power source beforecleaning, servicing or relocating the unit. Remove the power cord from the electrical receptacle bygrasping and pulling on the power cord plug-end only, neverpull the cord. DO NOT use the product in areas where gasoline, paint orother flammable goods and objects are stored. When using the COOL setting, check the water tank toWATER LEVEL INDICATORensure that it is full. Operation of this cooler on the COOLsetting with an empty tank may result in damage to the water pump. Warning: To reduce the risk of fire or electric shock, do not use this appliance with any solidstate speed control device.031ON2FFOFFONOSWINGCOOLMAXMIN5
SAFETY DO NOT attempt to repair or adjust any electrical or mechanical functions of the cooler, as this may void the warranty. DO NOT cover the air inlet or outlet on the appliance as thismay cause motor damage. DO NOT insert or allow objects to enter any ventilation orexhaust opening as this may damage the product and couldcause an electrical shock or fire. DO NOT operate with the Honeycomb media removed as thiswill overload and damage the motor. DO NOT leave the operating appliance unattended for anyextended period of time. DO NOT let children play with this appliance, packaging orplastic bags. If the unit is damaged or if it malfunctions, do not continue touse it. Refer to the Troubleshooting Guide (page 15) andcontact the service center. Place the unit on a level floor. This product is not intended for use in wet or damp locations. DO NOT use in bathrooms. Never locate the product whereit may fall into a bathtub or other water container. Store in a dry area when not in use. This appliance is not intended for use by persons (includingchildren or elderly) with reduced physical, sensory or mentalcapabilities, or lack of experience and knowledge, unlessthey have been given supervision or instruction concerninguse of the appliance by a person responsible for their safety. Always grip the side handles to move the cooler.6FFONOCOOL1023FFOONSWINGFLOOR LEVEL
SAFETY Use Only on GFCI Protected Receptacles. Power cords have to be contained. If they must run along the ground, make sure every inchof them is secured so they will not be tripped over. The wiring and connections must be waterproof. Be sure the connections (to the air cooler)never get wet. Your unit is waterproof, but everything attached to it must be waterproof, too. Set up your unit so it cannot be tripped over or wobble loose. It must rest on a solidsupport.7
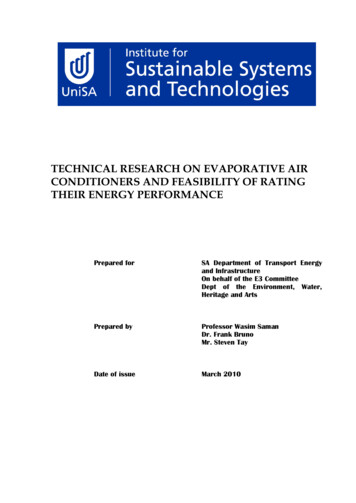
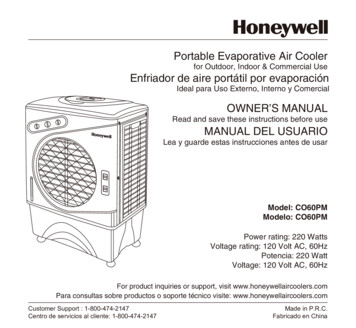
PARTS 71041311856121 Water Inlet and IceLoading Compartment2 Handle3 Left Honeycomb Panel4 Lever for Horizontal Louvers5 Water Tank6 Casters7 Horizontal Louvers8 Water Level Indicator879 Control Panel10 Right Honeycomb Panel11 Continuous Water Supply Connection12 Drain Plug13 Backside Honeycomb Panel14 Power Cord & Plug15 Rear Grill Removal Screws16 Water Fill Door17 Honeycomb Cooling Media
USE & OPERATIONCONTROL PANELOFF ON03OFF ON21COOLSPEEDSWING9
USE & OPERATIONCONTROL KNOBSSPEED / ON - OFFConnect to the power supply and turn the Speed knob. The fanwill start. Change the speed from 1 for Low to 2 for Medium to3 High. To switch OFF the unit turn the Speed know to 0.031SPEEDCOOLTo begin cooling the desired area turn the COOL switch ON.The water pump will operate. You can feel the cooler air afterthe Honeycomb media is completely wet.OFF ONCOOLSWINGTurn the SWING switch ON. The louvers will begin to movefrom right to left automatically. Manually adjust the horizontallouvers to change vertical airflow.Horizontal LouversManually adjust the horizontal louvers to change verticalairflow.102OFF ONSWING
USE & OPERATIONCAUTIONUnplug from power when refilling.FILLING WITH WATERThe water tank can be refilled in two ways:Water Inlet (Manual Refill)Water can be filled into the water tank through the top opening.There is a hole for water to flow into the tank.Continuous Water Supply (Auto Refill)Connect a garden hose to the continuous water supply inlet.WATER INLET (MANUAL REFILL) To refill the water tank, pull out the Water Fill Door locatedon the top of the unit (#16 on Page 8) and fill water to theMax, as indicated on the Water Level Indicator (#8 on Page 8). Do not fill water above the Max water level mark. For maximum cooling performance, put ice cubes inside theIce Loading Compartment located on the top of the Air Cooler(#1 on Page 8).Water Fill DoorWater InletIce Compartment11
USE & OPERATIONCONTINUOUS WATER SUPPLY (AUTO REFILL)CAUTIONUnplug from power source before fillingThis automated process eliminates the need to manually refill the water tank. Connect a garden hose to the continuous water supply inlet. Turn on the water supply. The water tank will refill automatically. The water float valve will detect the water level and will automatically startor stop the water flow. Plus the unit into the power source and turn the unit ON.Hose Connector12
CLEANING & MAINTENANCEIMPORTANT The cooler is supplied with Honeycomb Cooling Media. The cleaning frequency for the Honeycomb media depends on local air and waterconditions. In areas where the mineral content of water is high, mineral deposits may build upon the Honeycomb Cooling Media and restrict air flow. Draining the water reservoir andrefilling with fresh water at least once a week will help reduce mineral deposits. If mineraldeposits remain on the Honeycomb media, the media should be removed and washed underfresh water. The media should be cleaned every two months or sooner, depending on yourneeds. Do not run the unit in COOL mode with stale water in the tank. Empty the tank and refill itwith fresh water if the water has been standing in the tank for an extended period of time. For best results, allow the Honeycomb Cooling Media to dry after each use by turning off thecool function 15 minutes before turning the unit off.WARNING Before cleaning, turn the unit off and disconnect from the power source. Use a damp cloth to remove dirt and dust from the outside of the unit. Never use abrasive cleaners. When the unit is not in use, store it in a dry place, out of direct sunlight.13
CLEANING & MAINTENANCEDRAINING AND CLEANING THE WATER TANKTurn the power off and disconnect the air cooler from the power supply.Move the unit to a location where it can be drained.Remove the drain plug and allow the tank to empty(#12 on Page 8).Refill the water tank up to the maximum level with clean water and drainit completely. Fill water tank and rinse at least 2-3 times before use.Water DrainPlug After cleaning ensure that the drain plug is back in place. Plug into the power supply and turn on unit. CLEANING THE HONEYCOMB COOLING MEDIA Turn off the unit, and unplug the power cord from walloutlet. Rotate the unit facing the back panel, and locate the Rear Grill Removal Screws (#15 on Page 8). Remove the 4screws with a screw driver.Pull the rear grill panel, until it is completely removed.This cooler has Honeycomb cooling media on the right andleft panels. The cleaning and removal procedure is the sameas rear panel.The Honeycomb cooling media can now be seen. Cleanhoneycomb with clean cloth to remove all the dust &dirt particles.Once cleaning is finished, reassemble the unit.Plug into the power supply and turn on unit.14Open Screws
TROUBLESHOOTING GUIDEPROBLEMPOSSIBLE CAUSESOLUTIONNo discharge of airCord is not plugged in.Make sure power cord isplugged in and the supplyswitch is ON.Power is not ON.Turn the unit ON by changingthe mechanical knob positionon the control panel.Pump is not turned ON.Turn on COOL function fromremote or control panel.Low or no water in tank,when COOL is selected.Refill water tank.Damaged Pump or Calciumdeposits on blower.Contact Customer ServiceCenter.When the Cooler is new.When the unit is used for thefirst time, the HoneycombCooling Media will have anodor, which will dissipatewithin a few hours of initial use.If the Cooler has been used.There may be an algae issue.Replace the Honeycomb CoolingMedia.Not Cooling / Unit ismaking noiseOdorsCustomer Support: 1-800-474-214715
TECHNICAL SPECIFICATIONSMODEL NO.VoltageFrequencyWattageAmpereWater Tank CapacityCooling MediaProduct Dimension (inches)Net WeightELECTRICAL WIRING DIAGRAM16CO60PM120 V60 Hz220 Watts1.83A15.8 GallonHoneycomb27.56(L) X 18.35(W) X 40.0(H)41.5 lbs
SERVICE AND WARRANTY1-YEAR LIMITED WARRANTYRead all the instructions before attempting to use this product.This 1 year limited warranty applies to repair or replacement product found to be defective inmaterial or workmanship.A. This warranty does not apply to any damage resulting from commercial, abusive, unreasonableuse or supplemental damage. Defects that are the result of normal wear and tear will not beconsidered manufacturing defects under this warranty.JMA NORTH AMERICA LLC IS NOT LIABLE FOR INCIDENTAL OR CONSEQUENTIALDAMAGES OF ANY NATURE. ANY IMPLIED WARRANTY OF MERCHANTABILITY ORFITNESS FOR A PARTICULAR PURPOSE ON THIS PRODUCT IS LIMITED IN DURATIONTO THE DURATION OF THIS WARRANTY.Some jurisdictions do not allow the exclusion or limitation of incidental or consequentialdamages or limitations on how long an applied warranty lasts, so the above limitations orexclusions may not apply to you. This warranty gives you specific legal rights, and youalso may have other rights which vary from jurisdiction to jurisdiction. This warrantyapplies only to the original purchaser of this product from the original date of purchase.B. At its option, JMA NORTH AMERICA LLC will repair or replace this product if it is found to bedefective in material or workmanship.C. This warranty does not cover damage resulting from any unauthorized attempts to repair orfrom any use not in accordance with the instruction manual.17
SERVICE AND WARRANTYD. Please read the Instruction Manual carefully before setting up or using this product. If youbelieve this product to be suffering from a manufacturing fault, or if you have inquiries aboutthis product, please contact our Customer Support:CUSTOMER SUPPORTJMA North America LLCMahwah, New Jersey 07495 USAPhone : 1-800-474-2147Email: info@jmana.usWeb: www.honeywellaircoolers.comWhen contacting our Customer Support, please have the information below along with theproof of purchase. All warranty requests must be accompanied by a proof of purchase, whichis a copy of the original receipt.Model: .Date of purchase: .Purchased from : .18
GUÍA DE INICIO RÁPIDO1Llene con agua y conecte a una toma decorriente estándar.Nota: Por favor, asegúrese de que la toma de corrienteesta ajustada a la configuración correcta de acuerdo conlas especificaciones del producto.2Colocar cerca de una puerta o ventanaabierta.Nota: Enfriadores de aire por evaporación trabajan conel mecanismo de enfriamiento por evaporación querequiere una ventilación cruzada3Encienda y disfrutar de la brisa fresca.Nota: Comience con velocidad baja y aumentargradualmente a una velocidad más alta para unrendimiento óptimo de enfriamiento.
ÍNDICELea cuidadosamente todas las instrucciones antes de configurar y operar la unidad, y porfavor guarde este manual de instrucciones para futuras consultas. Este manualestá diseñado para proporcionarle información importante necesaria para laconfiguración,operación, mantenimiento, y resolución de problemas de suacondicionador. No seguirlas instrucciones puede dañarlo y/o perjudicar sufuncionamiento y anular la garantía.SECCIÓN1.2.3.4.5.PÁGINAGRACIAS .RECOMENDACIONES PARA EL USUARIO .NORMAS DE SEGURIDAD .DESCRIPCIÓN COMPONENTES .USO Y FUNCIONAMIENTO .Panel De Control .Mandos De Control .Llenado Del Tanque .6. LIMPIEZA Y MANTENIMIENTO .7. GUÍA DE SOLUCIÓN DE PROBLEMAS .8. ESPECIFICACIONES TÉCNICAS .9. ESQUEMA ELÉCTRICO .10. SERVICIO Y GARANTIA .2021232627272829313334343519
GRACIASFelicitaciones por su compra de este versátil Enfriador de aire por evaporación Honeywell. Paraun óptimo desempeño de su unidad, primero llénela con agua. Si dispone de hielo, eso aumentarásu potencia de enfriamiento. Por favor lea estas instrucciones cuidadosamente.Importante: Colocación de Enfriador (cuando se utiliza en el interior)Situe el enfriador en frente de una ventana o puerta abierta. Aseguresé que hay una adecuadaventilación en la estancia dejando una puerta o ventana abierta en el otro lado del enfriador.Si sigue estas instrucciones se asegurará que su enfriador trabajará de forma efectiva.Importante: No es un Aire AcondicionadoEl enfriador de aire evaporativo no es un aire acondicionado ya que no utiliza un compressor ogas refrigerante. No deberia esperar que enfrie tan bajo como un aire acondicinado.20
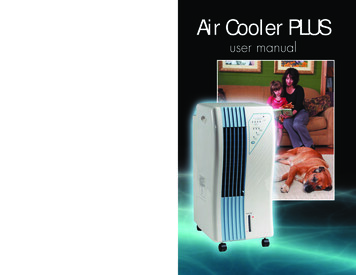
RECOMENDACIONES PARA EL USUARIOFRÍO EFICIENTE NATURALEl enfriamiento de aire por evaporación es la manera más natural de enfriamiento, similar a unabrisa que recorre un lago. Esta disminución de la temperatura de esta brisa produce un efectorefrescante y relajante en la personas. El enfriador de aire evaporativo refresca el aire por mediode la evaporación del agua. Cuando el agua se evapora del aire, se obtiene como resultado unamezcla de moléculas de aire y agua. Este intercambio químico requiere calor que es tomado delas moléculas del agua, resultando un enfriamiento de la temperatura del aire que sale del aparato.Medio de enfriamiento HoneycombAire Cálidoy secoAire Húmedoy fríoBombaAguaMecanismo de enfriamiento de aire por Evaporación21
RECOMENDACIONES PARA EL USUARIOUso En El InteriorEl nivel recomendado de humedad relativa máxima es 60% omenos, lo que permite que se aprecie un descenso en latemperatura. La disminución de temperatura será mayor en losclimas mas secos, porque una mayor evaporación es producidacuando la humedad es baja.El enfriador de aire no debe ser utilizado en espacios cerrados.Se debe mantener el nivel de agua en el tanque. La habitacióndebe tener puertas y ventanas abiertas para permitir el flujo deaire libre. El enfriador de aire por evaporación funciona mejorcuando se coloca cerca de una ventana abierta, de modo queel aire exterior es succionado por el enfriador, el aire circula enel cuarto, y luego sale a través de la puerta o ventana. El efectode enfriamiento máximo se siente cuando la persona estaubicado directamente en el flujo de aire que sale desde elenfriador.El enfriador de aire también puede ser utilizado para humidificarel aire seco durante el invierno. Para poder utilizarlo como unhumidificador, las puertas y ventanas deben estar cerradas parapermitir que se acumule el aire humidificado. El enfriador de airepor evaporación no es un aire acondicionado, ya que no utiliza uncompresor o un gas refrigerante. No se debe esperar que enfrie elambiente tan eficientemente como un aire acondicionado derefrigeración.Operar con la ventana y puertaabierta (RECOMENDADO)Operar con la ventana y puertacerrada (NO RECOMENDADO)Uso En El ExteriorLa unidad debe ser colocada mínimo 10 pulgadas (25,40 cm) de distancia de cualquier pared.NOTACuando se utiliza el producto por primera vez el panal Honeycomb de enfriamientoemitirá un olor q se disipara aproximadamente en una semana después del uso inicial.22
NORMAS DE SEGURIDADLea y Guarde Estas Instrucciones:Cuando se utilicen aparatos eléctricos, siempre deberían tomarse precauciones deseguridad básicas: Su enfriador trabaja a una tensión de 120 V AC, 60 Hz. Revisela tensión de su hogar para asegurarse de que coincide con la120 Volt AC 60Hzespecificación nominal del aparato. Antes de poner en marcha el aparato quite todo el embalaje ycompruebe que el enfriador esté en buenas condiciones NO ponga en funcionamiento ningún producto con cables PELIGRO DE ELECTROCUCIÓNoclavijas de conexión dañadas. Recomendamos no utilizarprolongadores eléctricos con este aparato. No ubique el cable de alimentación debajo de alfombras.Ubique el cable de alimentación lejos de lugares en los que sepueda pisar. Siempre desenchufe el producto antes de rellenar el tanquedeagua. Siempre desenchufe el aparato de la alimentación antesdelimpiarlo, repararlo ó reubicarlo. Desenchufe el cable de alimentación tirando desde el extremode la clavija de alimentación, nunca tire del cable. No use el producto en áreas donde se almacenegasolina,pinturas u otras sustancias y objetos inflamables. Cuando se usa la opción de Enfriamiento (COOL), porINDICADOR DE NIVEL DE AGUAfavorrevise el tanque de agua para asegurarse de que estélleno.El funcionamiento de esta unidad en la opción deEnfriamientocon el tanque vacío puede dañar la bomba de agua. Use sólo en receptáculos GFCI protegidos. No operar ningún ventilador con un cable o enchufe dañado. Desechar el ventilador o acercasea un centro de servicio autorizado para su revisión y / o reparación. ADVERTENCIA: Para reducir el riesgo de incendios o descargas eléctricas, no usar el ventiladorcon cualquier sólido - dispositivo de control de velocidad.031ONCOOL2FFOFFONOSWING23
NORMAS DE SEGURIDAD NO intente reparar ni ajustar ninguna parte eléctricaómecánica del enfriador, ya que esto puede anular lagarantía. NO obstruya la entrada ó salida de aire del aparato yaquepuede causar daños al motor. NO inserte ni permita que entren objetos a través deningunaabertura de ventilación ó salida ya que esto puededañar alproducto y podría causar descargas eléctricas óincendios. NO ponga en funcionamiento el aparato sin el medioHoneycomb" ya que esto sobrecargará y dañará al motor. NO deje el aparato funcionando sin atención por unperiodolargo de tiempo. NO deje que los niños jueguen con este aparato, ni consuembalaje, ni con las bolsas de plásticos. Si la unidad se daña o funciona mal, desconectala. Consultela sección de Solución de problemas (P.34) y/o por favorbusque consejo profesional. Coloque la unidad sobre un piso nivelado. Este producto no se destina para uso en lugares mojadosoextremadamente húmedos. No lo use en baños ni en que no esten cubiertos. Cuando no se utilice siempre guárdelo en un lugar seco. Este aparato no se destina a ser usado porpersonas(incluyendo niños) con capacidades físicas,sensoriales ómentales reducidas, ó falta de experiencia yconocimiento, amenos que sean supervisados o instruidosacerca de su usopor una persona responsable de su seguridad. Para mover la unidad, coja de sus asas laterales y SIEMPRESIN AGUA EN EL TANQUE.24FFONOCOOL1023FFOONSWINGNIVEL DEL PISO
NORMAS DE SEGURIDAD Use sólo en receptáculos GFCI protegidos. Los cables eléctricos tienen que estar protegidos. Si van a estar extendidos a lo largo del suelo,asegúrese de que cada centímetro esté en perfecto estado y protegido para evitar tropiezos. El cable y los conectores tiene que ser resistentes al agua. Asegúrese de que las conexiones(al refrigerador de aire) nunca se humedezcan. Su equipo es resistente al agua, pero todoaquello que se le añada tiene que serlo también. Coloque su unidad en un lugar en el que no pueda tropezarse con ella y esté estable. Debeapoyarse en un soporte firme.25
DESCRIPCIÓN DE 71041311856121 Entrada De Agua Y Compartimiento DeCarga De Hielo2 Asa3 Panel Izquierdo4 Palanca Para Deflectores Horizontales5 Tanque De Agua6 Ruedas7 Deflectores Horizontales8 Indicador De Nivel De Agua2679 Panel De Control10 Panel Derecho11 Continuo De Agua Conexión A La Red12 Tapón De Vacio13 Panel Trasero14 Cable De Alimentación Y Enchufe15 Los Tornillos De La Rejilla Posterior16 La Puerta De Llenado De Agua17 Medio De Enfriamiento Honeycomb
USO Y FUNCIONAMIENTOPANEL DE CONTROLOFF ON03OFF ON21COOLSPEEDSWING27
USO Y FUNCIONAMIENTOMANDOS DE CONTROLVELOCIDAD / ENCENDIDO (SPEED / ON - OFF)Conecte a la red de alimentación y gire el mando de velocidad(SPEED). Comenzará a funcionar el ventilador. Cambie lavelocidad de 1 (Baja) a 2 (Media) ó a 3 (Alta). Para apagar launidad, gire el mando de Velocidad hasta 0.ENFRIAMIENTO (COOL)Para comenzar a enfriar el área deseada gire el botón COOLa ON. La bomba de agua funcionará y comenzará a sentir elaire fresco después de que el filtro Honeycomb este mojadocompletamente.OSCILACIÓN (SWING)Gire el botón SWING a ON. Las rejillas comenzará a moversede derecha a izquierda de forma automática. Ajustemanualmente los deflectores horizontales para cambiar el flujode aire vertical.DEFLECTORES HORIZONTALESAjuste manualmente los deflectores horizontales para cambiarel flujo de aire vertical.280321SPEEDOFF ONCOOLOFF ONSWING
USO Y FUNCIONAMIENTOPRECAUCIÓNDesconecte la unidad de la toma corriente cuando añada líquido.LLENADO DEL TANQUEEl equipo puede ser llenado de agua por:Entrada de Agua (Manualmente)Agua / hielo se puede colocar en el tanque a través de la abertura superior.Hay un agujero para que el agua fluya hacia el tanque.Suministro de Agua Continua (Auto Refill)Conectar una manguera de jardín a la entrada de suministro de agua continuo.ENTRADA DE AGUA (MANUALMENTE) Para rellenar el tanque de agua, tire de la puerta de llenadod deagua situado en la parte superior de la unidad (# 16 en lapágina 27) y llenar de agua al máximo, como se indica en elindicador de nivel de agua (# 8 en la página 27). No llenar el tanque por arriba del nivel máximo que se marca. Para obtener un rendimiento máximo de enfriamiento, ponercubitos de hielo en el interior del compartimiento de carga dehielo ubicado en la parte superior del refrigerante del aire.Puerta parallenado deaguaEntrada de aguaCompartimiento de hielo29
USO Y FUNCIONAMIENTOLLENADO DE AGUA (CONEXIÓN CONTINUA SUMINISTRO DE AGUA)PRECAUCIÓNDesconecte la unidad de la toma corriente antes de añadir agua.Este proceso automatizado elimina la necesidad de rellenar manualmente el depósito de agua. Conecte firmemente el conector de suministro de agua continuo (situado en el panel lateralinferior izquierda # 11 en la página 27) para el suministro de agua. Abrir el suministro de agua. El tanque de agua se llenará automaticamente. La válvula de flotador de agua detecta el nivel de agua y automáticamente inicia o detiene elflujo de agua. Conecte la unidad a la fuente de alimentación y encender la unidad.INSTALACIÓN DEL ADAPTADOR DE MANGUERA Y DE LA VÁLVULA DE FLOT Conecte el conector de la manguera
to allow free air flow. The evaporative air cooler works best when placed near an open window, so that outside air is drawn into the evaporative air cooler, circulates in the room, then exits via the door. The maximum cooling effect is felt when a person is in the flow of air coming out of the evaporative air cooler.