Transcription
Document 452413Kitchen HoodsType I and Type II Installation, Operation and Maintenance ManualPlease read and save these instructions for future reference. Read carefully before attempting to assemble, install,operate or maintain the product described. Protect yourself and others by observing all safety information. Failureto comply with instructions could result in personal injury and/or property damage!Type IType IIGeneral Safety InformationOnly qualified personnel should install this system.Personnel should have a clear understanding of theseinstructions and all applicable local and nationalbuilding and fire codes. Personnel should be awareof general safety precautions. SMACNA guidelinesshould be followed for hanging and supporting thehood. If more information is needed, contact a licensedprofessional engineer before moving forward.DANGERAlways disconnect power before working on or nearany electrical components in the hood. Lock and tagthe disconnect switch or breaker to prevent accidentalpower up.NOTEAll information with regards to the self-cleaning AutoScrubber hoods and controls can be found in theAuto Scrubber hood and Auto Scrubber control panelinstallation, operation and maintenance manuals.NOTEAll information with regards to energy recovery greasefilters (ERF) and ERF hoods and controls can be foundin the Energy Recovery Filter installation, operationand maintenance manuals.NOTEFollow all local electrical and safety codes, as wellas the National Electrical Code (NEC), and thelatest edition of the National Fire Protection AgencyStandard for Ventilation Control and Fire Protectionof Commercial Cooking Operations (NFPA 96). Followthe Canadian Electrical Code (CEC) and ULC-S650 ifinstalling this product in Canada. Kitchen Hoods Type I and Type II1
ReceivingTable of ContentsUpon receiving the product, check to ensure all itemsare accounted for by referencing the delivery receipt orpacking list. Inspect each crate or carton for shippingdamage before accepting delivery. Alert the carrierof any damage detected. The customer will makea notation of damage (or shortage of items) on thedelivery receipt and all copies of the bill of lading whichis countersigned by the delivering carrier. If damaged,immediately contact your Greenheck Representative.Any physical damage to the unit after acceptance is notthe responsibility of Greenheck Fan Corporation.Receiving, Unpacking, Handling and Storage. . . . . . 2Removing from Storage. . . . . . . . . . . . . . . . . . . . . . . . 2Canopy Hood Weights . . . . . . . . . . . . . . . . . . . . . . . . . 3Proximity Hood Weights. . . . . . . . . . . . . . . . . . . . . . . . 4Supply PlenumWeights and Dimensions . . . . . . . . . . . . . . . . . . . . . . . 4Prior to Installation. . . . . . . . . . . . . . . . . . . . . . . . . . . . 5Wall or Single Island Canopy HoodsHood Installation Overview. . . . . . . . . . . . . . . . . . . . 5-6Filler Panel Installation. . . . . . . . . . . . . . . . . . . . . . . . . 7Clearance Reduction MethodsTop, Back, Front and End. . . . . . . . . . . . . . . . . . . . . 7-8Installing Duct CollarsExhaust Duct Collars . . . . . . . . . . . . . . . . . . . . . . . . . . 8Integral Supply Duct Collars. . . . . . . . . . . . . . . . . . . . . 8Installing the Back Supply PlenumInstall the Supply Duct Collar. . . . . . . . . . . . . . . . . . . . 9Hang the Plenum . . . . . . . . . . . . . . . . . . . . . . . . . . . . . 9Ductwork. . . . . . . . . . . . . . . . . . . . . . . . . . . . . . . . . . . . 9Continuous Capture Plenum Hoods. . . . . . . . . . . . . . 9Installing Front/Side External Supply PlenumsUsing the Uni-strut. . . . . . . . . . . . . . . . . . . . . . . . . . . 10Using Hanger Brackets and Threaded Rod. . . . . . . . 10Installing the Supply Duct Collar to the Plenum. . . . . 10Installing Backsplash PanelsFlat Backsplash Panels. . . . . . . . . . . . . . . . . . . . . . . . 11Insulated Backsplash Panels . . . . . . . . . . . . . . . . . . . 11Installing End Skirts . . . . . . . . . . . . . . . . . . . . . . . . . . 12Electrical ConnectionsHood Lights / Fan and/or Thermal (Tempering)Switches / Keypads or Touchscreens (Vari-Flow). . . 12Installing Enclosure Panels . . . . . . . . . . . . . . . . . . . . 13Double Island Canopy Style HoodsInstalling U-Channel Strips. . . . . . . . . . . . . . . . . . . . . 14Proximity (Backshelf) Hoods . . . . . . . . . . . . . . . . . . . 14Plate Shelf with Duct Enclosure Installation. . . . . . . . 14Balancing the Kitchen Exhaust System . . . . . . . . . . 15Testing Hood Air Volume - Procedureswith Baffle Filters (GH Series). . . . . . . . . . . . . . . . 16-17with High Velocity Cartridge Filters (GK Series). . 18-19with High Efficiency Filters (GX and GG Series). . 20-21Perforated Face Supply/External Supply Plenum.22-23Short Circuit Hoods . . . . . . . . . . . . . . . . . . . . . . . . . . 24Exhaust Air Balancing Baffles. . . . . . . . . . . . . . . . . . 25Supply Manual Balancing Baffles . . . . . . . . . . . . . . . 25Wiring DiagramsAmerex Wiring Plan View. . . . . . . . . . . . . . . . . . . . . 26Ansul Wiring Plan View . . . . . . . . . . . . . . . . . . . . . . 27Wiring Plan View for Kitchen Systems. . . . . . . . . . . . 28Wiring for Switch Panels and Circuit Diagrams. . . . . 29MaintenanceDaily, Weekly, Periodic . . . . . . . . . . . . . . . . . . . . . . . . 30Condensate Hood Baffle and Air Diffusers. . . . . . . . . 30Grease Grabber Filters Installation & Cleaning. 30-31Filter Washing Frequency Guide. . . . . . . . . . . . . . . . . 32Troubleshooting. . . . . . . . . . . . . . . . . . . . . . . . . . . 33-34Replacement Parts. . . . . . . . . . . . . . . . . . . . . . . . . . . 35Maintenance Log. . . . . . . . . . . . . . . . . . . . . . . . . . . . . 36Our Commitment. . . . . . . . . . . . . . . . . . . . . . . . . . . . . 36UnpackingVerify that all required parts and the correct quantityof each item have been received. If any items aremissing, report shortages to your local representativeto arrange for obtaining missing parts. Sometimes itis not possible that all items for the unit be shippedtogether due to availability of transportation and truckspace. Confirmation of shipment(s) must be limitedto only items on the bill of lading. Filters are shippedon a separate skid in their original packaging. Do notremove factory packaging or install filters until just priorto commissioning. Remove all other shipping/packingmaterials.HandlingUnits are to be rigged and moved by the lifting bracketsprovided or by the skid when a forklift is used. Locationof brackets varies by model and size. Handle in sucha manner as to keep from scratching or denting.Damaged finish may reduce ability of unit to resistcorrosion.StorageUnits are protected against damage during shipment. Ifthe unit cannot be installed and operated immediately,precautions need to be taken to prevent deterioration ofthe unit during storage. The user assumes responsibilityof the unit and accessories while in storage. Themanufacturer will not be responsible for damage duringstorage.The ideal environment for storage of the hood andaccessories is indoors, above grade in a clean, dryatmosphere that is sealed from the elements. While instorage, inspect equipment routinely. If any moisture,dirt or other accumulations are found on the hood orany of the parts, the source should be located andeliminated.Removing from StorageAs equipment is removed from storage to be installedin their final location, it should be protected andmaintained as outlined in the Handling section above.2Kitchen Hoods Type I and Type II
Canopy Hood WeightsHood Depth (Multiply by Length) for Hood Weight*Hood Model2 ft.609 m2.5 ft.762 m3 ft.914 m3.5 ft1.067 m4 ft1.219 m4.5 ft1.372 m5 ft1.524 m5.5 ft1.676 m6 ft1.829 m6.5 ft1.981 m7 ft2.134 mGH, GK, GX,GG, GTEW30 lbs/ft44.64 kg/m32 lbs/ft47.62 kg/m35 lbs/ft52.09 kg/m38 lbs/ft56.55 kg/m40 lbs/ft59.53 kg/m42 lbs/ft62.50 kg/m44 lbs/ft65.48 kg/m46 lbs/ft68.46 kg/m48 lbs/ft71.43 kg/mGH, GK, GX,GG, GTDW36 lbs/ft53.57 kg/m38 lbs/ft56.55 kg/m41 lbs/ft61.01 kg/m44 lbs/ft65.48 kg/m46 lbs/ft68.46 kg/m48 lbs/ft71.43 kg/m50 lbs/ft74.41 kg/m52 lbs/ft77.38 kg/m54 lbs/ft80.36 kg/m40 lbs/ft59.53 kg/m44 lbs/ft65.48 kg/m48 lbs/ft71.43 kg/m52 lbs/ft77.38 kg/m56 lbs/ft83.34 kg/m60 lbs/ft89.29 kg/m64 lbs/ft95.24 kg/m68 lbs/ft101.20 kg/m54 lbs/ft80.36 kg/m57 lbs/ft84.83 kg/m60 lbs/ft89.29 kg/m63 lbs/ft93.75 kg/m66 lbs/ft98.22 kg/m69 lbs/ft102.68 kg/mGH, GK,GX, GGFWGH, GK,GX, GGCWGH, GK,GX, GGSW44 lbs/ft65.48 kg/m48 lbs/ft71.43 kg/m52 lbs/ft77.38 kg/m56 lbs/ft83.34 kg/m60 lbs/ft89.29 kg/mGH, GK,GX, GGRW44 lbs/ft65.48 kg/m48 lbs/ft71.43 kg/m52 lbs/ft77.38 kg/m56 lbs/ft83.34 kg/m60 lbs/ft89.29 kg/m52 lbs/ft77.38 kg/m54 lbs/ft80.36 kg/m56 lbs/ft83.34 kg/m58 lbs/ft86.31 kg/m61 lbs/ft90.78 kg/m63 lbs/ft93.75 kg/m65 lbs/ft96.73 kg/m54 lbs/ft80.36 kg/m56 lbs/ft83.34 kg/m58 lbs/ft86.31 kg/m61 lbs/ft90.78 kg/m63 lbs/ft93.75 kg/m65 lbs/ft96.73 kg/m61 lbs/ft90.78 kg/m66 lbs/ft98.22 kg/m68 lbs/ft101.20 kg/m72 lbs/ft107.15 kg/m75 lbs/ft111.61 kg/m79 lbs/ft117.56 kg/m83 lbs/ft123.52 kg/mGH, GK,GX, GGEVGH, GK,GX, GGDVGH, GK,GXFV28 lbs/ft41.67 kg/m32 lbs/ft47.62 kg/m36 lbs/ft53.57 kg/m40 lbs/ft59.52 kg/m44 lbs/ft65.48 kg/m48 lbs/ft71.43 kg/m52 lbs/ft77.38 kg/m56 lbs/ft83.34 kg/m60 lbs/ft89.29 kg/mGD243 lbs/ft63.99 kg/m48 lbs/ft71.43 kg/m53 lbs/ft78.87 kg/m58 lbs/ft86.31 kg/m63 lbs/ft93.75 kg/m68 lbs/ft101.20 kg/m73 lbs/ft108.64 kg/m78 lbs/ft116.08 kg/m84 lbs/ft125.01 kg/mGD358 lbs/ft86.31 kg/m64 lbs/ft95.24 kg/m70 lbs/ft104.17 kg/m76 lbs/ft113.10 kg/m82 lbs/ft122.03 kg/m88 lbs/ft130.96 kg/m94 lbs/ft139.89 kg/mGO/GD120 lbs/ft29.76 kg/m24 lbs/ft35.72 kg/m*Hood weight calculations are based on standard selection. Hood height, accessories and material gauge affect overall hood weight.Example 1 IMPERIALHood ModelGHEWHood Weight Equation (lb)Hood Length120 inches (10 ft.)Hood Depth60 inches (5 ft)10 ft x 40 lbs/ft 400 lbsHood ModelGD2Hood Weight Equation (kg)Hood Length42 inches (1.067 m)Hood Length (m) x Hood Depth Factor (kg/m) Hood Weight (kg)Hood Depth36 inches (0.914 m)1.067 m x 63.99 kg/m 68.278 kgHood Length (ft) x Hood Depth Factor (lbs/ft) Hood Weight (lbs)Example 2 METRICModel Number CodeGH-E-WFilterConfigurationGH - Baffle FilterGK - High Velocity Cartridge FiltersGX - Grease-X-Tractor GG - Grease Grabber GT - Energy RecoveryW - Wall Style CanopyV - Single-Island Style (V-Bank) CanopyP - Proximity (Backshelf) Make-Up Air StyleE - Exhaust OnlyD - Exhaust Only - Double-Wall FrontF - Face SupplyC - Face and Air Curtain SupplyS - Short CircuitR - Register (Short Circuit)Kitchen Hoods Type I and Type II3
Proximity Hood WeightsBase Weight and Weight per Length based on Hood DepthHood ModelGH, GK,GX, GGEP23 to 25 in.584 to .635 m26 to 28 in.660 to .711 m29 to 32 in.737 to .813 m33 to 36 in.838 to .914 mBase Weight28 lbs12.70 kg30 lbs13.61 kg31.5 lbs14.29 kg33.5 lbs15.20 kgWeight Per Length20.4 lbs/ft30.36 kg/m21 lbs/ft31.25 kg/m21.6 lbs/ft32.14 kg/m22.2 lbs/ft33.04 kg/m*Hood weight calculations are based on standard selection. Hood height, accessories and material gauge affect overall hood weight.Example 1 IMPERIALHood ModelGHEPHood Weight Equation (lb)Hood Length60 inches (5 ft)Base Weight (lbs) [ Length (ft) x Weight per Length (lbs/ft) ] Hood Weight (lbs)Hood Depth24 inches (2 ft)28 lbs/ft (5 ft x 20.4 lbs/ft) 130 lbsExample 2 METRICHood ModelGXEPHood Weight Equation (kg)Hood Length192 inches (4.877 m)Base Weight (kgs) [ Length (m) x Weight per Length (kg/m) ] Hood Weight (kg)Hood Depth33 inches (0.838 m)15.20 kg (4.877 m x 33.04 kg/m) 176.336 kgSupply Plenum - Weights and DimensionsWeightExternal SupplyPlenum TypeWidthHeightLength per sectionlbs/ftkg/min.mmin.mmft.mAir Curtain Supply (ASP)Refer to Air CurtainSupply PlenumWeight TableRefer Air CurtainSupply PlenumWeight Table10 to 24254.0 to 609.610254.03 to 16.91 to 4.88Split Air Curtain Supply(Split ASP)12.518.6424609.610254.03 to 16.91 to 4.88Back Supply (BSP)35.052.096152.4VariableVariable3 to 16.91 to 4.88Horizontal Supply (HSP)14.020.8312304.818457.23 to 16.91 to 4.88Variable Supply (VSP)16.023.8112304.818457.23 to 16.91 to 4.88Weight4Air Curtain Supply Plenum Width 13.2813.6213.95Kitchen Hoods Type I and Type II
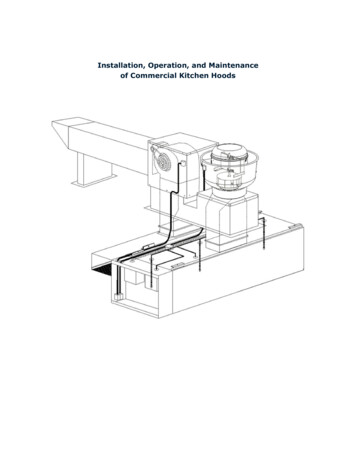
Prior to InstallationWall or Single Island Canopy HoodsPrior to installation, check with the Authorities HavingJurisdiction (AHJ) on clearance requirements tostructures surrounding the hood and other equipment.Verify there is enough space to safely lift hood up intoits operating position and enough clearance aroundthe hood for components like fire system connections,hood lights, hood control components, etc. Consideraccess for servicing the equipment and the differentcomponents when locating the hood.Hood Installation OverviewIf the hood is a grease hood (Type I), the UL labellocated on the end panel on the inside of the hoodwill provide pertinent information regarding the hoodinstallation. Information includes:/ in. threadedrod by Allowable cooking surface temperaturesof thecooking equipment1 2 Front and side overhang/underhang requirements Minimum exhaust (and possibly supply) airflowrequirements Hood lighting load information and restrictions Filter information Fire damper fusible link replacement information, ifapplicabletonWith the hood still inside its packingFrcrate,position theunit beneath its installation location. Carefully removethe packing crate and place some protective material onthe floor next to the crate to avoid damaging the hoodas it is tipped on its side. Tip the hood carefully onto theprotective material.Bottom of Hood1. If the hood is provided with filler panels, shippedloose, install them now. See page 7, Filler PanelInstallation. Filler panels may be integral to thehood, which requires no addi
Kitchen Hoods Type I and Type II 3 Hood Model Hood Depth (Multiply by Length) for Hood Weight* 2 ft.609 m 2.5 ft .762 m 3 ft .914 m 3.5 ft 1.067 m