Transcription
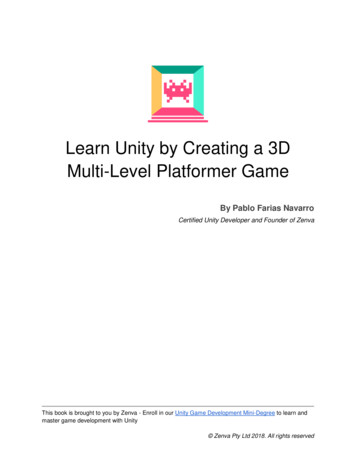
Learn Unity by Creating a 3DMulti-Level Platformer GameBy Pablo Farias NavarroCertified Unity Developer and Founder of ZenvaThis book is brought to you by Zenva - Enroll in our Unity Game Development Mini-Degree to learn andmaster game development with Unity Zenva Pty Ltd 2018. All rights reserved
Table of ContentsIntroductionTutorial requirements and project filesScene basicsTransform ComponentThe FloorAdding more game elementsCoin rotation scriptPlayer movementPlayer jumpingCollecting coinsGame ManagerEnemy movementMulti-level gameAdding the HUDHome screenGame Over screenFinishing upThis book is brought to you by Zenva - Enroll in our Unity Game Development Mini-Degree to learn andmaster game development with Unity Zenva Pty Ltd 2018. All rights reserved
IntroductionInterested in making games with Unity? In this guide you’ll learn to create a simple a 3D, multilevel platformer game with Unity.We’ll start from the very basics and I’ve done my best to leave no stone unturned!Tutorial requirements and project filesNo prior Unity or C# experience is required to follow along, although you should have familiaritywith basic programming concepts such as variables, conditional statements and objects.Project files can be downloaded here. This zip file contains all the files included in the Assetsfolder. You’ll still need to create a new project as covered in the tutorial.Some of the topics we’ll cover include: Basics of the Unity Editor, scenes, game objects and components Understanding game object core methods in C# scripts Working with object transforms both from the Inspector and from scripts Accessing user input from scripts Collision detection and rigid bodies Implementing multiple scenes to create a multi-level game and passing objects along Basic UI and importing fonts Building your gameScene basicsStart by opening Unity. Click New, enter a name for the project (“Zenva 3D Platformer”), makesure 3D is selected, then click on Create project.This book is brought to you by Zenva - Enroll in our Unity Game Development Mini-Degree to learn andmaster game development with Unity Zenva Pty Ltd 2018. All rights reserved
This will bring us to an empty Unity scene. I will now describe some of the main panels andelements present in the Unity Editor. If you are already familiar with the basics you can skipstraight to the next section.This book is brought to you by Zenva - Enroll in our Unity Game Development Mini-Degree to learn andmaster game development with Unity Zenva Pty Ltd 2018. All rights reserved
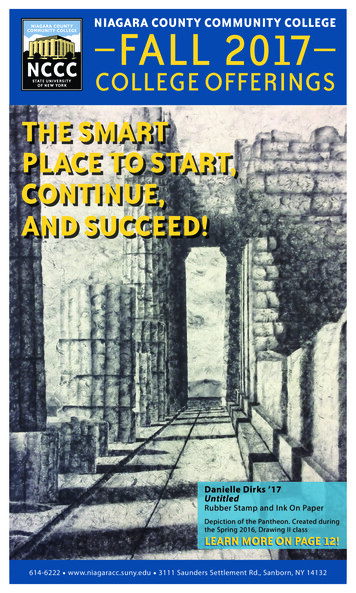
What is a scene? The word “scene” comes from the Greek skene, and was used back inancient world for the area in the theater that faces the public, where all the action takes place. InUnity the definition is not too distant: a scene in your game is an object that contains all gameobjects such as players, enemies, cameras, lights, etc. Every game object within a scene has aposition which is described in coordinates X, Y and Z.The following image shows the main elements we find in the Unity Editor: Project Window: this area shows the files and folders of our project. The only folderwe’ll see in our new scene is the Assets folder, which is created automatically and it’swhere we’ll place all the game assets (3D models, scripts, audio files, images, etc). Hierarchy Window: shows all the game objects that are present in our scene. Bydefault, Unity creates a camera and a directional light. Scene View: shows the 3D view of your game scene. All the objects that you create inthe Hierarchy Window will appear here in their corresponding X, Y, Z positions, and byusing different “gizmos” or tools you can move, rotate and scale these objects around. Game View: this view shows what the game actually looks like. In this case, it showswhatever the camera (which was created by default) is looking at.This book is brought to you by Zenva - Enroll in our Unity Game Development Mini-Degree to learn andmaster game development with Unity Zenva Pty Ltd 2018. All rights reserved
Inspector: whenever you select a game object, the Inspector will show different optionsand properties that are available for that game object. Toolbar: this area contains different tools we can use to modify our game objects, movearound the scene, and modify how the Editor works.When creating a new scene the first thing you’ll want to do is to save it. Let’s go to File – SaveScene and give it a name (“Game“).As a Unity project grows, it becomes paramount to keep your files organized. In the ProjectWindow, right click in Assets and create a new folder called Scenes. Drag our newly createdGame scene in there.Transform ComponentAll game objects in a scene have a Component named Transform. What is a component?Think of components as reusable “Lego pieces” that can be used in different objects. Acomponent provides a game object with certain behaviors and properties.As we mentioned before, all game objects in a scene have a position described in coordinatesX,Y,Z. That in Unity is called the Transform component. This is the only component that ispresent in all game objects. There can’t be a game object without a Transform component!This book is brought to you by Zenva - Enroll in our Unity Game Development Mini-Degree to learn andmaster game development with Unity Zenva Pty Ltd 2018. All rights reserved
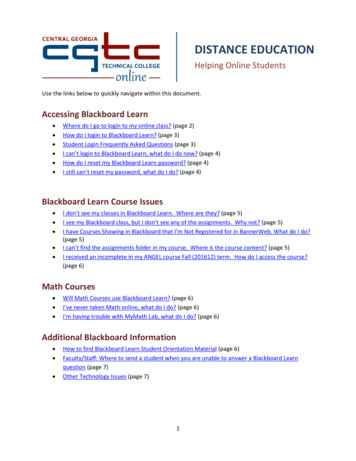
On the Hierarchy Window, click on both the default camera and directional light, and observehow the Transform component appears in the Inspector, indicating the position of the object,plus values for rotation and scale.Lets create a Cube to experiment with transforms. In the Hierarchy Window, right click andselect 3D Object – Cube.Click on the cube and change the position values in it’s Transform component to see how it’sposition in the scene changes as well. Experiment changing the scale and rotation as well.A scale of 1 means no change in size. If you set it to 2, it will twice the size in that axis. If youwant it halved, set the scale to 0.5.Notice that Unity uses what’s called a left-handed coordinate system:Rotation values are entered in degrees. If you enter, for instance 45 in X, that means that thegame object will rotate 45 around the X axis. To determine to which side it will rotate, use theleft-hand rule as shown in the image below. If the rotation value is negative, use your right hand.This book is brought to you by Zenva - Enroll in our Unity Game Development Mini-Degree to learn andmaster game development with Unity Zenva Pty Ltd 2018. All rights reserved
Besides changing the Transform properties of a game object from the Inspector, you can do soby using the Toolbar buttons and the “gizmos” in the Scene View:This book is brought to you by Zenva - Enroll in our Unity Game Development Mini-Degree to learn andmaster game development with Unity Zenva Pty Ltd 2018. All rights reserved
Unity unitsYou may wonder, what’s the unit of measure in a Unity game? if we move an object from X 1to X 2, how much would that represent in the real world? Unity uses Unity units. Byconvention (and this even includes some official Unity tutorials), 1 Unity unit is 1 meter.The FloorLet’s go ahead and create the floor of the game. For that, we will use a plane. Right click onyour scene in the Hierarchy Window and select 3D Object – Plane. This will bring up a planeinto our scene. From the Hierarchy Window, we can rename this object by right clicking –Rename, by selecting it and pressing F2, or by single-clicking on it after we’ve selected it. Call it“Floor”.We will now create a new material so that it can look green. Un Unity, a material is an assetthat controls the visual appearance of a game object. We can easily create materials from theProject Window and assign them to objects in our scene.Create a new folder inside of Assets called Materials. Inside of this new folder, right click andselect Create – Material. This will create a new material file. Rename it to “Grass”. If you click onthis file, the Inspector will show the properties of the newly created material. Click on the colorwhite in Albedo and pick a color for the grass in the game:This book is brought to you by Zenva - Enroll in our Unity Game Development Mini-Degree to learn andmaster game development with Unity Zenva Pty Ltd 2018. All rights reserved
Now drag the material file to the floor in the Scene View. The plane will look green, and if youclick on it, you’ll see the material in the Mesh Renderer component in the Inspector.This book is brought to you by Zenva - Enroll in our Unity Game Development Mini-Degree to learn andmaster game development with Unity Zenva Pty Ltd 2018. All rights reserved
Lastly, since the floor won’t be moving around in the game, check the Static checkbox locatedon the top-right of the Inspector.By making a game object static, we are informing Unity that this object won’t be moving in ourgame. This allows Unity to perform behind the scenes optimizations when running the game.Adding more game elementsLet’s add the remaining elements of our game. Start by creating the new materials. Pickwhichever color you want for each one: Platform Coin Enemy Goal PlayerThis book is brought to you by Zenva - Enroll in our Unity Game Development Mini-Degree to learn andmaster game development with Unity Zenva Pty Ltd 2018. All rights reserved
This is what mine look like:What we’ll do next is add all the remaining elements to create our level, so that we can get aclear idea of what it will look like. We haven’t implemented our player, the behavior of theenemies or coins yet. Moreover, we haven’t written a single line of code. However, it’s goodpractice to design a game as early as possible.Moving around blocks in Unity like we’ll do now is very easy and anyone can do it. This processcan give you a very clear idea of what your game will look like, and allow you to save timefurther down the road, and to show other people what the game will look like. This process iscalled prototyping.Let’s thus begin this process by adding some cubes to be used as platforms. Use the positiongizmos or the Inspector to position them in different places. Set their scale in Y to a smallervalue to make them thinner, and scale them up in X and Y so make them wider. Make sure todrag the Platform material we created to give them the color you want.Since platforms won’t be moving make sure to set them as “static” (unless you want to createmoving platforms of course!).As we create more platforms, the Hierarchy Window can start to get crowded of elements.Game objects in Unity can be children of other objects. This means that their position is relativeThis book is brought to you by Zenva - Enroll in our Unity Game Development Mini-Degree to learn andmaster game development with Unity Zenva Pty Ltd 2018. All rights reserved
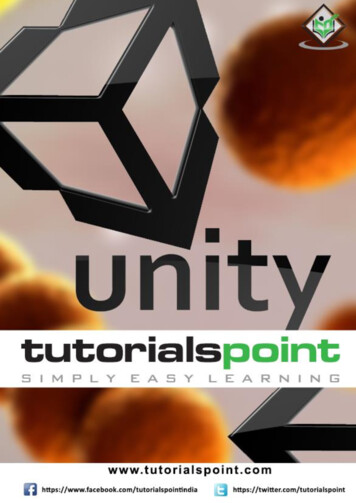
to that of the parent. In this case, grouping all the platforms inside of a single parent object canhelp us keep this window more clear – we won’t be moving this parent object.In the Hierarchy Window right click and select Create Empty. Rename this new object to“Platforms”. Drag and drop all the platforms you created into this object. Notice that even thoughPlatforms is empty (it doesn’t render anything on the screen), it still has a Transformcomponent. As we said before, this component is always present in Unity game objects.For the coins we’ll start by creating a cylinder in the Hierarchy Window (3D Object – Cylinder).Shrink it (this means, scale it down) on Y so that it looks more like a coin. Also, scale it down onX and Z to make it smaller (I’ve never seen a coin with a 1-meter diameter!). Lastly, rotate it 90degrees in X or Z.This book is brought to you by Zenva - Enroll in our Unity Game Development Mini-Degree to learn andmaster game development with Unity Zenva Pty Ltd 2018. All rights reserved
Rename the cylinder to “Coin”. Drag the Coin material into your coin and you’ll have your coinready! Once we get into scripting, coins will have a C# script associated to them which willdetermine how they behave. Since we’ll have many coins, having to re-create them each time isnot the best approach. Imagine we want to change how all coins behave at once? We need tocreate what’s called a prefab.Unity prefabs are templates of game objects that can be reused (even used in differentprojects), and that allow us to generate many game objects that share properties and behaviors.Changes made to a prefab are reflected in all of it’s instances.Create a new folder in Assets called Prefabs to keep our code organized. To create a prefab,simply drag and drop the coin you created (from the Hierarchy Window) into this new folder inthe Project Window.Now that we have our prefab ready, you could safely delete the coin from the HierarchyWindow, but you don’t really have to. To create more instances of our prefab, simply drag anddrop the coin Prefab into the Scene View. Do it many times (you can also do it once andduplicate the object with Control D).If you select any of these instance you’ll see a Prefab area in the Inspector. If you click onSelect in there, see how the Coin prefab is selected. If you make changes to this particularinstance (for example, change the scale, rotation or material) and press Apply, the changesmade will be applied to the prefab itself, changing thus all other instances!This book is brought to you by Zenva - Enroll in our Unity Game Development Mini-Degree to learn andmaster game development with Unity Zenva Pty Ltd 2018. All rights reserved
Place coins across your level. This will help you get familiar with moving around the scene,duplicating or copying and pasting objects, and using the position gizmo. When you are donewe’ll finish off with the design of our level. Make sure to group all the coins in an empty object,just like we did with the platforms before.This book is brought to you by Zenva - Enroll in our Unity Game Development Mini-Degree to learn and
In this guide you’ll learn to create a simple a 3D, multi-level platformer game with Unity. We’ll start from the very basics and I’ve done my best to leave no stone unturned! Tutorial requirements and project files No prior Unity or C# experience is required to follow along, although you should have familiarity with basic programming concepts such as variables, conditional statements and .