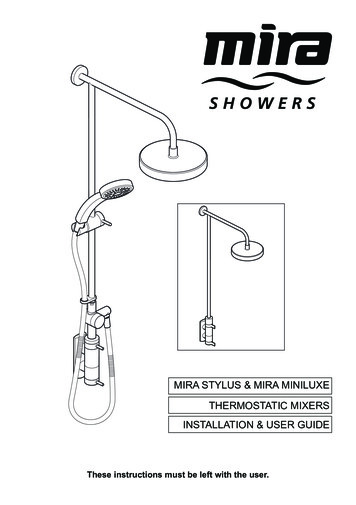
Transcription
élan Mira User GuideStenograph, L.L.C.1500 Bishop CourtMount Prospect, Illinois 60056www.stenograph.com
Release: July 2004; March, 2004; September 2003; August, 2001Copyright 2004, Stenograph, L.L.C.All Rights Reserved. Printed in U.S.A.No part of this publication may be reproduced, stored in a retrievalsystem, or transmitted in any form or by any means (electronic,mechanical, photocopy, recording or otherwise) without the priorwritten permission of Stenograph, L.L.C.Stenograph, Stentura, élan Mira, Case CATalyst, StenoMark,SmartWriter, RapidWrite Pro and the Stenograph logo areregistered trademarks of Stenograph, L.L.C.EasyLock and RAM-Lock are trademarks of Stenograph L.L.C.CompactFlash is a trademark of ImageMate Corporation.Bluetooth is a registered trademark of Bluetooth SIG, Inc.BlueSoleil is a trademark of IVT CorporationSocket is a trademark of Socket Communications, Inc.
Congratulations on the purchase of your new élan Mira!We strongly encourage you to read the User Guide and practiceusing your machine according to the instructions contained therein.This will allow you to become comfortable and familiar with yournew writer before taking it on a job or into class.The élan Mira is equipped with a non-glare liquid crystal displayscreen for easy read back of steno or text. The élan Mira providestext translation and searching, making it easier to provide “readback”. The RAM-Lock feature assures you of dependable, worryfree maintenance of notes and text integrity.TMYour élan Mira comes with rechargeable battery packs: two mainbatteries and a backup battery. Advanced battery technologyprevents the batteries from overcharging so you don’t have to worryabout leaving the batteries on the charger overnight or over aweekend. Be aware that batteries are consumable items and areusually ready to be replaced every twelve to eighteen months.EasyLock tripod positioning with a positive-locking mechanismprovides quick and easy setup. Simply open and set the tripod onthe floor and place your machine on it according to the instructionsin this guide. The design of the tripod assures a smooth, evenwriting platform for you to enjoy.TMYou’ll probably notice how light the élan Mira is -- only 6.7 poundswhich makes it a lot easier to carry than earlier models. The softsided carrying case also lightens your load when moving from placeto place for reporting jobs.Be sure to check the Stenograph web site, www.stenograph.com,for updates to the élan Mira. The élan Mira was designed with youin mind. We know you’ll enjoy using it!STENOGRAPH, L.L.C.iii
The Importance of Working Comfortably and EffectivelyStenograph believes that the élan Mira shorthand machine, whenused in compliance with the enclosed instructions and information,is safe. Certain sources, though controverted, suggest a relationshipbetween injuries of the hands and forearms with prolonged use ofany type of keyboard or other equipment involving repetitivemovements of the hands. At the same time, other sources indicatethat there is no such cause and effect.Because the safety and well-being of persons using Stenographequipment is of paramount concern and because we recognize thatthese medical and scientific questions are not definitively resolved,Stenograph encourages all users of our writers to carefully reviewthe following Work Area Checklist and to use appropriate workhabits.Remember, personalizing your environment so that it iscomfortable for you, promotes a healthy physical and mental worklifestyle.The following Work Area Checklist is not intended to be allinclusive but a guideline for you to use. Only you can determinewhat is best for you. Use the checklist to assess and adjust yourwork area to suit your own needs. Personalizing your environmentso that it is comfortable for you promotes a healthy physical andmental work lifestyle.iv
Work Area ChecklistAt Your élan Mira Use a comfortable chairconducive to correct posture. Adjust the height of theshorthand machine appropriatelyfor your body. Position the shorthand machinecomfortably close to you. Place the tripod between yourknees. Do not sit “sidesaddle”. Minimize the use of theshorthand machine on surfacesother than the tripod stand.At Your Computer Place monitor screenperpendicular to the window tohelp avoid glare. Adjust or close windowcoverings. Arrange materials such asreference book, diskettes, etc.close to you to help avoidexcessive reaching or twisting. Clear the area under and arounddesk to leave room for your feetand legs. Remove sources of distractionaround the monitor. Keep noise to a minimum. See accompanying materialsprovided by computer keyboardmanufacturer.Your Body Take frequent breaks to stretchor exercise. Maintain a straight wristposition. Avoid resting your wristswhile writing. Keep your hands level withyour forearms. Let your fingers curvenaturally. Let your forearm go up anddown a little when you write,pivoting at the elbow, not atthe wrists. Pull your steno machinecomfortably close to you. Keep feet on the floor orsupported by a footrest. Support your lower back. Assure that your knees arebent at an angle of 90 or moreand your thighs at an angle of90 or greater in relation toyour torso. Adjust chair position andpostures throughout the day. If you experience any aching,numbing, or tingling in yourarms, wrists, or hand, consult aqualified health careprofessional.v
vi
ContentsChapter 1: Introduction. 9élan Mira Features .Setting Up Your élan Mira.Typographical Conventions in this Guide .How This Guide is Organized .élan Mira Technical Support.1011121315Chapter 2: Hardware . 17Batteries .Communication Port .CompactFlash Card.Diskette Drive .Function Buttons.LCD Tilting Color Screen.LCD Status Screen.Reset.Tripod.Opening the Cover .Adjusting Depth of Stroke .Adjusting Key Contacts .Adjusting Keystroke Tension .18232831323335373843444649Chapter 3: Before Writing on the élan Mira . 51Getting Started on the élan Mira.Accessing the Setup Menus .A/An Resolution .Beeper Volume .Clock Display .CompactFlash Card Directory .525456575859vii
élan Mira User GuideDictionaries .Diskettes.J-Defines .LCD Appearance .Mode .RAM Storage of Steno Notes .SmartStroke .Status.Test Steno .Time and Date.Timestamping .Wireless .616672798185888990919293Chapter 4: Writing on the élan Mira. 97Accessing the Writing Menus.Writing Jobs .Electronic StenoMarks.J-Defines .LCD Appearance .Modem .Scroll .Search.Status.98100103104106108109110115Appendix A: Installing the USB Driver. 117Appendix B: Updating élan Mira Software . 121Download the Update to Your Computer . 121Load the Update Over a USB Cable . 122Load Software Update by Diskette . 124Appendix C: Troubleshooting . 127Index . 131viii
Chapter 1IntroductionCongratulations on the purchase of your élan Mira writer. Read thisuser guide to familiarize yourself with your writer’s components.Chapter 1, Introduction: highlights the features of your élan Mira describes typographical conventions used in this guide outlines the organization of this guide.Package ContentsYour new élan Mira writer comes with the following items: élan Mira Soft-sided carrying case EasyLockTM T2 tripod 2 Main battery packs Internal backup battery AC adapter/charger CompactFlashTM Card CompactFlash PC Card Adapter Mira serial cable adapter (purple) USB cable USB driver diskette élan Mira User Guide9
élan Mira User Guideélan Mira FeaturesThe élan Mira provides you with the following features: Translated text displays on color non-glare tilting LCD screen. Realtime ready through USB or serial port. CompactFlash card storage of notes. Adjustable digital clock with month, date, and time. Format and use 1.44MB (high density diskettes). Adjust beeper volume and LCD contrast, colors, and font size. Update Mira software from Internet download via USB orfloppy diskette. Date and timestamp note files. Automatically load main and job dictionaries. J-Define entries from the élan Mira to a job dictionary A/An resolution. Search for and display the previous or last Question, Answer,untranslate, StenoMark, or steno string. Scroll forward and backward in a file. Reopen an existing file. Wireless capabilities (optional).10
Chapter 1: IntroductionSetting Up Your élan MiraTo use your élan Mira you must set it up on the tripod and chargethe battery. Although you can use the writer with the AC adapter/charger, it is recommended that you charge the battery so that it isready when required.Refer to the Hardware chapter for detailed information aboutsetting up your tripod, charging your battery, and makingadjustments to the élan Mira to suit your personal writing needs.11
élan Mira User GuideTypographical Conventions in this GuideWe use symbols and typographical conventions in this manual tomake it easier for you to use: A bullet indicates an item in a list.1. Numbered lists take you step-by-step through procedures.A note indicates supplementary information.A caution warns you about actions that could damage your élanMira or the data it contains.Bold text indicates a key you press or emphasizes a selectionchoice.12
Chapter 1: IntroductionHow This Guide is OrganizedThis élan Mira User’s Guide contains chapters and sections. Achapter is built around a specific topic and a section is a componentof the chapter.Chapter 1: IntroductionIntroduction acquaints you to the élan Mira features and explain’sthis user’s guide.Chapter 2: HardwareHardware explains the various components of the élan Mira andhow to use them.Chapter 3: Before Writing on the élan MiraBefore Writing on the élan Mira explains software features of theélan Mira used for set up before you begin writing, such asformatting diskettes, loading dictionaries, reopening files andestablishing wireless connection.Chapter 4: Writing on the élan MiraWriting on the élan Mira explains the software features available onthe élan Mira after you begin writing, such as using an electronicStenoMark and searching. Appendix A: Installing the USB DriverInstalling the USB Driver instructs you how to install the USBdriver required for USB cable connection between the élan Miraand caseCATalyst4.Appendix B: Updating élan Mira SoftwareUpdating élan Mira Software instructs you how to downloadavailable updates for your élan Mira from the Stenograph web site.13
élan Mira User GuideAppendix C: TroubleshootingTroubleshooting suggests possible solutions to some commonsituations that you may encounter when using the élan Mira.14
Chapter 1: Introductionélan Mira Technical SupportIf you encounter a problem you cannot solve, an élan Mira SupportSpecialist is available to assist you at:1-800-323-4247, touch 7, then 1or 1-847-803-14008:00 a.m. to 6:00 p.m. (CT)Monday through FridayExcluding Stenograph HolidaysTo assist the Specialist, have the élan Mira with you, know yourcustomer number, and be prepared to describe your question orproblem in detail.To order supplies and accessories visit www.stenograph.com.Additional Help topics are available at www.stenograph.com. ClickTech Support, Help Desk.15
élan Mira User Guide16
Chapter 2HardwareChapter 2, Hardware, describes how to assemble and adjust thecomponents of your élan Mira. It is divided into two sections:external and internal features of the writer.External FeaturesExternal Features covers the parts of the élan Mira you use or adjuston the outside of the writer. For example, the battery,communication ports, disk drive, CompactFlash card, tilting LCDand the tripod are external components.Expanded View of élan Mira Ports17
élan Mira User GuideBatteriesThe élan Mira comes with a main rechargeable battery, a backuprechargeable battery, and an AC adapter/charger. You can operateyour writer using only the batteries, using only the AC adapter/charger, or using the AC adapter/charger while the main battery isin the writer charging.The main battery, fully charged, operates all the features on the élanMira for approximately 12 hours. Charging time for the mainbattery is approximately 3 hours.The backup battery provides a FailSafe mode if the charged level ofthe main battery becomes too low and you are not using the ACadapter/charger. In FailSafe mode, the tilting LCD and floppy driveturns Off. Your steno notes continue to be stored in RAM, written tothe CompactFlash card, and sent to the realtime screen if writingrealtime. The backup battery operates for approximately 18 hoursand charges, if necessary, when the main battery is charging.Low Battery WarningsAs the main battery becomes progressively low, three differentwarnings display: Danger -- Battery Low Danger -- Battery Low Recharge Now Battery Dead -- Switching to FailSafe18
Chapter 2: HardwareIf the Mira is connected to a computer with a USB cable duringrealtime and the main battery becomes low, all features except thefloppy diskette drive continue to operate. See Powering with theUSB cable for more information. The following low batterymessages display when using a USB cable: Danger -- Battery Low Danger -- Battery Low Recharge Now Battery Dead -- Recharge to use floppyCharging the BatteriesWhen the Mira is powered by the AC adapter/charger, both themain battery and backup battery levels are automaticallymaintained. You can use your writer while the AC adapter/chargeris charging the batteries.The Lithium backup battery charges only when necessary. Itcharges first, when needed, and then the main battery is charged.When the backup battery is charging, the battery icon displays onthe LCD status screen. Stenograph strongly recommends that thecharging cycle is not interrupted when the Lithium backup batteryis charging.While the batteries are charging, the LCD status screen displaysblack bars in running sequence from left to right. When finishedcharging, the bars move from each side of the screen to the middleof the screen in a “clapping” motion. If you leave the AC adapter/charger plugged in for a long time, the “clapping” motion stops,however the battery is fully charged. The main battery fully chargesin 3 hours. You can check the battery voltage to determine thecharged level of the batteries. See Checking the Battery Status inthis chapter.19
élan Mira User GuideUse only the battery charger supplied with the élan Mira. Chargersdesigned for other Stenograph writing machines will not power theélan Mira. Although the Stentura charger fits the élan Mira, it willnot charge the Mira battery. Charging RecommendationsTo utilize the full capacity of the main battery, Stenographrecommends that you charge your batteries when you are not usingyour élan Mira. Continuous charging does not damage the batteries.If you do not use your élan Mira for an extended period of time,recharge the batteries approximately every month. Stenographrecommends you store your élan Mira with the battery installed.Battery Charging ProcedureTo charge your élan Mira batteries, follow these steps:1. Insert the main battery into the writer.2. Plug the AC charger/adapter into a wall outlet.3. Insert the small plug on the AC adapter/charger cord into thesocket on the back left side of the writer.20
Chapter 2: HardwareThe writer is On when the batteries are charging, even thoughthe tilting LCD is Off. A black dot displays in the lower rightcorner of the LCD status screen to indicate the writer is On. Youcan use your writer while the batteries charge. Press the Onbutton to display the tilting LCD.The LCD status screen also displays a row of running blocks toindicate the batteries are charging. If you plug your writer in tocharge and only the black dot displays, the batteries do not needcharging and no charging takes place.Battery Charging HistoryTo view charging history for the main battery:1. From the Opening menu, press More twice.2. Press History. The battery charging status screen displays forthe main battery.3. When finished, press OK and then press More to return to theOpening menu.To view the charging history for the backup battery:1. From the Opening menu, press More twice.2. Press Li History. The battery charging status screen displaysfor the backup lithium battery.3. When finished, press OK and then press More to return to theOpening menu.21
élan Mira User GuideChecking Battery StatusChecking the battery status displays the voltage level of thebatteries in the élan Mira. The amount of voltage the battery hasindicates the degree to which it is charged: low, charged and fullycharged.To check battery status:1. Make sure the charger/adapter is not plugged into the Mira. Ifyou just disconnected the charger/adapter from the Mira, turnthe Mira On and wait 10 – 15 minutes to get an accurate batteryvoltage reading.2. From the Opening menu, press More twice.3. Press Battery. The Battery Status screen displays. Battery Voltage—the voltage level shows the following: 6.6volts or higher indicates the main battery is fully charged;6.4 volts indicates the main battery is charged; 6.1 volts orbelow indicates the battery is discharged. Lithium Bat. Voltage—the voltage level shows thefollowing: 3.9 or above indicates the lithium battery ischarged and will not charge when the adapter/charger isattached; 3.8 or below indicates the lithium battery needscharging and will automatically charge when the charger/adapter is attached. Main Battery State—when checking battery status with theadapter/charger not attached, the following displays:NotCharging Lithium Battery State—when checking battery status withthe adapter/charger not attached, the following displays:NoAdapter.4. When finished, press OK and then press More to return to theOpening menu.22
Chapter 2: HardwareCommunication PortThere are two types of communication ports on your élan Mira, a9-pin serial port and a USB port. When using CATalyst4 software,you can use either of these ports to connect the writer to externalequipment, such as a computer for realtime.When using other CAT software, external communication is onlyaccessible through the serial port. To use the serial port, the CATsoftware must have interface capabilities with the élan Mira,Stentura , or SmartWriter writing machines.Powering With the USB CableWhen the élan Mira is connected to your CATalyst4 computer forrealtime via a USB cable, the main battery continues to power thewriter. The USB port can, however, power the writer if you have nobattery power or want to run on USB power.To run on USB power, turn the élan Mira On, remove the mainbattery from the Mira and set the writer to Diskless mode. The USBport provides power to run realtime, display the LCD screens, storesteno notes on the CompactFlash card, and store steno notes inRAM. It does not power the floppy diskette drive. Because thefloppy diskette drive is not powered, you must set the élan Mira toDiskless mode. See Mode in the Before Writing on Your élan Mirachapter.To use the USB cable you must install the Mira USB driver on yourcomputer. See the Installing the USB Driver appendix forinstructions on loading the driver.23
élan Mira User GuideUpdating With the USB CableSoftware updates for your élan Mira, when available, can be easilydownloaded from the Stenograph web site. Once downloaded ontoyour computer, you can load the software update onto your élanMira over a USB cable. For more information about updating theélan Mira, see the Updating élan Mira Software appendix.Connecting for Realtime WritingTo connect your writer to your computer for realtime writing, youmust have one of the following: a USB cable. You must be using CATalyst4 software. a serial realtime cable kit. You canuse an existing realtime cable (P/N:23116) and female 9-pinadapter (P/N:30548) to connect tothe computer. The purple male 9pin adapter (P/N:35648) thatconnects to the élan Mira isincluded with the writer. Youcan also order a Mira realtime9-pin Cable Kitcable kit from Stenograph (P/N:35856). a wireless communication kit (P/N:36507). Stenograph onlyprovides élan Mira wireless support when the élan MiraWireless Communication kit is used. Other wireless adaptersand software are not supported.24
Chapter 2: HardwareUSB CableYou must be using CATalyst4 software and have installed the MiraUSB driver on your computer. See the Installing the USB Driverappendix for instructions on loading the driver.1. Be sure your writer and computer are turned On.2. Connect one end of the USB cable to the back of the writer andthe other end to a USB port on the computer.USB ports are often located on the back of the computer or, fornotebook computers, on the side.3. Start CATalyst4.4. Write a few strokes on the élan Mira before starting realtime. Ifyou loaded a CATalyst4 dictionary onto your Mira, thetranslated steno displays on the computer screen.If you leave USB realtime connection active when you take abreak, the realtime screen on the CAT system may not displaythe new steno strokes when you begin writing. This is afunction of the USB port when it remains idle for a period oftime. If this occurs, disconnect the USB cable from the back ofthe Mira and reconnect it. This does not affect your realtimefile. Once you reconnect the cable, the new steno strokesdisplay on the realtime screen.5. When you are finished writing realtime using a USB cable, it isimportant that you complete the following steps in order. Thisensures your computer shuts down properly.a. Press End on the élan Mira to close the file.b. Close and save the realtime file in CATalyst4.c. Unplug the Mira USB cable from your computer.25
élan Mira User GuideSerial Cable1. Be sure your writer and computer are turned Off.2. Connect the communications cable to the writer and thecomputer.élan Mira COM Ports3. Connect the purple male 9-pin adapter on the realtime cable tothe 9-pin COM port on the back of the writer.4. Connect the female 9-pin adapter to the COM port of thecomputer.5. Connect the realtime cable to the jacks on the back of theadapters.6. Turn your élan Mira On.7. Turn on your computer and start your realtime program.8. Write a few strokes on the élan Mira before starting realtime. Ifyou loaded a CATalyst4 dictionary onto your Mira, thetranslated steno displays on the computer screen.26
Chapter 2: HardwareWireless CommunicationThe following steps assume you have completed the wirelesscommunication installation on your computer and performed theinitial setup steps. For more detailed instructions on establishingwireless communication see the Wireless section in the BeforeWriting on the élan Mira chapter.1. Turn your computer On and open Socket BlueSoleil. Wait a fewmoments until it is done searching for devices.2. Turn the élan Mira On.3. Plug the Socket Bluetooth Serial Adapter into the élan Mira.4. When the Enter Bluetooth Passkey dialog box displays on yourcomputer, in the Passkey field type the Passkey code from theélan Mira and then press Enter (OK).5. Wait a few moments until the wireless connection isestablished.6. Begin a realtime session.27
élan Mira User GuideCompactFlash CardA CompactFlash card (CF) is a memory card that can hold largeamounts of data. In the élan Mira, the CF card stores steno notesand timestamps as an ultimate backup for the Mira. For example, a32MB card holds approximately the equivalent of 3,400,000strokes or approximately 15,000 pages. When the CF card is full,the new steno files overwrite the oldest files. The steno.bak file,which holds the steno notes on the CompactFlash card, is 25MB.The CompactFlash card is designed as a backup for the Miraand is not designed as a method for archiving steno notes.The élan Mira comes with a 32MB CompactFlash card. The Mirarequires a minimum CF card size of 32MB and supports CF cardsup to 512MB. Stenograph recommends ScanDisk CompactFlashcards, although any high quality CF card is acceptable.CompactFlash Card and PC Card AdapterThe élan Mira requires a CompactFlash card be inserted into thewriter. If you remove the CF card while the writer is On, the élanMira beeps and displays the message: CompactFlash missing orUnformatted!!! Insert Formatted Card or turn Off. You mustreinsert the card to use the writer.The card is removable for steno note retrieval if the writer is notoperable. To read the CF card, you need to insert the card into a PCcard adapter which plugs into your computer. A PC card adapter isincluded with your Mira.28
Chapter 2: HardwareAn external power supply is not necessary for the CF card to storesteno notes. The élan Mira always writes steno to the CF card usingit as a backup to the floppy disk. The backup battery is used to savesteno to the CF when there is no main battery, not enough charge inthe main battery, or when there is no AC adapter/charger power.Formatting the CompactFlash CardYou do not need to format the CompactFlash card before using it inthe élan Mira. There may be times, however, when you want toremove all the files on the CF card. Formatting the CF card erasesall the files and data.To format the CompactFlash card:1. Turn the élan Mira Off.2. Remove the CompactFlash card.3. Insert the CompactFlash card into a PC card adapter on yourcomputer.4. Using My Computer or Windows Explorer, highlight the driveletter assigned to the CompactFlash card. The computer usuallyassigns the next available drive letter.5. Confirm the highlighted drive letter is for the CompactFlashcard. Right click on the drive letter and select Format. TheFormat dialog box displays.6. In the File System field, select FAT. If the CompactFlash card is32MB, FAT is already selected.7. Click Start to begin formatting. When the formatting iscomplete, the Format Complete dialog box displays. Click OK.8. Click Close to exit the Format dialog box.9. Remove the CompactFlash card from the PC card adapter.29
élan Mira User Guide10. With the Mira turned Off, insert the CompactFlash into thewriting machine.11. Turn the Mira On.30
Chapter 2: HardwareDiskette DriveThe élan Mira diskette drive is located on the lower right side of themachine. It accommodates only 1.44MB, high density diskettes.A green indicator light next to the diskette drive flashes each timethe élan Mira writes to the diskette. You will not see the light as youstroke, but you might hear the quiet sound of the élan Miraaccessing the drive from time to time.Insert and Remove the Diskette1. To insert the diskette, grasp the plastic edge opposite the slidingmetal plate and with the coin-like metal disc facing down,gently push the diskette into the drive until you hear a “click”and see the release button on the élan Mira pop out.2. To remove the diskette from the drive, press the release buttonon the élan Mira, located on the upper right side of the drive.Do not store diskettes in the drive while transporting the élanMira. You might
élan Mira used for set up before you begin writing, such as formatting diskettes, loading dictionaries, reopening files and establishing wireless connection. Chapter 4: Writing on the élan Mira Writing on the élan Mira explains the software features available on the élan Mira after you begin writing, such as using an electronic