Transcription
Laser Projection Keyboard KitCalibration and Usage ManualRoboPeak Team2013-4Revision: 01 / 21
Catalog:1.2.3.4.Catalog: . 2Introduction . 31.1.Working Mechanism. 3Calibration and Tuning . 52.1.Basic Power-On Check . 52.2.Connecting with the Signal Processing Software . 52.3.Camera Focus Adjustment. 72.4.Calibrating the Projected Keyboard Pattern . 82.5.Camera Angle Adjustment . 92.6.Linear Laser Adjustment . 112.6.1.Adjusting the laser head. 112.6.2.Height adjustment . 142.7.Final Calibration . 14Usage of the Signal Processing Software . 163.1.Camera Selection . 163.2.the Working UI . 163.3.Multi-language Support . 173.4.Keyboard Mode . 173.5.Multi-touch Pad Moe . 183.6.Calibration Mode . 183.7.Command Lines . 193.8.Parameter Tuning . 193.8.1.The exposure value of the camera . 203.8.2.Key stroke delay and repeating interval . 20Source-code and Documents . 212 / 21
1.IntroductionThe Laser Projection Keyboard Kit is based on the open-source laser keyboard project designedby RoboPeak Team. After a few quick and simple assembly and calibration process, your laserprojection keyboard is ready to work!The laser keyboard works just like a standard keyboard on your PC/MAC with the help of therelated signal processing software designed by RoboPeak. The signal processing software alsosupports turning your laser keyboard kit into a multi-touch pad.As an open-source project, you can freely make any changes/improvement to the current designand go through the implementation detail of the kit.1.1.Working MechanismThe Laser Projection Keyboard kit contains the following 3 major key parts: an infrared lightcamera, a keyboard pattern projector and a linear laser.Infrared LightCameraKeyboard PatternProjectorLinear LaserThe keyboard pattern projector displays a virtual keyboard pattern on a flat surface, such as adesktop surface. When a user touches virtual keys using his/her fingers, the top of fingers will beilluminated by the lighting plane created by the linear laser. Since the infrared light is used, theuser won’t notice his/her fingers are illuminated.3 / 21
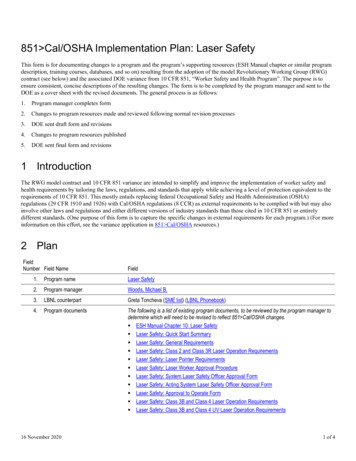
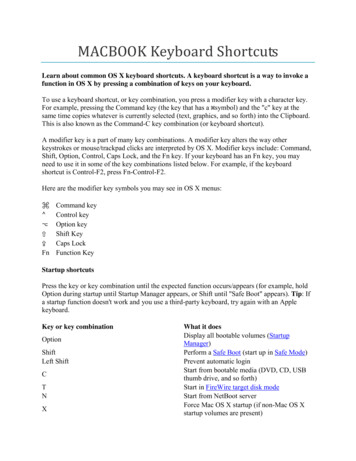
P’(x’, y’)CameraP(x, y)LaserFigure: Detect the position of the fingers using triangulationThe infrared light camera captures the images of the illuminated fingers, and sends the images tothe signal processing software. The position of the illuminated fingers is detected and localized bythe software, and it will be transformed to the related key input events.PxO(0,0)LaserP’xO’(0,0)P’yPyFigure: Mapping the desktop based finger position P(x,y) to the keyboard layout basedcoordination and generating key events4 / 21
2.Calibration and TuningYou need to calibrate and tune your laser projection keyboard in the first use after assembly. Agood calibration and tuning will make your laser projection keyboard perform well.This chapter will guide you through these processes.2.1.Basic Power-On CheckAfter finishing assembling the laser projection keyboard kit, please use a micro-usb cable toconnect the kit with a PC/Mac. If everything works fine, you will see the projected keyboardpattern on the desk surface and the PC/Mac will prompt you a new camera device has beenconnected.If you have noticed these, it means the assembly should be succeeded and you can continue todo the calibration job. Otherwise, please review the assembly manual to have further check.Figure: Windows prompts a camera device is connected when connect the kit with the PC2.2.Connecting with the Signal Processing SoftwareThe signal processing software designed by RoboPeak team has been included in this kit. Thesoftware processes the input video signal and transforms it to the related keyboard input events.Also, the software will guide you during the calibration and tuning processes.You can download the software via the DFRobot official website or from the official website ofRoboPeak team. The software supports both Windows and MacOS(Intel x64 only) platforms andno pre-installation is required.To run the software, simply double click the file named laser kbd.exe (or laser kbd.app onMacOS) as shown in the following figure. If it doesn’t work, please contact RoboPeak.5 / 21
Figure: Running the software (Windows)Before running the software, please make sure the laser keyboard kit has been connected to yourPC/Mac via the USB cable. You should see the following window when the software is started.Please select the camera named: Vimicro USB Camera(Altair) using the left/right arrow buttons.(If there have been similar cameras connected to your machine before, the name may bealtered.)Figure: the Camera Selection WindowPress the buttonto proceed. If everything works well, you will see the following window:6 / 21
Figure: The working UI of the signal processing softwareThe upper-left corner of the window displays the image captured from the infrared light camera.The upper-right corner shows the detected finger position. The software will enter the calibrationmode automatically during the first use.2.3.Camera Focus AdjustmentYou may need to adjust the infrared light camera’s focus in order to make it capture clear imagesof the finger input events. Please watch the camera image displayed on the signal processingsoftware’s window. If you find the image is like the left side of the following figure, you need tore-focus the camera. Not focused, the image is blurred Correctly focused, the image is clearPlease adjust the focus by tuning the camera lens and watch the images displayed on the signalprocessing software windows. When you see a clear image of the finger top, the focusadjustment is finished.7 / 21
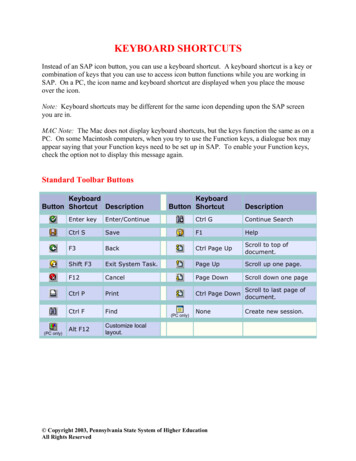
2.4.Calibrating the Projected Keyboard PatternPlease check the projected keyboard pattern on your desktop. A good projection image shouldlook like the first figure below. If you find the projected image looks like one of the followingdistorted sample image below, you need to tune the pattern projector.8 / 21
A Good projectedkeyboard patternimage The left side isdistortedThe rightdistortedside The bottom of theimage is distorted The top of theimage is distortedis 图 微调螺丝照片2.5.Camera Angle AdjustmentThe infrared light camera should capture the whole area of the projected keyboard pattern imageon the desktop. The signal processing software can be used to help you adjust the camera field of9 / 21
view angle if necessary.Please place your finger on the 4 corner of the projected keyboard pattern image on the desktopone-by-one and check whether the illuminated finger top has been captured by the camera.If you cannot find the illuminated finger shown on the software window, please use the extrascrew pad provided in the kit to make adjustment.10 / 21
The related illuminated finger top image is recommended to be displayed in the areas like thefollowing figureFinger positions2.6.Related imageLinear Laser AdjustmentThe line strip generated by the linear laser should be closely cover to desktop and be parallel withdesk surface to make the laser keyboard work.2.6.1. Adjusting the laser headWhen the linear laser beam isn’t parallel with the desk surface (as following figure depicts), youneed to adjust the laser head by tuning it.11 / 21
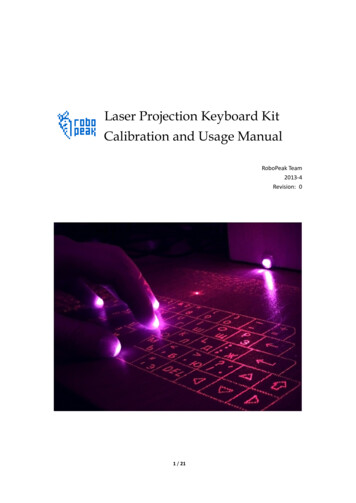
As the linear laser generates infrared laser which is invisible to human eyes. You need the help ofthe signal processing software.Please prepare a square box with white color (like the below figure) and place it in front of thelaser keyboard. Make sure it is parallel with the projected keyboard pattern:Then check the image on the signal processing software window. If the linear laser beam isparallel with the desktop, you will see a horizontal linear light pattern on the image. Otherwise,you will get a tilted linear light pattern or the pattern is incomplete.12 / 21
A horizontal linear light patternmeans the linear laser beam isparallel with the desktopA tilted linear light patternmeans the linear laser beam isnot parallel with the desktopAn incomplete linear lightpattern means the linear laserbeam is not parallel with thedesktopYou can adjust the angle of the linear laser beam by tuning the head of the linear laser like thefollowing figure:13 / 21
2.6.2. Height adjustmentThe generated linear laser beam should be kept close to the desktop enough in order to let thelaser keyboard generate precise key input events. If the laser beam is too high, the laser keyboardwill falsely generate key events for those fingers not touching the desktop. If the laser beam istoo close to the desktop, the desktop may be illuminated and a false key input event will begenerated as well.suitable height Laser beam is too highfrom the desktop. Laser beam is tooclose to the desktop The height of the linear laser beam can be adjusted via the adjustment screw.图: 激光器微调螺丝2.7. Final CalibrationIt is the last step of the calibration process. After this step, your laser projection keyboard willwork. The signal processing software will help you to complete this step. The software willprompt you to place your fingers to the point by flashed the related key button:14 / 21
After placing your finger to the required place, please don’t move the finger. Use mouse to clickthe light blob that is related to your finger:You will be asked to repeat the above steps several times. After about 10 “key pressing”, thecalibration process is completed. The calibration data is stored in the software folder for nextuses. You don’t need to recalibrate your laser keyboard as long as the laser keyboard structurewon’t be changed.The software will enter keyboard mode when the calibration is finished. In this mode you can useyour laser projection keyboard just as a normal keyboard device.15 / 21
3.Usage of the Signal Processing SoftwareThe signal processing software is specifically designed to be used together with the laserprojection keyboard kit by RoboPeak team. Besides the standard keyboard input feature, thesoftware also supports turning the laser keyboard kit into a multi-touch pad which tracks up to 10points at the same time.The software also provides calibration features for users to calibrate the keyboard.The software is softwared, you can download its source code and new updates submitted byRoboPeak.3.1.Camera SelectionThe software allows you to select a camera that is used by the laser keyboard kit when multiplecameras have been connected to your machine.After the software is started, it shows the camera selection window. For the laser projectionkeyboard kit, the camera should be named with: Vimicro USB Camera(Altair). The softwareremembers your choice and the related camera will be selected by default in the next softwarelaunch.3.2.the Working UIThe following working UI window will be appear when the camera has been connected.16 / 21
Working mode switchingRaw Camera Inputdetected finger blobDesktop Coordination MappingKeyboard Mapping3.3.Multi-language SupportThe software supports English and Chinese as its UI languages. The related language will beselected automatically based on the current UI language setting of your machine’s OS.3.4.Keyboard ModeThe Keyboard Mode is the default working mode of the software. After the calibration has beendone, the software will switch to this mode as well.The detected user key input events will be injected to the OS in this mode. It supports multiplekey stroke and auto repeat features.NOTE: the key events will be sent to the signal processing software’s window as well when thewindow is active. The software will quit when you press the ESC button.17 / 21
3.5.Multi-touch Pad MoeWhen in this mode, the software supports up to 10 points’ multi input sketch pad. Move yourfingers in the areas of the projected keyboard pattern image, and you will see your masterpiecedisplayed on the sketchpad window.The sketch image can be cleared by right clicking the mouse.3.6.Calibration ModeThe calibration mode can be entered any time when you need to calibrate your keyboard. Thequality of a calibration will greatly affect the keyboard performance.Once entering the calibration mode, the software will guide you to perform the calibrationprocess. You can also refer to the section 3.6 of this document for details.18 / 21
3.7.Command LinesYou can change the default behavior of the software by specifying command line arguments tothe software. Use the –help parameter to see all the available options.The following command line format is used:laser kbd [options] [camera id]OptionsDescriptions-mDefault working modeAvailable values:calibKeyboardsketchCamera idThe camera to beconnectedwithoutprompting.Startsform 03.8. ExampleEntering the multi touch pad mode when thesoftware started:laserkdb –m sketchMake the software to connect the secondcamera of the system without display thecamera selection window:laserkdb 1Parameter TuningWindow Users:The software will read the file named config/general.txt under the same folder where thesoftware locates. Mac Users:The software will read the file under the user’s home folder with the path: /Library/rp laserkbd/config/general.txt19 / 21
Users can change the configurations inside this file for extra tuning.3.8.1.The exposure value of the cameraThe software will disable the auto-exposure feature of the camera to work correctly. Theexposure value will be set to a fix value. You can modify this value when you think the currentexposure is not suitable for your keyboard.exposure level -7You can reference to the following figures to determine which exposure value is suitable for you. 3.8.2.suitable exposure valueOnly the finger top partsis sensed by the cameraunder-exposure.Thesensed finger top is toosmallOver-exposure.Thesensed finger top areasare mixed up.Key stroke delay and repeating intervalYou can modified the general.txt to change the intervals of key stroke delay and repeating:keyrefire delay 1000keyrefire interval 100The values are measured in the unit of millisecond (ms).20 / 21
4.Source-code and DocumentsPlease visit the official website of RoboPeak team for the details of the openosource laserprojection keyboard design.The related source code can be obtained via Github:URL:https://github.com/robopeak/laserkbd21 / 21
The laser keyboard works just like a standard keyboard on your PC/MAC with the help of the related signal processing software designed by RoboPeak. The signal processing software also supports turning your laser keyboard kit into a multi-touch pad. As an open-source project, you can freely make any changes/improvement to the current design .