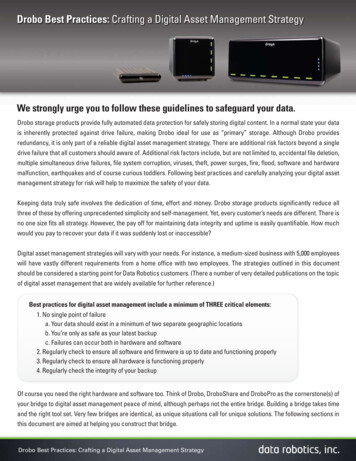
Transcription
Drobo 5N2 User Guide
Contents1Drobo 5N2 User Guide . 61.1Before You Begin . 71.1.1Product Features at a Glance . 81.1.2Checking Box Contents .101.1.3Checking System Requirements.111.1.3.1Operating Systems Supported .121.1.3.2Connectivity Interfaces Supported for the Drobo 5N2 .131.1.41.2Checking the Hardware You Need.141.1.4.1Selecting Drives .151.1.4.2Determining Drive Space Requirements .181.1.4.3Using a Router or Switch with the Drobo 5N2 .191.1.4.4Using Power Protection .20Setting Up Your Drobo 5N2 . 211.2.1Overview of First Time Setup .221.2.2Downloading and Installing Drobo Dashboard.241.2.2.1Installing Drobo Dashboard on Windows .251.2.2.2Installing Drobo Dashboard on Mac .301.2.3Connecting Cables and Powering On Your Drobo 5N2 .361.2.4Inserting Drives .391.2.5Setting Administrator Username and Password .411.2.6Understanding the Indicator Lights .431.2.7Migrating a Disk Pack from Another Drobo Device .451.2.8Using Drobo 5N2 with Time Machine .471.3Where to Go Next . 541.3.1Using Best Practices for Protecting Data .551.3.2Keeping Your Software Up to Date .561.3.2.1Checking for Software Updates .571.3.3Using Online User Guide .581.3.4Using Context-Sensitive Help .591.3.5Using Knowledge Base .60Drobo5N2 User Guide2
1.3.6Registering Your Drobo 5N2 .621.3.7Getting Technical Support .651.4Using and Managing Your Drobo 5N2 . 671.4.1Using Drobo Dashboard .681.4.1.1Installing Drobo Dashboard .691.4.1.2Keeping Your Software Up to Date .811.4.1.3Touring Drobo Dashboard.841.4.2Logging On to a Drobo 5N2 .881.4.3Logging Out of a Drobo 5N2 .891.4.4Modifying the Administrator Username and Password .901.4.5Renaming Your Drobo 5N2 .921.4.6Safely Shutting Down Your Drobo 5N2 .931.4.6.1Safely Shutting Down Your Drobo 5N2 Using Drobo Dashboard .941.4.7Restarting Your Drobo 5N2 .961.4.8Resetting Your Drobo 5N2 .981.4.9Blinking Lights to Test Connectivity . 1001.4.10Enabling or Disabling the System Tray . 1011.5Modifying Device Settings for Your Drobo 5N2 . 1021.5.1Managing Auto-Discovery of Drobo 5N2 . 1031.5.1.1Adding a Drobo 5N2 by Its IP Address . 1041.5.1.2Enabling or Disabling a Drobo Device by Its IP Address . 1061.5.1.3Enabling or Disabling Auto-Discovery of Drobo 5N2 . 1071.5.1.4Removing a Drobo 5N2 by Its IP Address from the Discovery List . 1081.5.2Enabling or Disabling Dual Disk Redundancy . 1091.5.3Modifying the Disk Drive Spin Down Time . 1111.5.4Dimming the Lights on Your Drobo 5N2 . 1131.5.5Setting Your Drobo 5N2 to Independent Network Mode or Network Interface BondingMode1141.5.6Configuring Network Settings (and IP Addresses) for Your Drobo 5N2. 1151.5.7Modifying the MTU Settings for Jumbo Frames . 1171.6Creating and Using Shares . 1191.6.1Creating Shares . 1211.6.2Creating Users . 124Drobo5N2 User Guide3
1.6.3Assigning Users Access Rights to a Share . 1271.6.3.1Assign Users Access Rights via Shares View . 1281.6.3.2Assign Users Access Rights via Users View . 1291.6.4Mounting Shares . 1301.6.5Accessing Shares as the User . 1321.6.6Renaming or Modifying Users . 1331.6.7Deleting Users . 1361.6.8Renaming Shares . 1371.6.9Deleting Shares . 1401.7Managing Capacity (Drive Space) . 1411.7.1Calculating Capacity to Use . 1421.7.2Adding Capacity (or Drives) . 1431.7.3Removing Capacity (or Drives) . 1451.8Checking Storage Usage and Device Status Information . 1471.8.1Checking Storage Usage . 1481.8.1.1Viewing the Capacity Chart . 1491.8.1.2Viewing Storage Usage . 1511.8.2Checking the Status of Your Drobo 5N2 . 1531.8.3Checking Your Drobo 5N2's Serial Number . 1551.8.4Checking Your Drobo 5N2's Firmware Version . 1561.8.5Checking Your Current Version of Drobo Dashboard . 1571.8.5.1Checking Current Version on Windows . 1581.8.5.2Checking Current Version on Mac. 1591.8.6Checking System Information . 1601.8.7Checking Drive Information . 1621.8.8Checking Network Information . 1641.8.9Getting Diagnostics on Your Drobo 5N2 . 1661.8.10Understanding the Indicator Lights . 1681.9Using Additional Software and Functionality . 1701.9.1Using On-Screen and E-mail Alerts . 1711.9.1.1Setting Up or Modifying Email Alerts . 1721.9.1.2Modifying When to Send Email Alerts . 1781.9.1.3Disabling Email Alerts . 180Drobo5N2 User Guide4
1.9.1.4Modifying When to Send On-Screen Alerts . 1811.9.1.5Disabling On-Screen Alerts . 1831.9.1.6Setting or Modifying Email Alerts for a Selected Drobo 5N2 Only . 1841.9.2Using DroboDR to Replicate Data. 1861.9.2.1Checking System Requirements for DroboDR . 1871.9.2.2Setting Up Your Drobo Device to Use DroboDR. 1881.9.2.3Setting or Modifying a DroboDR Schedule . 1891.9.2.4Starting a DroboDR Manually . 1911.9.2.5Stopping a DroboDR in Progress . 1931.9.2.6Viewing the Summary Log of Synchronizations . 1941.9.2.7Saving a Detailed Log of Synchronizations to View. 1961.9.2.8Disabling DroboDR at the Source. 1971.9.2.9Disabling DroboDR at the Target . 1991.9.2.10Configuring the Destination Drobo Device . 2011.9.2.11Configuring the Source Drobo Device . 2031.9.3Using DroboApps . 2051.9.3.1Enabling or Disabling Drobo Apps . 2061.9.3.2Managing Drobo Apps . 2071.10Inserting an mSATA SSD . 2101.11Removing an mSATA SSD . 2121.12Troubleshooting Your Drobo 5N2 . 213Drobo5N2 User Guide5
1 Drobo 5N2 User GuideCongratulations on your new Drobo!This Getting Started section will help you set up your Drobo 5N2 and run it in just a few steps.Related topics:Before You BeginSetting Up Your Drobo 5N2 in Just a Few Steps!Where to Go NextDrobo5N2 User Guide6
1.1 Before You BeginBefore you begin setting up your Drobo 5N2, it’s a good idea to check the system and hardwarerequirements.This section covers the following topics:Product Features at a GlanceChecking Box ContentsChecking System RequirementsChecking the Hardware You NeedDrobo5N2 User Guide7
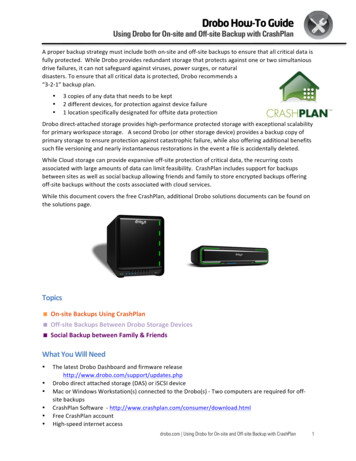
1.1.1 Product Features at a GlanceFor a quick overview of features of the Drobo 5N2, refer to the following images.Figure 1: Front of the Drobo 5N2 with the bezel (faceplate) removed.Drobo5N2 User Guide8
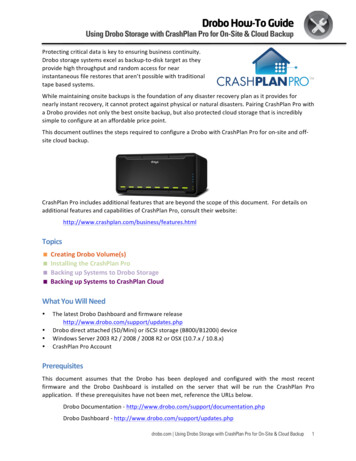
Figure 2: Back of the Drobo 5N2Related topic:Before You BeginDrobo5N2 User Guide9
1.1.2 Checking Box ContentsWhen you open the product’s box, you will find the components listed below. Drobo 5N2 Two 6ft (1.8m) Ethernet cable 6ft (1.8m) power cord with power supply Quick Start Card Safety and Warranty GuideRelated topic:Before You BeginDrobo5N2 User Guide10
1.1.3 Checking System RequirementsCheck to ensure your operating system and cable interface are supported with the Drobo 5N2.Related topics:Operating Systems SupportedConnectivity Interfaces Supported for the Drobo 5N2Before You BeginDrobo5N2 User Guide11
1.1.3.1 Operating Systems SupportedFor the most current list of supported operating systems, check the specifications for your productsonline at www.drobo.com/products/index.php.Related topics:Connectivity Interfaces Supported for the Drobo 5N2Before You BeginDrobo5N2 User Guide12
1.1.3.2 Connectivity Interfaces Supported for the Drobo 5N2Your Drobo 5N2 connects to a network via a router or switch using an Ethernet port. Ethernet is thestandard local area network (LAN) access method.Gigabit Ethernet PortDrobo 5N2 supports dual gigabit Ethernet connections (1000 Mbit/s) for optimal performance. It will,however, auto-negotiate the highest connection speed available to your router or switch.Related topic:Before You BeginDrobo5N2 User Guide13
1.1.4 Checking the Hardware You NeedTo use your Drobo 5N2, you will need at least two hard drives. If you plan to use Dual DiskRedundancy, which protects your data against two hard drive failures, you will need at least threehard drives.Related topics:Selecting DrivesDetermining Drive Space RequirementsUsing a Router or Switch with the Drobo 5N2Using Power ProtectionBefore You BeginDrobo5N2 User Guide14
1.1.4.1 Selecting DrivesThe Drobo 5N2 supports both standard 3.5” SATA hard disk drives (HDDs) as well as SATA solid statedrives (SSDs) for added performance. For HDDs, these drives can be from any manufacturer and withany capacity. For SSDs, please visit our web page for compatible drive options.In addition, the Drobo 5N2 has a Drobo Accelerator Bay, which accepts an industry-standard mSATASSD. When the mSATA SSD is installed, Drobo’s Hot Data Caching feature is enabled, acceleratingperformance when reading data from your Drobo device. Having an mSATA SSD installed leaves alldrive bays available for high-capacity hard disk drives (HDDs) so that you can get both high-capacityand accelerated performance out of your Drobo device.NoteMake sure that you are not using SandForce SSD's or mSATA.Using only SSDs in the main drive bays of your Drobo 5N2 provides the fastest performance whenreading and writing data to and from your Drobo device.In summary, here are the recommended number and type of drives you can use with your Drobo5N2: 2 to 5 HDDs in the main drive bays - enables you to maximize capacity 2 to 5 HDDs in the main drive bays plus an mSATA SSD installed - enables you to maximizecapacity and accelerate read performance 2 to 5 SSDs in the main drive bays with no mSATA SSD - enables you to maximize read and writeperformanceNoteIn the event of drive failure, you need to insert 5 drives in the drive bays to ensure thatyour data is protected and to avoid any formatting issues.For a performance comparison of these options, see the image below.Drobo5N2 User Guide15
Important Notes:If an incompatible SSD is inserted into the Drobo device, the drive light will blink red,indicating the need to replace that drive. Please refer to our web page on compatible driveoptions for more information.The mSATA SSD is not part of the disk pack of your Drobo 5N2, allowing you to leave itinstalled even if you transfer drives from the drive bays to another Drobo device, for example.When Hot Data Caching is enabled, an icon displays in Drobo Dashboard, the softwarecompanion to your Drobo device.The Drobo 5N2 is not compatible with IDE, SCSI, PATA or SAS drives.The Drobo 5N2 supports migrating entire disk packs from a Drobo5N (16TB volume),Drobo5N (64TB volume), and DroboFS (16TB volume), preserving its data. For moreinformation, and to ensure a safe and successful migration of the drives, carefully follow theinstructions in Migrating a Disk Pack from Another Drobo Device.For EOL product (Drobo FS and old Drobo 5N’s) in order to achieve 64TB volume size youneed to copy data to new drives in 5N2.Warning:Any pre-existing data on the drives will be erased when inserted into the Drobo 5N2.Drobo5N2 User Guide16
Related topics:Determining Drive Space RequirementsChecking the Hardware You NeedBefore You BeginDrobo5N2 User Guide17
1.1.4.2 Determining Drive Space RequirementsIn order to protect your data from hard drive failure, your Drobo 5N2 requires more space than whatyou will use for your data, sometimes as much as double or more the amount of space.The best way to determine how much usable, protected storage space you will have available foryour data, based on the number and capacity of your drives, is to use our Capacity Calculator atwww.drobo.com/calculator.A shortcut to estimating the capacity available for your data is to omit the largest drive and then addthe capacity of the remaining drives. If you plan to use Dual Disk Redundancy, omit the largest twodrives. For example:Single Disk (Default) RedundancyDual Disk RedundancyNotes:Actual capacity is often less than what is shown in the examples above due to thedifferent systems used for rating capacity. This has nothing to do with Drobo devices.Know that all Drobo devices enable you to easily increase storage capacity at any time bysimply inserting additional drives or replacing smaller drives with larger ones.Related topics:Selecting DrivesManaging Capacity (Drive Space)Checking the Hardware You NeedBefore You BeginDrobo5N2 User Guide18
1.1.4.3 Using a Router or Switch with the Drobo 5N2You will be plugging your Drobo 5N2 into a router or switch that must already be configured to workwith your network. Your router or switch must have at least one Ethernet port open and available.Your router or switch must also support DHCP. If it does not, you will need to directly connect yourDrobo 5N2 to one of your computer’s Ethernet ports for the initial setup.Tip:To check for DHCP support, refer to the documentation for your router or switch. You mayalso choose to proceed with installation and check for DHCP support only if you experience aproblem.For optimal performance, it’s best if your router or switch supports gigabit Ethernet connections(1000 Mbit/s). Your Drobo 5N2, however, will auto-negotiate the highest connection speed availableto your router or switch.Related topics:Checking the Hardware You NeedConnectivity Interfaces Supported for the Drobo 5N2Before You BeginDrobo5N2 User Guide19
1.1.4.4 Using Power ProtectionWe recommend using the following power protection with your Drobo device: An uninterruptible power supply (UPS), which protects against sudden losses in power A power surge protector to protect against power surgesRelated topics:Checking the Hardware You NeedBefore You BeginDrobo5N2 User Guide20
1.2 Setting Up Your Drobo 5N2Once you have unpacked your Drobo 5N2 from its box and ensured you meet all system andhardware requirements, it is time to set up your Drobo device for use. This can be done in just a feweasy steps!1.Overview of First Time Setup2.Downloading and Installing Drobo Dashboard3.Connecting Cables and Powering on Your Drobo 5N24.Inserting Drives5.Setting Administrator Username and Password6.Understanding the Indicator Lights7.Migrating a Disk Pack from Another Drobo Device8.Using Drobo 5N2 with Time Machine9.Inserting an mSATA SSD (optional)Note:The Drobo 5N2 supports migrating entire disk packs from a Drobo5N (16TB and 64TBvolume) and DroboFS (16TB volume), preserving its data. To ensure a safe and successfulmigration of the drives, carefully follow the instructions in Migrating a Disk Pack from AnotherDrobo Device.Drobo5N2 User Guide21
1.2.1 Overview of First Time SetupThis section explains how to set up your Drobo 5N2 for the first time.1.2.1.1.1.1 Checking Box ContentsWhen you open the product’s box, you will find the components listed below. Drobo 5N2 Two 6ft (1.8m) Ethernet cable 6ft (1.8m) power cord with power supply Quick Start Card Safety and Warranty GuideSteps for setting up your Drobo 5N2 are as follows:1.When you first receive a new Drobo 5N2, you must use the Drobo Dashboard app to update it tothe latest firmware releaseImportant Note:If you are a first-time Drobo user, simply install the latest version of Drobo Dashboard. Ifyou are an existing Drobo user and have a Drobo Dashboard version earlier than2.7.0 installed, then you must follow these instructions to uninstall Drobo Dashboard prior toinstalling the latest version: What is the proper way to uninstall and re-install DroboDashboard on my Mac?2.Connect the data port of the Drobo to an Ethernet switch.3.Ensure that the Mac or PC you are using for this setup has a valid Internet/network connection.4.If you are using a Mac, ensure that the Firewall (System Preferences Security &Privacy Firewall) is set to "allow incoming" for DD service (Drobo Dashboard).5.Verify that the Drobo is powered off.6.Insert the drives.7.Turn on the Drobo.Warning:Powering on the Drobo will begin the disk format process. Please be aware that all data onthe disks will be erased.Drobo5N2 User Guide22
8.Your Drobo should begin updating to the latest firmware and automatically formatting thedisk. Please allow Drobo up to 20 minutes for the total initialization process. Here's what you will seehappen:When your Drobo appears in Drobo Dashboard, you may select it and go into the Status page whichwill show that the Drobo is initializing. While initialization is taking place, all of the drive slot LEDs willbe yellow, and the capacity LEDs will blink blue. When initialization is complete, Drobo will restartto finish the firmware upgrade process.Note:If Drobo Dashboard does not detect your Drobo and initialization does not begin, pleasedisable any firewall and antivirus programs and ensure that your Drobois connected directly to the Ethernet port on your computer and not via an ethernet switch. Inthis scenario, be sure that your computer is set to get its IP address on that Ethernet port viaDHCP. If Drobo Dashboard will still not detect your Drobo and the lights remain solid red,please call our support line for assistance or open a ticket on your support account.For more info, please see: How do I contact technical support?9.If red drive lights are seen again (e.g. "Unknown Disk Set"), please go to Drobo Dashboard's"Tools" and choose ERASE (reset), allowing reboot of the Drobo.Alternatively, you can use the pinhole method as described in Step 2 of:How can I clear all my data off my Drobo storage device and start anew?WarningThis procedure will erase all data from all drives and return your Drobo to default settings.Note:If you need to assess that the process is moving smoothly, see Guide to meaning ofindicator lights (LEDs).Related topics:Keeping Your Software Up to DateDownloading and Installing Drobo DashboardDrobo5N2 User Guide23
1.2.2 Downloading and Installing Drobo DashboardThe Drobo Dashboard application will help you to set up and manage your Drobo 5N2. Afterinstallation of the Dashboard, you can configure the settings to automatically install version updates,which is highly recommended.Drobo software and firmware updates for Drobo 5N2 can be downloaded and installed from StartDrobo 5N2 page.This section covers the following topics: Installing Drobo Dashboard on Windows Installing Drobo Dashboard on MacNote:You need a full admin user account and internet access on the computer on which you aregoing to install the Drobo Dashboard.Next in the Setup for Your Drobo 5N2:Updating Your Drobo 5N2 to the Latest FirmwareReturn to Setting Up Your Drobo 5N2Related topics:Using Drobo DashboardTouring Drobo DashboardDrobo5N2 User Guide24
1.2.2.1 Installing Drobo Dashboard on WindowsTo install the Drobo Dashboard on a Windows machine:1.Go to the Start 5N2 page and download the Drobo Dashboard installation file for Windows.2.After downloading, double-click the Drobo Dashboard Installer to launch it.3.A pop up will appear asking you to choose the language for installation. Select the language ofyour choice and click OK.4.The Drobo Dashboard Installer (or Installation Wizard) will appear.Drobo5N2 User Guide25
5.Click the Next button to proceed.6.Follow the instructions of the Installation Wizard by clicking the Next button after each page.7.Once you reach the installation page, click the Install button.8.In some Windows operating systems, the Windows Access Control dialog box appears, asking ifDrobo
In addition, the Drobo 5N2 has a Drobo Accelerator Bay, which accepts an industry-standard mSATA SSD. When the mSATA SSD is installed, Drobo's Hot Data Caching feature is enabled, accelerating