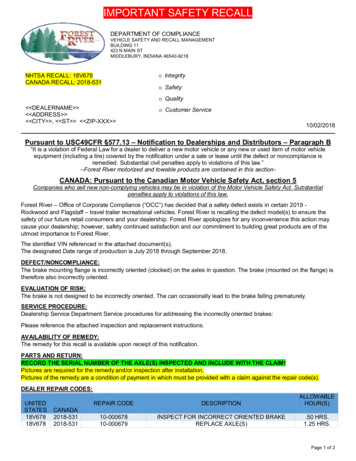
Transcription
TECHNICAL INSTRUCTIONSFORSAFETY RECALL CSJREAR LOWER SUSPENSION ARM No.12006 – EARLY 2011 MODEL YEAR RAV4Complete CSJ Technical Video SupplementONLY TECHNICIANS WHO HAVE COMPLETED TRAINING COURSES SC13A,SC13C, AND HAVE THE FOLLOWING LEVEL OF CERTIFICATION CAN PERFORMTHIS REPAIR: CHASSIS EXPERT TECHNICIANSMASTER TECHNICIANSMASTER DIAGNOSTIC TECHNICIANSAs of 8/27/13 the Remedy instructions are only applicable to the following regions: BostonRefer to the Dealer Letter for anticipated remedy dates for all remaining regions
I.OPERATION FLOW CHARTVerify Vehicle Eligibility1. Check the VIN range.2. Check the TIS Vehicle InquirySystem.Not CoveredNo further action required.CoveredCheck the suspension arm No.1design.Adjusting cam designONLY a small number of vehicleswith have the adjusting cam designAdjusting tube designInspect visually and by hand forlooseness.NOT LooseInspect the threads under theadjusting tube and lock nuts for rust.LooseRustNO RustReplace the suspension arm.Perform four wheel alignment. Tightensuspension arm lock nuts correctly.The lock nut tightening procedure iscritical. Follow the steps EXACTLY asdescribed in these instructions.Apply epoxy and labels to thesuspension arms.Campaign complete, return the vehicleto the customer.II. BACKGROUNDVideo supplement: IntroductionSafety Recall C0J involved inspecting the right and left Rear Suspension Lower Arm No. 1 (“arm”) forlooseness. Based upon this inspection, it may have been necessary to replace the arm(s).TMS received reports from dealers indicating that some vehicles experienced symptoms of the recalledcondition after being inspected or repaired. Upon investigation, it was discovered that some inspections werenot adequate and portions of the repair procedure may not have been performed correctly.Based upon this information, Toyota will be re-notifying all owners covered by Safety Recall C0J. Thenotification will apologize to customers and inform them that their vehicles may not have been inspected orrepaired correctly. The letter will request the customer to return to the dealership for a revised inspection andremedy procedure. The revised inspection and remedy will be performed at No Charge.2
III. PREPARATIONA. PARTSPart Number00289-SW1KT-DSPart DescriptionEpoxy KitQuantity1*The kit above includes the following parts. 50ml Epoxy CartridgeMixing NozzleCaution Labels112All vehicles will require this epoxy kit.Part Number04002-22142Part DescriptionRear Suspension Arm No.1 Kit*Quantity1*The kit above includes the following parts.48710-0R01090179-12027Rear Lower Suspension Arm No.1Nut11This part will be replaced based upon inspection, follow these instructions for details.B. TOOLS & EQUIPMENT Standard hand tools Torque wrench 22mm crowfoot 4 Wheel alignment machineC. MATERIALS FIPG 00295-00103 – Needed if voids are found in the epoxy, follow these instructions for details Frekote Lifft Mold Release 00289-HKLMR-DS – This material is only currently available in case quantity(12 cans/case), one can will cover approximately 75 vehiclesSST – This is an essential special service tool that the dealership should have.Part NumberPart NameQuantity09960-20010Ball Joint Puller Set1CAMPAIGN TOOLS – These tools are provided to the dealership. These tools are necessary whenperforming this repair.ImageNameQuantityEpoxy Mold Set4 halves /2 complete moldsEpoxy Applicator1NOTE: These tools CANNOT be ordered through the parts or tools system. There is a very limitedsupply of tools, but if additional tools are needed, contact your regional representative.3
IV. IDENTIFICATION OF AFFECTED VEHICLESA. COVERED VIN VVDS VVDS 810564
COVERED VIN RANGE CONTINUED F35VZK31VZK32VZK33VZK34VZK35VBF4DVBK4DVDF4DVVDS F4DVWK4DVXF4DVYF4DVYK4DVZF4DVZK4DVVDS 77-D0047975032172-D0294705027376-D004782NOTE: Check the TIS Vehicle Inquiry System to confirm the VIN is involved in this Safety Recall, and that thecampaign has not already been completed prior to dealer shipment or by another dealer. TMS warranty will not reimburse dealers for repairs conducted on vehicles that are not affected or werecompleted by another dealer.5
V. COMPONENTSVI. REAR LOWER SUSPENSION ARM No.1 INSPECTION1. CHECK THE SUSPENSION ARM DESIGNADJUSTING TUBE DESIGNARM DESIGNAdjusting TubeAdjusting CamADJUSTING CAM DESIGNACTION REQUIREDProceed to STEP 2. CHECK FOR LOOSENESS VISUALLY AND BY HANDNo further action required. Campaign complete.6
Replace the suspension arm(s) if: Looseness is found. A gap is visible between the lock nut(s) and adjusting tube.The arm(s) that do not exhibit the above conditions MUST also be inspected for rust.Video supplement: Suspension Arm Inspection steps2. CHECK FOR LOOSENESS VISUALLY AND BY HANDa) Check visually and by hand to determine if any looseness is seen or felt in the suspension arm lock nuts oradjusting tube. Check the LH and RH arms.NOTE: If recall C0J waspreviouslyperformedandsuspension arm clips areinstalled, remove and discardthe clips.b) Inspect for a gap between the lock nuts and the adjusting tube.CONDITIONLooseORGapNOT LooseANDNO GapACTION REQUIREDReplace the suspension arm(s) with looseness OR if a gap is found between the lock nut(s)and adjusting tube. Refer to TIS for instructions on suspension arm replacement.NOTE: To prevent stress on the new suspension arm bushing, apply a load to thesuspension system to confirm the suspension arm bushing is aligned correctlywhen tightening by confirming that rear suspension arm No.1 is level with theground. Suspension arm adjustment and tightening procedure is critical. After replacing thearm, refer to SECTION VII. in these instructions for this procedure.Proceed to STEP 3. CHECK THE SUSPENSION ARM THREADS FOR RUST7
3. CHECK THE SUSPENSION ARM THREADS FOR RUSTa) Brush the exposed threads if there is excessive buildup orrust on the threads.NOTE: Brushing the threads will ease the loosening of thenuts.b) Hold the adjusting tube steady and loosen each lock nut toexpose 1/8” (3mm) of threads.NOTE: It takes approximately 2 complete revolutions of thenut to expose 1/8” of threadsIf either nut is seized or extremely tight, the armshould be replaced. DO NOT apply heat in anattempt to loosen the arm.c) Rotate the adjusting tube to expose an additional 3/8”(10mm) of threads.NOTE: To prevent the arm from binding when rotating, holdthe ball joint side with locking pliers.If the adjusting tube is seized or extremely tight,the arm should be replaced. DO NOT apply heatin an attempt to loosen the arm.There should now be 1/2” (12mm) of threads exposed on both sides of the adjusting tube.8
d) Use a flashlight to inspect the newly exposed threads for RED RUST.In order to perform a thorough inspection, it is CRITICAL to use a flashlight when inspecting forrust.CONDITIONObvious red rustACTION REQUIREDSmall amount of red rustReplace the suspension arm(s) that exhibit any ofthe three conditions to the left. Refer to TIS forinstructions on suspension arm replacement.NOTE: To prevent stress on the new suspensionarm bushing, apply a load to thesuspension system to confirm thesuspension arm bushing is alignedcorrectly when tightening by confirmingthat rear suspension arm No.1 is level withthe ground. Suspension arm adjustment and tighteningprocedure is critical. After replacing thearm, refer to SECTION VII. in theseinstructions for this procedure.Red rust and white residueINSPECTION CONDITIONS CONTINUED ON NEXT PAGE9
d) Inspection conditions continued.In order to perform a thorough inspection, it is CRITICAL to use a flashlight when inspecting forrust.CONDITIONWhite residue ONLYACTION REQUIREDTemporarily tighten the arm back to the originalcondition. Confirm the inspection is performed onboth arms then proceed to vehicle alignment.NO Red Rust and NO White ResidueNOTE: Suspension arm adjustment andtightening procedure is critical. Refer toSECTION VII. in these instructions for thisprocedure.10
VII. SUSPENSION ARM ADJUSTMENT AND LOCK NUT TIGHTENINGVideo Supplement: Suspension Arm Adjustment and Lock Nut Tightening steps1. JOUNCE THE REAR OF THE VEHICLEa) Due to the pressure applied to the rear suspension system during inspection, it is CRITICAL to jounce therear of the vehicle to resettle the suspension prior to vehicle alignment.2. PERFORM FOUR WHEEL ALIGNMENTa) Perform alignment using an alignment machine.b) Test drive the vehicle to confirm the alignment. Holding the adjusting steady tube is CRITICAL when tightening the lock nuts, if the adjustingtube is not held steady the lock nuts may become loose. The alignment MUST be performed by the same technician performing the recall. Only oneperson should perform the entire recall on each vehicle. The tightening procedure for these lock nuts is critical, failure to tighten them in the correctorder could cause them to become loose.VITAL STEPS3. TIGHTEN THE LOCK NUTS EXACTLY AS DESCRIBED BELOWUse a 22mm combination wrench and a 22mm crowfoot attached to a torque wrenchTightening Sequence: 1. Inboard 2. Outboard 3. Inboard AgainTorque: 41ft. lbf (56N m)a) Tighten the inboard lock nut. Hold the adjusting tube steady and tighten the inboard lock nut to thespecified torque.b) Tighten the outboard lock nut. Hold the adjusting tube steady and tighten the outboard lock nut to thespecified torque.c) Tighten the inboard lock nut again. Hold the adjusting tube steady and tighten the inboard lock nut tothe specified torque.11
VIII. SUSPENSION ARM EPOXY APPLICATIONVideo Supplement: Epoxy Application stepsConfirm the thread inspection, vehicle alignment, and lock nut tightening have all been performedcorrectly before proceeding.1. PREPARE THE EPOXY MOLDSa) Confirm there is no dried epoxy or debris in the molds.b) Apply two light coats of the mold release to the molds.c) Once the mold release has dried, there should not be wetpools in the molds.NOTE: The mold release will set and be ready for epoxyapplication after 60 seconds.2. CLEAN THE SUSPENSION ARMa) Clean the area of the arm where the epoxy will be applied.b) Use a steel bristle brush to remove any rust buildup andflaking that may be present on the arm.c) Use a rag and brake clean to finish cleaning the arm.Cleaning the exterior surface, even on a newarm, is CRITICAL to confirm the epoxy adheresproperly.3. FILL THE MOLDS WITH EPOXYa) Assemble the applicator by following the instructionsincluded in the applicator box.b) Install the epoxy cartridge in the applicator.c) Install the mixing nozzle to the cartridge.d) Start by squeezing the handle to pre-fill the mixing tube untilthe epoxy reaches the end of the nozzle, then stopsqueezing.Pre-filling the mixing nozzle is critical to ensurethe molds are each filled with even amounts ofepoxy in the following steps.NOTE: Confirm the one-to-one ratio plunger is installed inthe applicator.12
4. FILL THE MOLDS WITH EPOXY One complete epoxy cartridge should be used for every 2 suspension arms. There are approximately 12 full squeezes of epoxy in each cartridge. Follow these steps exactly as described so there are no voids in the epoxy when installed on thesuspension arm.a) Apply two full squeezes of the epoxy along the length of each mold. (eight total squeezes)b) Apply the remaining 3-4 squeezes evenly in the upper and lower thirds of the molds. It is important that the epoxy is filled evenly between the four mold halves. If the molds have an uneven amount of epoxy, pair the mold with the least amount of epoxy andthe one with the most epoxy together to avoid creating voids in the epoxy once it sets.13
5. INSTALL THE MOLDS ON THE SUSPENSION ARMSa) Confirm the molds are centered over the adjusting tube andlock nuts, then place them on the arm.b) Press the mold halves together and confirm the edges of themold halves are aligned with each other.The mold should be installed within 5 minutesof dispensing the epoxy to ensure the epoxyadheres properly.c) The epoxy should be forced out evenly along the partinglines to indicate a good fill.d) There is NO NEED to wipe the epoxy along the parting lines,it can be trimmed easily once it has set.NOTE: There is no need to clamp the molds, the epoxy willhold the molds in place.e) Confirm the epoxy at the ends of the mold is clean andsmooth.6. ALLOW THE EPOXY TO SETa) Allow the epoxy to set for 30 minutes.NOTE: The set time is temperature dependent, it may takelonger in cold temperatures. Heat SHOULD NOT be applied to speed the set time.7. REMOVE THE CAUTION LABELS FROM SUSPENSION ARMNo.2a) Remove the labels from the front and back sides ofsuspension arm No.2.NOTE: This step only needs to be performed if recall C0J waspreviously performed and caution labels are installed. It may be necessary to heat the labels with a heat gunto ease the removal process.14
8. REMOVE THE MOLDSa) If temperatures are cold, confirm the epoxy has set bytouching it prior to removing the molds.b) After the epoxy has set for a minimum of 30 minutes, themolds can be removed.c) Use a screwdriver on the mold tabs to remove the molds. DO NOT remove the molds early or the epoxymay be damaged.DO NOT twist the molds during removal, thismay deform the epoxy.It is normal for the epoxy to still be flexible,the epoxy will continue to cure over the next6-8 hours.9. TRIM AND CLEAN THE EPOXYa) Trim the excess epoxy from the parting lines using a razor.NOTE: The excess epoxy MUST be trimmed to confirm thecaution label adheres properly.b) Wipe the epoxy clean using a shop cloth to remove anyremaining mold release.DO NOT use brake clean on the epoxy.10. INSPECT FOR VOIDSa) Inspect the epoxy for any voids that expose the arm.b) If any voids are identified, fill with FIPG.There should not be any voids that expose thearm if the molds are filled with epoxy correctly.Identify VoidFill Void11. APPLY CAUTION LABELa) Wrap the caution label around the epoxy.NOTE: The label is designed to overlap over itself byapproximately 3/8”.12. REMOVE THE OWNER’S MANUAL SUPPLEMENTa) Remove and discard the owner’s manual supplementlocated in the glove box.NOTE: This step only needs to be performed if recall C0Jwas previously performed and owner’s manual supplementcan be found in the glove box.13. CAMPAIGN COMPLETE15
VERIFY REPAIR QUALITY Confirm ALL inspection steps are followed EXACTLY as described in these instructionsConfirm the lock nut tightening procedure is followed EXACTLY as described in these instructions if thearm is being replacedConfirm vehicle alignment is correct prior to applying epoxy to the armConfirm the epoxy is applied correctly and that the caution label is installedIf you have any questions regarding this update, please contact your regional representative.IX. APPENDIXA. CAMPAIGN DESIGNATION DECODERCSYear Campaign is Launched Repair PhaseB 2011C 2012D 2013E 2014F 2015Etc.0 Remedy1 Interim (Remedynot yet available) “1”will change to “0” whenthe Remedy isavailableS SupplementalCampaignJCurrent Campaign Letterfor this year1st Campaign A2nd Campaign BEtc.Examples:thA0D Launched in 2010, Remedy Phase, 4 Campaign Launched in 2010thB1M Launched in 2011, Interim Phase, 13 Campaign Launched in 2011thCSJ Supplemental Campaign for 9 Campaign Launched in 2012B. CAMPAIGN PARTS DISPOSALAs required by Federal Regulations, please make sure all campaign parts (original parts) removed from thevehicle are disposed of in a manner in which they will not be reused, unless requested for parts recoveryreturn.16
JTM 2010 DF4DV 5017212-D039591 JTM 2011 ZK4DV 5027376-D004782 . NOTE: Check the TIS Vehicle Inquiry System to confirm the VIN is involved in this Safety Recall, and that the campaign has not already been completed prior to dealer shipment or by another dealer. TMS warranty will not reimburse dealers for repairs conducted on vehicles .