Transcription
Wellness Steam PackageInstallation ManualFor Tutorials and Troubleshooting visit www.thermasol.com/solutionsOVER 60 YEARS OF STEAM SHOWER INNOVATION
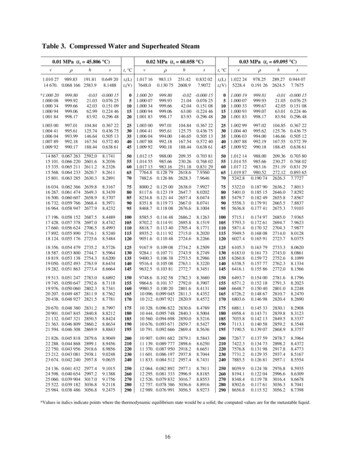
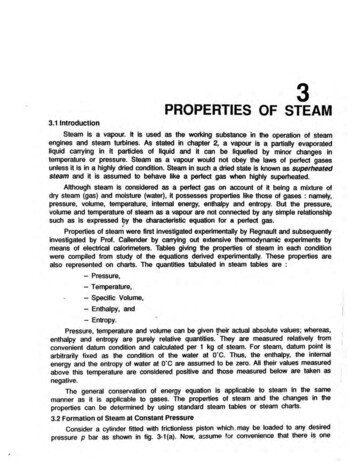
ThermaTouch Control10 Inch ScreenInstallation ManualFor Tutorials and Troubleshooting visit www.thermasol.com/solutionsTT10-XXOVER 60 YEARS OF STEAM SHOWER INNOVATION2
Wellness Steam Package1 Important Information before You InstallThe ThermaTouch Control must be installedinside the shower. The ThermaTouch controlwill only function on the current TFX, SSA andPRO Series generators.The control should be installed 60" fromthe floor of the shower and away fromthe steamhead.The steamhead should be installed 24" fromthe floor and 6" from any wall. Locate as faras possible from the bathing seating areaor location of the users and not belowany fixtures.IMPORTANT: When locating and installing theThermaTouch, it is required to not place thecontrol under any water-outlets, shower headsor in the direct path of flowing water.SEE DIAGRAM FOR LOCATION EXAMPLE.PLEASE REVIEW WARNINGS BELOW AND LEAVE THIS MANUAL WITH HOMEOWNERDO NOT USE THIS PRODUCT UNLESS YOU HAVE CONSULTED WITH YOUR DOCTOR AND RECEIVED WRITTEN PERMISSION TO DO SO.USE OF THIS PRODUCT MAY BE HAZARDOUS TO YOUR HEALTH.PLEASE CONSULT YOUR PHYSICIAN BEFORE USING. IF YOU ARE PREGNANT, ELDERLY, HAVE HIGH BLOOD PRESSURE, DIABETES,SUFFERING FROM HEART DISEASE, ARE INTOXICATED, OR NOT IN GOOD HEALTH, DO NOT USE THIS STEAM BATH.STEAM IS HOT! DO NOT TOUCH OR GO NEAR THE STEAMHEAD FROM THE TIME THE UNIT IS “ON,” UP TO ONE HOUR AFTER IT HAS SHUTOFF. SEVERE BURNS WILL OCCUR IF YOU COME IN CONTACT WITH THE STEAMHEAD OR STEAM EMITTING FROM THE STEAMHEAD.NEVER ATTEMPT TO FILL AROMA RESERVOIR ON THE STEAMHEAD WHEN UNIT IS IN THE "ON" POSITION. SEVERE BURNS WILL OCCUR.DO NOT USE THERMASOL AROMATHERAPY OILS, SKIN CARE PRODUCTS OR ANY PRODUCT ASSOCIATED WITH YOUR THERMASOL UNITWITHOUT CONSULTING WITH YOUR ALLERGIST OR DOCTOR BEFORE USE. THESE PRODUCTS MAY BE HAZARDOUS TO YOUR HEALTH.DO NOT USE STEAM ROOM WHILE UNDER THE INFLUENCE OF ALCOHOL OR DRUGS, AS THIS CAN BE HAZARDOUS TO YOUR HEALTH.YOUR SHOWER MAY BE A SLIP-AND-FALL HAZARD. CHECK WITH YOUR CONTRACTOR OR FLOORING MANUFACTURER REGARDING THESAFE USE OF YOUR FLOORING IN A STEAM APPLICATION. SLIPPING AND FALLING INTO THE STEAMHEAD ITSELF OR INTO THE STREAMOF STEAM EMITTING FROM THE STEAMHEAD WILL CAUSE SERIOUS BURNS OR PHYSICAL INJURY.IF YOU ARE FEELING UNCOMFORTABLE, DIZZY, FAINT, OR STARTING TO FALL ASLEEP, IMMEDIATELY EXIT THE STEAM ROOM.DO NOT USE STEAM ROOM IF YOU ARE UNDER THE AGE OF 16 UNLESS SUPERVISED BY AN ADULT.THERMASOL STEAM BATH GENERATORS ARE NOT DESIGNED TO BE USED FOR SPACE HEATING PURPOSES.THERMASOL STEAM BATH GENERATORS ARE FOR INDOOR USE ONLY. THEY SHOULD NEVER BE LOCATED OUTSIDE THE HOME.All products must be installed in accordance with installation instructions provided. Failure to do so may invalidate warranty atmanufacturer’s discretion. 2019ThermaSol.THERMASOL.COM I 800.776.07113
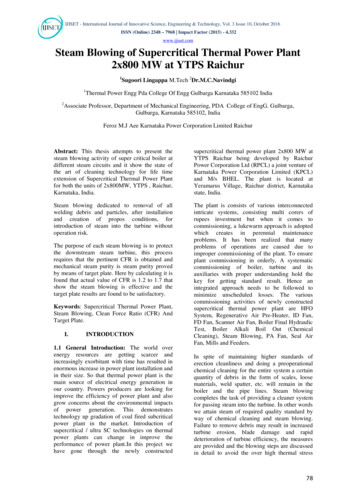
Wellness Steam Package2 Tools and MaterialsControllerItem TT10-XXSilicone25-foot YellowM12 CableItem 03-7149-25Power Supply BrickItem 03-7142PDMItem 10-8147RCA cable25 footItem 03-7207Materials needed:Mud RingItem 04-8567Installation instructions,warranty, static clingwarning labelBack of Controlo ThermaTouch controlo M12 cableo SiliconePower/DataM12 connectiono Power Distribution Module (PDM)BluetoothAntennao Mud RingPlug in network cableRJ-45 for updatesover the interneto Ethernet Cable with RJ-45 Connector (not supplied)o Other materials as requiredAudio OutREMINDERin order to receive software updates the unit must be plugged intothe internet using an Ethernet Cable connected to a Router(Router and Ethernet Cable not supplied).3 Mud Ring ApplicationFinished wall must be flushwith the mud ring.Shower wallShower wallMud Ring goesinside wall opening9.75"W x 6.375"H x 3.125"D opening for recessed mount TT10-XX Mud Ring4THERMASOL.COM I 800.776.0711
Wellness Steam Package4 Control Installation and Data Cable ConnectionShower wallRoute the M12 cable through the finished wallto the back side of the control. (The other endof the cable runs to the PDM location.) NOTE:It is recommended to run the cable throughelectrical conduit. DO NOT STAPLE the cable!RCA cable included with controlRun the M12 cable so the 90-degree endconnection will connect to the ThermaTouchcontrol. Then connect the M12 Cable toThermaTouch control. Do not over tighten.Ethernet cable with RJ-45(not included)M12 CableConnectorDetailIf the Serenity Light, Sound, Rain Head option isnot used then amplified speakers are requiredfor sound.DO NOT pinch, nail, staple, wedge, or bind thedata cable."ON"Turn ClockwiseDO NOT wrap the data cable around steam lineor route it in a manner so that the hot steam linecould meltthe cable.Contactpins"OFF"Turn Counter ClockwiseContactpinsCableendsAny damage to the control cable will result inthe control not working properly.Carefully connect the data cable to the PDMand control BEFORE turning power on to thegenerator or PDM. Do not staple, strain or damage data cableTTC Align pins to receptacle visually before tightening Do not force plugSLS Hand tighten onlyConnect to PDMPDM requires 110V powerConnect the data cable to Power Distribution Module (PDM).(The other end of the cable runs to the back of the control in the shower location.)THERMASOL.COM I 800.776.07115
Wellness Steam Package5 Sealing ControlTHESE STEPS MUST BE TAKEN FOR CORRECT INSTALLATION OF THE CONTROL. REMOVE MUD RINGFROM WALL CUTOUT BEFORE MAKING FINAL CABLE CONNECTIONS TO THE THERMATOUCH CONTROL.TEST THAT ALL CONNECTIONS ARE WORKING BEFORE SEALING THE CONTROL TO THE WALL.(Power on the control and see that it lights up).ACoat the entire groove on the control back with supplied waterproof silicone to fully seal the control to the wall.Completely seal the control to the wall so moisture does not collect behind it.Place the control on the wall pressing firmly.(You may need to tape the control into place until the silicone dries.)Be careful not to harm the wall or control with the tape. Let dry for 24 hours before using steam bath.NECOLISIAWallWallM12 Cable ConnectionEthernet CableConnectionAudio CableConnectionWallBack Side of SurfaceMount Control6Side View of SurfaceMount ControlTHERMASOL.COM I 800.776.0711
Wellness Steam Package6a Connecting ThermaTouch to Generator110vTTCSLSM8 CableM12 Cable6b Connecting ThermaTouch to Serenity Light,Sound, Rainhead110vM12 CableAudio CableTTCSLSM12 CableTHERMASOL.COM I 800.776.07117
Wellness Steam Package6c Connecting ThermaTouch to Digital Shower110vM12 CableAudio CableTTCSLSM12 Cable6b Connecting Total Wellness Package110vM12 CableAudio CableM8 CableTTCSLSM12 Cable8THERMASOL.COM I 800.776.0711
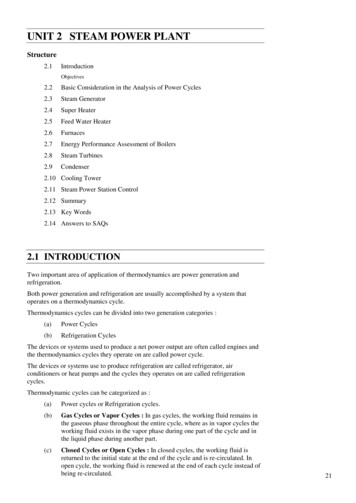
Wellness Steam Package7Steam Line and SteamheadNow you will need to decide on the steamhead placement in the shower so you can run the steam line from the generator to thesteamhead. There are a couple of things you need to know about the placement of the steamhead and steam line itself.DO NOT install any valve in the steam line. Flow of steam mustbe unobstructed.The steam line can run up and then down, once; or horizontal;but never run down and then up. If it does, a steam trap willbe produced at the low point blocking the flow of steam.DO NOT plumb any traps in the steam line.AThe steam outlet on the generator requires a 1/2" brassunion for easy installation (not included).BUse 1/2” brass pipe or copper tubing from unit tosteamhead rough-in fitting as permitted by code.I nsulate the steam outlet piping if the piping run exceeds 10 feet oris exposed to cold areas. Use steam rated insulation. itch/angle steam lines back towards generator before any up orPdown turns; pitch/angle towards steam room after any up or downand avoid perfectly level plumbed lines.AShown installedin atticBSteam Line6"C24"THERMASOL.COM I 800.776.07119
Wellness Steam PackageSteamhead LocationDO NOT install the steamhead near the seating area or the user.DO NOT forget to install the steamhead rough-in fitting!CI nstall the steamhead 24" from the floor or bathtub rimand 6" from any corner.Steamhead is to be mounted as far as possible fromtypical bathing position (seated or standing) and installedas far from the in-shower controller as possible.For retrofit to existing finish wall:Drill a 1-1/8" diameter hole in the shower wall or wall abovebathtub rim for the steam outlet rough-in fitting and installto be flush with the finished wall. this housing must besealed to the wall to not allow vapor or water behind it.(plumbing must be done from backside offinshed space)important that the pipe is firmly secured to the wall, sothat when the steamhead is installed it doesn’t push therough-in fitting back into the wall. Install a 1/2” dropearelbow on the end of the 1/2” pipe or tubing for therough-in fitting.Use the installation tool to tighten the housing in placewith a 1" socket and driver. Then insert the protective capinto the housing.For all the connections, use solder for copper joints andTeflon tape for pipe fittings and do not over tighten fittings.DO NOT USE PVC CEMENT.For new framing: Mount and install rough-in fitting to beflush with finished wall.Connect a 1/2" NPT brass pipe or copper tubing tothe steam outlet union (not included) on the generatorrunning the pipe to the steam head location in the wallto connect with the steamhead rough-in fitting. It is veryCInsert protective capinto housingInsert installation tool andtighten housing into placewith a 1" socket and driverSteamhead rough-in fittingto be installed flush andsealed to finished wall10THERMASOL.COM I 800.776.0711
Wellness Steam PackageDOnce the shower wall is complete and the housingis sealed to the wall, remove the protective cap andinsert the steamhead into housing. Use the suppliedsilicone to adherethe steamhead to the wall sealingout any water from getting behind the head.Use supplied o-ring lubricant to assist in steam headinstallation. A very small amount is all that is need directlyon the o-rings.DRemove protectivecap from housingUse the suppliedsilicone to adherethe steamhead tothe wallInsert steamheadinto housingApply a small amount ofsupplied lubricant directlyon the o-rings.Allow 24 hours for silicone to dry before use.Upon final installation mount steamhead with facing upto allow aromatherapy well to dispense steam.For detailed installation instructions of the steamhead pleasesee Installation section in thermasol.com/customer-support8Final Pre-Check Before OperationTurn ON the water supply to the generator. Check all the connections for leaks.Plug in generator (unless hardwired model).Turn ON the power source or breaker.Verify control panel lights up and test operation. Note: Initial power-on phase takes several minutes for generator toheat up steam.Please direct the home owner to visit www.thermasol.com/solution and click on the “I’m the home owner” button tolearn about set-up and programing (in order to set up the clock and any other options if applicable).THERMASOL.COM I 800.776.071111
Serenity Light,Sound, Rain HeadInstallation ManualFor Tutorials and Troubleshooting visit www.thermasol.com/solutionsSLSRRD-XX, SLSSQ-XXOVER 60 YEARS OF STEAM SHOWER INNOVATION12
Wellness Steam Package1 Important Information Before You InstallPLEASE REVIEW WARNINGS BELOW AND LEAVE THIS MANUAL WITH HOMEOWNERDO NOT USE THIS PRODUCT UNLESS YOU HAVE CONSULTED WITH YOUR DOCTOR AND RECEIVED WRITTEN PERMISSION TO DO SO. USE OFTHIS PRODUCT MAY BE HAZARDOUS TO YOUR HEALTH.PLEASE CONSULT YOUR PHYSICIAN BEFORE USING. IF YOU ARE PREGNANT, ELDERLY, HAVE HIGH BLOOD PRESSURE, DIABETES, SUFFERINGFROM HEART DISEASE, ARE INTOXICATED, OR NOT IN GOOD HEALTH, DO NOT USE THIS STEAM BATH.STEAM IS HOT! DO NOT TOUCH OR GO NEAR THE STEAMHEAD FROM THE TIME THE UNIT IS “ON,” UP TO ONE HOUR AFTER IT HAS SHUT OFF.SEVERE BURNS WILL OCCUR IF YOU COME IN CONTACT WITH THE STEAMHEAD OR STEAM EMITTING FROM THE STEAMHEAD.NEVER ATTEMPT TO FILL AROMA RESERVOIR ON THE STEAMHEAD WHEN UNIT IS IN THE "ON" POSITION. SEVERE BURNS WILL OCCUR.DO NOT USE THERMASOL AROMATHERAPY OILS, SKIN CARE PRODUCTS OR ANY PRODUCT ASSOCIATED WITH YOUR THERMASOL UNITWITHOUT CONSULTING WITH YOUR ALLERGIST OR DOCTOR BEFORE USE. THESE PRODUCTS MAY BE HAZARDOUS TO YOUR HEALTH.DO NOT USE STEAM ROOM WHILE UNDER THE INFLUENCE OF ALCOHOL OR DRUGS, AS THIS CAN BE HAZARDOUS TO YOUR HEALTH.YOUR SHOWER MAY BE A SLIP-AND-FALL HAZARD. CHECK WITH YOUR CONTRACTOR OR FLOORING MANUFACTURER REGARDING THE SAFEUSE OF YOUR FLOORING IN A STEAM APPLICATION. SLIPPING AND FALLING INTO THE STEAMHEAD ITSELF OR INTO THE STREAM OF STEAMEMITTING FROM THE STEAMHEAD WILL CAUSE SERIOUS BURNS OR PHYSICAL INJURY.IF YOU ARE FEELING UNCOMFORTABLE, DIZZY, FAINT, OR STARTING TO FALL ASLEEP, IMMEDIATELY EXIT THE STEAM ROOM.DO NOT USE STEAM ROOM IF YOU ARE UNDER THE AGE OF 16 UNLESS SUPERVISED BY AN ADULT.THERMASOL STEAM BATH GENERATORS ARE NOT DESIGNED TO BE USED FOR SPACE HEATING PURPOSES.THERMASOL STEAM BATH GENERATORS ARE FOR INDOOR USE ONLY. THEY SHOULD NEVER BE LOCATED OUTSIDE THE HOME.ALL PRODUCTS MUST BE INSTALLED IN ACCORDANCE WITH INSTALLATION INSTRUCTIONS PROVIDED. FAILURE TO DO SO MAY INVALIDATEWARRANTY AT MANUFACTURER’S DISCRETION. 2016 THERMASOL.THERMASOL.COM I 800.776.071113
Wellness Steam Package2 Tools and MaterialsParts Enclosed:Serenity Light, Sound,Rain Head fixture and hardwareItem SLSRX-XXSilicone25-foot Yellow M12 CableItem 03-7149-25Bluetooth ModuleInstallation instructionsCompatable controls:Materials needed:o Tile CutterThermaTouch 7" and 10"o PDM (Item 10-8147)o Ply Wood Backing BoardSignaTouch Controlo Compatible controllero 36" long 3/8" Compression Flexible Water LineSignature Controlo Drillo Separate water volume control divertero 7/16", 1/2” and 1-1/2" Drill Bitswith shut off valveTighten retaining spring to halfits normal heightRetaining nutRetaining washerRetaining spring3 1/2" x 1/4"threadedrod-bolt (studs)PlywoodWaterproofBackingMortarFinished Shower Surface(Fig. 1) Installation Profile View14THERMASOL.COM I 800.776.0711
Wellness Steam Package3 Placing and Cutting TemplateAfter completing the shower construction and running thenecessary cables, water supplies and etc. using templateincluded in these instructions (page 8) proceed to:Cutout After choosing the desired location, use the printed templateto drill the three 7/16” holes Then proceed cutting the cutout7/16”Note: Template must be printed out at actual size.Install suitable wood support between joists.25-foot Audio CableItem 03-7140ships with Serenity Light,Sound, Rain HeadThis 25-foot Yellow M12CableItem 03-7149-25ships with Serenity Light,Sound, Rain HeadThermaTouch Controlsold separatelyThis 25-foot Yellow M12 CableItem 03-7149-25ships with ThermaTouch controlPDM Sold and shipswith ThermaTouch controlas well as with the other ThermaSolwellness packages.Template (see back cover)THERMASOL.COM I 800.776.071115
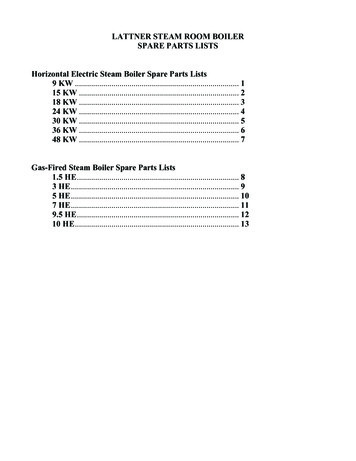
Wellness Steam Package4 Mounting Hardware Connect the 3 1/2” x 1/4” all-thread rod bolts (studs) together withsupplied couplings. Insert the 3 1/2” x 1/4” studs from the shower side into the 7/16” predrilled holes. Hold it in place while from the top side of the cut out insertsupplied spring, washer and secure it with provided wing nut. Tighten retaining spring to half its normal height (shown on page 14)Repeat the above steps for all three studs5 Connecting Water SupplyNOTE: Make sure to flush out any debris from the pipe beforeconnecting the fixture!Flex Water SupplyYou will need a 36” flex water supply that connects to your water pipethat you plumbed for the Rain Head. The connection to the Rain Headneeds to be 3/8” compression. Please connect the 36” flex watersupply from the water source to the Rain Head. Do NOT over tighten.Slowly open the water and check for leaks before proceeding.6 Connecting CablesM12 power/datacable to PDMConnect the Audio cable that is connected to theThermaTouch control. Red to (R), White to (L), and make sure that both cables areconnected to the same Input “1” or Input “2”. At this point IF you have any other audio source to be connectedplease do it now to the open Input on the Rain Head. Next, connect the M12 power/data cable that runs or will run to thePower Distribution Module (PDM).Audio Cablefrom ThermaTouchcontrolNOTE: Make sure that the “L” shaped end of M12 cable isconnected to the Rain Head16THERMASOL.COM I 800.776.0711
Wellness Steam Package Carefully conceal in attic space any extra lengths ofthe cables or the water supply above the shower area.Align the Rain Head fixture to the three couplings.Make sure that the Rain Head will fit perfectly andflush with the ceiling. IF needed please adjust thestuds and couplings to assure perfect fit. After you confirmed that the three couplings willperfectly align and Rain Head will be flush with thefinished ceiling material apply silicone around centergroove on back of the fixture. Push fixture tightagainst ceiling. Use the three provided screws and secure them intothe fixture which will connect with the couplings.Tighten them carefully so you don’t cross thread themor you don’t damage the fixture. Allow silicone to dry for 24 hours.M12 Power/Data CableAUDIO CABLE7 Securing Serenity Rain HeadSilicone Beadall around theperimeter of groove.Push fixture tightagainst the ceiling.PDM Provided and shipswith ThermaTouch control8 Connecting to Power Distribution Module (PDM) Make sure that the M12 power/data cable isconnected from the Rain Head to PDM PDM must be plugged in to standard 110Velectrical outlet If your control is plugged in and powered ONyou can test the lights and etc.THERMASOL.COM I 800.776.071117
Wellness Steam Package1234567Template must be fullscale 1:1 when printed1234185567
Wellness Steam PackageThermaSol Product RegistrationDear ThermaSol End User:Please register your product at www.thermasol.com/warranty so we can assist you much quicker if you ever need tocontact our Technical Support Department.In addition we’ll keep you informed about your product and time to time we’ll update you about new products and othercompany announcements.Thank you from all of us at ThermaSol and we wish you many relaxing and steamy days ahead.We will not sell, rent or share your personal information.1958 Steam WayRound Rock, TX 78665THERMASOL.COM I 800.776.071119
1958 STEAM WAY ROUND ROCK, TX 78665PHONE: 800.776.0711 FAX: 800.556.5257 WWW.THERMASOL.COM81241 NC
Mud Ring Application. PDM. Item 10-8147 Silicone. Installation instructions, warranty, static cling . warning label 25-foot Yellow. M12 Cable Item 03-7149-25 Mud Ring Item 04-8567. 2. Tools and Materials. Controller. Item TT10-XX Shower wall. Shower wall Mud Ring goes inside wall opening. Finished wall must be flush with the mud ring. Power .